background image

2

FOR SAFE INSTALLATION: During Installation

1.3

During Installation

WARNING

• Use a hand cart when moving the instrument. At least

two persons are necessary to lift the instrument.

Failure due to dropping of the instrument, back
injury, or stumbling may occur.

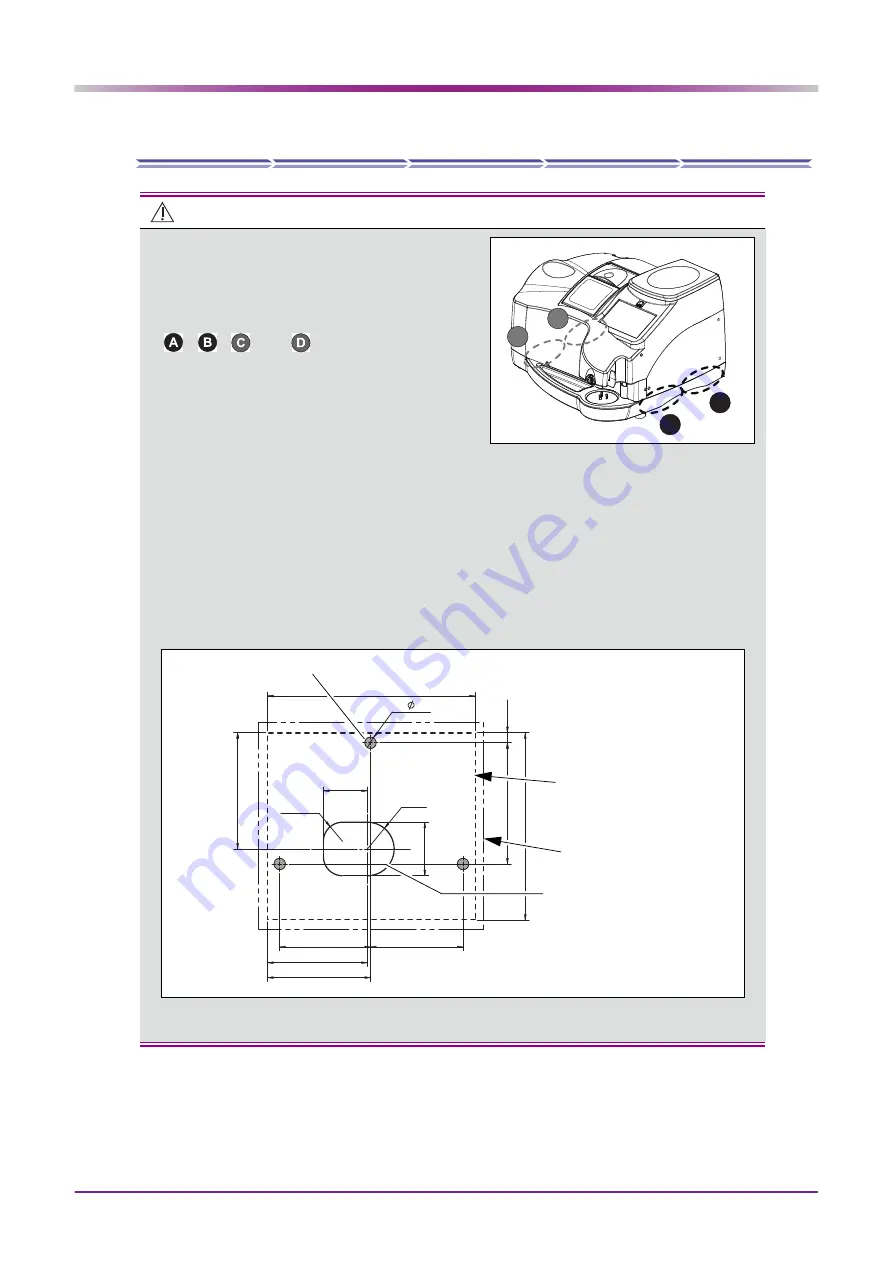
• Be sure to lift the instrument by holding it at the points

, , 

, and 

 at the bottom of both sides

(see the figure to the right). Do not lift the instrument
by its cover.

Failure to do so may cause the instrument to fall
resulting in injury or malfunction.

• Be careful not to get fingers caught when setting the

instrument down.

Fingers may get caught between the table and instrument resulting in injury.

• Set the instrument on a table whose area is larger (50 mm or more) than the outer dimensions of the

instrument as shown below. A table height of 650 to 700 mm is recommended to allow space for the
pump tank to be installed under the table. Additionally, the table must be sturdy enough to bear the
weight of the instrument (33 kg) and be provided with adjusters on its legs to allow it to be level and
stable.

Failure to do so could cause the instrument to fall in the event of impact or accidents.

An opening must be made in the table to pass the pipe through.

• Install the instrument in a stable and level place where vibration or shock does not occur.

Tilting or vibration can cause the instrument to fall or prevent normal lens processing.

B

A

D

C

26.5

316.5

490

543

50

3-

115

304

2-R50

R70

237

242

261

269

Position of instrument rubber foot (three spots)

Opening for drain pipes

Opening for cooling water and 

cleaning water pipes

(unit: mm)

Instrument perimeter

Table perimeter (example)

A height of 650 to 700 mm 

recommended

Summary of Contents for LE-700

Page 1: ...instrument for use by service personnel during installation The contents are not intended for customer use and should only be conducted by qualified personnel Changing the settings inadvertently may cause the instrument to perform improperly INSTALLATION MANUAL INSTALLATION MANUAL Edging Station ...

Page 2: ...ngo Tokyo Office Bunkyo Ku Tokyo 113 0033 Japan Telephone 81 3 5844 2641 Facsimile 81 3 5844 2642 NIDEK INCORPORATED 47651 Westinghouse Drive Fremont California 94539 U S A United States Agent Telephone 1 510 226 5700 Facsimile 1 510 226 5750 NIDEK S A Europarc 13 rue Auguste Perret 94042 Créteil France EU Authorized Representative Telephone 33 1 49 80 97 97 Facsimile 33 1 49 80 32 08 ...

Page 3: ...ibed in this manual can only be performed by service personnel Changing the settings inadvertently may cause the instrument to perform improperly This installation manual contains precautions and installation procedures for the NIDEK Edging Station LE 700 A thorough understanding of the contents of the installation manual and operator s manual is essential for proper installation and use of the in...

Page 4: ...Cooling Water and Cleaning Water 17 2 6 1 Checking water flow 17 3 CHECK AND ADJUSTMENT PROCEDURES 19 3 1 Check and Adjustment Procedure Flowchart 19 3 2 Service Mode 20 3 2 1 Entering service mode 20 3 2 2 Loading internal shape data 21 3 3 Size Setting 22 3 4 Surface Measurement LMU Calibration 24 3 5 Size Check and Adjustment 27 3 5 1 Size check 27 3 5 2 Size adjustment 31 3 6 Axis Angle Check ...

Page 5: ... axis check 53 3 11 Polish Size Check and Adjustment 56 3 11 1 Polish size check 56 3 11 2 Polish size adjustment 58 3 12 Groove Position Check and Adjustment 61 3 12 1 Groove position check 61 3 12 2 Groove position adjustment 63 3 13 Groove Depth Check and Adjustment 65 3 13 1 Groove depth check 65 3 13 2 Groove depth adjustment 67 3 14 Date and Time Setting 70 4 CHECKLIST 73 4 1 LE 700 Installa...

Page 6: ...IV ...

Page 7: ... In this installation manual signal words are used to designate the degree or level of safety alerting The definitions are as follows WARNING Indicates a potentially hazardrous situation which if not avoided might result in death or serious injury CAUTION Indicates a potentially hazardous situation which if not avoided might result in minor or moderate injury or a property damage accident Even sit...

Page 8: ...mensions of the instrument as shown below A table height of 650 to 700 mm is recommended to allow space for the pump tank to be installed under the table Additionally the table must be sturdy enough to bear the weight of the instrument 33 kg and be provided with adjusters on its legs to allow it to be level and stable Failure to do so could cause the instrument to fall in the event of impact or ac...

Page 9: ... the instrument where it is exposed to caustic material such as corrosive gas acid or salt Corrosion or malfunction may occur Do not use a power cord other than that supplied Also do not connect the supplied cord to any other instrument Malfunction or fire may result Do not overload the electrical outlet A multi outlet supplying power to too many instruments may become overheated and cause fire In...

Page 10: ...electric shock In case of fire use a dry chemical ABC extinguisher to extinguish the fire Immediately replace the power cord if its internal wires are exposed power is intermittent when the cord is moved or the cord and or plug are hot to the touch Electric shock or fire may occur In the event of malfunction disconnect the power cord from the wall outlet Never touch the interior of the instrument ...

Page 11: ...caliper marked in 0 01 mm for adjustment Axis angle alignment jig 40300 1530 Graduated loupe for adjustment Test lenses for adjustment CR39 SPH 3 00 to 5 00 D 15 pieces The number of test lenses above is the bare minimum number necessary for checking It is advised to prepare at least five additional lenses for adjustment ...

Page 12: ...tic bag and push the sides down to the bottom of the case to expose the main body 3 Lift the instrument by holding it at points and at the bot tom of both sides see the figure to the right and place the instrument in the installation position 1 3 During Installation page 2 Store the shipping case accessory box pack ing supports and plastic bag in a secure place They will be used if the instrument ...

Page 13: ...h Half eye lens cups green red 5 units each Double coated adhesive pad for half eye lens cup 1 unit Dressing stick for glass roughing wheel 1 unit Dressing stick for finishing wheel 1 unit Dressing stick for polishing wheel 1 unit Cup remover 1 unit Pattern holder 1 unit Calibration jig 1 unit Adapter set 1 set Power cord 1 unit OPERATOR S MANUAL CD and Read Before Use printed version 1 set ᝢ ᝢ ం ...

Page 14: ...nter of the left side and remove the car riage fixing screw 2 4 2 Removing packing 1 Remove the packing from the blocking unit 1 Remove the tape securing the packing that pro tects the blocking unit 2 Remove the packing Store the removed carriage fixing screw and packing in the accessory box or shipping case as they are used if the instrument is moved to a different place Carriage fixing screw Tap...

Page 15: ... the dis play 1 Remove the tape from the packing that protects the display 2 Remove the packing 3 Remove the packing cushioning the pro cessing chamber 1 Remove the tape adhered to the processing chamber cover 2 Fully open the processing chamber cover Tape Packing Tape Processing chamber cover ...

Page 16: ...on the power switch to remove the packing cushioning the chuck shaft 1 Connect the power cord to the power inlet 2 Turn on the power switch 3 Turning on the power switch automatically starts initialization After the chuck shaft is opened remove the packing Packing in the processing chamber Power cord Power inlet Power switch Packing ...

Page 17: ...k Drain pipe Cuff Connect the two feedwater hoses to the inlets on the underside of the main body Connect the feedwater hose labeled as to the rear inlet and feedwater hose labeled as to the front inlet 1 2 Connect the two feedwater hoses to the tank as follows Connect the two feedwater hoses labeled as to Pump and feedwater hose labeled as to Pump 1 1 2 2 Inlets ...

Page 18: ...nsion cord 2 units Drain pipe 1 unit Feedwater hose 2units Cuff 1 unit Stocking filter 20 units Pump tank 1 unit 2 Screw the drain pipe into the cuff 3 Screw the other end of the drain pipe into the hose adapter standard accessory of the LE 700 Drain pipe Two feedwater hoses Stocking filter 20 units Cuff Two extension cords Pump tank Drain pipe Cuff Hose adapter ...

Page 19: ...oses on the bot tom of the main body As viewed from the front the rear inlet is for Pump 1 and the front inlet is for Pump 2 Refer to the hose connection sticker shown to the right 1 Push the feedwater hose labeled as into the rear inlet as viewed from the front Push the hose until it clicks 2 Push the feedwater hose labeled as into the front inlet as viewed from the front Push the hose until it c...

Page 20: ...illustrated in the figure to the right and attach the cover Stocking filter Drain cover Rubber part of stocking filter opening Hole on the receptacle Water vol ume guide Do not put a plastic sheet in the tank The pump supply aperture may be blocked and cause malfunction Do not allow the water level to rise over the maximum line instrument malfunction or water spillover may result Fill the tank wit...

Page 21: ...Route the extension cord through the hole on the top or rear of the table and connect it to the outlet for Pump 2 on the right side of the main body 11 Put the tank back into the table 12 Connect the feedwater hoses to the tank 1 Push the feedwater hose labeled as into the connection labeled as Pump 1 Push the hose until it clicks 2 Push the feedwater hose labeled as into the connection labeled as...

Page 22: ... it to the proper length 14 Connect the power cord to the outlet on the rear side of the main body 15 Connect the plug of the power cord to a wall outlet CAUTION Connect the main power plug to a grounded outlet Electric shock or fire may occur in the event of malfunction or power leakage ...

Page 23: ...e Machine test tab The machine test screen appears 3 Confirm that the both cooling and cleaning water flow properly 1 Press the SSR1 button to confirm that the cooling water flows properly 2 Press the SSR2 button to confirm that the cleaning water flows properly If the cooling water or cleaning water does not flow properly confirm that the Pump 1 and Pump 2 hoses and power cord are properly connec...

Page 24: ...18 INSTALLATION Cooling Water and Cleaning Water ...

Page 25: ...ize adjustment page 31 Is the lens size 45 0 0 1 mm 3 5 1 Size check page 27 Polish check and adjustment 3 8 Size Check and Adjustment page 42 Is the lens size 45 0 0 1 mm 3 5 1 Size check page 27 Load the circle 45 internal data and process a lens with Frame Flat and Polish None 1 Perform LMU Calibration 3 4 Surface Measurement LMU Cali bration page 24 Load the circle 45 internal data and process...

Page 26: ...d with the numeric keypad on the menu screen Password consists of four digits and is specified as follows 1 6 The last two digits of the password are the last two digits of the serial number 3 Pressing the enter key on the numeric keypad displays the service mode A gray bar indicating Service mode is displayed along the left of the screen Processing conditions may become altered from those set at ...

Page 27: ...ars 3 Load the internal shape data 1 Press the desired internal shape button Circle 45 Press Square 45 Press The processing condition screen appears 2 Select the desired processing condition and press 3 The layout screen appears Example shown to the right Circle 45 shape data CAUTION Rectangle 50 x 25 Process test and Multirole shape data are not used during installation Refer to the LE 700 Servic...

Page 28: ...e ters is necessary or to confirm that the lens processed after changing a parameter value is within the range process the lens with the original specification 0 00 1 Enter service mode from the LE 700 home screen 3 2 1 Entering service mode page 20 2 Press the Maintenance tab The maintenance screen appears 3 Press Circle 45 or Square 45 The processing condition screen appears 4 Specify the proces...

Page 29: ...required and a lens is desired to be used multiple times change the size entered in Step 6 as follows For circle 45 Enter 9 00 For square 45 Enter 3 00 The diameters of the processed lenses are greater than 45 mm by the amount of the numbers entered above therefore subsequent processing can be performed Specify the size entered in Step 6 for subsequent processing as follows regardless of lens shap...

Page 30: ...g off attach the trimmed double coated adhe sive pad to the pattern holder Trim off the shaded area of the double coated adhe sive pad with scissors as shown in the figure to the right and attach the pad to the pattern holder CAUTION Clean the surface feelers before calibration If the feeler is soiled correct measurement may not be possible The RMU LMU calibration jig easily comes loose from the l...

Page 31: ...ation jig to the lens adapter as shown to the right and hold it by hand 2 Press to secure the jig 6 Press the Surface meas button in the Cal ibration field The selected button is displayed in blue Surface meas Calibration of surface mea surement LMU Top mark Calibration jig Groove Pattern holder CAUTION Be careful not to get fingers caught when chucking securing a lens Calibration jig LMU feeler f...

Page 32: ...e it 9 Press Circle 45 The processing condition screen appears 10 Specify the flat edging conditions 1 Set each item as follows Material CR39 Type Single Frame Flat Soft None Polish None Layout Passive FC None 2 Press The layout screen appears 11 Continue the processing and checking procedures on the layout screen using the same procedures explained by the following steps starting from size settin...

Page 33: ...f φ45 0 0 1 mm 3 5 1 Size check 1 Enter service mode from the LE 700 home screen 3 2 1 Entering service mode page 20 2 Press the Maintenance tab The maintenance screen appears 3 Press Circle 45 The processing condition screen appears 4 Specify the flat edging conditions 1 Set each item as follows Material CR39 Type Single Frame Flat Soft None Polish None Layout Passive FC None 2 Press The layout s...

Page 34: ...ess The blocking screen appears 7 Block a lens The diameter of the lens on the lens table is pro jected 1 Set the lens cup with the double coated adhe sive pad to the cup holder Insert the lens cup as far as it will go with the top mark oriented downward Use the lens cup of the color appropriate to the lens being processed as indicated below to prevent confusion of R L Right lens Green lens cup Le...

Page 35: ... the right to rotate it about 90 degrees 4 Push the blocking lever down to start blocking Firmly push the lever down so that the double coated adhesive pad adheres to the lens 5 Release the blocking lever After blocking the processing start screen is automatically displayed 6 Remove the blocked lens from the lens table and set it to the lens adapter Convex side of the lens Lens table CAUTION When ...

Page 36: ...t processing 11 Measure the outer diameter of the pro cessed lens with a caliper and check the size Flat edged lens The outer diameter is within the tolerance of φ45 0 0 1 mm 12 When the outer diameter is out of the tolerance of φ45 0 0 1mm adjust the size 3 5 2 Size adjustment page 31 CAUTION Be careful not to get fingers caught when chucking securing a lens φ45 0 0 1mm ...

Page 37: ...Tab 1 4 Press the numeric field of Master size adjustment The numeric field turns orange and the numeric key pad appears When the outer diameter is out of the range perform the surface measurement calibration a single time 3 4 Surface Measurement LMU Calibration page 24 If the outer diameter is out of the range even after the surface measurement calibration adjust the size in the following procedu...

Page 38: ...ify the flat edging conditions 1 Set each item as follows Material CR39 Type Single Frame Flat Soft None Polish None Layout Passive FC None 2 Press The layout screen appears 9 Continue the processing method on the layout screen using the same procedures explained by the following steps starting from size setting 3 5 1 Size check page 27 Step 5 to Step 10 10 Measure the outer diameter of the proces...

Page 39: ...he LE 700 home screen 3 2 1 Entering service mode page 20 2 Press the Maintenance tab The maintenance screen appears 3 Press Square 45 The processing condition screen appears 4 Specify the flat edging conditions 1 Set each item as follows Material CR39 Type Single Frame Flat Soft None Polish None Layout Passive FC None 2 Press The layout screen appears ...

Page 40: ...the same procedures explained by the follow ing steps starting from blocking 3 5 1 Size check page 27 Step 7 to Step 10 8 Attach the processed lens to the axis angle alignment jig and check the axis angle 1 After processing attach the lens to the axis angle alignment jig 2 Confirm that the lens and axis angle alignment jig are parallel 9 When it is not 1 adjust the axis angle 3 6 2 Axis angle adju...

Page 41: ...gle adjustment 1 Enter service mode from the LE 700 home screen 3 2 1 Entering service mode page 20 2 Press the Grinding tab 3 Press Tab 2 4 Press the numeric field of Axis adjustment The numeric keypad appears 5 Enter a value with the numeric keypad and change the parameter value ...

Page 42: ... jig decrease the parame ter value Ex For each shift of a scale along the marking off line on the axis angle alignment jig decrease the parameter value by 1 00 6 Enter a value with the numeric keypad and press 7 Press the Maintenance tab The maintenance screen appears 8 Press Square 45 The processing condition screen appears 9 Specify the flat edging conditions 1 Set each item as follows Material ...

Page 43: ... entry press 3 Press The blocking screen appears 12 Continue the processing method using the same procedures explained by the follow ing steps starting from blocking 3 5 1 Size check page 27 Step 7 to Step 10 13 Attach the processed lens to the axis angle alignment jig and check the axis angle 3 6 1 Axis angle check page 33 Step 8 14 Repeat Step 1 to Step 13 until the axis shift becomes within 1 T...

Page 44: ... 3 Press Circle 45 The processing condition screen appears 4 Specify the beveling conditions 1 Set each item as follows Material CR39 Type Single Frame Metal Bevel position Auto Soft None Polish None Layout Passive FC None 2 Press The layout screen appears CAUTION The following procedure is to change the position of an auto processed bevel according to the user s needs Do not per form this procedu...

Page 45: ...ng the same procedures explained by the following steps starting from size setting 3 5 1 Size check page 27 Step 5 to Step 10 6 Check the bevel position of the processed lens Adjust the bevel position if neces sary 3 7 2 Bevel position adjustment page 40 Lens front surface Lens rear surface Lens middle Example of bevel positions ...

Page 46: ...stment 1 Enter service mode from the LE 700 home screen 3 2 1 Entering service mode page 20 2 Press the Grinding tab 3 Press Tab 3 4 Press the numeric field of Bevel position adjustment for auto mode The numeric keypad appears 5 Enter a value with the numeric keypad and change the parameter value ...

Page 47: ...dition screen appears 9 Specify the beveling conditions 1 Set each item as follows Material CR39 Type Single Frame Metal Bevel position Auto Soft None Polish None Layout Passive FC None 2 Press The layout screen appears 10 Continue the processing method on the layout screen using the same procedures explained by the following steps starting from size setting 3 5 1 Size check page 27 Step 5 to Step...

Page 48: ...w ing procedure 3 8 1 Polishing check 1 Enter service mode from the LE 700 home screen 3 2 1 Entering service mode page 20 2 Press the Maintenance tab 3 Press Circle 45 4 Specify each processing condition 1 Set each item as follows For flat edge polishing Material CR39 Type Single Frame Flat Soft None Polish Exec Layout Passive FC None For bevel polishing Material CR39 Type Single Frame Metal Beve...

Page 49: ...xplained by the following steps starting from size setting 3 5 1 Size check page 27 Step 5 to Step 10 6 Use a loupe to check whether the lens edge is left unpolished or burnt 7 When the some of the lens edge are left unpolished or burnt adjust the Polish differ ential value 3 8 2 Polishing adjustment page 44 Loupe Unpolished or burnt lens edge ...

Page 50: ...croll down the scroll bar 4 Press the numeric fields of CR39 Bevel and CR39 Flat next to Polish differential The numeric keypad appears 1 Enter a value with the numeric keypad and change the parameter value When the lens edge is left unpolished Increase the parameter value by 0 05 When the lens edge is burnt Decrease the param eter value by 0 05 2 Press 5 Press the Maintenance tab The maintenance ...

Page 51: ...polishing Material CR39 Type Single Frame Metal Bevel position Auto Soft None Polish Exec Layout Passive FC None 2 Press The layout screen appears 8 Continue the processing method on the layout screen using the same procedures explained by the following steps starting from size setting 3 5 1 Size check page 27 Step 5 to Step 10 9 Confirm that the lens edge is not left unpolished or burnt 3 8 1 Pol...

Page 52: ...m the LE 700 home screen 3 2 1 Entering service mode page 20 2 Press the Maintenance tab The maintenance screen appears 3 Press Circle 45 The processing condition screen appears 4 Specify the bevel polishing conditions 1 Set each item as follows Material CR39 Type Single Frame Metal Bevel position Auto Soft None Polish Exec Layout Passive FC None 2 Press The layout screen appears 5 Continue the pr...

Page 53: ...m that none of the front or rear sur faces of the bevel are left unpolished or burnt 7 If some of the front or rear surfaces of the bevel are left unpolished or burnt adjust the polished bevel position 3 9 2 Polished bevel position adjustment page 48 Bevel front surface Bevel rear surface ...

Page 54: ...olished bevel position adjustment 1 Enter service mode from the LE 700 home screen 3 2 1 Entering service mode page 20 2 Press the Grinding tab 3 Press Tab 3 4 Press the numeric field of Bevel position Pol 5 Enter an adjustment value with the numeric keypad and change the parameter value ...

Page 55: ...he front surface is burnt decrease the value 6 Enter a value with the numeric keypad and press 7 Press the Maintenance tab The maintenance screen appears 8 Press Circle 45 The processing condition screen appears 9 Specify the bevel polishing conditions 1 Set each item as follows Material CR39 Type Single Frame Metal Bevel position Auto Soft None Polish Exec Layout Passive FC None 2 Press The layou...

Page 56: ...wing steps starting from size setting 3 5 1 Size check page 27 Step 5 to Step 10 11 Confirm that the unpolished portions on the front and rear surfaces of the bevel are minimized to the same amount 3 9 1 Polished bevel position check page 46 Step 6 12 Repeat Step 1 to Step 11 until the unpolished portions on the front and rear sur faces of the bevel are minimized to the same amount ...

Page 57: ...0 1 Polish axis check 1 Enter service mode from the LE 700 home screen 3 2 1 Entering service mode page 20 2 Press the Maintenance tab The maintenance screen appears 3 Press Square 45 The processing condition screen appears 4 Specify the flat edge polishing conditions 1 Set each item as follows Material CR39 Type Single Frame Flat Soft None Polish Exec Layout Passive FC None 2 Press The layout scr...

Page 58: ...3 5 1 Size check page 27 Step 5 to Step 10 6 Confirm that there are no unpolished portions or unpolished portions of equal size on both the right and left surfaces of the lens edge 7 When the unpolished portions are not equal on both sides of the lens edge adjust the Polish axis parameter 3 10 2 Polish axis check page 53 Unpolished portions present No unpolished portions present Unpolished portion...

Page 59: ... Enter service mode from the LE 700 home screen 3 2 1 Entering service mode page 20 2 Press the Grinding tab 3 Press Tab 2 4 Press the numeric field of CR39 or Polyca next to Polish axis The numeric keypad appears 5 Enter an adjustment value with the numeric keypad and change the parameter value ...

Page 60: ...ge remains unpolished Decrease the value 6 Enter a value with the numeric keypad and press 7 Press the Maintenance tab The maintenance screen appears 8 Press Square 45 The processing condition screen appears 9 Specify the flat edge polishing conditions 1 Set each item as follows Material CR39 Type Single Frame Flat Soft None Polish Exec Layout Passive FC None 2 Press The layout screen appears Fron...

Page 61: ...es explained by the following steps starting from size setting 3 5 1 Size check page 27 Step 5 to Step 10 11 Confirm that the unpolished portions on the front and rear surfaces of the lens edge are minimized to the same amount 3 10 1 Polish axis check page 51 Step 6 12 Repeat Step 1 to Step 11 until the polishing becomes uniform in circumference ...

Page 62: ... check 1 Enter service mode from the LE 700 home screen 3 2 1 Entering service mode page 20 2 Press the Maintenance tab The maintenance screen appears 3 Press Circle 45 The processing condition screen appears 4 Specify the polishing conditions 1 Set each item as follows For flat edge polishing Material CR39 Type Single Frame Flat Soft None Polish Exec Layout Passive FC None For bevel polishing Mat...

Page 63: ...ollowing steps starting from size setting 3 5 1 Size check page 27 Step 5 to Step 10 6 Measure the outer diameter of the processed lens with a caliper to check the value is in the following tolerance For beveling φ45 0 0 1 mm For flat edging φ45 0 0 1 mm 7 When the lens outer diameter is out of the tolerance of φ45 0 0 1 mm change the Polish size diameter 3 11 2 Polish size adjustment page 58 PP P...

Page 64: ...ng tab 3 Press Tab 5 Scroll up the scroll bar 4 Press the numeric fields of CR39 Bevel and CR39 Flat next to Polish size The numeric keypad appears 5 Enter an adjustment value with the numeric keypad and change the parameter value Change the parameter by the difference between 45 00 mm and the measured outer diameter Ex When the measured outer diameter is 45 15 mm decrease the parameter value by 0...

Page 65: ...aintenance tab The maintenance screen appears 8 Press Circle 45 The processing condition screen appears Lens material Processing method Parameter item CR39 Bevel CR 39 Bevel CR39 Flat CR 39 Flat Hi index Bevel Hi index Bevel Hi index Flat Hi index Flat Polyca Acrylic Bevel Polyca Acrylic Bevel Polyca Acrylic Flat Polyca Acrylic Flat Trivex Bevel Trivex Bevel Trivex Flat Trivex Flat Urethane Bevel ...

Page 66: ...n Auto Soft None Polish Exec Layout Passive FC None 2 Press The layout screen appears 10 Continue the processing method on the layout screen using the same procedures explained by the following steps starting from size setting 3 5 1 Size check page 27 Step 5 to Step 10 11 Measure the outer diameter of the processed lens to confirm the value is within the following tolerance 3 11 1 Polish size chec...

Page 67: ...ach item as follows Material CR39 Type Single Frame Groove Groove position Auto Soft None Polish None Layout Passive FC None 2 Press The layout screen appears 5 Continue the processing method on the layout screen using the same procedures explained by the following steps starting from size setting 3 5 1 Size check page 27 Step 5 to Step 10 CAUTION The following procedure is to change the position ...

Page 68: ...ve Position Check and Adjustment 6 Check the groove position of the processed lens Adjust the bevel position if neces sary 3 12 2 Groove position adjustment page 63 Lens front surface Lens middle Lens rear surface Example of groove position ...

Page 69: ...t 1 Enter service mode from the LE 700 home screen 3 2 1 Entering service mode page 20 2 Press the Grinding tab 3 Press Tab 3 4 Press the numeric field of Groove position adjustment for auto mode The numeric keypad appears 5 Enter an adjustment value with the numeric keypad and change the parameter value ...

Page 70: ...tion screen appears 9 Specify the grooving conditions 1 Set each item as follows Material CR39 Type Single Frame Groove Groove position Auto Soft None Polish None Layout Passive FC None 2 Press The layout screen appears 10 Continue the processing method on the layout screen using the same procedures explained by the following steps starting from size setting 3 5 1 Size check page 27 Step 5 to Step...

Page 71: ...rom the LE 700 home screen 3 2 1 Entering service mode page 20 2 Press the Maintenance tab The maintenance screen appears 3 Press Circle 45 The processing condition screen appears 4 Specify the grooving conditions 1 Set each item as follows Material CR39 Type Single Frame Groove Groove position Auto Soft None Polish None Layout Passive FC None 5 Specify the groove depth 1 Press the side menu butto...

Page 72: ...imum value to Wid 6 Press The layout screen appears 7 Refer to the following procedure for the processing method after size setting on the layout screen 3 5 1 Size check page 27 8 Check the groove depth of the processed lens Check that the groove is slightly made the depth is within 0 10 mm on the processed lens 9 When the groove cannot be found or is too deep change the Groove depth param eter 3 ...

Page 73: ...e depth adjustment 1 Enter service mode from the LE 700 home screen 3 2 1 Entering service mode page 20 2 Press the Grinding tab 3 Press Tab 3 4 Press the numeric field of Groove depth The numeric keypad appears 5 Enter a value with the numeric keypad and change the parameter value ...

Page 74: ...ric keypad and press 7 Press the Maintenance tab The maintenance screen appears 8 Press Circle 45 The processing condition screen appears 9 Specify the grooving conditions Set each item as follows Material CR39 Type Single Frame Groove Groove position Auto Soft None Polish None Layout Passive FC None 10 Specify the groove depth 1 Press the side menu button on the right of the screen to display the...

Page 75: ... value to Wid 11 Press The layout screen appears 12 Continue the processing method on the layout screen using the same procedures explained by the following steps starting from size setting 3 5 1 Size check page 27 Step 5 to Step 10 13 Check the groove depth of the processed lens Check that the groove is slightly made the depth is within 0 10 mm on the processed lens 14 Repeat Step 1 to Step 13 un...

Page 76: ...de page 20 2 Press the Maintenance tab The maintenance screen appears 3 Press the time indication on the mainte nance screen The date and time setting panel appears 4 If necessary select the display format by pressing the date format Date format yyyymmdd Year Month Day ddmmyyyy Day Month Year mmddyyyy Month Day Year 5 Press Year Month Day and time change buttons to display the numeric key pad ente...

Page 77: ...71 CHECK AND ADJUSTMENT PROCEDURES Date and Time Setting 6 After all changes press the Set button to update the time 7 Press to close the date and time setting panel 8 Press to return to the home screen ...

Page 78: ...72 CHECK AND ADJUSTMENT PROCEDURES Date and Time Setting ...

Page 79: ... polished properly Polish differential CR 39 Bevel At installation After adjustment Polish differential CR 39 Flat At installation After adjustment Polish size CR 39 Bevel At installation After adjustment Polish Size CR 39 Flat At installation After adjustment Polish axis CR 39 Flat At installation After adjustment Complete if the parameter setting of any other items has been changed Is the bevel ...

Page 80: ... 700 Installation Work Check List Is the time set properly After installation the representative must send this list to the NIDEK International Service Depart ment Product name Type S N Ver Installation date Installer ...

Reviews:

Related manuals for LE-700