4
●5.
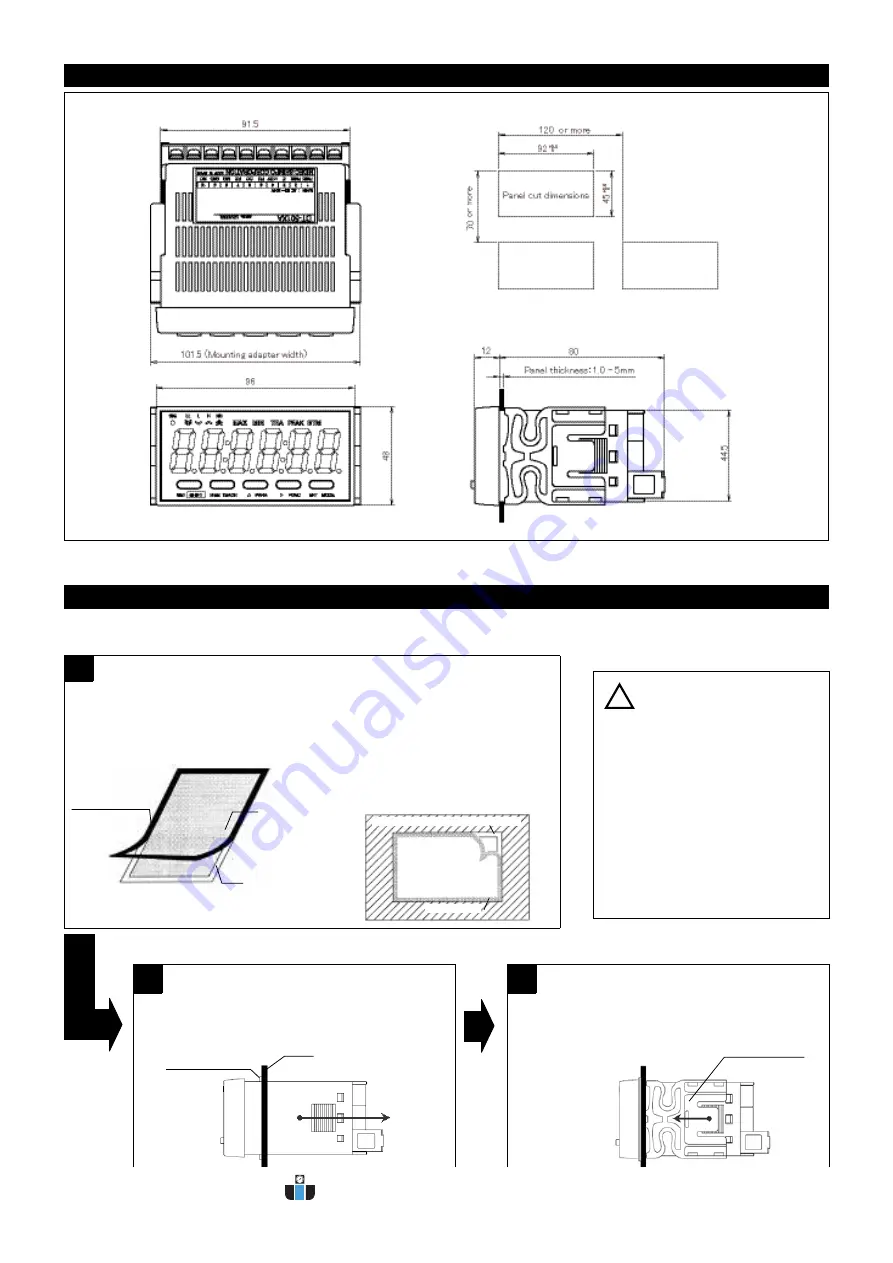
External Dimensions
●6.
Installation to the Panel
●mm●
Mount this unit to the panel according to the following procedures.
Check that the mounting panel is thick enough (1.0 - 5mm) before mounting operation.
3
Attach the mounting adapter to the unit.
Slide the mounting adapter until it lightly touches the
panel surface.
Mounting adapter
2
Place the unit horizontally, and insert the gasket into
the opening of the panel surface.
Push the unit until the waterproof gasket (adhesive part)
securely reaches the panel surface of the unit.
● Front panel: IP66 (or equivalent)
● Rear terminal block: IP20 (non-waterproof)
Do not install the unit in the following
places or conditions.
(1) Places regularly subject directly to water
(2) Places subject to oil splashes and/or
medical supplies
(3) Places subject to water splashes on the
rear or side face(s).
* The front panel is IP66 (or equivalent)
waterproofed, but if water is splashed on
the unit, be sure to wipe it off the unit as
soon as possible.
1
Attach the provided waterproof gasket to the panel surface.
* If waterproofing is not necessary, skip this step.
(1) Remove the external frame with the cutting
lines(backing paper + waterproof gasket)
from the gasket sheet.
(Adhesive paste is applied on the both
sides of the waterproof gasket.)
(2) Attach the provided waterproof gasket to
the edges of the unit attachment panel and
opening, aligning with its left and right sides,
and then peel off the backing paper.
About waterproofing
* At this time, be sure not to displace or wrinkle
the waterproof gasket. Also, do not expand the
waterproof gasket vertically and/or horizontally
past the attachment panel’s edges.
External frame
(backing paper +
waterproof gasket)
Backing paper
(side with cutting lines)
Backing paper
(side without cutting lines)
Unit attachment opening
Backing paper
Adhesive part of the waterproof gasket
Panel
Waterproof gasket
!
CAUTION
www.calcert.com
1.888.610.7664
0
5
10
15
20
25
30


