background image

Maintain and Monitor the Extender 

73

 N600 WiFi Range Extender

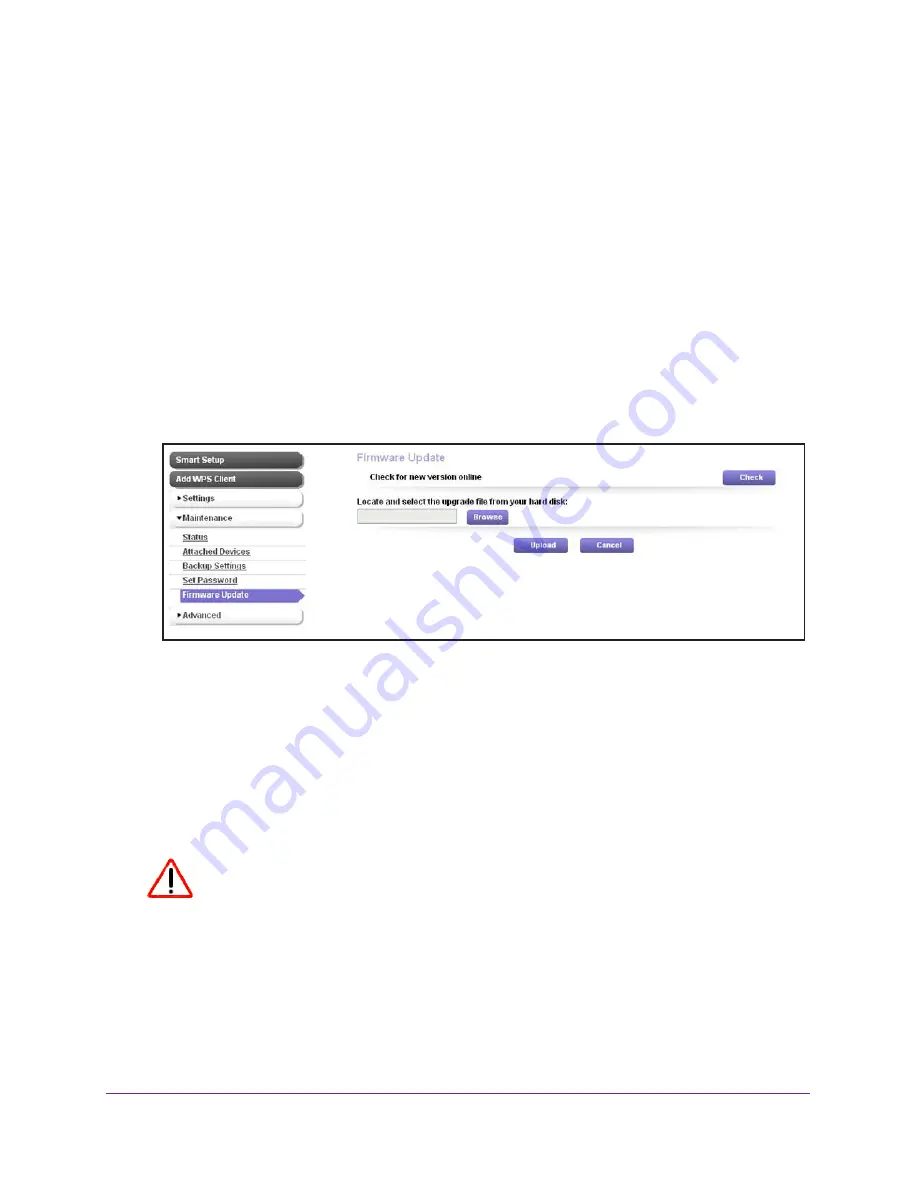
Update the Firmware

Unless you changed the settings in the Firmware Update screen previously, the extender is 
set up to check for new firmware automatically at login.

To check manually for new firmware and, if available, update the firmware:

1. 

On your computer, launch an Internet browser such as Mozilla Firefox or Microsoft 
Internet Explorer. 

2. 

In the address field of your browser, enter 

www.mywifiext.net

.

You are prompted to enter a user name and password.

3. 

Type 

admin

 for the user name and type your password.

If you have not yet personalized your password, type 

password 

for the password.

4. 

Select 

Maintenance > Firmware Update

.

5. 

Click the 

Check

 button.

6. 

If new firmware is available, follow the onscreen prompts to download it onto your computer.

Note:

You might need to unzip the firmware file.

7. 

Click the 

Browse

 button.

8. 

Locate and select the new firmware file.

The firmware file has a 

.chk

 extension.

CAUTION:

After you click the 

Upload

 button, do not try to go online, turn off the 

extender, shut down the computer, or do anything else to the extender 
until it finishes restarting! 

9. 

Click the 

Upload

 button.

The firmware update starts and the extender restarts. The firmware update process takes 
a couple of minutes.

Summary of Contents for WN2500RPv2

Page 1: ...350 East Plumeria Drive San Jose CA 95134 USA May 2014 202 11354 01 N600 WiFi Range Extender Model WN2500RPv2 User Manual ...

Page 2: ... http support netgear com Phone US Canada only 1 888 NETGEAR Phone Other Countries Check the list of phone numbers at http support netgear com general contact default aspx Compliance For regulatory compliance information visit http www netgear com about regulatory See the regulatory compliance document before connecting the power supply Trademarks NETGEAR the NETGEAR logo and Connect with Innovati...

Page 3: ...nder After Initial Setup 31 Change the Password 33 Connect the Extender to a WiFi Network Without Using Smart Setup 33 Connect the Extender to a Hidden WiFi Network 37 Use WPS to Add a Device to the Extender s WiFi Network 40 Use WPS with the Push Button Method 41 Use WPS with the PIN Method 42 Manage the Extender WiFi Settings 43 Configure WPA WPA2 or WPA WPA2 49 Configure WEP 50 Change the Exten...

Page 4: ...he Extender Configuration Settings 72 Update the Firmware 73 View the Status and Traffic Statistics of the Extender 74 View the Wired and WiFi Network Devices 78 Chapter 5 FAQs and Troubleshooting FAQs 80 You Cannot Connect to the Extender 81 You Cannot Join a WiFi Network and Receive an Error Message 82 Improve the Connection Between the Extender and the WiFi Router 83 Appendix A Factory Settings...

Page 5: ... more information about the topics covered in this manual visit the support website at support netgear com Note Firmware updates with new features and bug fixes are made available from time to time on downloadcenter netgear com Some products can regularly check the site and download new firmware or you can check for and download new firmware manually If the features or behavior of your product doe...

Page 6: ...the best location for the extender or to monitor the extender performance The following figure shows the extender in upright position with the feet attached For information about attaching the feet see Attach the Feet on page 8 2 4 GHz Link Rate LED 5 GHz Link Rate LED Device to Extender LED LAN LEDs 1 through 4 WPS LED WPS button on the right panel Power LED Figure 1 Front panel LEDs and right pa...

Page 7: ...nection Green The 5 GHz WiFi connection between the extender and the WiFi router is optimum Amber The 5 GHz WiFi connection between the extender and the WiFi router is good Red The 5 GHz WiFi connection between the extender and the WiFi router is poor Off The extender and the WiFi router do not have a 5 GHz WiFi connection Device to Extender LED Green The extender is connected to a computer or WiF...

Page 8: ...age 8 Restore Factory Settings button Ethernet LAN ports Power connector On Off button Figure 2 Rear panel Attach the Feet If you prefer to place the extender in upright vertical position attach the feet that come with the extender Although the extender functions well in either horizontal or vertical position a horizontal position might give a better performance To attach the feet 1 Hold the exten...

Page 9: ...rks The extender works like a bridge between a WiFi router or a WiFi access point and a WiFi device outside the range of the WiFi router The extender has two main jobs The extender connects to a WiFi network that is up and running When the extender connects over WiFi to an existing network it functions as a network client similar to how a WiFi device connects to a network The extender acts as an a...

Page 10: ...outer does not provide the WiFi coverage you need WiFi Range Extender Boosts the range of your existing WiFi and creates a stronger signal in hard to reach areas Overview 10 N600 WiFi Range Extender Figure 4 Range extender in a home ...

Page 11: ...he following topics How to Position the Extender Connect the Extender to Your WiFi Router Connect the Extender with WPS to a WiFi Network Access the Extender over WiFi and Use Smart Setup Access the Extender over Ethernet and Use Smart Setup ...

Page 12: ... unplug the extender plug it in again at its new location and restart it Use the Link Rate LEDs on the extender to choose the location where the connection between the extender and the WiFi router is optimal These steps are described in detail in the sections that describe how to connect the extender to a WiFi network Connect the Extender to Your WiFi Router To connect the extender to your WiFi ro...

Page 13: ... the extender at its permanent location 2 Plug the extender into an electrical outlet 3 If necessary press the Power button The power LED lights amber during startup process After about one minute the power LED turns green and the startup process is complete You are now ready to connect the extender to your WiFi router 4 Press the WPS button on the right side panel of the extender The WPS LED blin...

Page 14: ...nder provides the best performance The Link Rate LED is amber and the Device to Extender LED is green and The extender provides a workable performance The Link Rate LED is red and The extender provides a poor performance The Link Rate LED is off The extender cannot function If the Link Rate LED is off the extender cannot connect to the WiFi router If the Link Rate LED is red the extender has a poo...

Page 15: ... GHz network name MyNetworkName_2GEXT New extended 5 GHz network name MyNetworkName_5GEXT To access the extender over WiFi and use Smart Setup to connect the extender to an existing WiFi network 1 Place the extender close to the WiFi router Note In a later step in this procedure after you have established a connection to the WiFi router you can place the extender at its permanent location 2 Plug t...

Page 16: ...evice is established the Device to Extender LED lights solid green 6 Open a web browser window from the same computer or mobile device The browser takes you directly to the NETGEAR genie Smart Setup start screen Note If you are not automatically directed to the NETGEAR genie Smart Setup start screen go to www mywifiext net and enter admin for the user name and password for the password Smart Setup...

Page 17: ...hrase also called a password or network key b Click the Continue button If the network uses WEP do the following a From the Encryption Strength menu select the encryption strength 64 bit or 128 bit b Specify the active key by selecting the Key 1 Key 2 Key 3 or Key 4 radio button only one key can be the active key and type the value for the key For 64 bit WEP type 10 hexadecimal digits any combinat...

Page 18: ...PSK WPA2 PSK or a combination of these options do the following a In the Password network key field type the network passphrase also called a password or network key b Click the Continue button If the network uses WEP do the following a From the Encryption Strength menu select the encryption strength 64 bit or 128 bit b Specify the active key by selecting the Key 1 Key 2 Key 3 or Key 4 radio butto...

Page 19: ...SSID field enter new network names for your extender WiFi networks and click the Continue button Note If you do not want to use the same security modes for your extender networks as you use for your existing networks clear the check box before you click the Continue button You then can configure the security settings for the extender networks However you can also change the security settings later...

Page 20: ...etwork to which you connected the extender and adds _2GEXT to the end of the 2 4 GHz network name and _5GEXT to the end of the 5 GHz network name Note If your computer or mobile device cannot join the new WiFi network of the extender see Improve the Connection Between the Extender and the WiFi Router on page 83 14 Select the My wireless devices are connected to the Extender network check box and c...

Page 21: ...rt the extender Unless the extender is outside the range of your WiFi router the extender connects automatically to the WiFi router The Link Rate LEDs help you choose a spot where the extender to router connection is optimal The following tables describe how the LEDs show the quality of the connection 2 4 GHz LED Status LED Color Performance Both the Link Rate LED and the Device to Extender LED ar...

Page 22: ...net cable to connect your computer to one of the LAN ports of the extender Then use the browser based NETGEAR genie Smart Setup to connect the extender to an existing WiFi network After you have used Smart Setup to connect the extender to an existing WiFi network the extender changes its default NETGEAR_EXT WiFi network name SSID in the 2 4 GHz band to the name of the existing WiFi network and add...

Page 23: ... the extender CAUTION Do not use an Ethernet cable to connect the extender to a WiFi router If you do so the extender does not work because it is designed to use only a WiFi connection to a WiFi router 6 If you have trouble connecting try the following Wait a couple of minutes If you start your computer connect the Ethernet cable to the extender and launch your browser quickly the computer might s...

Page 24: ... automatically directed to the NETGEAR genie Smart Setup start screen go to www mywifiext net and enter admin for the user name and password for the password Smart Setup searches for existing WiFi networks automatically and displays the networks in the 2 4 GHz band 8 Select a 2 4 GHz WiFi network to extend and click the Continue button ...

Page 25: ...t b Specify the active key by selecting the Key 1 Key 2 Key 3 or Key 4 radio button only one key can be the active key and type the value for the key For 64 bit WEP type 10 hexadecimal digits any combination of 0 9 A F For 128 bit WEP type 26 hexadecimal digits The key values are not case sensitive c Click the Continue button If Smart Setup detects any networks in the 5 GHz band it displays them 1...

Page 26: ...exadecimal digits any combination of 0 9 A F For 128 bit WEP type 26 hexadecimal digits The key values are not case sensitive c Click the Continue button Smart Setup displays the network names and adds _2GEXT to the end of the 2 4 GHz network name and _5GEXT to the end of the 5 GHz network name 12 Use the default extension names or in the Name 2 4GHz SSID field and if you have set up a 5 GHz netwo...

Page 27: ...te Unless you entered a new network name in Step 12 the extender changes its default NETGEAR_EXT network name to the name of the WiFi network to which you connected the extender and adds _2GEXT to the end of the 2 4 GHz network name and _5GEXT to the end of the 5 GHz network name Note If your computer or mobile device cannot join the new WiFi network of the extender see Improve the Connection Betw...

Page 28: ...and the extender 22 Now that the extender is connected to the WiFi router and you can connect a computer or mobile device to the extender s WiFi network move it to a location where you can boost your WiFi range The location you choose must be within the range of your existing WiFi router network 23 Plug the extender into an electrical outlet at the new location and restart the extender Unless the ...

Page 29: ...WiFi network to which you connected the extender and adds _2GEXT to the end of the 2 4 GHz network name and _5GEXT to the end of the 5 GHz network name 26 Select the new network and use your WiFi router password to connect You are now using your extended WiFi network The Link Rate LED is red and The extender provides a poor performance The Link Rate LED is off The extender cannot function 5 GHz LE...

Page 30: ...WiFi Network Without Using Smart Setup Connect the Extender to a Hidden WiFi Network Use WPS to Add a Device to the Extender s WiFi Network Manage the Extender WiFi Settings Change the Extender IP Address Manage Advanced WiFi and WPS Settings Manage a WiFi Access List Set the Operating Mode to FastLane Technology Run Smart Setup Again After Initial Setup Connect Ethernet Enabled Devices ...

Page 31: ...ress field of your browser enter www mywifiext net You are prompted to enter a user name and password 3 Type admin for the user name and password for the password Note NETGEAR recommends that you set a more secure password after you log in For more information see Change the Password on page 33 The Status screen displays see the following figure Menu selections display on the left The Status scree...

Page 32: ...Manage the Extender Network and Security Settings 32 N600 WiFi Range Extender ...

Page 33: ...Type admin for the user name and password for the password If you already changed the password and want to change it again type your personalized password 4 Select Maintenance Set Password 5 Type the old password 6 Type the new password twice 7 Click the Apply button Your settings are saved Connect the Extender to a WiFi Network Without Using Smart Setup If you want to change the extender connecti...

Page 34: ...the user name and type your password If you have not yet personalized your password type password for the password 4 Select Settings Connect to Existing Network The extender scans for existing WiFi networks and displays the networks in the 2 4 GHz band If your WiFi network is functioning but not on the list your WiFi network might be hidden or the connection between the WiFi router and the extende...

Page 35: ...y selecting the Key 1 Key 2 Key 3 or Key 4 radio button only one key can be the active key and type the value for the key For 64 bit WEP type 10 hexadecimal digits any combination of 0 9 A F For 128 bit WEP type 26 hexadecimal digits The key values are not case sensitive c Click the Continue button If the extender detects any networks in the 5 GHz band it displays them If your WiFi network is func...

Page 36: ...lled a password or network key b Click the Continue button If the network uses WEP do the following a From the Encryption Strength menu select the encryption strength 64 bit or 128 bit b Specify the active key by selecting the Key 1 Key 2 Key 3 or Key 4 radio button only one key can be the active key and type the value for the key For 64 bit WEP type 10 hexadecimal digits any combination of 0 9 A ...

Page 37: ... hidden WiFi network the type of security that the network uses and the key or passphrase to connect to the network Note You cannot use the following procedure to change the network names or security options for your extender WiFi networks For information about how to change these settings see Manage the Extender WiFi Settings on page 43 To connect the extender to a hidden WiFi network without usi...

Page 38: ...ts 6 In the Name SSID field enter the name of the 2 4 GHz network to which you want to connect the extender 7 From the Security menu select the security setting for the 2 4 GHz network The screen adjusts 8 Enter the security settings for the 2 4 GHz network If the network uses WPA PSK WPA2 PSK or a combination of these options do the following a In the Password network key field type the network p...

Page 39: ... it displays them 9 Select the Manually input my wireless SSID radio button and click the Continue button Note If your router does not support the 5 GHz band not all routers do or you do not want to connect the extender to a hidden 5 GHz network click the Skip button and go to Step 13 on page 40 The screen adjusts 10 In the Name SSID field enter the name of the 5 GHz network to which you want to c...

Page 40: ...WiFi network of the extender see You Cannot Join a WiFi Network and Receive an Error Message on page 82 15 Click the I have connected to the Extender network button The WiFi network settings for the extender are saved and the Status screen displays Use WPS to Add a Device to the Extender s WiFi Network WPS Wi Fi Protected Setup lets you connect a computer or WiFi device to the extender s network w...

Page 41: ...Fi device join the extender s WiFi network using WPS with the Push Button method 1 On your computer launch an Internet browser such as Mozilla Firefox or Microsoft Internet Explorer 2 In the address field of your browser enter www mywifiext net You are prompted to enter a user name and password 3 Type admin for the user name and type your password If you have not yet personalized your password typ...

Page 42: ... PIN of the WiFi device that you are trying to connect To let a WiFi device join the extender s WiFi network using WPS with the PIN method 1 On your computer launch an Internet browser such as Mozilla Firefox or Microsoft Internet Explorer 2 In the address field of your browser enter www mywifiext net You are prompted to enter a user name and password 3 Type admin for the user name and type your p...

Page 43: ...different from the WiFi security of the network that the extender is connected to you typically would select the same type of WiFi security for both networks In some regions not all channels are available Do not change the channel unless you experience interference shown by lost connections or slow data transfers If this happens experiment with different channels to see which is the best When you ...

Page 44: ...router in the 2 4 GHz band you cannot change the wireless mode in the 2 4 GHz band because the extender adopts the wireless mode that the WiFi router functions in To change the WiFi settings for the extender s network 1 On your computer launch an Internet browser such as Mozilla Firefox or Microsoft Internet Explorer 2 In the address field of your browser enter www mywifiext net You are prompted t...

Page 45: ...5 GHz WiFi band My WN2500RPv2 wireless network 2 4GHz Name SSID In the Name SSID field type a new name or use the name that the extender assigns by default Existing network name MyNetworkName New extended 2 4 GHz network name MyNetworkName_2GEXT If more than one extender operates in your neighborhood changing the SSID makes it easier to identify the extenders Channel From the Channel menu select A...

Page 46: ...ence For more information about FastLane Technology see Set the Operating Mode to FastLane Technology on page 61 For more information about disabling 20 40 MHz coexistence see Manage Advanced WiFi and WPS Settings on page 53 Disable 20 40 MHz coexistence only if no other wireless networks are present in your environment Security Options 2 4GHz Select the type of WiFi security that you want to use ...

Page 47: ...following modes Up to 54 Mbps Legacy mode This mode allows 802 11an and 802 11a devices to join the network but limits 802 11n devices to function at up to 54 Mbps If your network security is WEP or WPA PSK TKIP you must use the Up to 54 Mbps mode Up to 145 Mbps Neighbor friendly mode for reduced interference with neighboring wireless networks Allows 802 11an and 802 11a devices to join the networ...

Page 48: ...urity that you want to use for the extender s 5 GHz WiFi network None An open WiFi network that does not provide any security Any WiFi device can join the network WEP WEP is an older standard and is less secure than WPA or WPA2 WEP limits the wireless mode to Up to 54 Mbps WEP uses encryption keys and data encryption for data security Select 64 bit or 128 bit encryption and enter a key To join the...

Page 49: ...maximum speed that your devices are capable of The process to configure WPA WPA2 or WPA WPA2 security is the same for the 2 4 GHz and 5 GHz bands To configure WPA WPA2 or WPA WPA2 in the extender 1 On your computer launch an Internet browser such as Mozilla Firefox or Microsoft Internet Explorer 2 In the address field of your browser enter www mywifiext net You are prompted to enter a user name an...

Page 50: ...curity NETGEAR recommends that you use WPA2 or WPA WPA2 security Note 802 11n devices do not support WEP security If you change the security to WEP 802 11n devices in either the 2 4 GHz or 5 GHz band cannot join the network Note WPS does not support WEP security If you change the security to WEP you can no longer let WiFi devices join the extender s WiFi network by using WPS The process to configu...

Page 51: ...ny combination of 0 9 a f or A F or a string of 13 characters 7 Specify the active key by selecting the Key 1 Key 2 Key 3 or Key 4 radio button Only one key can be the active key 8 Enter the value for the key For 64 bit WEP type 10 hexadecimal digits any combination of 0 9 A F The key values are not case sensitive For 128 bit WEP type 26 hexadecimal digits any combination of 0 9 A F The key values...

Page 52: ...nnecting to the extender and might require you to reset the extender to factory default settings To change the IP address of the extender to a static IP address 1 On your computer launch an Internet browser such as Mozilla Firefox or Microsoft Internet Explorer 2 In the address field of your browser enter www mywifiext net You are prompted to enter a user name and password 3 Type admin for the use...

Page 53: ...such as Mozilla Firefox or Microsoft Internet Explorer 2 In the address field of your browser enter www mywifiext net You are prompted to enter a user name and password 3 Type admin for the user name and type your password If you have not yet personalized your password type password for the password 4 Select Advanced Wireless Settings 5 View or change the following settings as described in the fol...

Page 54: ...ed to the maximum supported speed Enable Wireless Access Point 5GHz By default the extender functions as a WiFi access point in the 5 GHz band Clear the Enable Wireless Access Point 5GHz check box only if you want to prevent WiFi devices from connecting to the extender in the 5 GHz band LAN devices can still connect to the extender over an Ethernet cable Enable SSID Broadcast 5GHz By default the e...

Page 55: ...g the network configuration utilities of the computer You might also find the MAC addresses on the Network Devices screen see View the Wired and WiFi Network Devices on page 78 CAUTION If you use a WiFi device to set up the access list add your WiFi device to the access list Otherwise you are disconnected when you click the Apply button To avoid this situation use a computer with a wired connectio...

Page 56: ...le Wireless Cards table displays the name and MAC address of WiFi devices that are connected to the extender 7 Select a device by one of the following methods Select a device from the table by selecting its associated radio button The Device Name and MAC Address fields are automatically populated Enter a device name and MAC address manually a In the Device Name field type a name for the WiFi devic...

Page 57: ... Click the Apply button Now only WiFi devices that are in the Wireless Card Access List can access the WiFi network of the extender Disable the Access List If you decide that you no longer need an access list on the extender you can disable the access list To disable the access list 1 On your computer launch an Internet browser such as Mozilla Firefox or Microsoft Internet Explorer 2 In the addres...

Page 58: ...ge a Device on the Access List You can change the name or MAC address of a device on the access list To change a WiFi device on the access list 1 On your computer launch an Internet browser such as Mozilla Firefox or Microsoft Internet Explorer 2 In the address field of your browser enter www mywifiext net You are prompted to enter a user name and password 3 Type admin for the user name and type y...

Page 59: ...nced Wireless Settings 5 Click the Setup Access List button 6 Select the radio button to the left of the device that you want to change 7 Click the Edit button 8 Change the name of the device or the MAC address 9 Click the Apply button The changed settings display in Wireless Card Access List ...

Page 60: ...er such as Mozilla Firefox or Microsoft Internet Explorer 2 In the address field of your browser enter www mywifiext net You are prompted to enter a user name and password 3 Type admin for the user name and type your password If you have not yet personalized your password type password for the password 4 Select Advanced Wireless Settings 5 Click the Setup Access List button 6 Select the radio butt...

Page 61: ...astLane Technology When you enable FastLane Technology you have two options Use the 2 4 GHz band to connect the extender to the WiFi devices and use the 5 GHz band to connect the extender to the WiFi router Use this mode if your WiFi router supports the 5 GHz band but the devices that you want to use for gaming and streaming support the 2 4 GHz band Use the 5 GHz band to connect the extender to th...

Page 62: ...nly and extender to router in 2 4GHz only Your WiFi devices must support the 5 GHz band Device to extender in 2 4GHz only and extender to router in 5GHz only Router must support 5GHz band Your WiFi router must support the 5 GHz band This option is enabled by default 8 Click Apply Your settings are saved 9 If you are disconnected reconnect your WiFi device to the extender s network with its new set...

Page 63: ...er a user name and password 3 Type admin for the user name and type your password If you have not yet personalized your password type password for the password 4 Select Smart Setup Smart Setup searches for existing WiFi networks automatically and displays the networks in the 2 4 GHz band 5 Select a 2 4 GHz WiFi network to extend and click the Continue button 6 Enter the security settings for the e...

Page 64: ...er does not support the 5 GHz band not all routers do or you want to set up the 5 GHz extender network later click the Skip button and go to Step 9 on page 65 8 Enter the security settings for the existing 5 GHz network If the network uses WPA PSK WPA2 PSK or a combination of these options do the following a In the Password network key field type the network passphrase also called a password or ne...

Page 65: ...inue button Note If you do not want to use the same security modes for your extender networks as you use for your existing networks clear the check box before you click the Continue button You then can configure the security settings for the extender networks However you can also change the security settings later The extender applies the settings 10 Wait a couple of minutes while the extender cre...

Page 66: ...Smart Setup describes the color of the Link Rate LED on the front of the extender Because you placed the extender close the WiFi router the Link Rate LED is green 13 Click the Finish button A pop up screen displays 14 To bookmark the URL of the extender click the OK button A NETGEAR website displays You are now online Connect Ethernet Enabled Devices You can use the extender to connect as many as ...

Page 67: ...Extender WiFi router Blue ray player TV Gaming console Manage the Extender Network and Security Settings 67 N600 WiFi Range Extender Figure 6 Connecting devices to the LAN ports on the rear panel ...

Page 68: ...chapter covers the following topics Back Up and Manage the Extender Configuration Return the Extender to Its Factory Default Settings Update the Firmware View the Status and Traffic Statistics of the Extender View the Wired and WiFi Network Devices ...

Page 69: ...extender To back up the extender configuration settings 1 On your computer launch an Internet browser such as Mozilla Firefox or Microsoft Internet Explorer 2 In the address field of your browser enter www mywifiext net You are prompted to enter a user name and password 3 Type admin for the user name and type your password If you have not yet personalized your password type password for the passwo...

Page 70: ...sword 3 Type admin for the user name and type your password If you have not yet personalized your password type password for the password 4 Select extender Maintenance Backup Settings 5 Click the Browse button 6 Locate and select the previously saved backup file By default the name of the backup file is NETGEAR_WN2500RPv2 cfg CAUTION After you click the Restore button do not try to go online turn ...

Page 71: ...nel or the Erase function However if you have lost the password to access the extender you must use the Restore Factory Settings button For a list of factory default settings see Factory Default Settings on page 85 Use the Restore Factory Settings Button CAUTION This process erases any settings that you have configured in the extender To reset the extender to factory default settings 1 Insert a st...

Page 72: ...nter www mywifiext net You are prompted to enter a user name and password 3 Type admin for the user name and type your password If you have not yet personalized your password type password for the password 4 Select Maintenance Backup Settings CAUTION After you click the Erase button do not try to go online turn off the extender shut down the computer or do anything else to the extender until it fi...

Page 73: ... the user name and type your password If you have not yet personalized your password type password for the password 4 Select Maintenance Firmware Update 5 Click the Check button 6 If new firmware is available follow the onscreen prompts to download it onto your computer Note You might need to unzip the firmware file 7 Click the Browse button 8 Locate and select the new firmware file The firmware f...

Page 74: ...ackets sent and number of packets received for each port To view the status of the extender to view the traffic statistics and to change the poll interval 1 On your computer launch an Internet browser such as Mozilla Firefox or Microsoft Internet Explorer 2 In the address field of your browser enter www mywifiext net You are prompted to enter a user name and password 3 Type admin for the user name...

Page 75: ... displays Click the Connect button connect the extender to the WiFi network in the 2 4 GHz band Note The extender can be connected simultaneously to a network in the 2 4 GHz band and to a network in the 5 GHz band If you have a dual band WiFi router the router can broadcast the same network name SSID simultaneously in both bands Connection Status to Existing Network 5GHz Name SSID The name SSID of...

Page 76: ...ss AP Shows whether the WiFi access point of the extender is on in the 2 4 GHz band Broadcast Name Shows whether broadcasting of the network name SSID of the extender is on in the 2 4 GHz band Wi Fi Protected Setup Shows whether Wi Fi Protected Setup WPS is configured for the 2 4 GHz band Extender Wireless Settings 5GHz Name SSID The name SSID of the WiFi network of the extender in the 5 GHz band ...

Page 77: ... packets transmitted on the port since the extender was restarted RxPkts The number of packets received on the port since the extender was restarted Collisions The number of collisions on the port since the extender was restarted Tx B s The packet transmission rate in bytes per second on the port Rx B s The packet reception rate in bytes per second on the port Up Time The time elapsed since the co...

Page 78: ...uter launch an Internet browser such as Mozilla Firefox or Microsoft Internet Explorer 2 In the address field of your browser enter www mywifiext net You are prompted to enter a user name and password 3 Type admin for the user name and type your password If you have not yet personalized your password type password for the password 4 Select Maintenance Attached Devices For each wired and WiFi devic...

Page 79: ...roubleshooting This chapter covers the following topics FAQs You Cannot Connect to the Extender You Cannot Join a WiFi Network and Receive an Error Message Improve the Connection Between the Extender and the WiFi Router ...

Page 80: ...mobile device is connected to the extender by using the SSID and the passphrase that you have set up and clicking the Refresh button in your browser You should be returned to Smart Setup 5 Question I connected to NETGEAR_EXT and launched a browser but why can I not see Smart Setup Answer First make sure that your device is set up to use DHCP Second make sure that the Device to Extender Connection ...

Page 81: ...estion Is seamless roaming supported During a VoIP call when I move to a different location the call is dropped What should I do Answer No the extender does not support seamless roaming You might notice performance issues if your WiFi device laptop smartphone or tablet connects to a different WiFi network For example you might connect to the extender WiFi network begin a call and then move to the ...

Page 82: ...t the WiFi router is turned on If possible move the extender closer to the WiFi router For more information see Improve the Connection Between the Extender and the WiFi Router on page 83 If the extender Link Rate LED is red a poor WiFi connection exists between the WiFi router and the extender You can establish the best connection with a clear line of sight between the extender and the WiFi router...

Page 83: ...where the Link Rate LED is green or amber and the Device to Extender LED is green The following tables describe how the LEDs show the quality of the connection 2 4 GHz LED Status LED Color Performance Both the Link Rate LED and the Device to Extender LED are green and The extender provides the best performance The Link Rate LED is amber and the Device to Extender LED is green and The extender prov...

Page 84: ...84 A A Factory Settings and Technical Specifications This appendix covers the following topics Factory Default Settings Technical and Environmental Specifications ...

Page 85: ...y default settings Factory Settings Smart Setup Enabled WiFi WiFi communication Enabled WiFi network name SSID NETGEAR_EXT Security Disabled Transmission speed Auto1 1 Maximum WiFi signal rate IEEE Standard 802 11 Actual throughput can vary Network conditions and environmental factors including volume of network traffic building materials and construction and network overhead lower actual data thr...

Page 86: ...ent Power adapter North America input 120V 60 Hz Australia and UK input 240V 50 Hz Europe excluding the UK input 230V 50 Hz All regions output 12 VDC 2 5A Physical specifications Dimensions 177 x 116 x 30 mm 7 0 x 4 6 x 1 2 in Weight 0 25 kg 0 54 lb Environmental Operating temperature 32 to 140 F 0 to 40 C Operating humidity 90 maximum relative humidity noncondensing Interface Local 10BASE T 100BA...

Reviews: