background image

Administration

101

 A750 Wireless Dual Band Gigabit Router JR6150

2.

Select 

ADVANCED > Administration > Logs

.

3.

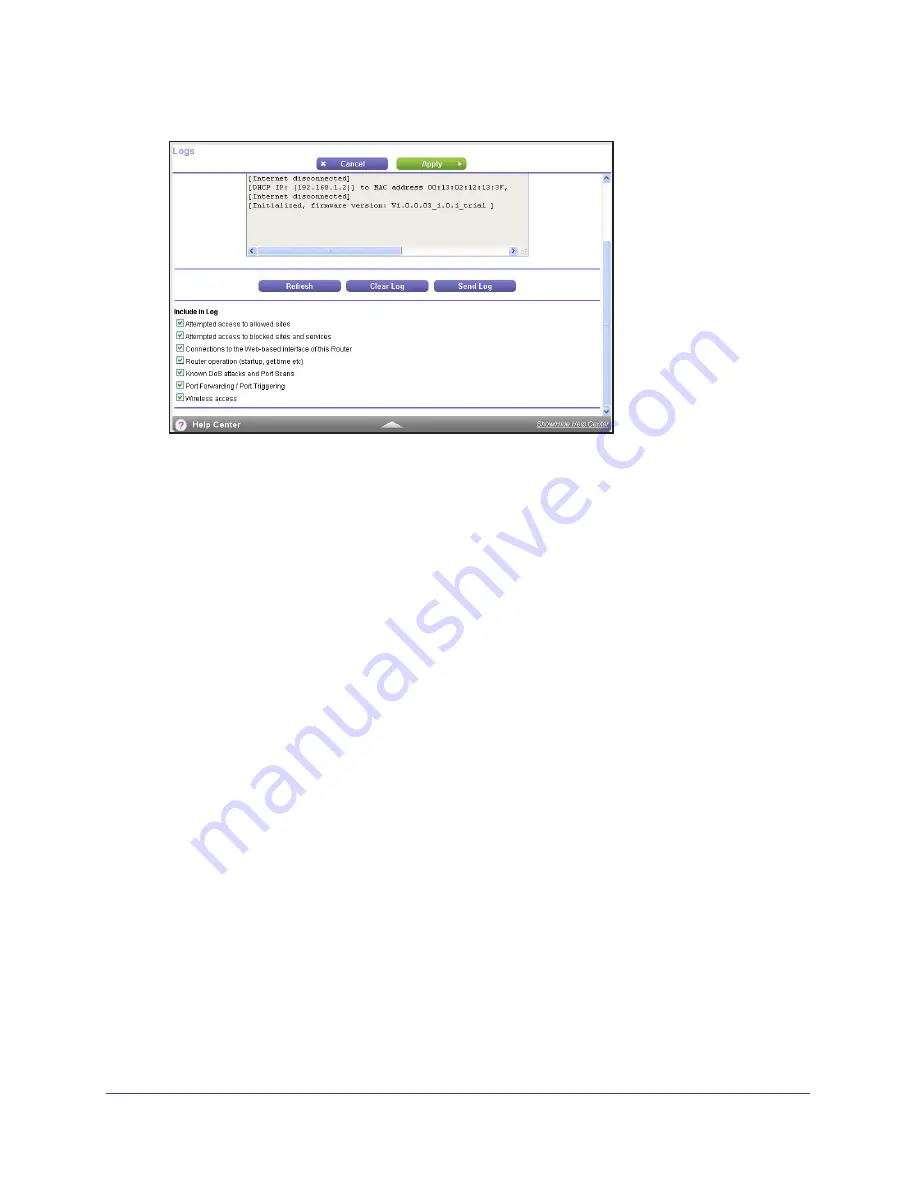
Select the following check boxes for the events that you want to include in the log:

Attempted access to allowed sites


Attempted access to blocked sites and services


Connections to the Web-based interface of this Router


Router operation (startup, get time etc)


Known DoS attacks and Port Scans


Port Forwarding / Port Triggering


Wireless access


4.

Click the 

Apply

 button.

Manage the Configuration File

The configuration settings of the router are stored within the router in a configuration file. You 
can back up (save) this file to your computer, restore it, or reset it to the factory default 
settings.

Back Up Settings

To back up the router’s configuration settings:

1.

Log in to the router.

For more information, see 

Use NETGEAR genie after Installation 

on page


17.

Summary of Contents for JR6150

Page 1: ...350 East Plumeria Drive San Jose CA 95134 USA November 2013 202 11270 01 A750 Wireless Dual Band Gigabit Router JR6150 User Manual ...

Page 2: ...or product updates additional documentation and support visit http support netgear com Phone US Canada only 1 888 NETGEAR Phone Other Countries Check the list of phone numbers at http support netgear com general contact default aspx Trademarks NETGEAR the NETGEAR logo and Connect with Innovation are trademarks and or registered trademarks of NETGEAR Inc and or its subsidiaries in the United States...

Page 3: ... Access 15 NETGEAR genie Setup 16 Use NETGEAR genie after Installation 17 Upgrade Router Firmware 18 Change the Password 18 Password Recovery 19 Add Wireless Devices or Computers to Your Network 21 Manual Method 21 Wi Fi Protected Setup Method 21 Chapter 3 genie BASIC Settings Internet Setup 24 Basic Wireless Settings 25 WPA PSK WPA2 PSK and WPA PSK WPA2 PSK Mixed Mode 28 WPA WPA2 Enterprise 29 WE...

Page 4: ...he Available Network Folders 70 Specify Approved USB Devices 74 Access and Share Your Network Storage 75 Common Uses of Network Sharing 75 Access Your USB Storage Device Locally 77 Access Your USB Storage Device Remotely 78 Set Up a Network Printer 79 Chapter 6 Security Keyword Blocking of HTTP Traffic 85 Port FIltering to Block Services 87 Schedule Blocking 88 Security Event Email Notifications 8...

Page 5: ...e a Port Forwarding Entry 125 Application Example Make a Local Web Server Public 126 Set Up Port Triggering 127 Dynamic DNS 131 Static Routes 132 Remote Management 136 Universal Plug and Play 138 Traffic Meter 139 Chapter 9 Troubleshooting Quick Tips 144 Sequence to Restart Your Network 144 Check Ethernet Cable Connections 144 Wireless Settings 144 Network Settings 144 Troubleshooting with the LED...

Page 6: ...s Dual Band Gigabit Router JR6150 Test the LAN Path to Your Router 151 Test the Path from Your Computer to a Remote Device 152 Appendix A Supplemental Information Factory Default Settings 154 Specifications 155 Index ...

Page 7: ...t you connect to your home network If you have not already set up your new router using the installation guide that comes in the box Chapter 2 Get Started with NETGEAR genie walks you through the hardware setup Chapter 3 genie BASIC Settings explains how to set up your Internet connection This chapter contains the following sections Unpack Your Router Position Your Router Hardware Features For inf...

Page 8: ...r adapter Ethernet cable JR6150 router Figure 1 Check the package contents Your box contains the following items A750 Wireless Dual Band Gigabit Router JR6150 AC power adapter plug varies by region Category 5 Cat 5 Ethernet cable Installation guide with cabling and router setup instructions If any parts are incorrect missing or damaged contact your NETGEAR dealer ...

Page 9: ...ter of the area where your computers and other devices operate and within line of sight to your wireless devices 2 Make sure that the router is within reach of an AC power outlet and near Ethernet cables for wired computers 3 Place the router in an elevated location minimizing the number walls and ceilings between the router and your other devices 4 Place the router away from electrical devices su...

Page 10: ...el and the front and back panels Pay particular attention to the LEDs on the front panel Front Panel The router front panel has the status LEDs and icons shown in the following figure 2 4 GHz Wireless LED Power Check Internet Ethernet LAN ports USB port WPS FastLane Wireless On Off button 5 GHz Wireless LED and LED button and LED Figure 2 Router front view ...

Page 11: ... being transmitted at 1000 Mbps Solid amber The local port is connected to a 10 100 Mbps device Blinking amber Data is being transmitted at 10 100 Mbps Off No link is detected on this port USB Solid green The USB device is accepted by the router and is ready to be used Blinking green A USB device is in use Off No USB device is connected or the Safely Remove Hardware button was clicked and it is no...

Page 12: ...your wireless network The LED below the WPS FastLane button blinks green when the router is trying to add the wireless device or computer The LED stays solid green when wireless security is enabled in the router Back Panel The back panel has the buttons and connections shown in the following figure Ethernet LAN Internet Power Power On Off button Figure 3 Router rear view ...

Page 13: ...e SSID network key password login information MAC address and serial number MAC address Serial number Network key password Network name SSID Restore Factory Settings button Figure 4 The label shows unique information about your router See Factory Default Settings on page 154 for information about restoring factory settings ...

Page 14: ...after you complete cabling as described in the installation guide This chapter contains the following sections Router Setup Preparation Types of Logins and Access NETGEAR genie Setup Use NETGEAR genie after Installation Upgrade Router Firmware Change the Password Password Recovery Add Wireless Devices or Computers to Your Network ...

Page 15: ... launch the ISP login program on your computer to access the Internet When you start an Internet application your router automatically logs you in You might need the following information to set up your router The ISP configuration information for your DSL account ISP login name and password Fixed or static IP address settings special deployment by ISP Wireless Devices and Security Settings Make s...

Page 16: ...TGEAR genie screen displays If you already used the NETGEAR genie type http www routerlogin net in the address field for your browser to display the NETGEAR genie screen See Use NETGEAR genie after Installation on page 17 4 Follow the onscreen instructions to complete NETGEAR genie setup NETGEAR genie guides you through connecting the router to the Internet 5 If the browser cannot display the web ...

Page 17: ...ch your browser from a computer or wireless device that is connected to the router 2 Enter http www routerlogin net or http www routerlogin com in the web browser address bar A login screen displays admin 3 Enter the router user name and password The user name is admin The default password is password Both user name and password are case sensitive Note The router user name and password are differe...

Page 18: ...e After the upgrade the router restarts CAUTION Do not try to go online turn off the router shut down the computer or do anything else to the router until the router finishes restarting and the Power Check LED has stopped blinking for several seconds Change the Password The default password that you use to log in to the router is password NETGEAR recommends that you change this default password to...

Page 19: ...able to recover the password select the Enable Password Recovery check box For more information see Password Recovery on page 19 5 Click the Apply button Password Recovery NETGEAR recommends that you enable password recovery if you change the password for the router s user name of admin Then you have an easy way to recover the password when it is forgotten This recovery process is supported in Int...

Page 20: ...he login screen displays 2 Click the Cancel button If password recovery is enabled you are prompted to enter the serial number of the router The serial number is on the product label 3 Enter the serial number of the router 4 Click the Continue button A screen displays requesting the answers to your security questions 5 Enter the saved answers to your security questions 6 Click the Continue button ...

Page 21: ... on the product label 3 From your wireless device initiate a wireless connection For more information see the manual that came with your device 4 When prompted by your wireless device enter the wireless network key password of the router The password is printed on the product label 5 From the screen of your wireless device click the appropriate button to continue the connection procedure You are c...

Page 22: ...panel 2 Within two minutes press the WPS button on your wireless device or follow the WPS instructions that came with the device The device is now connected to your router 3 Repeat Step 1 through Step 2 to add other WPS wireless devices You can also use the WPS Wizard to add computers and other devices to your wireless network For more information see WPS Wizard on page 41 ...

Page 23: ...basic features of the router The chapter contains the following sections Internet Setup Basic Wireless Settings Attached Devices Parental Controls Guest Networks FastLane ReadySHARE allows you to enhance your local network with the router s USB port For more information see Chapter 5 USB Port ...

Page 24: ...login is required Account Name If required Enter the account name provided by your ISP This might also be called the host name Domain Name If required Enter the domain name provided by your ISP These fields display when your ISP requires a login Internet Service Provider Select PPPoE L2TP or PPTP Login The login name provided by your ISP This login name is often an email address Password The passw...

Page 25: ...on Enter the IP address of your ISP s primary DNS server If a secondary DNS server address is available enter it also Router MAC Address The Ethernet MAC address that the router uses on the Internet port Some ISPs register the MAC address of the network interface card in your computer when your account is first opened They accept traffic only from the MAC address of that computer This feature allo...

Page 26: ...computer with a wired connection to access the router To view or change basic wireless settings 1 Log in to the router For more information see Use NETGEAR genie after Installation on page 17 2 Select BASIC Wireless The 2 4 GHz and 5 GHz WiFi bands are configured separately 3 To specify the location where the router is used select from the countries in the Region list In Europe the region is fixed...

Page 27: ...lows the router to broadcast its SSID so wireless stations can see this wireless name SSID in their scanned network lists This check box is selected by default but you can clear it to disable broadcast of the SSID 8 To enable wireless isolation select the Enable Wireless Isolation check box This feature allows wireless clients computers or wireless devices that join the network to use the Internet...

Page 28: ...g wireless PSK security options WPA PSK TKIP Wi Fi Protected Access WPA data encryption provides strong data security with Temporal Key Integrity Protocol TKIP encryption This option supports speeds of up to 54 Mbps only WPA2 PSK AES Wi Fi Protected Access version 2 WPA2 data encryption provides strong data security with Advanced Encryption Standard AES encryption This setting is the preset wirele...

Page 29: ...y used in a business or enterprise WPA WPA2 Enterprise does not use a password but supports 802 1x authentication which requires an internal or external RADIUS server A Remote Authentication Dial In User Service RADIUS server provides Authentication Authorization and Accounting AAA management to grant or deny computers access to your wireless network WPA WPA2 Enterprise can support WPA TKIP for WP...

Page 30: ...535 The default number is 1812 7 Type the shared secret which must be from 1 through 128 characters the default value is blank The shared secret is case sensitive 8 Click the Apply button WEP Wired Equivalent Privacy WEP security is an authentication and data encryption mode that is superseded by WPA PSK and WPA2 PSK WEP supports speeds of up to 54 Mbps and does not function with WPS Note The WEP ...

Page 31: ...s higher encryption security 6 Depending on the authentication type generate the key automatically or enter it manually If the authentication type is Automatic do the following a In the Passphrase field enter a password b Click the Generate button For 64 bit WEP four different WEP keys are generated For 128 bit WEP only one WEP key is generated and the four key fields are populated with the same W...

Page 32: ...The following information displays number The order in which the device joined the network IP Address The IP address that the router assigned to this device when it joined the network This number can change if a device is disconnected and rejoins the network MAC Address The unique MAC address for each device does not change The MAC address is typically shown on the product label Device Name If the...

Page 33: ...e NETGEAR website where you can learn more about Live Parental Controls or download the application The following screen displays Figure 5 Live Parent Controls screen To set up Live Parental Controls 1 On the Live Parental Controls screen click either the Windows Users or Mac Users button 2 Follow the onscreen instructions to download and install the NETGEAR Live Parental Controls Management Utili...

Page 34: ...e Next button again to proceed You are prompted to log in or create a free account 4 Select the radio button that applies to you and click the Next button Select one of the following If you already have an OpenDNS account leave the Yes radio button selected If you do not have an OpenDNS account select the No radio button A screen displays that lets you set up a free OpenDNS account ...

Page 35: ... level that you want and click the Next button 6 Click the Take me to the status screen button Parental controls are now set up for the router The dashboard shows Parental Controls as enabled The next time that you select Parental Controls on the BASIC Home screen you can sign in to your free OpenDNS account and manage the parental controls Figure 6 Sign in to your OpenDNS account screen ...

Page 36: ...also known as the wireless network name The default SSID is randomly generated NETGEAR recommends that you do not change the default SSID If you do decide to change the name enter a 32 character maximum name in this field This field is case sensitive 5 To enable the guest network select the Enable Guest Network check box This feature allows guests to connect to your network using the SSID of this ...

Page 37: ...curity key is different for each network You can set up the security options for the guest network as discussed in the following sections For information about how to set up WPA PSK WPA2 PSK or WPA PSK WPA2 PSK mixed mode security see WPA PSK WPA2 PSK and WPA PSK WPA2 PSK Mixed Mode on page 28 For information about how to set up WPA WPA2 enterprise security see WPA WPA2 Enterprise on page 29 For i...

Page 38: ...ify the IP address of the trusted computer Set the WPS FastLane button on your router to WPS or FastLane This button is set to WPS by default To use FastLane 1 Log in to the router For more information see Use NETGEAR genie after Installation on page 17 2 Select BASIC FastLane 3 To enable FastLane select the Turn On FastLane check box 4 In the field provided enter the IP address of the trusted com...

Page 39: ...an access from the dashboard on the BASIC Home screen See Internet Setup on page 24 Wireless Setup This link is a shortcut to the same Wireless Settings screen that you can access from the dashboard on the BASIC Home screen See Basic Wireless Settings on page 25 Guest Network This link is a shortcut to the same Guest Network screen that you can access from the dashboard on the BASIC Home screen Se...

Page 40: ... can run Setup Wizard from the ADVANCED tab of the genie To use the Setup Wizard 1 Log in to the router For more information see Use NETGEAR genie after Installation on page 17 2 Select Setup Wizard 3 Select either the Yes or No I want to configure the router myself radio button If you select the No button you are taken to the Internet Setup screen For more information see Internet Setup on page 2...

Page 41: ...r ISP configuration WPS Wizard The WPS Wizard helps you add a WPS capable client device a wireless device or computer to your network On the client device you need to either press its WPS button or locate its WPS PIN To use the WPS Wizard 1 Log in to the router For more information see Use NETGEAR genie after Installation on page 17 2 Select ADVANCED WPS Wizard ...

Page 42: ...S button to join the network without entering a password To use the PIN method select the PIN Number radio button enter the client security PIN and click the Next button Within two minutes go to the client device and use its WPS software to join the network without entering a password The router attempts to add the WPS capable device The WPS LED on the front of the router blinks green When the rou...

Page 43: ...ed only in special circumstances Default DMZ Server This feature is sometimes helpful when you are playing online games or videoconferencing Be careful when using this feature because it makes the firewall security less effective For more information see Default DMZ Server on page 44 Respond to Ping on Internet Port If you want the router to respond to a ping from the Internet select this check bo...

Page 44: ...N VPN Passthrough The router supports VPN passthrough for IPSec PPTP and L2TP IPSec Passthrough To enable or disable IPSec passthrough select the Enable or Disabled radio button PPTP Passthrough To enable or disable PPTP passthrough select the Enable or Disabled radio button L2TP Passthrough To enable or disable L2TP passthrough select the Enable or Disabled radio button 4 Click the Apply button D...

Page 45: ...municates across the Internet with another the data packets travel through many devices along the way If any device in the data path has a lower MTU setting than the other devices the data packets must be split or fragmented to accommodate the device with the smallest MTU The best MTU setting for NETGEAR equipment is often just the default value and changing the value might fix one problem but cau...

Page 46: ...ximum value of 1500 until the problem goes away The following table describes common MTU sizes and applications Table 2 Common MTU sizes MTU Application 1500 The largest Ethernet packet size This value is the typical setting for non PPPoE non VPN connections and is the default value for NETGEAR routers adapters and switches 1492 Used in PPPoE environments 1472 Maximum size to use for pinging Large...

Page 47: ...onfiguration includes the following settings LAN IP address 192 168 1 1 Subnet mask 255 255 255 0 These addresses are part of the designated private address range for use in private networks and should be suitable for most applications If your network requires the use of a different IP addressing scheme make the changes in the LAN Setup screen Note If you change the LAN IP address of the router wh...

Page 48: ...ting table periodically With the Both or In Only setting the router incorporates the RIP information that it receives RIP Version This setting controls the format and the broadcasting method of the RIP packets that the router sends It recognizes both formats when receiving By default the RIP function is disabled Four RIP versions exist RIP 1 is universally supported It is adequate for most network...

Page 49: ...ter are satisfactory You can specify the pool of IP addresses for assignment by setting the starting IP address and ending IP address These addresses must be part of the same IP address subnet as the router s LAN IP address Using the default addressing scheme define a range between 192 168 1 2 and 192 168 1 254 although you might want to save part of the range for devices with fixed addresses The ...

Page 50: ... your computers IP addresses manually or your computers are not able to access the router Address Reservation When you specify a reserved IP address for a computer on the LAN that computer always receives the same IP address each time it accesses the router s DHCP server Reserved IP addresses should be assigned to computers or servers that require permanent IP settings To reserve an IP address 1 L...

Page 51: ...s field type the IP address to assign to the computer or server Choose an IP address from the router s LAN subnet such as 192 168 1 x 5 Type the MAC address of the computer or server Tip If the computer is already on your network you can copy its MAC address from the Attached Devices screen and paste it here 6 Click the Apply button The reserved address is entered into the table ...

Page 52: ... application need to have WMM enabled Legacy applications that do not support WMM and applications that do not require QoS are assigned to the best effort category which receives a lower priority than voice and video WMM QoS is enabled by default Quality of Service Priority Rules and Internet Access You can give prioritized Internet access to the following types of traffic Specific applications Sp...

Page 53: ...ge the QoS rules For more information about how to manage and create QoS rules which are also referred to as QoS policies see Manage QoS Rules on page 54 6 To allocate half of the WAN bandwidth to a special host in heavy traffic situations select the Enable Trusted IP address check box In the field that is provided enter the IP address of the trusted host 7 Click the Apply button Your settings are...

Page 54: ...n can help you to determine the maximum bandwidth setting that you want to allow 6 Select the Uplink bandwidth radio button 7 Enter the maximum bandwidth that you want to allow and select either Kbps or Mbps 8 Click the Apply button Manage QoS Rules The following procedure refers to preconfigured and custom QoS rules which are also referred to as QoS policies For information about how to create cu...

Page 55: ...red QoS rules are displayed in a table along with their priority Highest High Normal or Low and a description 4 Select the radio button next to the QoS policy that you want to edit or delete and do one of the following To remove the QoS policy from the table click the Delete button To edit the QoS policy click the Edit button The QoS Priority Rules screen displays ...

Page 56: ...MAC Address on page 59 b When you are done on the QoS Priority Rules screen click the Apply button Your changes are saved in the table on the QoS Setup screen WARNING If you click the Delete All button all preconfigured and custom QoS rules are deleted Create a QoS Rule for an Application or Online Game To create a QoS policy for an application or online game 1 Log in to the router For more inform...

Page 57: ...Set Up QoS Rule button Scroll down 4 Click the Add Priority Rule button 5 In the Priority Category list select either Applications or Online Gaming Applications The Applications list lets you select existing applications but scroll down to the bottom to select Add a new application ...

Page 58: ...c when accessing the Internet Select Highest High Normal or Low 8 In the Connection Type field select either TCP UDP or TCP UDP 9 In the Starting Port and Ending Port fields specify the port number or range of port numbers that the application or game uses 10 Click the Apply button The rule is saved in the QoS Policy table on the QoS Setup screen Create a QoS Rule for Ethernet LAN Ports To create ...

Page 59: ... for the LAN port 7 From the LAN Port list select the LAN port number 8 From the Priority list select the priority that this traffic should receive relative to other applications and traffic when accessing the Internet Select Highest High Normal or Low 9 Click the Apply button The rule is saved in the QoS Policy table on the QoS Setup screen Create a QoS Rule for a MAC Address To create a QoS poli...

Page 60: ...ireless Dual Band Gigabit Router JR6150 For more information see Use NETGEAR genie after Installation on page 17 2 Select ADVANCED Setup QoS Setup 3 Click the Set Up QoS Rule button Scroll down 4 Click the Add Priority Rule button ...

Page 61: ... Optional If the device does not display in the MAC Device List click the Refresh button If it still does not display you must complete these fields manually 9 From the Priority list select the priority that this traffic should receive relative to other applications and traffic when accessing the Internet Select Highest High Normal or Low 10 Click the Apply button The rule is saved in the QoS Poli...

Page 62: ... Rule button 5 In the Priority Category list select MAC Address 6 Select the radio button next to the device that you want to edit or delete and do one of the following To remove the device from the table click the Delete button To edit the MAC address device name or priority a Click the Edit button b Edit the information you want to change ...

Page 63: ...less Dual Band Gigabit Router JR6150 Note You cannot delete or edit a device that is detected and automatically added to the MAC Device List 7 Click the Apply button The device information is saved or removed from the MAC Device List ...

Page 64: ...is chapter describes how to use the USB port on your router to enhance your local network The chapter contains the following sections Enhance Your Local Network Set Up Network Storage Access and Share Your Network Storage Set Up a Network Printer ...

Page 65: ... page 66 ReadySHARE Access Share the files on your network drive with local and remote computers and digital devices For more information see Access and Share Your Network Storage on page 75 ReadySHARE Printer Send the files on your computers and digital devices to a network printer For more information see Set Up a Network Printer on page 79 The USB port on the router can connect only USB devices...

Page 66: ...e systems EXT2 and EXT3 Some USB external hard drives and flash drives require drivers to be loaded into the Windows computer before the Windows computer can access the USB device Such USB devices do not work with the router To physically disconnect a USB drive from the router USB port first log in to the router and then safely remove it To connect a USB storage device 1 Insert your USB storage de...

Page 67: ... or Configure a USB Drive You can view or configure your USB storage device View the basic information about the drive Set up the device name workgroups and network folders View or change the network folders For more security share only approved USB devices To view basic information about the USB storage device 1 Log in to the router For more information see Use NETGEAR genie after Installation on...

Page 68: ... USB device click the network device name or the share name 4 To view more detail or to change the USB device settings click the Edit button The USB Storage Advanced Settings screen displays For more information see Configure the USB Storage Device and Access Settings on page 68 Configure the USB Storage Device and Access Settings You can set up the device name workgroups and network folders for y...

Page 69: ... default is readyshare This name is the name used to access the USB device connected to the router Workgroup If you are using a Windows workgroup rather than a domain the workgroup name displays here The name works only in an operating system that supports NetBIOS such as Microsoft Windows Access Method Select the check boxes for the access methods that you want Network Neighborhood MacShare Enabl...

Page 70: ...ure supports file uploading only FTP Disabled by default FTP via Internet Disabled by default If you select this check box remote users can access the USB drive through FTP over the Internet This feature supports both downloading and uploading of files 5 If you changed the settings click the Apply button Your changes are saved Configure the Available Network Folders You can view or change the netw...

Page 71: ...leted and no other share for the root folder exists Click the link to change this setting Read Access and Write Access Show the permissions and access controls on the network folder All no password the default allows all users to access the network folder The password for admin is the same one that you use to log in to the router Folder Name Full path of the network folder Volume Name Volume name ...

Page 72: ...USB Port 72 A750 Wireless Dual Band Gigabit Router JR6150 2 Select BASIC ReadySHARE 3 Click the Edit button ...

Page 73: ...elect the folder 6 Enter a name in the Share Name field 7 In the Read Access list and the Write Access list select the settings that you want The user name account name for All no password is guest The password for admin is the same one that is used to log in to the router By default it is password 8 Click the Apply button The folder is added on the USB device To edit a network folder 1 Log in to ...

Page 74: ...ork Folder screen 5 Change the settings in the fields as needed 6 Click the Apply button Your changes are saved Specify Approved USB Devices For more security you can set up the router to share only approved USB devices To set up approved USB devices 1 Log in to the router For more information see Use NETGEAR genie after Installation on page 17 2 Select ADVANCED Advanced Setup USB Settings ...

Page 75: ...ve on page 66 Access and Share Your Network Storage You can share files on the USB drive for a wide variety of business and recreational purposes The files can be Windows Mac or Linux file types NTFS FAT32 HFS Ext 3 Ext 4 including text Word PowerPoint Excel MP3 picture and multimedia files Common Uses of Network Sharing USB drive applications include the following Sharing multimedia such as MP3 f...

Page 76: ...er on the network To print high quality photos from a non shared printer 1 On the Mac access the USB drive by typing readyshare in the address field of a web browser Then copy the photos to the USB drive 2 On a Window computer use a web browser or Microsoft Networking to copy the files from the USB drive to the computer Then print the files You can also set up a network printer For more informatio...

Page 77: ...rs on your local area network LAN To access the USB device from a local Mac computer 1 Select Go Connect to Server 2 Enter smb readyshare as the server address 3 Click the Connect button To access the USB device from a local Windows computer Use any of these methods Select Start Run Enter readyshare in the dialog box and click the OK button Open a browser and enter readyshare in the address bar Op...

Page 78: ...outer s Internet IP address on the BASIC Home screen For more information see BASIC Home Screen on page 16 To access the USB drive with FTP from a remote computer 1 Make sure that the FTP check box is selected in the Access Method section of the USB Storage Advanced Settings screen For more information see Configure the USB Storage Device and Access Settings on page 68 2 Launch a web browser 3 Typ...

Page 79: ...to work the following conditions must be met This utility must be installed and running in the background on each computer from which you want to control this USB printer The driver software for the USB printer must be installed on each computer from which you want to control this USB printer The ReadySHARE Printer utility has both a Mac version and a Windows version The ReadySHARE Printer utility...

Page 80: ...RE section of the desktop NETGEAR genie For more information see NETGEAR genie App and Mobile genie App on page 18 Note You must install this utility before you can use the ReadySHARE Printer feature For the ReadySHARE Printer feature to work this utility must be running in the background 4 Follow the instructions to install the NETGEAR USB Control Center utility ...

Page 81: ... Wireless Dual Band Gigabit Router JR6150 5 After you install the utility select the language If this setup is the first time you are accessing the utility you are asked to select the printer 6 Click the Connect button ...

Page 82: ...nect and Disconnect buttons once the utility automatically handles the printing queue The status of the printer displays as Available on all the computers Here are the rules of operation When the status is Available you can use the USB printer When the status is Manually connected by xxx only the xxx computer can use the printer Other network devices must wait until the xxx computer has released t...

Page 83: ... If you exit the utility printing does not work Some firewall software such as Comodo blocks the ReadySHARE Print utility from accessing the USB printer If you do not see the printer in the utility you can disable the firewall temporarily to allow the utility to work If your printer supports scanning make sure that the printer is in the Available state and click the Network Scanner button This ste...

Page 84: ...omputers and other devices connected to your network The chapter includes the following sections Keyword Blocking of HTTP Traffic Port FIltering to Block Services Schedule Blocking Security Event Email Notifications For information about parental controls see Parental Controls on page 33 For information about access control see Set Up a Wireless Access List by MAC Address on page 110 ...

Page 85: ... options Per Schedule Turn on keyword blocking according to the Schedule screen settings Always Turn on keyword blocking all the time independent of the Schedule screen 4 In the keyword field enter a keyword or domain click Add Keyword and click Apply The keyword list supports up to 32 entries Here are some sample entries Specify XXX to block http www badstuff com xxx html Specify com if you want ...

Page 86: ... 5 Click the Apply button You can exempt one trusted computer from blocking and logging The computer you exempt must have a fixed IP address To specify a trusted computer 1 Log in to the router For more information see Use NETGEAR genie after Installation on page 17 2 Select ADVANCED Security Block Sites 3 In the Trusted IP Address field enter the IP address 4 Click the Apply button ...

Page 87: ...00 Assigned Numbers The authors of other applications typically choose service numbers for those applications from the range 1024 65535 Although the router already holds a list of many service port numbers you are not limited to these choices You can often find port number information by contacting the publisher of the application by asking user groups or newsgroups or by searching You can add and...

Page 88: ...ot sure select TCP UDB both 8 Enter the starting and ending port numbers If the application uses a single port number enter that number in both fields 9 Select the radio button for the IP address configuration you want to block and enter the IP addresses You can block the specified service for a single computer a range of computers with consecutive IP addresses or all computers on your network 10 ...

Page 89: ...of Day to Block Select a start and end time in 24 hour format or select the All Day check box for 24 hour blocking 4 Select your time zone from the list If you use daylight saving time select the Automatically adjust for daylight savings time check box 5 Click the Apply button Your settings are saved Security Event Email Notifications You can receive logs and alerts by email and specify which aler...

Page 90: ... 6 To use a secure connection select the Secure connection use SSL check box 7 If your outgoing email server requires authentication select the My Mail Server requires authentication check box Complete the User Name and Password fields for the outgoing email server 8 Select the Send Alerts Immediately check box Email alerts are sent immediately when someone attempts to visit a blocked site 9 Enter...

Page 91: ...taining your router and local network are described in separate chapters For information about changing and recovering your password see Change the Password on page 18 and Password Recovery on page 19 For information about the devices that are connected to your network see Attached Devices on page 32 For information about upgrading or checking the status of your router over the Internet see Remote...

Page 92: ...mation see Use NETGEAR genie after Installation on page 17 2 Click the ADVANCED tab Note The Router Status screen also displays when you select ADVANCED Advanced Home or ADVANCED Administration Router Status Router Information Pane To display the Router Information pane 1 Log in to the router For more information see Use NETGEAR genie after Installation on page 17 ...

Page 93: ...nterface LAN Port MAC Address The Media Access Control address for the LAN port This address is the unique physical address that the Ethernet LAN port of the router uses IP Address The IP address that the Ethernet LAN port of the router uses The default is 192 168 1 1 DHCP Server Identifies whether the router s built in DHCP server is active for the LAN attached devices Internet Port Pane To displ...

Page 94: ...he Internet Connection Shows whether the router is using a fixed or dynamic IP address on the Internet port If the value is DHCP the router obtains an IP address dynamically from the ISP or from a DHCP server on your LAN IP Subnet Mask The IP subnet mask that the Internet port of the router uses Domain Name Server The Domain Name Server address that the router uses A Domain Name Server translates ...

Page 95: ...link status of the port TxPkts The number of packets transmitted on this port since reset or manual clear RxPkts The number of packets received on this port since reset or manual clear Collisions The number of collisions on this port since reset or manual clear Up Time The time elapsed since this port acquired the link Poll Interval The interval at which the statistics are updated on this screen 4...

Page 96: ...he ADVANCED tab 3 In the Internet Port pane click the Connection Status button The content of the Connection Status pop up screen depends on the type of connection You can start new connections and end existing connections from this screen The following list describes the different types of connections and the associated settings that display on the Connection Status pop up screen DHCP connection ...

Page 97: ...tons in the Connection Status screen display only when the connection mode is Manually Connect The following information displays for a PPPoE connection Connection Time The time that elapsed since the connection was established Connection Status The status of the connection Connected Disconnected Negotiation Success or Authentication Success indicates failure IP Address The IP address that is assi...

Page 98: ...and 5 GHz WiFi bands displays separately The following information displays Name SSID The wireless network name SSID that the router uses Region The geographic region where the router is used It might be illegal to use the wireless features of the router in some parts of the world Channel The operating channel of the wireless port The default channel is Auto When Auto is selected the router finds ...

Page 99: ...ation on page 17 2 Click the ADVANCED tab Scroll down Information for the 2 4 GHz and 5 GHz WiFi bands displays separately The following information displays Name SSID The 11n wireless network name SSID used by the router The default names are NETGEAR Guest and NETGEAR 5G Guest Wireless AP Indicates whether the radio feature of the router is enabled If this feature is not enabled the Wireless LED ...

Page 100: ...og in to the router For more information see Use NETGEAR genie after Installation on page 17 2 Select ADVANCED Administration Logs The Logs screen shows the following information Source IP The IP address of the initiating device for this log entry Target address The name or IP address of the website or news group visited or to which access was attempted Action The action that occurred Date and tim...

Page 101: ...uter operation startup get time etc Known DoS attacks and Port Scans Port Forwarding Port Triggering Wireless access 4 Click the Apply button Manage the Configuration File The configuration settings of the router are stored within the router in a configuration file You can back up save this file to your computer restore it or reset it to the factory default settings Back Up Settings To back up the...

Page 102: ...store your settings 4 Choose a location to store the cfg file that is on a computer on your network 5 Click the OK button A copy of the current settings is saved Restore Configuration Settings To restore configuration settings that you backed up 1 Log in to the router For more information see Use NETGEAR genie after Installation on page 17 2 Select ADVANCED Administration Backup Settings ...

Page 103: ...s if you move the router to a different network You can also use the Restore Factory Settings button of the router to erase the configuration and restore the factory settings For more information see Factory Default Settings on page 154 To erase the configuration settings 1 Log in to the router For more information see Use NETGEAR genie after Installation on page 17 2 Select ADVANCED Administratio...

Page 104: ...ter 1 Log in to the router For more information see Use NETGEAR genie after Installation on page 17 2 Select ADVANCED Administration Router Update 3 Click the Check button If new firmware is available the router detects it and displays the Firmware Upgrade Assistant screen 4 To update the router to the new firmware click the Yes button 5 If you have manually downloaded new firmware from the NETGEA...

Page 105: ...ow clicking a link or loading a new page If the browser is interrupted the firmware might be corrupted When the upload is complete your router restarts The upload process can take up to three minutes and the upgrade process typically takes about one minute To determine whether you need to reconfigure the router after upgrading read the new firmware release notes ...

Page 106: ... by IP or domain name is needed The chapter includes the following sections Advanced Wireless Settings Wireless AP Wireless Repeating Function Port Forwarding and Port Triggering Configuration Concepts Set Up Port Forwarding to Local Servers Set Up Port Triggering Dynamic DNS Static Routes Remote Management Universal Plug and Play Traffic Meter For added security you can set up the router to share...

Page 107: ...utton on the router front panel When the wireless radio is off you can still use an Ethernet cable for the WAN and LAN connections to the router To turn the wireless radios on or off 1 Log in to the router For more information see Use NETGEAR genie after Installation on page 17 2 Select ADVANCED Advanced Setup Wireless Settings The 2 4 GHz and 5 GHz WiFi bands are configured separately By default ...

Page 108: ...tion For example you could turn it off for the weekend if you leave town You can turn the wireless radio off only when the router is in Wired WAN mode To configure and enable the wireless schedule 1 Log in to the router For more information see Use NETGEAR genie after Installation on page 17 2 Select ADVANCED Advanced Setup Wireless Settings The 2 4 GHz and 5 GHz WiFi bands are configured separate...

Page 109: ... Settings screen displays 7 Click the Apply button Your changes are saved View or Change WPS Settings To specify WPS settings 1 Log in to the router For more information see Use NETGEAR genie after Installation on page 17 2 Select ADVANCED Advanced Setup Wireless Settings Scroll down The Router s PIN field displays the PIN that you use on a registrar for example from Network Explorer on a Vista Wi...

Page 110: ...less settings change to an automatically generated random SSID and security key 5 Click the Apply button Your changes are saved Set Up a Wireless Access List by MAC Address You can set up a list of computers and wireless devices that are allowed to join the wireless network This list is based on the unique MAC address of each computer and device Each network device has a MAC address which is a uni...

Page 111: ...et MAC addresses 5 If the computer or device you want is in the Available Wireless Cards list select that radio button otherwise type a name and the MAC address You can usually find the MAC address on the label of the wireless device Tip You can copy and paste the MAC addresses from the Attached Devices screen into the MAC Address field of this screen Take this action to have each wireless compute...

Page 112: ...r delete 4 Do one of the following Click the Edit button The Edit Wireless Card screen displays a Edit the address information b Click the Accept button Click the Delete button The address is removed from the table Wireless AP The router can function in access point AP mode instead of regular router mode In AP mode the router can function as a bridge between wireless clients and another router or ...

Page 113: ...g information about your Internet connection IP Address The IP address that your ISP assigned IP Subnet Mask The IP subnet mask that your ISP assigned Gateway IP Address The gateway IP address that your ISP assigned The gateway is the ISP s router to which your router connects Primary DNS The IP address of your ISP s primary DNS server Secondary DNS The IP address of your ISP s secondary DNS serve...

Page 114: ...o the Internet can have wired and wireless clients and sends its wireless signal to an access point that functions as a wireless repeater A wireless repeater can also have wired and wireless clients but connects to the Internet through the wireless base station The following figure shows a wireless repeating scenario Repeater Base station access point access point Figure 8 Wireless repeating scena...

Page 115: ...ss computers must be configured to operate in the same LAN network address range as the access points The channel selection on the access points cannot be Auto see Basic Wireless Settings on page 25 The security option must be WEP or no security The WEP option displays only if you select Up to 54 Mbps from the Mode list on the Wireless Settings screen see Basic Wireless Settings on page 25 Set Up ...

Page 116: ...less clients to be able to associate with the base stations 6 In the Repeater MAC Address 1 through 4 fields enter the MAC addresses for the access points that will function as repeaters If your router is the base station it can function as the parent for up to four other access points 7 Click the Apply button Set Up a Repeater To set up the repeater to avoid conflicts with the wireless connection...

Page 117: ...Advanced Setup Wireless Repeating Function The wireless MAC address of the router displays onscreen The 2 4 GHz and 5 GHz WiFi bands are configured separately 3 Select the Enable Wireless Repeating Function check box 4 Select the Wireless Repeater radio button 5 Complete the Repeater IP Address field This IP address must be in the same subnet as the base station but different from the LAN IP addre...

Page 118: ...o access a server on your local network To allow certain applications and games to work correctly when your router does not recognize their replies Your router provides two features for creating these exceptions port forwarding and port triggering The next sections provide background information to help you understand how port forwarding and port triggering work and the differences between the two...

Page 119: ...r at www example com composes a return message with the requested web page data The web server then sends this reply message to your router The return message contains the following address and port information Source address The IP address of www example com Source port number 80 which is the standard port number for a web server process Destination address The public IP address of your router De...

Page 120: ...between your computer and the IRC server Your router stores the original information performs Network Address Translation NAT on the source address and port and sends this request message through the Internet to the IRC server 4 Noting your port triggering rule and having observed the destination port number of 6667 your router creates an additional session entry to send any incoming port 113 traf...

Page 121: ... the public IP address of your router The remote computer composes a web page request message with the following destination information Destination address The IP address of www example com which is the address of your router Destination port number 80 which is the standard port number for a web server process The remote computer then sends this request message through the Internet to your router...

Page 122: ...t forwarding is always active and does not need to be triggered Set Up Port Forwarding to Local Servers You can configure the router to forward specific incoming protocols to computers on your local network For example you might want to make a local web server FTP server or game server visible and available to the Internet In addition to servers for specific applications you can also specify a def...

Page 123: ... IP Address field enter the last octet of the IP address of your local computer that provides this service 5 Click the Add button The service is added to the table onscreen Add a Custom Service To define a service game or application that does not display in the Service Name list you must first find out which port number or range of numbers the application uses You can usually find this informatio...

Page 124: ...stom Service button 4 In the Service Name field enter a descriptive name 5 In the Service Type list select the protocol Select TCP UDP or TCP UDP If you are not sure select TCP UDP 6 In the External Starting Port field enter the beginning port number 7 In the External Ending Port field enter one of the following If the application uses a single port enter the same port number in the External Endin...

Page 125: ...s this service You can also select a radio button for one of the devices in the list of attached devices to automatically place the IP address of the selected device in the Internal IP Address field 9 Click the Apply button The service is added to the table on the Port Forwarding Port Triggering screen Edit or Delete a Port Forwarding Entry To edit or delete a port forwarding entry 1 Log in to the...

Page 126: ...le your router always gives your web server an IP address of 192 168 1 33 For more information see Address Reservation on page 50 2 On the Port Forwarding Port Triggering screen configure the router to forward the HTTP service to the local address of your web server at 192 168 1 33 HTTP port 80 is the standard protocol for web servers For more information see Set Up Port Forwarding to Local Server...

Page 127: ...iggered ports to the triggering computer Port forwarding creates a static mapping of a port number or range to a single local computer Port triggering can dynamically open ports to any computer that needs them and can close the ports when they are no longer needed Note If you use applications such as multiplayer gaming peer to peer connections real time communications such as instant messaging or ...

Page 128: ...Triggering check box is selected after you configure port triggering port triggering is disabled However any port triggering configuration information you added to the router is retained even though it is not used 5 In the Port Triggering Time out field enter a value up to 9999 minutes The default value is 20 minutes This value controls the inactivity timer for the designated inbound ports Because...

Page 129: ...In the Service Type list select the protocol Select either TCP or UDP or TCP UDP 10 In the Triggering Port field enter the number of the outbound traffic port that should open the inbound ports 11 Enter the inbound connection port information in the Connection Type Starting Port and Ending Port fields 12 Click the Apply button The service is added to the Port Triggering Portmap Table on the Port F...

Page 130: ...d Gigabit Router JR6150 2 Select ADVANCED Advanced Setup Port Forwarding Port Triggering 3 Select the Port Triggering radio button 4 In the Port Triggering Portmap Table select the radio button next to the service that you want to edit or delete ...

Page 131: ...e a commercial Dynamic DNS service This type of service lets you register your domain to their IP address and forwards traffic directed at your domain to your frequently changing IP address If your ISP assigns a private WAN IP address such as 192 168 x x or 10 x x x the Dynamic DNS service does not work because private addresses are not routed on the Internet Your router contains a client that can...

Page 132: ... 5 Type the host name or domain name that your Dynamic DNS service provider gave you 6 Type the user name for your Dynamic DNS account This name is the name that you use to log in to your account not your host name 7 Type the password or key for your Dynamic DNS account 8 Click the Apply button 9 To verify the Dynamic DNS status click the Show Status button Static Routes Static routes provide more...

Page 133: ...on the 134 177 0 0 network your router forwards your request to the ISP The ISP forwards your request to the company where you are employed and the company s firewall denies the request In this case you must define a static route telling your router that 134 177 0 0 should be accessed through the ISDN router at 192 168 1 100 This example assumes the following settings The Destination IP Address an...

Page 134: ...cation purposes only 5 If you want to limit access to the LAN only select the Private check box If you select Private the static route is not reported in RIP 6 To make this route effective select the Active check box By default the Active check box is selected 7 Type the IP address of the final destination 8 Type the IP subnet mask for this destination If the destination is a single host type 255 ...

Page 135: ...outers between your network and the destination Usually a setting of 2 or 3 works but if this link is a direct connection set it to 1 11 Click the Apply button The route is added to the table on the Static Routes screen To edit or delete a static route 1 Log in to the router For more information see Use NETGEAR genie after Installation on page 17 2 Select ADVANCED Advanced Setup Static Routes 3 In...

Page 136: ...u can upgrade or check the status of your router over the Internet Note Before you enable remote management be sure to change the router s default login password to a secure password The ideal password contains no dictionary words from any language and contains uppercase and lowercase letters numbers and symbols It can be up to 30 characters To set up remote management 1 Log in to the router For m...

Page 137: ...tton To define the allowed range enter a beginning and ending IP address To allow access from any IP address on the Internet select the Everyone radio button 5 Specify the port number for accessing the router user interface Normal web browser access uses the standard HTTP service port 80 For greater security enter a custom port number for the remote router user interface Choose a number from 1024 ...

Page 138: ...lay 1 Log in to the router For more information see Use NETGEAR genie after Installation on page 17 2 Select ADVANCED Advanced Setup UPnP 3 Select the Turn UPnP On check box This check box is selected by default You can enable or disable UPnP for automatic device configuration If the Turn UPnP On check box is cleared the router does not allow any device to automatically control the resources such ...

Page 139: ...ick the Apply button The UPnP Portmap Table displays the IP address of each UPnP device that is accessing the router and which ports internal and external that device has opened The UPnP Portmap Table also displays what type of port is open and whether that port is still active for each IP address 7 To refresh the information in the UPnP Portmap Table click the Refresh button Traffic Meter Traffic...

Page 140: ...ume when you make a new connection enter the extra data volume in MB in the Round up data volume for each connection by field 6 In the Traffic Counter section set up the traffic counter to begin at a specific time and date of each month If you want the traffic counter to start immediately click the Restart Counter Now button 7 In the Traffic Control section specify whether a warning message is iss...

Page 141: ...eless Dual Band Gigabit Router JR6150 2 Select ADVANCED Advanced Setup Traffic Meter 3 In the Internet Traffic Statistics section monitor the data traffic Scroll down To update the Traffic Statistics section click the Refresh button ...

Page 142: ...Advanced Settings 142 A750 Wireless Dual Band Gigabit Router JR6150 To display more information about the data traffic on your router and to change the poll interval click the Traffic Status button ...

Page 143: ... solution here visit the NETGEAR support site at http support netgear com for product and contact information This chapter contains the following sections Quick Tips Troubleshooting with the LEDs Cannot Log In to the Router Cannot Access the Internet Changes Not Saved Wireless Connectivity Restore the Factory Settings and Password Troubleshoot Your Network Using the Ping Utility ...

Page 144: ...le the corresponding numbered router LAN port LED is lit Wireless Settings Make sure that the wireless settings in the computer and router match exactly For a wirelessly connected computer the wireless network name SSID and wireless security settings of the router and wireless computer need to match exactly If you set up an access list in the Advanced Wireless Settings screen you must add each wir...

Page 145: ...et Make sure that you are using the power adapter that NETGEAR supplied for this product If the Power Check LED blinks slowly and continuously the router firmware is corrupted This corruption can happen if a firmware upgrade is interrupted or if the router detects a problem with the firmware If the error persists you have a hardware problem For recovery instructions or help with a hardware problem...

Page 146: ...uter Be sure that you are using the correct cable When connecting the router s Internet port to a cable or DSL modem use the cable that was supplied with the cable or DSL modem This cable can be a standard straight through Ethernet cable or an Ethernet crossover cable Wireless LEDs Are Off If the Wireless LEDs stay off check to see if someone pressed the Wireless On Off button on the router This b...

Page 147: ... your browser has Java JavaScript or ActiveX enabled If you are using Internet Explorer click the Refresh button to be sure that the Java applet is loaded Try quitting the browser and launching it again Make sure that you are using the correct login information The factory default login name is admin and the password is password Make sure that Caps Lock is off when you enter this information If yo...

Page 148: ...lowing Inform your ISP that you have bought a new network device and ask them to use the router s MAC address Configure your router to clone your computer s MAC address If your router can obtain an IP address but your computer is unable to load any web pages from the Internet it might be for one of the following reasons Your computer might not recognize any DNS server addresses A DNS server is a h...

Page 149: ...uter can obtain an IP address but your computer is unable to load any web pages from the Internet check the following Your computer might not recognize any DNS server addresses A DNS server is a host on the Internet that translates Internet names such as www addresses to numeric IP addresses Typically your ISP provides the addresses of one or two DNS servers for your use If you entered a DNS addre...

Page 150: ...lient s scanning list By default SSID broadcast is enabled Does your wireless device support the security that you are using for your wireless network For example does your wireless device support WPA2 security If not then you must change the security of the router to match the security that is supported by your wireless device For more information see Basic Wireless Settings on page 25 WARNING NE...

Page 151: ...netgear com support Troubleshoot Your Network Using the Ping Utility Most network devices and routers contain a ping utility that sends an echo request packet to the designated device The device then responds with an echo reply You can easily troubleshoot a network by using the ping utility in your computer or workstation Test the LAN Path to Your Router You can ping the router from your computer ...

Page 152: ...he path is functioning correctly replies like the examples shown in Test the LAN Path to Your Router on page 151 are displayed If you do not receive replies check the following Check that your computer has the IP address of your router listed as the default gateway If the IP configuration of your computer is assigned by DHCP this information is not visible in your computer s Network Control Panel ...

Page 153: ...A A Supplemental Information Factory settings and technical specifications This appendix provides factory default settings and technical specifications for the router Factory Default Settings Specifications ...

Page 154: ...product SKU Adjust for daylight saving time Disabled Allow a registrar to configure this router Enabled Wireless communication Enabled Preset SSID NETGEARxx xx refers to two random digits Security option password Preset password printed on product label Wireless access list MAC filtering All wireless stations allowed Broadcast SSID Enabled Transmission speed Auto Maximum wireless signal rate deriv...

Page 155: ...DC 1 5A output Dimensions 217 74 x 147 73 x 34 92 mm 8 57 x 5 81 x 1 37 in Weight 392 6 g 0 87 lb Operating temperature 0 to 40 C 32º to 104ºF Operating humidity 90 maximum relative humidity noncondensing Designed to conform to the following standards CCC SRRC CE LAN 10BASE T 1000BASE T or 100BASE Tx RJ 45 WAN 10BASE T 1000BASE T or 100BASE Tx RJ 45 Inbound communication from the Internet Disabled...

Page 156: ...eless 26 configuration file 101 connecting wirelessly operating range 9 connection status 96 country setting 40 crossover cable 146 CTS RTS Threshold 107 custom service port forwarding 123 D data packets fragmented 45 default DMZ server 44 default factory settings restoring 103 151 default gateway 97 denial of service DoS protection 43 84 devices attached 32 DHCP server 49 97 DMZ server 44 45 DNS ...

Page 157: ...ibed 11 troubleshooting and 145 146 Live Parental Controls 33 local servers port forwarding to 122 logging in 15 17 logs 89 M MAC addresses product label 13 QoS for 58 59 mail server outgoing 90 maintenance settings 91 metric values static routes 135 mixed mode wireless security option 28 mode wireless 27 MTU size 45 multicasting 48 N NAT Network Address Translation 43 44 NETGEAR genie logging in ...

Page 158: ...otocol setting up 48 static routes 134 router status viewing 92 rules QoS 54 S scheduling keyword and service blocking 89 secondary DNS 25 113 secured NAT 44 security 25 firewall settings 84 wireless settings 31 security PIN 42 sending logs by email 89 serial number product label 13 services blocking 87 port forwarding 123 port triggering 129 Session Initiation Protocol Application Layer Gateway S...

Page 159: ... Fi Protected Setup WPS 21 42 devices adding 21 keep existing settings 110 Wired Equivalent Privacy WEP 30 Wireless Card Access List 111 wireless channel 26 wireless connections operating range 9 troubleshooting 150 wireless devices adding to the network 21 wireless distribution system 115 116 Wireless LEDs described 11 troubleshooting and 146 wireless mode 27 wireless network name SSID broadcasti...

Reviews: