


SECTION 2
SETTING UP THE SYSTEM
30
USER GUIDE
5
4
2
1
3
6
XPS-ProDry 8.0 Setup
Please review and understand all operation
and safety precautions, before operating the
dryer.
DRYER HAZARDS:
The dryer presents the following hazards.
FIRE HAZARD:
If media is left under the
dryer lamps for more than a few seconds, it
will ignite.
SEVERE PERSONAL INJURY or DEATH
HAZARD:
If you touch the hot surface of the
dryer or dryer base, a serious burn will
result. Shock hazards are present, when not
properly used/connected.
Please read the “Dryer Safety Precautions”
section before proceeding.
NOTICE:
A Fire Extinguisher (rated for energized
electrical equipment and wood/paper/plastic/cloth fires)
must be within reach at all times.
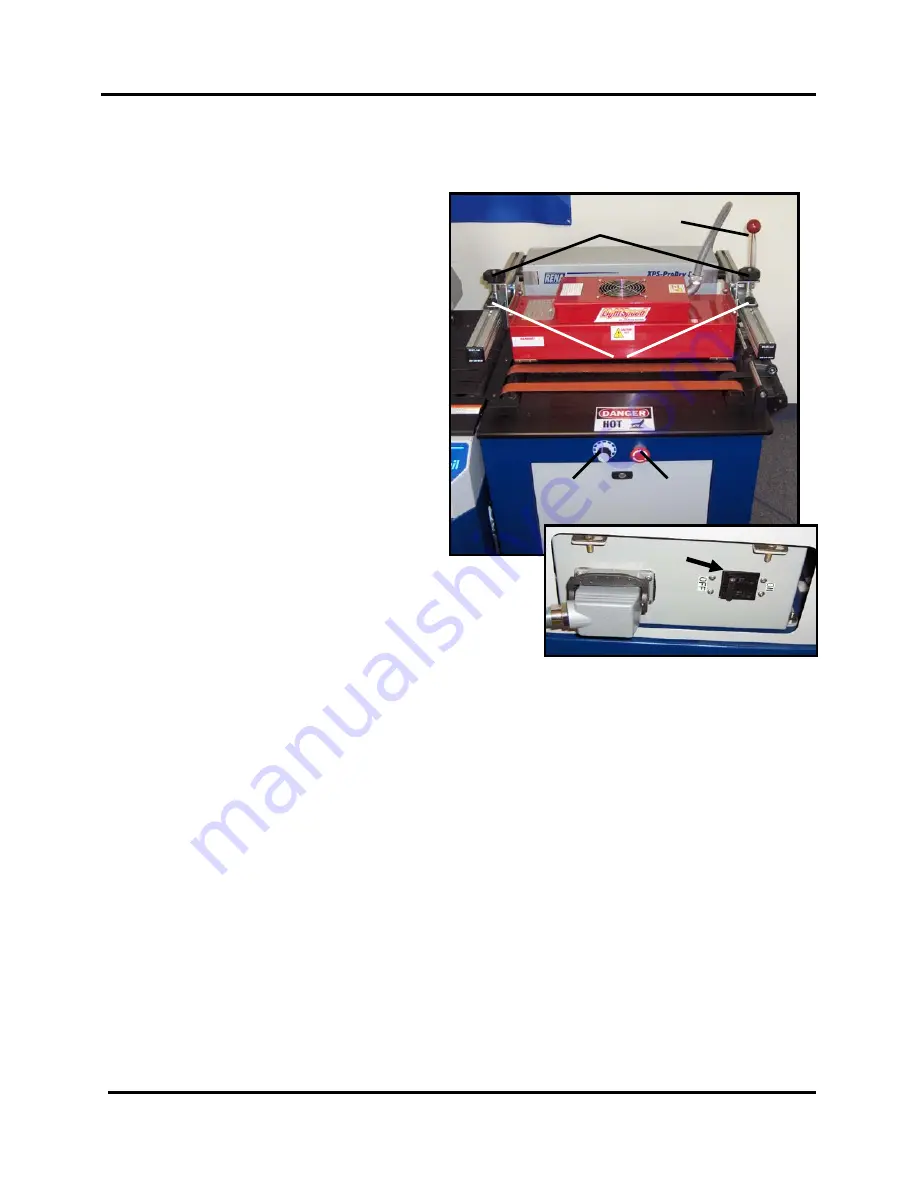
Emergency Stop Control:
An emergency stop button [5] is located on the operator side of the dryer. Pressing this button
will cause the entire XPS-ProMail system to stop/shut down.
Release this button by turning it clockwise. Then restart the system.
Lamp Intensity Adjustment:
The intensity of the dryer lamps can be adjusted using the dial [4]. Set this control for the
minimum amount of intensity required to dry/set the ink on your media. The appropriate lamp
intensity setting will depend on type of media, print quality, and belt speed. You will need to
experiment to find the right combination for each job.
Dryer Lamp Power Switch:
The main dryer lamp power switch [6] is located at the bottom, right-hand side of the dryer
transport base.
When this switch is set to ON, the fan on top of the dryer lamps will run; indicating that power is
present. The dryer lamps will only be activated (turned on) if all of the activation conditions have
been met. See “Lamp Activation Control Conditions”.
Summary of Contents for RENA XPS-ProMail 3.0
Page 6: ...TABLE OF CONTENTS 6 USER GUIDE Notes...
Page 14: ...SECTION 1 GETTING ACQUAINTED 14 USER GUIDE Notes...
Page 36: ...SECTION 2 SETTING UP THE SYSTEM 36 USER GUIDE Notes...
Page 48: ...SECTION 3 OPERATING THE SYSTEM 48 USER GUIDE Notes...
Page 56: ...SECTION 4 MAINTENANCE 56 USER GUIDE Notes...
Page 65: ...SECTION 5 TROUBLESHOOTING 65 USER GUIDE Notes...
Page 72: ...Appendix 72 USER GUIDE Notes...
Page 74: ......
Page 76: ...Rev 03 2018...


