Disassembly and Reassembly 3-17
I/O Board
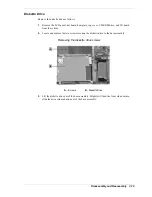
Remove the I/O board as follows.
1.
Remove the LCD panel, keyboard, heat plate, and top cover from the system.
2.
Release the diskette drive cable from connector P6 on the I/O board by pushing the two lock
tabs (one on each side) away from the connector.
3.
Unplug the CMOS battery cable from connector P1 on the I/O board.
4.
Carefully lift up the I/O board to unplug it from P12 on the main board.
5.
Remove the I/O board from the main board.
Removing the I/O board
A
– I/O Board
Summary of Contents for VERSA VXi
Page 61: ...3 Disassembly and Reassembly Required Tools and Equipment Disassembly Reassembly...
Page 84: ...4 System Board Layout Audio Board DC DC Board I O Board Main Board...
Page 87: ...5 Illustrated Parts Breakdown Illustrated Parts Breakdown Parts List...
Page 94: ...7 Troubleshooting Quick Troubleshooting Helpful Questions...
Page 102: ...9 Specifications System Components Memory Map Interrupt Controllers...


