background image


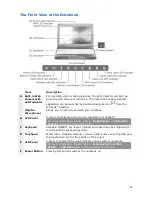
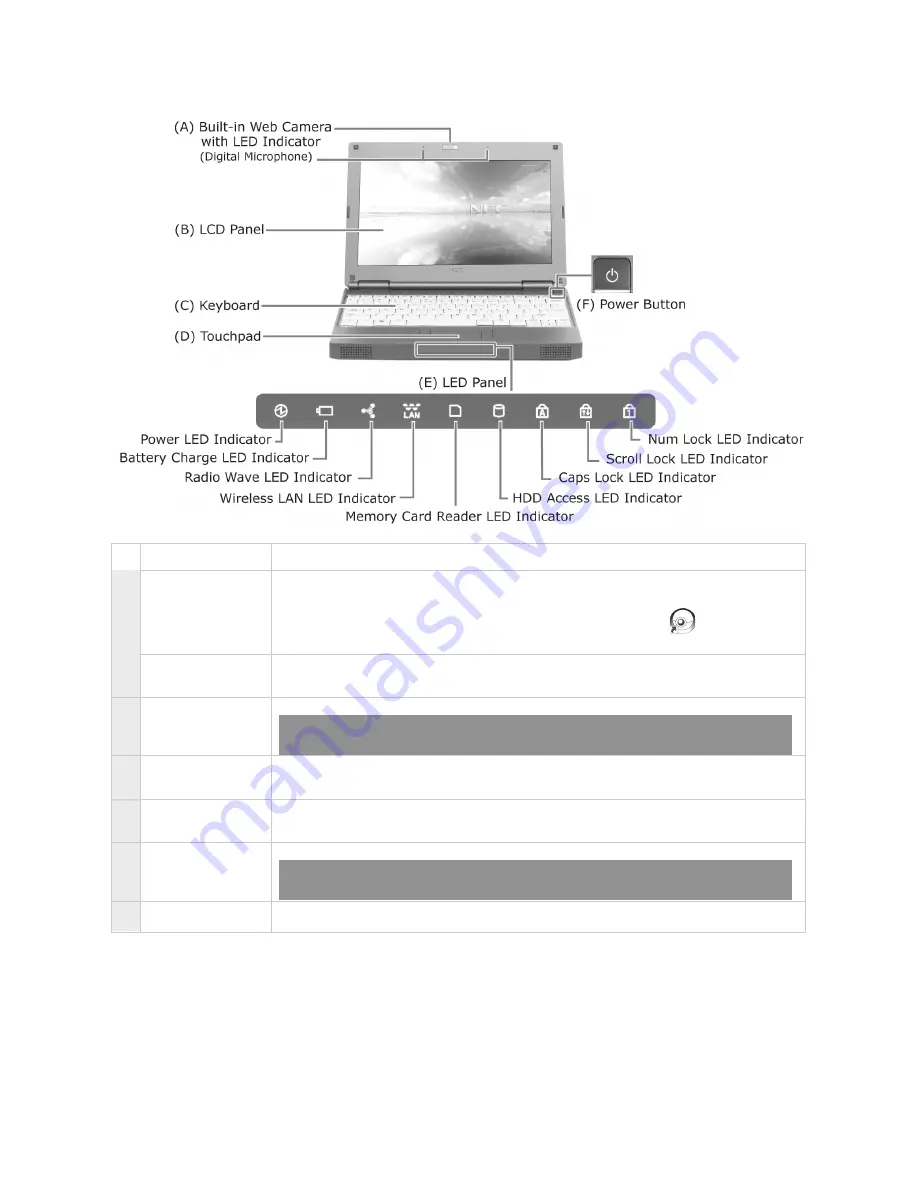
The Front View of the Notebook 


Item 

Description 

Built-in Web 
Camera with 
LED Indicator


For recording video or taking pictures. The LED Indicator will light up 
when the web camera is turned on. The CyberLink YouCam webcam 

application can be launched by double-clicking its icon 

 from the 

Windows

®

 desktop. 

(Digital 
Microphone) 

Allows you to record sound with your notebook. 

B  LCD Panel 

A colour LCD display with a screen resolution of 1024x576.  

For more information, please refer to: 

Applications 

 Hiding the 

Taskbar

 in this Electronic User Guide. 


C  Keyboard 

Standard QWERTY key layout (models purchased may be shipped with 
country-specific keyboard layouts). 

D  Touchpad 

Works like a standard computer mouse. Simply move your fingertip over 
the touchpad to control the position of the cursor. 

E  LED Panel 

A panel of several LEDs which indicate various system conditions.  

For more information, please refer to: 

Introducing Your NEC 

VERSA 

 LED Behaviour

 in this Electronic User Guide. 


F  Power Button 

Pressing this button switches the notebook on. 


Summary of Contents for VERSA N1200 Series

Page 1: ...1 NEC VERSA N1200 Series Electronic User Guide ...

Page 2: ... 34 Applications 35 Operating Environment 46 Preventive Maintenance 47 Taking Care of Your Notebook 48 Shipping Your Notebook 51 Preparing for Travel 52 Setting Up a Healthy Work Environment 53 Recovery Information Windows XP 59 Contact NEC Customer Support 62 Safety Notices 63 Glossary 70 License Agreement 71 Copyright 73 Trademarks 74 Official Name of the Software Used 75 ...

Page 3: ...njury or even loss of life For specific models only Items marked with an asterisk are supplied for specific models only If the items are not found in the packaging box or preloaded in the notebook it is because they are not applicable to the notebook you have just purchased Thus they are not provided together with the notebook Electronic User Guide This Electronic User Guide aims to help you famil...

Page 4: ...sical contact such as being bumped or dropped Check the notebook for condensation If condensation is present allow it to evaporate before switching on the notebook Keep the notebook away from dust sand and dirt Note For information on the specifications of your notebook please refer to the System Configuration Label on the packaging box that comes with your system CAUTION Before you connect or dis...

Page 5: ...AC power outlet if it is not going to be used for a long time This will avoid damage from transient over voltage Do not attempt to disassemble the notebook Do not push any foreign objects into the notebook bays connectors or slots Keep the notebook away from magnetised areas some airline tray tables are magnetic do not set your notebook on top of them Doing so may damage the data on your hard driv...

Page 6: ...ironment Guidelines in this Electronic User Guide Keep the storage area away from vibratory and magnetic fields Keep the notebook and its components away from organic solvents or corrosive gases Avoid leaving the notebook and its components under direct sunlight or near heat sources Routine Cleaning CAUTION Never use harsh solutions household cleaners or spray cleaners that contain caustic materia...

Page 7: ...tebook in a productive and safe manner Information found in the section includes setting up and using your notebook while reducing the risk of developing nerve muscle or tendon disorders For more information please refer to Setting Up a Healthy Work Environment in this Electronic User Guide Read through this Electronic User Guide to familiarise yourself with the notebook NEC VERSA The notebook off...

Page 8: ...reen resolution of 1024x576 For more information please refer to Applications Hiding the Taskbar in this Electronic User Guide C Keyboard Standard QWERTY key layout models purchased may be shipped with country specific keyboard layouts D Touchpad Works like a standard computer mouse Simply move your fingertip over the touchpad to control the position of the cursor E LED Panel A panel of several LE...

Page 9: ...15 pin port to attach an external VGA or analogue monitor to your notebook C Ventilator This provides ventilation to ensure the temperature of your notebook is optimal D USB Gadget Charger Port Allows you to charge devices that can be charged from a USB port such as portable media players and mobile phones E Microphone In Jack Allows you to connect to an external microphone This will transmit soun...

Page 10: ...t allows you to connect USB equipped peripheral devices such as printers monitors and scanners to your notebook C LAN Port Connects to a network cable allows your notebook to communicate with other devices over a network such as via the Internet D AC Power Port Lets you attach the notebook to the AC Power source Use the AC adaptor that comes with your notebook and keep the notebook connected to AC...

Page 11: ...ion please refer to Introducing Your NEC VERSA Replacing the Battery in this Electronic User Guide B Battery Bay Equipped with a rechargeable Li Ion battery C Battery Release Latch Releases the battery from the battery bay For more information please refer to Introducing Your NEC VERSA Replacing the Battery in this Electronic User Guide ...

Page 12: ...k again the keys revert to their normal functions as typewriter keys Control Keys C Ctrl Alt Fn and Shift are controls used in conjunction with other keys to change their functions To use control keys press and hold down the control key while pressing another key For example Press Ctrl c means to hold down the Ctrl key and press the c key Key combinations are specific to the application you are ru...

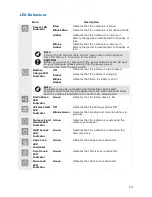
Page 13: ...hat the battery is charging Battery Charge LED Indicator Blinks Amber Indicates that there is a battery error Note The battery may be overheating and therefore cannot start charging Disconnect the AC adapter from the wall outlet and allow both the notebook and battery to cool to room temperature Radio Wave LED Indicator Green Indicates that the Radio Wave is On Off Indicates that the Wireless LAN ...

Page 14: ... speaker When toggled On the notebook will beep once Fn F8 Brightness Down Lowers the brightness of your screen display Each press lowers the brightness by one level Fn F9 Brightness Up Increases the brightness of your screen display Each press increases the brightness by one level Fn F10 Speaker Volume Down Lowers the volume of your sound audio system Each press lowers the volume by one level Fn ...

Page 15: ...screen B Left Click Button This is the primary button Clicking it usually selects the item your cursor is pointing at C Right Click Button Clicking this button usually opens a menu of options available for the item currently selected If you find the double tapping difficult to use go to the next section for general directions about adjusting the touchpad properties Note If you install another mous...

Page 16: ... recharge the battery pack Try to use the AC adaptor whenever an AC power outlet is nearby Keep the adaptor connected whenever possible The AC adaptor charges the battery when it is connected regardless the notebook is powered on or off Note The power cable may vary from country to country Note Consult your dealer or the local electrical authorities if you are unsure of the type of power cord to u...

Page 17: ...ur local dealer for the HAR Harmonisation certification mark type 18 AWG American Wire Gauge 2 conductor cord or better Obtain replacement cords from an authorised service centre The replacement must be of the same type and have the same voltage rating as of the original cord Using the Battery Note Although the battery was fully charged at the factory transit and shelf time may have had reduced th...

Page 18: ...ge the battery for the specified charge time only During charging keep the environmental temperature between 5 C and 35 C Read the instructions that came with the battery charger before attempting to charge the battery Low Battery Power When battery power runs low connect your notebook to the AC adaptor If no AC adaptor is available change the battery by following the battery replacement procedure...

Page 19: ... foul odour Keep the battery dry and away from water Keep metal objects away from the battery terminals Metal objects that come in contact with the connectors can cause a short circuit and subsequently damage the battery If the battery leaks If the battery leaks onto skin or clothing wash the area immediately with clean running water Battery fluid can cause skin rashes and damage fabric If battery...

Page 20: ...e your notebook in this position and follow the steps stated below to remove the battery 1 Save your files exit Windows and turn off system power 2 Close the LCD panel and turn the system over CAUTION Be extra careful to avoid damage to your notebook 3 Unlock the battery security lock 4 Hold the latch to the Unlock position 5 Lift this area up 6 Carefully remove the battery from its bay ...

Page 21: ...nstall the battery 1 Turn the notebook over CAUTION Be extra careful to avoid damage to your notebook 2 Make sure you unlock the battery security lock 3 Align the battery with the battery bay slot and connector 4 Place the battery into the battery bay Carefully press and secure the battery into the battery bay 5 Make sure you lock the battery security lock ...

Page 22: ...ok power after use Clean the battery connectors with a dry cloth if they get dirty When not in use store the battery in a dry cool area The following symptoms indicate that the battery life is nearing its end Discard batteries that display these symptoms Shorter work times Discoloured warped Hot to the touch Strange odour Disposing of the Battery Before disposing the battery put adhesive tape on t...

Page 23: ...y discharged BIOS Setup Menus The BIOS Setup features five menus which are listed on the menu bar at the top of the screen Main use this menu for basic system configuration Advanced use this menu to control system ports and components Security use this menu to establish system passwords and protect the boot sector of the hard disk drive against infection by certain virus types Exit use this menu t...

Page 24: ... state A user will not have access to the other user s running applications Windows Explorer Windows Explorer has also had its functionality expanded Explorer windows now are 3 paned with extra information and functionality in the middle window Preview Applet For viewing and editing images An enhanced Preview Applet is included and lets you view zoom in and out rotate print save as and delete imag...

Page 25: ...pear in the notification area Time Clock Allows you to adjust the time and date select your time zone and offers the option to automatically synchronise the time with an internet time server For more information about the Desktop and taskbar icons refer to the Windows XP operating system online help To do this click on Start and select Help and Support Depending on the version of Windows XP operat...

Page 26: ...book Turn off monitor plugged in 1 2 3 5 10 15 20 25 30 45 minutes 1 2 3 4 5 hours Never Selects the time delay before your LCD panel turns off Turn off monitor running on batteries 1 2 3 5 10 15 20 25 30 45 minutes 1 2 3 4 5 hours Never Selects the time delay before your LCD panel turns off Turn off hard disks plugged in 3 5 10 15 20 25 30 45 minutes 1 2 3 4 5 hours Never Selects the time delay b...

Page 27: ...n Allows you to select which action is to be taken by the notebook when the alarm goes off Run a program None Allows you to select which program is to be launched when the alarm goes off Critical battery alarm 3 0 100 Allows you to define a critical battery alarm percentage notification and system action Notification Display message Sound alarm Allows you to select a visual or aural alarm video or...

Page 28: ...termines if the notebook should prompt for your Windows password when resuming from Standby or otherwise When I close the lid on my notebook Standby Do nothing Hibernate Defines the system action when the LCD panel is closed When I press the Power button on my notebook Shut down Standby Hibernate Do nothing Ask me what to do Defines the system action when the Power button is used Default settings ...

Page 29: ...d on the Desktop Recognising the Power Management States It is important to recognise the behaviour of your notebook when it is in these power management states The following table describes the notebook behaviour for each power management state LCD Timeout Standby STR Hibernate STF Default Setting 2 minutes DC power 5 minutes DC power 20 minutes AC power 15 mins DC power Manually Invoke Go to Sta...

Page 30: ...r to restore your notebook using the Recovery Program refer to the Quick Reference delivered with your notebook Restarting in Safe Mode 1 Click on Start Turn Off Computer and then click on Restart 2 When you see the message Please select the operating system to start press F8 3 Use the arrow keys to highlight the appropriate safe mode option and then press Enter Safe Mode starts your notebook usin...

Page 31: ... do so click on Start Help and Support and pick the What s new in Windows XP topic The Internet Connection Wizard The Internet Connection Wizard also known as New Connection Wizard allows you to configure your notebook for Internet access To access this wizard click on Start Control Panel Network and Internet Connections pick Setup or change your Internet connection The Internet Properties window ...

Page 32: ...ed click on Create Password You will now be prompted for this password each time you log on to Windows both when you boot and when you resume from the Hibernate state To be prompted for this password when you resume from Standby follow the steps below 1 Click on Start Control Panel and Performance and Maintenance 2 Click on the Power Options icon 3 On the Advanced tab put a check mark in front of ...

Page 33: ...n area pane click on Customise to change the notification area behaviour for instance if you do not wish to take advantage of the feature that hides the seldom used notification icons Note If you wish to restore the Speaker icon to the notification area as in previous versions of Windows follow the steps below 1 Click on Start Control Panel Sounds Speech and Audio Devices 2 Pick Change the speaker...

Page 34: ...34 Notebook Components For details of notebook components please refer to the System Configuration label System Configuration Label ...

Page 35: ...software application you may find that part of the user interface is hidden behind the Microsoft Windows task bar when it s in full window mode Example To hide the taskbar 1 Place the mouse pointer on the taskbar and right click Select Properties from the pop up menu ...

Page 36: ...36 2 When the Taskbar and Start Menu Properties pops up Check on the Auto Hide the taskbar option and click OK 3 The taskbar is now hidden ...

Page 37: ...e mouse pointer to the bottom of the LCD screen NOTE The taskbar will automatically hide itself again when the pointer is moved away The software varies according to the model and is subject to change without notice for specific models only ...

Page 38: ... you to watch video files in AVI MPEG 1 MPEG 2 DivX ASF ASX and dvr ms formats on your computer You may need to install a special driver to view DivX and dvr ms files Select Videos on the Home page to open the Video function Pictures CyberLink PowerCinema lets you view digital pictures in BMP JPEG and PNG formats either individuallly or as a slide show You can even edit pictures to make them perfe...

Page 39: ... the folder c Apps SoftDMA You first need to transfer all the files in the SoftDMA folder to a removable media such as a USB flash drive On the targeted computer run the SETUP EXE file to install SoftDMA The setup process will require an installation key and it can be obtained upon completion of your warranty registration Kindly register your NEC Computer at http www nec computers ap com regwarran...

Page 40: ...your computer and what you value blocks offensive content and prevents malicious activity 10 in1 Protection Safe Search and Surf Home License Subscription Stop Viruses Halts Hackers Blocks Spyware Improves Computer Health Secures Your Identity Prevents Spam and Email Scams Protects Children Online Backs Up and Restores Files ...

Page 41: ...s watch for activity that may signal a virus spyware or hacker is on your notebook Always active detection that watches the key system Windows host file and browser settings for suspicious changes such as DNS poisoning or pharming which can redirect surfing to fraudulent websites or activities that can compromise anti virus security such as buffer overflow attacks McAfee X Ray for Windows removes ...

Page 42: ... and other personally identity information The suite also includes Password Vault which safely stores Web login ins passwords and other personally identifiable information in a secure password protected easy to access location Prevents Spam and Email Scam McAfee Internet Security Suite with SiteAdvisor automatically recognises and helps to stop junk email including identity and credit card scams v...

Page 43: ...rd onto the Bit Budget and RecordNowTM will elect the project for you If you install a CD RW device later on you have the possibility to install this software application using SmartRestore Access RecordNowTM either via the Start Programs All Programs RecordNowTM Note we advise you to read the online Help Guide before using the software application In the RecordNowTM submenu select Documentation a...

Page 44: ...lity to control burn speeds Control write format including ISO and UDF Record types Disc at once Track at once open or closed Premastering cache file date and time Primary volume descriptor fields publisher ID data preparer application ID Note we advise you to read the online Help Guide before using the software application In the RecordNowTM submenu select Documentation and Readme An online help ...

Page 45: ...order to activate the SRS Premium Sound please double click on its icon on the Windows desktop Once activated it will be automatically loaded every time you start your computer For further information please refer to its on screen help The software varies according to the model and is subject to change without notice for specific models only ...

Page 46: ...eir notebooks at the most unlikely places like the kitchen the bathroom on the garden table or by the swimming pool where the chances of it getting wet is high Placing a notebook near an open window is also not advisable since it can easily collect and expose some parts to moisture Be wary of liquid spilling into the power supply since it may trigger an electric short circuit Keep your notebook co...

Page 47: ...Scan for viruses your notebook is delivered with an antivirus software pre installed on your hard drive For better security we recommend you use the automatic scanning option and perform on demand scanning CAUTION Update the virus definition files at least once every month or as soon as you hear about a new virus Back up your data on a regular basis you can use the Microsoft Backup tool to save yo...

Page 48: ...maintain power during outages the UPS allows users to save data and properly shut down the notebook Most UPS also include surge protection as a feature There are two basic UPS types the standby power supply the least expensive choice and the multi featured on line UPS systems Below are tips on power protection and some hardware features to consider before buying these devices Be sure to unplug you...

Page 49: ... can also travel in on power lines and damage your monitor and system unit Note Please note that the product warranty does not apply if damage to your notebook is the result of a lightning strike Be sure that notebook power is off before you connect or disconnect a cable except USB and IEEE 1394 devices that can be hot swapped and hot plugged Never make cable changes when the notebook power is on ...

Page 50: ...does not apply to optical mice Power off your notebook and any peripherals attached to it Invert the mouse Locate the mouse ball cover Rotate the ball cover counter clockwise and remove the cover Turn the mouse over so that the cover and ball fall into your palm Clean the mouse as follows first use tap water or tap water and a mild detergent to clean the mouse ball Use a clean lint free cloth to d...

Page 51: ... locking device stable turn the key clockwise to the unlocked position 5 Insert the locking device into the Security Cable slot in your notebook Turn the key 90 counter clockwise to lock and remove the key Check that the Security Cable is secured by gently pulling on the locking device Shipping Your Notebook Use these steps to prepare your notebook for shipping 1 Back up the files on the hard disk...

Page 52: ...f proof of purchase for your notebook and other equipment or customs registration form for customs check The Warranty Card or Service and Warranty Guide detailing the international technical support phone numbers Your notebook s Quick Reference Power Connections With the right accessories you can run your notebook almost anywhere Your notebook self adjusts to various power sources Most other count...

Page 53: ...air o Your Desk o Your Input Devices o Your Screen or Monitor Reducing the Risk of Injuries o Vary Your Workday o Practise Some Stretching Exercises Potential Medical Conditions o Repetitive Strain Injury o Pre Existing Conditions and Psychosocial Factors o Epilepsy Warning ...

Page 54: ...our workstation set up to the proper height as described below by lowering the table or stand that holds your notebook equipment or raising the seat height of your chair Position your notebook directly in front of you for increased safety and comfort Your Chair Your chair should be adjustable and stable Vary your posture throughout the day Check the following Keep your body in a relaxed yet uprigh...

Page 55: ...e so that your wrists are straight while you are typing Type with your hands and wrists floating above the keyboard Use a wrist pad only to rest your wrists between typing Avoid resting your wrists on sharp edges Type with your wrists straight Instead of twisting your wrists sideways to press hard to reach keys move your whole arm Keep from bending your wrists hands or fingers sideways Press the k...

Page 56: ...Stretching Exercises The daily exercises described below can be very effective in stopping Repetitive Strain Injury development or in minimising its effects They can easily be carried out behind your notebook Bend wrists stretch and close fingers stretch your arms and wrists with closed fingers keep this pose for 8 seconds Repeat the exercise 3 times You can repeat the same exercise with your fing...

Page 57: ... such disorders Some doctors believe that using the keyboard and mouse may aggravate existing musculoskeletal disorders Note Contact a doctor if you experience pain tenderness swelling burning cramping stiffness throbbing weakness soreness tingling and or numbness in the hands wrists arms shoulders neck back and or legs Repetitive Strain Injury Repetitive Strain Injury is caused by a constant tens...

Page 58: ...p stiffness throbbing weakness soreness tingling and or numbness in the hands wrists arms shoulders neck back and or legs Epilepsy Warning Some people are susceptible to epileptic seizures or loss of consciousness when exposed to certain flashing lights or light patterns in their daily life Such people may have a seizure while watching television images or playing certain games This may happen eve...

Page 59: ...same state as when you purchased it while giving you an option to retain all settings and personal data for later retrieval CAUTION Due to the wide range of reasons for which the Recovery Program may be used no guarantee can be given that all data will be retained The procedure described below is only applicable if your backup data is stored on hard disk on your notebook CAUTION Before using the N...

Page 60: ...uration 1 Remove any additional hardware components such as sound card video card and network card that you may have added to your notebook 2 Reinstall the original NEC hardware components if you have removed them 3 Make sure that your keyboard mouse monitor and speakers are connected properly if applicable to your notebook 4 Disconnect any additional devices that you have connected to your notebo...

Page 61: ...lder on the hard disk drive 3 The next screen displays a summary of your selected options Click on Next to launch recovery Note There may be a delay the first time Windows restarts after the recovery process This delay depends on the amount of data that must be retrieved from the selected account 4 After the Partial Recovery process has been completed and if you have used default Windows settings ...

Page 62: ...oblem you can contact NEC Customer Support Please check the terms of your warranty and have the serial number of your notebook at hand before you call us Please write down any error message causing the problem and have the notebook in front of you switched on if possible ...

Page 63: ...t Connections and Remote Earth Power Supply and Cables Batteries Laser Compliance Statement Thunderstorm Warning Radio communication Regulation if applicable Additional Notices Electrostatic Discharge ESD and ESD Protection Product Storage Environment Guidelines Recommended Environment ...

Page 64: ...e on Radio Interference IEC These limits are designed to provide reasonable protection against harmful interference in a residential installation This equipment generates uses and can radiate radio frequency energy If not installed and used in accordance with the instructions it may cause harmful interference to radio communications There is no guarantee however that interference will not occur in...

Page 65: ...nput and output of this product is classified as Safety Extra Low Voltage Remote Earth To prevent electrical shocks connect all local individual office notebooks and computer support equipment to the same electrical circuit of the building s wiring If you are unsure check the building s wiring to avoid remote earth conditions Building Supply Only connect the equipment to a building supply that is ...

Page 66: ... as Hazardous Voltage You must unplug the power supply cord to disconnect the equipment from the power supply For this purpose the socket outlet should be installed as close to the equipment as possible and should be easily accessible In Europe before plugging the power cord into an AC power outlet check if the voltage selector switch for the power supply of the computer if available is in the 230...

Page 67: ...ielded cables only Cat 5 Heat build up The AC adaptor and the underside of the notebook can become hot after prolonged use Sustained physical contact with either should be avoided Batteries Replacing batteries A lithium battery in some computers maintains system configuration information In the event that the battery fails to maintain system configuration information we recommend that you replace ...

Page 68: ...nts of Code of Federal Regulation Sec 1040 10 and Sec 1040 11 for COMPLETE laser products Thunderstorm Warning This warning is only applicable if the product you purchased has a modem and or TV tuner Similar precautions should be taken if you are connecting a modem or TV tuner to the product It is advisable to connect a telephone cable and or an antenna cable to wall plugs which are equipped with ...

Page 69: ...m 5ºC to 35ºC Avoid placing the product in a dusty environment as excessive dust might be sucked into the machine body reducing its cooling efficiency Do not try to block any ventilation holes as you may cause the product to over heat Do not place the product in a humid environment to avoid rusting or corrosion due to excessive water vapourisation 2 When the product is shut down Avoid placing the ...

Page 70: ...rive ISP Internet Service Provider JPEG Joint Photographic Expert Group LAN Wireless LAN Local Area Network Wireless Local Area Network LCD Liquid Crystal Display LED Light Emitting Diode PC Personal Computer PNG Portable Network Graphic RAM Random Access Memory SD SDHC Secure Digital Secure Digital High Capacity SDIO Secure Digital Input Output TCP IP Transmission Control Protocol Internet Protoc...

Page 71: ...when it is loaded into the temporary memory i e RAM or installed in the permanent memory e g hard disk CD ROM or other storage device of that computer A copy of Software installed on a network server for the sole purpose of distribution to other computers is not in use if you have a separate license for each computer to which the Software is distributed You must ensure that you have purchased addi...

Page 72: ...ited Warranty and which is returned to NECCAP with a dated proof of purchase and authorisation number to NECCAP at your own cost risk and expense If dated proof of purchase is not provided NECCAP s authorised service provider will not render service or may charge the customer for the service s performed This limited warranty is void if product failure has resulted from accident abuse misuse or mis...

Page 73: ...or written permission of NECCAP Disclaimer NECCAP specifically disclaims all warranties either expressed or implied including but not limited to implied warranties of merchantability and fitness for a particular purpose with respect to this product and documentation to the extent permitted by the law NECCAP reserves the right to revise or make changes or improvements to this product or documentati...

Page 74: ...affiliates in the US and or other countries Microsoft Encarta MSN Windows Microsoft Outlook Microsoft Office logo and Windows logo are either registered trademarks or trademarks of 2009 Microsoft Corporation in the United States and or other countries Windows XP is either a registered trademark or trademark of 2009 Microsoft Corporation in the United States and or other countries SRS Premium Sound...

Page 75: ... Edition Windows XP Windows XP Professional Internet Explorer Windows Media Center Official Name Microsoft Windows XP Home Edition operating system Service Pack 2 Microsoft Windows XP Professional operating system Service Pack 2 Windows Internet Explorer Windows Media Center ...

Reviews: