background image

54

Chapter 6, Printer Tasks

S

CALE

 P

RINTING

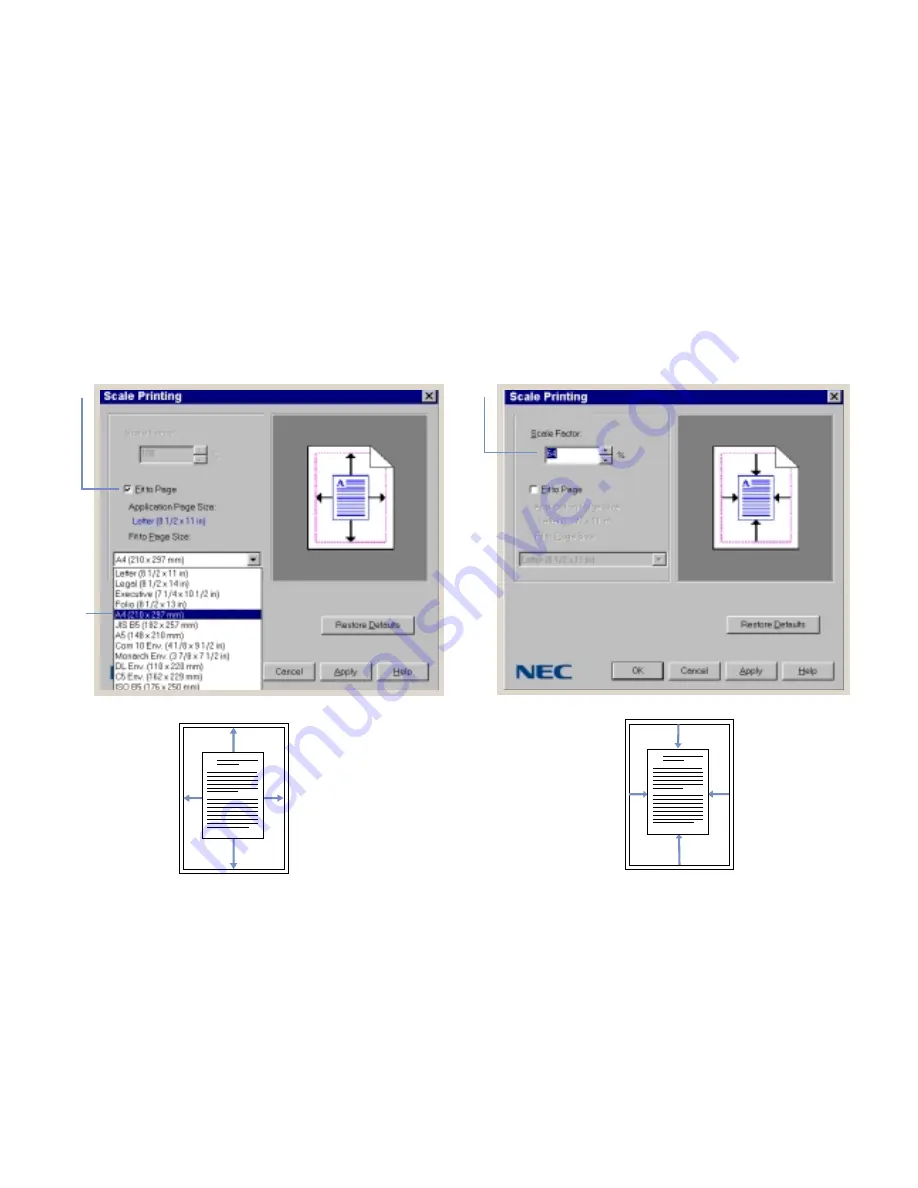
This feature allows you to scale your print job to any selected 
paper size regardless of the digital format of the document. 
This is especially useful when you want to check the detail in 
a small file. To enable this feature:

1.

From your software application, access the printer 
Properties

 window.

2.

Click the Job Finishing tab and then Scale Printing... in 
the Layout Options area and select Fit to Page In the 
Scale Printing 

dialog box 

(A)

.

3.

Select the paper size from the Fit to Page Size drop down 
menu and click OK 

(B)

.

4.

Or fill in a percentage of the original format size in the 
Scale Factor

 box and click OK 

(C)

.

B

C

A

note:

Clicking on the 

OK

 button 

saves all changes and leaves the tab. 
Clicking the 

Apply 

button saves 

changes before leaving the tab.

A

A

Fit to Page Icon

Scale Factor Icon

Summary of Contents for SuperScript 1400

Page 1: ...S U P E R S C R I P T 1 4 0 0 USER S GUIDE June 2000 ...

Page 2: ...uitability of specific product configurations and applications must be determined by the customer and is not warranted by NEC Technologies To allow for design and specification improvements the information in this document is subject to change at any time without notice Reproduction of this document or portions thereof without prior approval of NEC Technologies is prohibited NEC Technologies Inc 2...

Page 3: ...ING THE SOFTWARE 19 Overview 19 Software For Windows 19 Installing the Software 19 Software for Windows 95 98 2000 21 Installing Software for Windows 95 98 2000 21 Removing Printer Software 21 Software for Windows NT 4 0 21 Installing the Software 21 Removing Printer Software 22 Software for the Macintosh 22 Software Requirements 22 Hardware Requirements 22 Installing the Software 22 Ch 4 THE OPER...

Page 4: ...s for Avoiding Paper Jams 73 Understanding the Paper Path 74 Clearing Paper Jams 75 Paper Jams in the Input Area 75 Paper Jams in the Engine Area 76 Paper Jams in the Output Area 77 Paper Jams in the 550 sheet 2nd Cassette Tray 3 78 Common Windows Problems 79 Common Macintosh Problems 79 Ch 9 CUSTOMER SERVICE 81 Overview 81 Assistance Nearby 81 Help From Within Your Company 81 Help From Your Deale...

Page 5: ...v Appendix D SAFETY INFORMATION 99 Laser Safety 99 CDRH Regulations 99 Ozone Emission 99 FCC Statement 100 Index 101 ...

Page 6: ...vi SuperScript 1400 User s Guide ...

Page 7: ...s note The instructions in this guide assume that you are familiar with your computer configuration and that your system is configured and operating properly SuperScript 1400 Highlights Prints up to 12 pages per minute Up to 1 200 dpi class resolution quality Parallel and USB ports Versatile paper handling for envelopes and labels 66MHz 64 bit PowerPC RISC processor 4 MB of RAM set 1 Year limited ...

Page 8: ...atures give you many ways to customize your print jobs To take advantage of these features you need to become familiar with the SuperScript 1400 Series printer driver Printer Driver Features Proof Sheets This layout mode allows you to print out a reduced version of your document or booklet It lets you view multiple pages at a glance and is accessible through the Layout Mode area of the Finishing t...

Page 9: ...n your PC and your printer Printer status messages such as Paper Needed in Tray 1 show up on your screen See Appendix C for more information on this useful feature Energy Saving The SuperScript 1400 printer meets the requirements of the Environmental Protection Agency s ENERGY STAR Computers program for printers The purpose of this program is to promote the manufacturing and marketing of energy ef...

Page 10: ...4 Chapter 1 Introduction ...

Page 11: ...ial setup keep this User s Guide and SuperScript 1400 CD handy for future referencing The fuser area under the Top and Back Covers is very hot Let the printer cool before touching these areas WARNING This printer is intended to be electrically grounded It comes with a three wire grounding plug This plug will only fit a grounded AC outlet or power strip This is a safety feature Do not defeat the pu...

Page 12: ...th sides of the printer as shown B 3 Make sure all items are included in your box see the list on the next page 4 Remove any packing tape from the printer 5 Remove the 270 sheet Tray from the printer and peel off any packing tape C Save the printer box and all packing materials that came with your SuperScript 1400 printer in case you need to ship it later Unpacking the Printer note Do not discard ...

Page 13: ...olutions CD and ServiceXpress information Power Cord Toner Cartridge Not Included IEEE 1284 compliant Bidirectional Parallel Cable To connect your printer note Save the box and packing material Power Cord Toner Cartridge QuickStart Guide SuperScript 1400 Series Solutions CD ServiceXpress information For local connection Certified USB Cable For USB connection If any items are missing or damaged con...

Page 14: ...nter driver Manual Feed Tray drops open to allow you to feed various types of paper envelopes labels or transparencies one at a time Referred to as Tray 1 Manual in the printer driver Back View Interface Panel contains the Controller Board ports including a parallel port and a USB port Back Cover acts as the Face up Output Tray when opened out Power Cord Connector for attaching the Power Cord Powe...

Page 15: ...W with Optional 550 sheet 2nd Cassette 270 sheet Cassette FRONT VIEW 1400 Model Important Printer Parts Power Switch Interface Panel Hand Grip Power Cord Manual FeedTray Face up OutputTray Back Feed Roller Tray 2 Side Vent 550 sheet 2nd Cassette Paper Level Indicator Tray 1 Fuser Unit Face up Output Tray 3 Tray Connector Warning Label ...

Page 16: ... prevent damage from light keep the Toner Cartridge covered until you are ready to install it 3 Hold the cartridge horizontally and shake as shown about 10 times D 4 Rock Toner Cartridge forward and back several times E loosening and distributing any toner that may have settled during storage 5 With the Toner Cartridge on a sturdy surface pull the end of the sealing tape straight out F 6 Locate th...

Page 17: ...tion the shutter that covers the green shiny material of the OPC unit will flip up on the front of the Cartridge Guide exposing the OPC unit to the inside of the printer 8 Grasp the handle and gently guide the Toner Cartridge into the printer I 9 The Toner Cartridge will click into place J 10 Close the Top Cover K J H I K ...

Page 18: ...Pull the 270 sheet Cassette tray out of the printer A 2 Push down the metal plate in the bottom of tray B 3 Fan the paper C 4 Load paper print side down C 5 Make sure the paper stack is flat and that it fits under the metal tab in the corner of the tray D note To adjust the tray for different paper sizes see page 14 D note The 270 sheet Cassette will be referred to asTray 2 in the printer driver B...

Page 19: ... printer F Directions for adjusting the paper tray size are in the following section Changing Paper Sizes WARNING When sliding the tray into the printer do not place your hand on the tray opening in back Place your hand on the top of the printer as shown below 8 The Paper Level Indicator will show how much paper is left in the tray G G F E Paper Limit Line ...

Page 20: ... on the Back Paper Guide A 2 Slide the Back Paper Guide so that the pointer matches the desired size indicated on the bottom of the tray 3 Load the paper in the tray print side down B 4 After loading media print side down pinch the Side Guide and slide it until it lightly touches the media C note The 270 sheet Cassette will be referred to asTray 2 in the printer driver Do not overfill the cassette...

Page 21: ...tray back as far back as it will go A 2 Pinch the tab on the Back Paper Guide and slide it so that the pointer matches the desired size indicated on the bottom of the tray B 3 Load the tray C 4 After loading media print side down pinch the Side Guide and slide it until it lightly touches the media D note The 270 sheet Cassette will be referred to asTray 2 in the printer driver Do not overfill the ...

Page 22: ...ate end of the parallel cable into the connector on the back of the printer Fasten the clips at the end of the connector into the notches on the plug A 3 Plug the other end of the cable into the appropriate parallel connector on your computer B 4 Connect the Power Cord to the back of the printer Plug the other end of the Power Cord into a properly grounded outlet C note Do not turn on your compute...

Page 23: ...talled to support USB printing 1 Make sure the printer and the computer are turned off 2 Plug the appropriate end of the USB cable into the connector on the back of the printer A 3 Plug the other end of the cable into the appropriate USB connector on your computer B 4 Connect the Power Cord to the rear of the printer Plug the other end of the Power Cord into a properly grounded outlet C note Do no...

Page 24: ...ed off turn the printer power on A All the Operator Panel lights will cycle on 2 When only the Ready light remains on press and hold the Go Continue button until the LED lights cycle 2 times about 4 seconds B When you release the button a Configuration Sheet will print NEC SuperScript Demo Page a Ready Go Continue B A note Printing a Configuration Sheet may take up to 25 seconds An example of a Co...

Page 25: ... 1400 Series Printer Driver SuperScript 1400 Status Monitor not available for Windows NT NEC USB printer port driver for Windows 98 Electronic version of the SuperScript 1400 User s Guide Adobe Acrobat Reader 4 0 INSTALLING THE SOFTWARE 1 Place the NEC SuperScript 1400 Series Solutions CD in your CD ROM drive 2 If the installer does not launch automatically select Run from the Start menu A and typ...

Page 26: ...atest printer driver from NEC The disadvantage is that the install may be interrupted or slowed down by your Internet provider 6 Next you will be asked to choose between the following install options Easy Local Install Use this if you have a parallel connection between your PC and the printer The printer driver Status Monitor and electronic user s guides will be automatically loaded on your PC Cus...

Page 27: ... prompted by Windows 98 Plug N Play The USB driver is located at x USB Windows98 NEC USB Printer Port where x is the letter of your CD ROM drive Windows 2000 has USB support already installed 7 Follow the directions on the monitor Removing Printer Software Use the following method to remove the SuperScript software from Windows 95 98 2000 computers To remove the printer driver 1 Click the Windows ...

Page 28: ...ters and how to install the printer software Software Requirements For Macintosh computers to connect to the printer they must be running Mac OS 8 6 or higher Hardware Requirements Hardware requirements are categorized into requirements for the Macintosh and requirements for the printer Macintosh Hardware Requirements The hardware required by your Macintosh is a USB port Printer Hardware Requireme...

Page 29: ...NG THE SOFTWARE 7 From the left pane of the Chooser window select the NEC 1400 Series icon and NEC 1400 Series will appear in the right pane of the window 8 Close the Chooser window 9 The NEC 1400 Series icon will be placed on your desktop ...

Page 30: ...24 Chapter 3 Installing the Software ...

Page 31: ...ingle button functionality The table on the next page shows double button functionality NEC SuperScript Demo Page Error Manual Feed Ready Paper Cancel Go Continue Button Button Button Function Cancel When the printer is processing a print job you can press this button to cancel the print job Pressing the Cancel button for 1 second will cause the printer to flush out all received data The time it t...

Page 32: ... all lights blink three times and cycle once then release the buttons The printer will revert to its factory default settings Internal Cleaning Sheet To enable the internal cleaning process press and hold down the Go Continue and Cancel buttons simultaneously for about 4 seconds or until all four lights are blinking A one page Internal Cleaning Sheet will print LED Function The Error LED red light...

Page 33: ... Light off Light On Light blinking Processing Job Warming Up The Ready LED blinks fast when the printer is printing a page or is receiving data The Ready LED also blinks fast when the printer is warming up Manual Feed Both the Ready and Manual Feed LEDs are on The printer is ready to receive a manual feed job Feed media into the Manual Feed Tray Tray 1 and press the Go Continue button to start pri...

Page 34: ...h Memory Overflow Error The Error LED is blinking The document is too complex and the printer does not have enough memory to print the job Cover Open NoToner Cartridge The Error LED is steady Either a cover is open or there is no Toner Cartridge in the printer Mode Message Internal Error All four LEDs blink sequentially and fast The printer detects an internal error i e memory link crash Engine Er...

Page 35: ...g guidelines Desired result Choose paper that will be appropriate for the project you have in mind For example a matte ecru colored recyled paper works for natural subjects because it has a casual look and feel Size Use a paper size that fits easily within the paper tray Weight Your printer supports the following paper weights 16 28 lbs bond for Tray 2 and 3 16 47 lbs bond max 97lb index and 65 lb...

Page 36: ... to the Face up Output Tray if it is open Media comes out of the printer face up with the last page on top Printing from Tray 1 Manual Feed tray to the Face up Output Tray uses a straight paper path with less chance of paper curl B Printing to the Main OutputTray NEC SuperScript Demo Page B A Use the Main Output Tray for Continuous printing Holds up to 250 sheets Transparencies Printing to the Fac...

Page 37: ...FACE UP OUTPUT TRAY Here s how to use the Face up Output Tray 1 Open the Back Cover as shown A 2 Pull the tray extender out for longer paper B 3 The Back Cover now functions as the Face up Output Tray C The Back Cover is also used as the Face up OutputTray B A C ...

Page 38: ... printed media until you close it Media will then print to the Main OutputTray on top of the printer 4 Push the tray extender in A 5 Close the Back Cover as shown B note The capacity of the Face up OutputTray can only hold small amounts of any given media Do not over load the tray B A ...

Page 39: ...parator sheets or other special sheets not kept in Tray 2 or 3 The minimum size that the Manual Feed Tray supports is 3 8 inches by 5 8 inches The maximum size it supports is 8 5 inches by 14 inches Load only one size or type of media one at a time face up 1 From your software application select Tray 1 2 Also select the paper size and type in the printer driver 3 Open Tray 1 as shown A 4 Pull out ...

Page 40: ...h Guide until it lightly touches the stack A Load paper print side up note Do not load more than one sheet of paper into Tray 1 Manual FeedTray B 7 After printing push the tray extender in C 8 After printing close Tray 1 D Width Guide note CloseTray 1 Manual Feed Tray when not in use A B C D ...

Page 41: ...your application Press the Go Continue button to print each page 1 Load media in Tray 1 Manual Feed Tray print side up A 2 Adjust the Width Guide so that it lightly touches the side of the stack B note Gently slide the single sheet of media forward in the tray until the printer catches it and moves it forward itself B A Print side up Directions continued on next page The minimum size that the Manu...

Page 42: ... Panel will start blinking D Press the Go Continue button 5 After one page has printed the Manual Feed light will start blinking again prompting you to feed the next sheet 6 Repeat this step for each page you want printed C Windows 98 Macintosh NEC SuperScript Demo Page D note The Manual FeedTray will be referred to asTray 1 Manual in the printer driver Macintosh Windows 98 ...

Page 43: ...1 Open Tray 1 Manual Feed Tray A 2 Open the Face up Output Tray in back of the printer B 3 Load one envelope flap side down against the left tray edge C The stamp area is on the left side of the envelope and it enters Tray 1 first 4 Adjust the Width Guide to the envelope D A Width Guide D E B C note Be sure to feed each envelope in level to the surface of Tray 1 Feeding envelopes at an angle will ...

Page 44: ...38 Chapter 5 Using Print Media 5 Configure the paper source type and size in your application E 6 After printing close Tray 1 F Windows 98 Macintosh E F ...

Page 45: ...e letter or A4 size label sheets Make sure all labels are attached to the backing sheet 1 Avoid label sheets that have the backing sheet material exposed Don t use label sheets with some labels already removed A Don t overprint label sheets B 2 Open Tray 1 Manual Feed Tray 3 Align a label sheet in Tray 1 C 4 Open the Face up Output Tray D 5 Configure the paper source type and label sheet size in y...

Page 46: ...e only Transparencies must be able to withstand temperatures of 392 F 200 C for at least 0 1 second Keep the paper path clean Transparencies are especially sensitive to dirt If shadows appear on the sheets clean the inside of the printer See page 63 1 Open Tray 1 Manual Feed Tray A 2 Load a transparency B Properly adjust the Width Guide 3 Configure the paper source type and size within your softwa...

Page 47: ...to the printer s fusing temperature of 400 F for 0 1 seconds Inks must be non flammable Paper and ink must both be dry Follow these directions 1 Load letterhead stationary or other preprinted paper into Tray 1 printed side up A one sheet at a time 2 Or load into Tray 2 or 3 printed side down B Adjust the Width Guide properly 3 Configure the paper source type and size within your software applicati...

Page 48: ...do not melt or vaporize when subjected to the printer s fusing temperature of 400 F for 0 1 seconds Inks used on preprinted media must be non flammable Paper and ink must both must be dry Follow these directions 5 Open Tray 1 Manual Feed Tray A 6 Open Face up Output Tray B 7 Load material into Tray 1 with the side to be printed facing up C one sheet at a time 8 Configure the paper source type and ...

Page 49: ...asic document printing How to save toner Manual duplex printing N up printing Booklet printing First page printing Fit to page printing Poster printing How to use watermarks How to use page overlays 8 9 Poster Printing Booklet Printing Watermark Manual Duplexing N up Printing A Fit to Page Take advantage of the SuperScript 1400 Series useful printer task features ...

Page 50: ...ame field A note If you do not see a Properties button click on the Setup Printer or Options button Then click Properties in the next screen 3 Click on the Properties button B 4 The Properties window appears containing the various tabs for your SuperScript 1400 Series driver 5 If necessary click the Paper tab to display the screen below This tab contains options for setting basic paper handling C ...

Page 51: ...older Be careful not to change the same print settings you changed in the application to a different setting in the printer driver ACCESSING PRINTER PROPERTIES The settings you change from your application remain in effect while you are using the current application To make permanent changes set them through the Printer folder Use the following instructions 1 Click the Windows Start button 2 Selec...

Page 52: ...he remainder of the print job note Pressing the Cancel button only cancels the current print job If more than one print job is in printer memory Cancel must be pressed once for each job Canceling a Job from the Printers Folder 1 From the Windows Start button select Settings then Printers B 2 The Printers window opens Double click SuperScript 1400 Series 3 From the Document menu select Cancel Print...

Page 53: ...the printer driver This feature is especially useful for printing drafts To enable this feature 1 From your software application access the printer Properties window and select the Print Quality tab A 2 In the Toner Usage area select Save Toner from the drop down menu B 3 Click OK to save selection C A B C ...

Page 54: ...g Edge if you want the binding orientation along the left edge of the paper as in a magazine B Choose Flip on Short Edge if you want the binding orientation along the top edge of the paper as in a calendar C 4 Select the Print Instruction Sheet box 5 Click the OK button 6 Start printing The printer automatically prints only the odd numbered pages note Once you get used to using manual duplex print...

Page 55: ... before you feed it in note If you are printing to the Face up OutputTray the last page will be on top of the stack Do not rearrange the pages The printer knows the stacking order and will print the corresponding side for each page 10 Click OK on the screen to start printing the second side The printer automatically prints only the even numbered pages Portrait Orientation D E Long Edge in Portrait...

Page 56: ...the tab to show the effect of the settings you select 1 Set up basic paper handling parameters such as paper orientation source and size from the Paper tab in the Properties window 2 Select the Job Finishing tab and choose N up Printing in the Layout Options area 3 Select the number of pages you want to print per sheet in the Pages per Sheet drop down menu A 4 Click the Print Page Borders selectio...

Page 57: ...struction sheet to help you re insert the pages correctly When you pick one of the booklet sizes in your Windows program the driver will do what is needed to print a booklet including reducing the page size and activating 2 sided printing 1 Choose any available tray in Paper Source for the first side of printing A If you choose Tray 1 Manual Feed Tray feed media in one sheet at a time 2 Click on t...

Page 58: ... to the drawing below C 9 Flip but do not rearrange the stack of printed pages Straighten them before loading them back into Tray 1 Manual Feed Tray The drawings here show how to put the pages back into the printer according to portrait orientation D or landscape orientation E Instructions continued on next page 7 1 8 9 6 3 8 1 In portrait orientation re insert the pages in the Manual Feed Tray wi...

Page 59: ...o that follow these directions 1 Open the Properties window and click on the Paper tab 2 In the Paper Source Selection area select Different paper source for first pages and set up paper size paper source and paper type in the First Page tab A Don t forget to select Preprinted if your first page is commerically printed letterhead 3 Select the Other Page tab and set up paper size paper source and p...

Page 60: ...rinter Properties window 2 Click the Job Finishing tab and then Scale Printing in the Layout Options area and select Fit to Page In the Scale Printing dialog box A 3 Select the paper size from the Fit to Page Size drop down menu and click OK B 4 Or fill in a percentage of the original format size in the Scale Factor box and click OK C B C A note Clicking on the OK button saves all changes and leav...

Page 61: ...rom the Job Finishing tab select Poster Printing in the Layout Options area 3 In the Poster Printing dialog box select your poster style and the desired overlap A 4 To determine the scaling factor B select 2X2 3X3 4X4 5X5 or 6X6 As an example if you select 2X2 the output will automatically be distributed to completely cover four physical pages B 5 You can specify an overlap in inches or millimeter...

Page 62: ...watermark will show in the preview window A 2 Click OK and print your document B note To stop printing a watermark choose None in the drop down menu 3 To create new watermark text enter it in the Text field of Edit section of the Watermark tab C The new watermark text will show in the preview window 4 Select the desired watermark options such as font transparency and angle 5 Click the Add button 6...

Page 63: ...verlay A 2 Select Print from the File menu Open the Properties window and click on the Overlays tab and click on Create Overlay 3 In the Create Page Overlay dialog box type a name of up to eight letters in the file name box Select the destination path if necessary the default is C FORMOVER B 4 Click OK You will see the name in the Overlays list 5 Click OK or Yes until you complete the creation The...

Page 64: ...in the Overlay List box and is available for printing Select the overlay from the Overlay List box G 6 If necessary click the Query Page Overlay H If this box is checked a message box will appear each time you submit a document for printing asking you to confirm your wish to print an overlay on your document Answering Yes to the message box means that the selected overlay will be printed with your...

Page 65: ...i printouts Select Photographic if your print job contains photos halftones or bitmap images The default selection is Text This feature is grayed out when values other than 1200 dpi are selected 4 In the Darkness area C you can adjust the toner density on the print output Your choices are Normal Light and Dark For example if you print something that appears to be too light you can choose Dark to m...

Page 66: ...60 Chapter 6 Printer Tasks ...

Page 67: ...ed cleaners on the printer exterior They may damage the plastic case Do not expose the Toner Cartridge to direct sunlight or bright room light Do not spill any liquid inside the printer or in the power cord connector Turn off and unplug the printer while working inside the covers Follow all directions carefully Save this user s guide for future reference Do not attempt to service the printer yours...

Page 68: ...etter size To order the high capacity Toner Cartridge contact your NEC printer dealer or contact NEC at 800 632 2326 or www nectech com Follow these directions to replace the Toner Cartridge 1 Open the Top Cover A 2 Pull out and discard the used Toner Cartridge B 3 Shake Toner Cartridge thoroughly as shown C then rock Toner Cartridge forward and back several times D 4 Remove the new Toner Cartridg...

Page 69: ... for more than a few minutes Cover with a dark cloth if it will be out of the printer for any length of time 3 Using a soft lint free cloth gently wipe the internal toner cartridge area and lens C 4 Re insert the Toner Cartridge D 5 Close the Top Cover E 6 Using a clean soft cloth wipe off any stains or dust from the printer s exterior F note Do not use strong solvents or abrasive cleansers on pla...

Page 70: ...2 Unplug the Power Cord and any connecting cables from the printer B 3 If applicable remove the printer from the 550 sheet 2nd Cassette and place it on a sturdy surface or cart C Refer to page 91 and reverse directions 4 If you are shipping your printer repack it in its original packaging and box Lift the printer properly C A B ...

Page 71: ...fore feeding subsequent pages The connection cable between the computer and the printer is not connected properly Disconnect the printer cable and then reconnect it The connection cable between the computer and the printer is not connected properly If possible attach the cable to another computer and print a job you know works You may also try using a different printer cable The port setting is in...

Page 72: ...e any unnecessary graphics from the document if possible The page orientation setting may be incorrect Change the page orientation in your application The paper size and the paper size settings do not match Make sure that the paper size in the print settings matches the paper in the paper tray If the paper keeps jamming Possible Cause Solution There is too much paper in the paper tray Remove exces...

Page 73: ... Series Toner Cartridge The sealing tape may still be in the Toner Cartridge Remove the Toner Cartridge and pull out the sealing tape Reinstall the Toner Cartridge and check the printer by printing a Configuration Sheet The file may have blank pages Check the file to make sure that it does not contain blank pages Some parts such as the Controller Board may be defective Contact a service representa...

Page 74: ...ob Try to free some printer memory by removing any unnecessary fonts macros or any data currently in printer memory For a temporary solution simplify the image or print at a lower resolution Mode Message Cover Open NoToner Cartridge The printer s Top Cover is open or there is no Toner Cartridge Close the Top Cover Make sure that the Toner Cartridge is correctly installed in the printer Internal Er...

Page 75: ...hotos select Photographic in the Document Type area of the Print Quality tab Use high quality paper or transparencies to obtain the sharp crisp characters and maximum contrast Solving Print Quality Problems Problem Solution Solid White If the whole page is blank The Toner Cartridge may be out of toner Replace the Toner Cartridge if necessary The Toner Cartridge may be defective Remove the Toner Ca...

Page 76: ...e and quality The toner may be unevenly distributed inside the Toner Cartridge Remove the Toner Cartridge and redistribute the toner Check the Toner Cartridge for damage White Streak If a vertical white streak appears on the page The toner supply may be low You may be able to temporarily extend the Toner Cartridge life by redistributing the toner The Toner Cartridge may be defective Remove the car...

Page 77: ...ace Up Output Tray and print to this tray Turn over the stack of paper in the paper tray Problem Solution Damaged Print If the page is torn Check the paper type and quality Make sure you are using only new undamaged paper Check for contamination along the paper path Make sure the paper is not damp Make sure the paper is properly loaded Open the Face Up Output Tray and print to this tray Turn over ...

Page 78: ...ge Skew If the page prints at an unplanned angle Check the paper type and quality Make sure that the paper or other media is loaded correctly and the guides are not too tight or too loose against the paper stack Character Voids Character voids are white areas within the characters that should be solid black If you are using transparencies when you experience this problem try another type of transp...

Page 79: ... the Manual Feed Tray Tray 1 Do not load wrinkled creased damp or highly curled paper Do not mix paper types in any of the paper tray Use only recommended print media See Appendix A Printer Specifications Make sure you load the paper print side down into Tray 2 or optional Tray 3 Load paper print side up into the Manual Feed Tray Tray 1 Keep print media stored in an acceptable environment Backgrou...

Page 80: ...d Cassette Tray Tray 3 and then passed under the Transfer Drum It then is passed through the Fuser Unit and delivered to either the Main Output Tray on the top of the printer or to the Face up Output Tray at the back of the printer Paper jams occur in the following three areas 1 The Input Area 2 The Engine Area 3 The Output Area note Frequent jams occurring in a specific area indicate that the are...

Page 81: ...o expose the jammed paper A 2 Remove the jammed paper from the tray B If the paper is jammed in the paper feed area and cannot be easily removed remove the paper tray from the printer and carefully pull the jammed paper from the printer 3 Make sure that the rest of the paper is stacked neatly in the tray and slide the tray back into the printer C 4 Open the Top Cover and then close again to resume...

Page 82: ...small piece of paper gets lodged on the side turn the printer off and then on The rollers will turn slightly and this should release the paper 5 Re install the Toner Cartridge E note If theToner Cartridge is difficult to re install make sure the Feed Guide has been flipped back down into position 6 Close the Top Cover to resume printing F note If the Paper and the Error lights do not go out there ...

Page 83: ...it roller and swing the roller open in the direction of the arrow shown D 5 Remove the jammed paper E 6 Replace the exit roller F Make sure the right end of the roller clicks in place If the handle is not closed completely the printer will indicate a cover open or fuser error with the red Error light on the Operator Panel 7 Re attach the strap and close the Face up Output Tray G 8 Open and close t...

Page 84: ...aper gently remove it from the tray B 3 Slide Tray 2 slightly back into the printer and pull Tray 3 out of the printer C 4 If you see the jammed paper in Tray 3 gently pull the paper out D 5 Gently remove any jammed paper from the front of Tray 3 E 6 Slide the trays back into the printer F 7 Open and reclose the Top Cover to resume printing G A B C D E F G ...

Page 85: ...d try printing again Delete all temp files from the Temp sub directory You can determine the name of the directory by editing the AUTOEXEC BAT file and looking for the statement Set Temp The name after this statement is the temp directory It is usually C temp by default but can be redefined Problems in the Chooser Problem Possible Cause and Solution The printer driver icon does not appear in the C...

Page 86: ...80 Chapter 8 Troubleshooting ...

Page 87: ...when you contact NEC Model number Serial number Page count shown on the Printer Settings page Date and place of purchase NEC Maintenance agreement number if printer is already under agreement NEC Technical Support can help you with the initial installation of this product Please contact your operating system or network software vendor if you require assistance in optimizing or customizing your sys...

Page 88: ...ing NEC You can mail your questions and comments to NEC Technical Support at the following address Printer Technical Support Dept 3390 NEC Technologies Inc 305 Foster Street Littleton MA 01460 2004 ORDERING SUPPLIES To order printing supplies contact your SuperScript 1400 Series dealer You can also call 800 632 2326 to locate the NEC supplies dealer nearest you or purchase supplies directly from N...

Page 89: ...tion to furnish or install said items NEC reserves the right to modify or update SuperScript software as it deems necessary and to determine distribution policies for such changes to existing owners SUPERSCRIPT 1400 SERIES PRINTER LIMITED WARRANTY NEC TECHNOLOGIES INC hereinafter NECTECH warrants this Product to be free from defects in material and workmanship and agrees to repair or replace any p...

Page 90: ...vice Please retain such proof of purchase with your records You can contact Technical Support and Service by dialing 800 632 4650 Limitation of Damages and Implied Warranties NECTECH s sole liability for any defective product is limited to the repair or replacement of the product at our option NECTECH shall not be liable for 1 Damage to other property caused by any defects in this product damages ...

Page 91: ... Series Printer Driver Automatic Jam Recovery Automatically reprints jammed pages when enabled Interface Ports IEEE 1284 compliant parallel USB Power Requirements 100 127VAC 50 60Hz 3Hz Power Consumption Operating average 300 watts W average during operation In Power save mode Less than 12 watts W Temperature Operating 50 F to 86 F 10 C to 30 C Non operating in packed condition 4 F to 104 F 20 C t...

Page 92: ...e a 4 mm border around the edge of the paper Envelope Inside a 10 mm border around the edge of an envelope Noise Level Operating 48 dBA or less Standby 35 dBA or less Sleep Background Noise Clearance Space Front 19 482 6mm enough space so that trays can be removed Back 12 6 320mm enough space to allow opening of the Back Cover Right 3 9 100mm Left 3 9 200mm enough space for ventilation Top 11 8 30...

Page 93: ...mly creased and be no thicker than two paper thicknesses As a rule the larger the envelope is the more difficult it is to feed properly The way you load envelopes in Tray 1 and Tray 3 are different See Chapter 6 for instructions Designate Thick paper in the printer driver when printing envelopes made from paper heavier than 24 lb Adhesive Labels Only use adhesive labels that are recommended for us...

Page 94: ...ximum size it supports is 8 5 inches by 14 inches Table A 1 Manual Feed Tray Tray 1 Paper Type Size U S Letter 8 5 x 11 215 9 mm x 279 4 mm Executive 7 25 x 10 5 184 mm x 267 mm Folio 8 5 x 13 215 9 mm x 330 mm U S Legal 8 5 x 14 215 9 mm x 355 mm Statement 5 5 x 8 5 140 mm x 216 mm A4 8 27 x 11 69 210 mm x 297 mm A5 5 84 x 8 26 148 mm x 210 mm ISO B5 6 93 x 9 84 176 mm x 250 mm JIS B5 7 17 x 10 1...

Page 95: ...4 176 mm x 250 mm JIS B5 7 17 x 10 12 182 mm x 257 mm Table A 3 Optional 550 Sheet 2nd Cassette Tray 3 Paper Type Size U S Letter 8 5 x 11 215 9 mm x 279 4 mm U S Legal 8 5 x 14 215 9 mm x 355 6 mm Executive 10 5 x 7 25 266 7 mm x 184 2 mm Folio 8 5 x 13 215 9 mm x 330 mm A4 8 27 x 11 69 210 mm x 297 mm ISO B5 6 93 x 9 84 176 mm x 250 mm JIS B5 7 17 x 10 12 182 mm x 257 mm COM10 4 125 x 9 5 104 8 ...

Page 96: ...depends upon the thickness of the paper Table A 4 Envelopes to Use in the Manual Feed Tray Tray 1 and 550 sheet 2nd Cassette Tray 3 Only Envelope Weight Size COM 10 20 28 lb 4 1 8 x 9 1 2 104 8 mm x 241 3 mm Monarch 20 28 lb 3 7 8 x 7 1 2 98 4 mm x 190 5 mm DL 80 g m2 110 mm x 220 mm C5 90 g m2 162 mm x 229 mm ...

Page 97: ...No 1401 Follow these directions for installing the optional 550 sheet 2nd Cassette 1 Turn the printer OFF and unplug all cables from the printer A 2 Make sure there is plenty of room around and above the printer to work Remove the 550 sheet 2nd Cassette from its packaging and remove the Tray 3 from the Feeder Unit B 3 Put the 550 sheet 2nd Cassette next to the printer and observe the location of t...

Page 98: ...t all cables then turn the printer ON E 6 Open the Properties window for the driver In the Device Option field on the Printer tab select 550 sheet 2nd Cassette Tray 3 F 7 Push down the metal plate in the bottom of Tray 3 G Directions continued on next page Check this box in the Printer tab so thatTray 3 is selectable from the Paper Source drop down list D E G F ...

Page 99: ...e and adjust the Back Paper Guide to the desired paper length embossed on the inside tray bottom J 10 If you are loading paper adjust the Envelope Guide to its back position K 11 Lift the tab on the top of Side Guide 1 and slide it to the paper size indicated on the tray bottom L Match the left side of Side Guide 1 to the paper size markings on the bottom of the tray Directions continued on next p...

Page 100: ...to fit against the paper stack N 14 Re insert the tray into the 550 sheet 2nd Cassette unit O 15 Confirm the installation by printing a Configuration Sheet From the Ready state press and hold the Go Continue button for 4 seconds P NEC SuperScript Demo Page M N O Print side down Envelope flaps up P Side Guide 2 For best results fan paper before loading ...

Page 101: ...us Monitor first comes up in minimized view To maximize the view left click on the Status Monitor icon found on Windows task bar For options right click on the icon The table below explains messages that can appear in the maximized Status Monitor Use the Preferences tab to choose between Status Monitor views A B Maximized Status Monitor View Minimized Status Monitor View on WindowsTaskbar Displaye...

Page 102: ...Tray 1 Manual Feed Tray Displayed Image Status Message Corrective Action Paper Size Error in Tray 2 Refill Tray 2 270 sheet Cassette with the specified paper Paper Size Error in Tray 3 Refill Tray 3 550 sheet 2nd Cassette with the specified paper Page Too Complex Simplify your document or lower the resolution of the document Cover Open or No Toner Cartridge Make sure the Top Cover is completely cl...

Page 103: ...ower There is miscommunication between the computer and the printer Possible causes Printer is not powered on Incorrect cabling Printer s parallel cable does not support bi directional communication Displayed Image Status Message Corrective Action ...

Page 104: ...98 Appendix C The Status Monitor ...

Page 105: ...s guide may result in hazardous radiation exposure Ozone Emission The corona assemblies found in laser printers and photocopiers generate ozone gas O3 as a by product of the electrophotographic process Ozone is only generated while the printer is printing while the coronas are energized UL Standards for Ozone The only existing standard for ozone emissions has been established by Underwriters Labor...

Page 106: ... the equipment to an outlet on a circuit different from the one to which the receiver is connected Consult the dealer or an experienced radio or TV technician for help Use a shielded and properly grounded I O cable to ensure compliance of this unit to the specified limits of the rules For Canadian Use Only This digital apparatus does not exceed the Class B limits for radio noise emissions from dig...

Page 107: ...ng properly paper 66 first page printing 54 fuser unit 8 G general printing problems 65 66 Go continue button 25 go continue button 25 graphic properties darkness 59 document type 59 resolution 59 toner usage 59 H hardware requirements 2 heavy paper 87 humidity 85 I IEEE 1284 bidirectional parallel cable 16 installing software for Macintosh 22 software for Windows 95 98 2000 21 software for Window...

Page 108: ...nt job cancelling 46 Print quality problems 69 print speed 1 85 printable area 86 printer capacity 1 cleaning inside 63 clearance space 5 dimensions 85 location 5 moving 64 repair 83 safety 5 settings 2 system requirements 2 unpacking 6 printer dimensions 85 Printer does not print 65 printer does not print 65 printer operating specifications 85 printer parts 8 printer processor 85 printer properti...

Page 109: ...ing 62 toner usage 59 toner saving 47 top cover 8 transparencies 40 Tray 1 8 tray 1 33 Tray 2 8 Troubleshooting 65 66 79 U UL 99 Unpacking 6 USB Windows 2000 support 21 Windows 98 printer software 21 22 USB cable 2 USB port 1 W warranty 83 watermarks 3 56 weight 6 85 Window problems common 79 Windows system requirements 2 Windows 95 98 printer software installing 21 removing 21 Windows 95 98 2000 ...

Reviews: