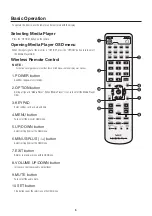
16
<Using LAN>
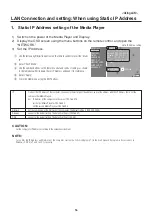
DATE/TIME
NETWORK
PREVIEW
TIMER
LANGUAGE
VIDEO OUT
MEMORY CARD
SLIDE SHOW
ADVANCED
Static IP
IP:
192 .168 .0
.2
Netmask: 255 .255 .255 .0
Gateway: 192 .168 .0
.1
DNS:
0
.0
.0
.0
MAC:
00:50:41:80:02:A9
Proxy
Update Mode from LAN:
Push mode
Pull mode
Apply
LAN Connection and setting: When using Static IP Address
1.
Static IP Address setting of the Media Player
1)
Switch on the power of the Media Player and Display.
2)
Display the OSD screen using the menu buttons on the remote control, and open the
“NETWORK.”
3)
Set the IP Address.
1
Use the left and right direction buttons on the remote control to select the “Static
IP.”
2
Select “Push Mode”.
3
Use the number buttons on the remote control and conduct settings as shown
in the table below. Write down the set IP Address and keep it for reference.
4
Select “Apply”.
5
Close the OSD menu using the EXIT buttons.
CAUTION:
Set the computer’s IP Address according to the network environment.
NOTE:
To confirm the IP Address and Netmask of the computer, startup the “command prompt” (In the Start menu>All programs>Accessories.) in
Windows XP/Vista/7 and run C:\> ipconfig.
IP
Netmask
Gateway
DNS
Static IP Address setting
Find out the IP Address of the computer, change only the last digit of the address, and set the address with the IP Address that is not the
same as other Media Players.
Ex) IP Address of the computer: In the case of 192.168.0.10,
set the first Media Player as 192.168.0.2.
Set the second Media Player as 192.168.0.3.
Set the same value as the Netmask of the computer. The default setting is (255.255.255.0)
Leave it at the default setting. The default setting is (192.168.0.1)
Leave it at the default setting. The default setting is (0.0.0.0)
1
3
2
4


