35
OFF
VIDEO
S-VIDEO
VIEWER
LAN
COMPUTER
COMPONENT
ON
SELECT
POWER
POWER
MENU
EN
TER
EX
IT
3
1
2
쐊
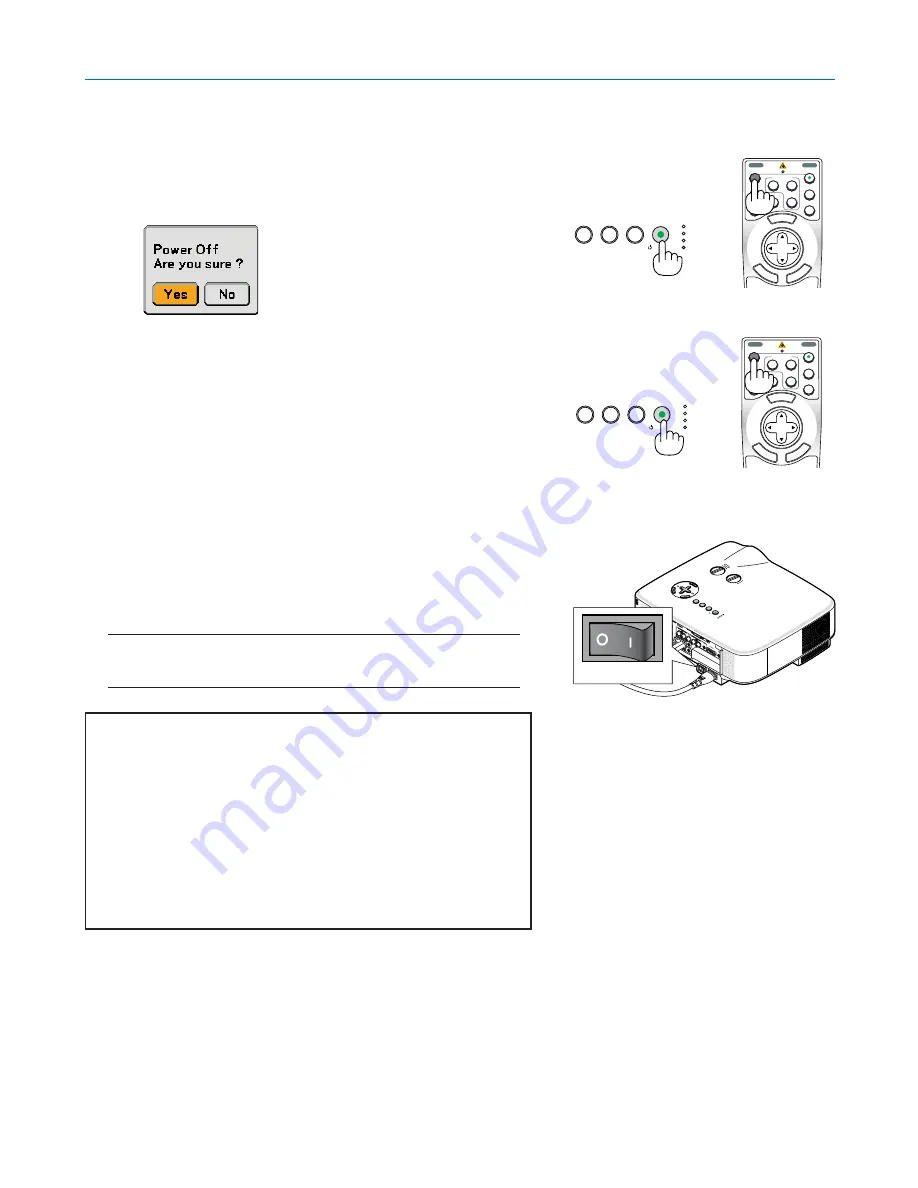
Turning off the Projector
To turn off the projector:
3. Projecting an Image (Basic Operation)
1. Press the POWER (ON/STAND BY) button on the projector
cabinet or the POWER OFF button on the remote control. The
[Power Off / Are you sure?] message will appear.
2. Press the ENTER button
After the projector turns off, the cooling fans keep operating for a
while (Cooling-off time).
The cooling fans stop operating when the projector turns off and
goes into standby mode.
When in standby mode, the POWER indicator will light orange
and the STATUS indicator will light green.
3. After making sure that the projector is in standby mode, turn
off the Main Power switch. The power indicator will go out.
About Direct Power Off
The projector has a feature called "Direct Power Off". This fea-
ture allows the projector to be turned off (even when projecting
an image) using a power strip equipped with a switch and a
breaker.
NOTE: Before using Direct Power Off, be sure to allow at least 20 min-
utes immediately after turning on the projector and starting to display an
image.
CAUTION
• Do not unplug the power cable from the wall outlet or projector
when the projector is powered on. Doing so can cause dam-
age to the AC IN connector of the projector and (or) the prong
plug of the power cable. To turn off the AC power supply when
the projector is powered on, use a power strip equipped with a
switch and a breaker.
• Do not turn off the AC power supply within 10 seconds of mak-
ing adjustment or setting changes and closing the menu.
Doing so can cause loss of adjustments and settings and re-
turn to default.
TIP:
The projector can be unplugged during its cool down period after it is turned off.
쐎
After Use
Preparation:
Make sure that the main power is turned off.
1. Unplug the power cable.
2. Disconnect any other cables.
3. Retract adjustable tilt feet if extended.
4. Cover the lens with the lens cap.
OFF
VIDEO
S-VIDEO
VIEWER
LAN
COMPUTER
COMPONENT
ON
SELECT
POWER
POWER
MENU
EN
TER
EX
IT
3
1
2
PC CARD
LAMP
STATUS
POWER
ON/STAND BY
SOURCE
AUTO ADJUST
3D REFORM
PC CARD
LAMP
STATUS
POWER
ON/STAND BY
SOURCE
AUTO ADJUST
3D REFORM
PC CARD
LAM
P
STATUS
POWER
ON/STAND BY
SO
URCE
AUTO ADJUST
3D R
EFORM
SELEC
T
PC CARD
LAMP
STATUS
POWER
ON/STA
ND BY
SO
URCE
AUTO ADJUST
3D R
EFORM
LENS
SH
IFT
LEFT
RIGHT
DOWN
UP
Summary of Contents for NP1000
Page 1: ...LCD Projector NP2000 NP1000 User s Manual ...
Page 145: ...LCD Projektor NP2000 NP1000 Bedienungshandbuch ...
Page 289: ...Projecteur LCD NP2000 NP1000 Mode d emploi ...
Page 433: ...Proiettore LCD NP2000 NP1000 Manuale dell utente ...
Page 577: ...Proyector LCD NP2000 NP1000 Manual del usuario ...
Page 721: ...LCD projektor NP2000 NP1000 Bruksanvisning ...
Page 939: ......
Page 942: ......
Page 943: ......
Page 981: ...35 MEMO ...
Page 982: ...36 MEMO ...
Page 988: ...LCD 液晶 NP2000 NP1000 用户手册 ...
Page 1002: ...6 1 产品说明 锁定提手 1 小心地将投影机的底部朝上放置 2 按下卡口拉起提手 3 按下左右锁将提手设置在适当位置 若要将提手位置还原 将左右锁往上推然后将提手往下推 ...
Page 1042: ...46 4 便利的功能 4 按四次 SELECT 键打亮 安全 5 按 ENTER 键显示安全画面 6 按一次 SELECT 键打亮密码输入框并按 ENTER 键 显示软键盘 ...
Page 1100: ...104 6 使用屏幕菜单 信号源页 1 输入端口 信号类型 视频类型 信号源名 项目号码 信号源页 2 水平频率 垂直频率 同步类型 同步极性 扫描类型 ...
Page 1112: ...116 8 使用可选的镜头 使用防盗螺丝防止镜头被盗 拧紧正面底部随机附带的防盗螺丝 镜头装置的防盗螺丝孔 ...
Page 1127: ...Printed in China 7N8P6621 NEC Viewtechnology Ltd 2006 ...
Page 1164: ...35 备忘录 ...
Page 1165: ...36 备忘录 ...


