background image

English-8

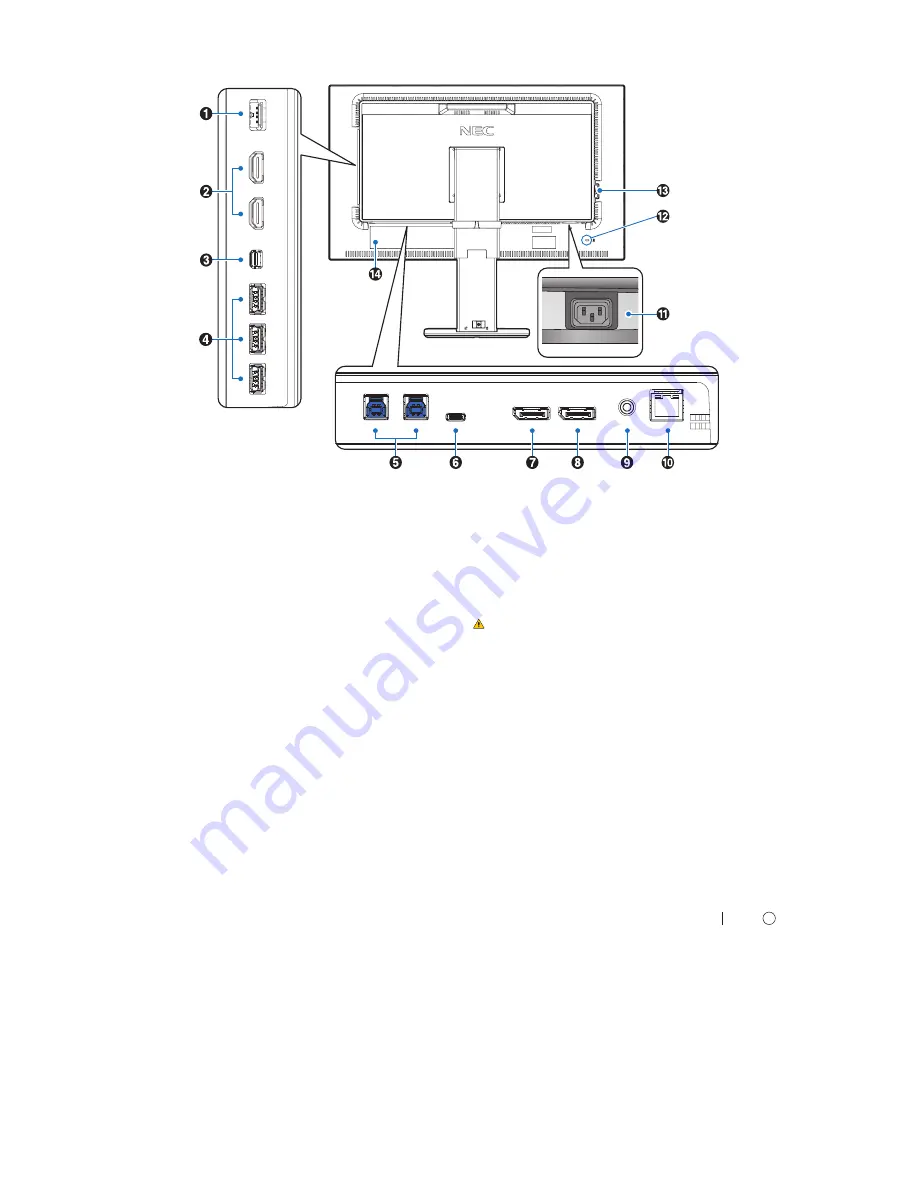
Terminal Panel

A

 SENS/MEM Port

Connect the external USB color sensor or USB memory.

NOTE:

 This port is not for USB hub connection.

B


HDMI IN

Digital HDMI signals input.

C

 Mini-DisplayPort IN

DisplayPort signals input.

D

 USB Downstream Port (Type-A)

Connects with USB devices. 
Connects with external equipment such as a computer 
compliant with USB.

E

 USB Upstream Port (Type-B)

Connects with external equipment such as a computer.
Please use this port to control the monitor from connected 
external equipment.

F

 USB-C Port

Connects with USB Type-C compliant external equipment 
such as a computer.

G

 DisplayPort IN

DisplayPort signals input.

H

 DisplayPort OUT

Outputs DisplayPort signals or USB-C signals.
Connects with DisplayPort input of another monitor.

I


Headphone 

Jack

Connects with headphones.

NOTE:

 Adjustment of the volume control as well as the 

equalizer to other settings than the center position may 
increase the ear-/headphones output voltage and therefore 
the sound pressure level.
Use an audio cable without a built-in resistor. Using an audio 
cable with a built-in resistor lowers the sound.

 CAUTION:

   Do not connect headphones to the monitor 

while you are wearing them.  
Depending on the volume level, it may 
damage your ears and cause loss of hearing.

J

 LAN Port IN (RJ-45)

LAN connection.

K

 AC IN Connector

Connects with the supplied power cord.

L

 Security Slot

Security and theft protection lock compatible with Kensington 
security cables/equipment.
For products, visit Kensington’s website, 

http://www.kensington.com/

M

 Main Power Switch

On/Off switch to turn main power ON/OFF.    : ON     : OFF

N

 Rating Label

Summary of Contents for MultiSync PA271Q

Page 1: ...Please find your model name in the label on the rear side of the monitor MODEL PA271Q BK Desktop Monitor MultiSync PA271Q User s Manual ...

Page 2: ...sh 4 Product Features English 5 Parts Name and Functions English 7 Quick Start English 9 Using the Monitor functions English 13 OSD On Screen Display Controls English 16 Controlling the LCD monitor via LAN English 23 Stand Alone Calibration English 25 Import export and firmware update with USB flash drive English 27 Specifications English 28 Troubleshooting English 30 Manufacturer s Recycling and ...

Page 3: ...ly Plug Type North America European Continental U K Chinese Japanese Plug Shape Country U S A Canada EU U K China Japan Voltage 120 230 230 220 100 When operating the monitor with its AC 125 240V power supply use a power supply cord that matches the power supply voltage of the AC power outlet being used NOTE This product can only be serviced in the country where it was purchased Windows is a regis...

Page 4: ... the following measures Reorient or relocate the receiving antenna Increase the separation between the equipment and receiver Connect the equipment into an outlet on a circuit different from that to which the receiver is connected Consult your dealer or an experienced radio TV technician for help If necessary the user should contact the dealer or an experienced radio television technician for addi...

Page 5: ...ing To ensure the monitor s reliability please clean the holes at the rear side of the cabinet at least once a year to remove dirt and dust When using a LAN cable do not connect to a peripheral device with wiring that might have excessive voltage Immediately turn off the power unplug your monitor from the wall outlet and move to a safe location then refer servicing to qualified service personnel u...

Page 6: ...bility Use a document holder placed close to the screen Position whatever you are looking at most of the time the screen or reference material directly in front of you to minimize turning your head while you are typing Blink often Eye exercise helps to reduce eye strain Please contact your ophthalmologist Get regular eye checkups To avoid eye fatigue adjust the brightness to a moderate setting Pla...

Page 7: ... updates the display s internal color processor reference data with measurements taken using your color sensor Those measurements will become the reference for all color settings in the display Multiple signal input USB type C interface see page 14 Supports video and audio input supplies power and USB hub function with a single cable DisplayPort and HDMI interfaces see page 8 Designed to be future...

Page 8: ...rive connected to the SENS MEM port Ergonomics Human Ambient Sensors see page 7 and page 21 Automatically detects your presence and work environment to determine and control the display brightness to conserve power Fully adjustable quick release stand see page 11 and page 12 Provides flexibility and comfort for individual viewer preferences including height adjustment pivot tilt and swivel capabil...

Page 9: ...OSD control menu G Key7 Information i Shows the SpectraView engine status H Key8 Power Power Turns the monitor on and off I LED Indicates that the power is on The LED color can be changed in the OSD menu J Sensor Detects the ambient lighting and the presence of a user allowing the monitor to make adjustments to various settings resulting in a more comfortable viewing experience Do not cover this s...

Page 10: ...als Connects with DisplayPort input of another monitor I Headphone Jack Connects with headphones NOTE Adjustment of the volume control as well as the equalizer to other settings than the center position may increase the ear headphones output voltage and therefore the sound pressure level Use an audio cable without a built in resistor Using an audio cable with a built in resistor lowers the sound C...

Page 11: ...tem Figure A 2 For a PC with HDMI output Connect the HDMI cable to the connector of the display card in your system Figure A 3 Figure A 3 Mini DisplayPort to DisplayPort cable Figure A 1 Figure A 2 DisplayPort cable HDMI cable NOTE Please use a Certified DisplayPort cable When removing the DisplayPort cable hold down the top button to release the lock Please use a High Speed HDMI cable with the HD...

Page 12: ...UTION Do not bind the USB cable It may cause heat or fire Figure C 1a A Type B Type A Type B Type Maximum Tilt DisplayPort IN USB Upstream USB Type B Headphone Highest Stand Position Figure C 1 DisplayPort OUT LAN USB C USB Downstream USB Type A Power cord Mini DisplayPort IN HDMI 1 IN HDMI 2 IN SENS MEM Remove the SENS MEM and DP OUT cap when using the connector 5 To keep the cables neatly and ev...

Page 13: ...t Tilt and Swivel Hold the top and bottom sides of the monitor screen with your hands and adjust the tilt and swivel as desired Screen Rotation Pivot Hold the monitor on each side and turn it from landscape to portrait To rotate the OSD menu between landscape and portrait refer to the OSD On Screen Display Controls section see page 16 Tilt and Swivel Rotation Raise and Lower CAUTION Handle with ca...

Page 14: ... mounted using an alternate method Reverse the process to reattach stand NOTE Handle with care when removing the monitor stand Mount the Flexible arm This LCD monitor is designed for use with a flexible arm 1 Follow the instructions on how Remove the Monitor Stand for Mounting to remove the stand 2 Use the attached 4 screws to fasten the arm to the monitor Figure F 1 Figure F 1 100 mm 100 mm Weigh...

Page 15: ...Color setting for digital cinema Rec 709 Color setting for High definition television Rec 2100 HLG Color setting for HDR High Dynamic Range broadcasting Rec 2100 PQ Color setting for HDR High Dynamic Range digital cinema on disc and internet streaming High Bright Highest brightness setting Low Blue 1 Reduces blue light emitted from the monitor Paper like color setting Full Native LCD panel color g...

Page 16: ...he power voltage and current information in the OSD If the connected device does not comply with USB Power Delivery or the device is not recognized the information shows In this case the power might be supplied as complies with USB Type C power delivery depending on the type of connected devices and cables Please use a USB C cable that complies with USB Power Delivery USB hub function Allows using...

Page 17: ...ck recovery is set to On DP out multistream setting is set to MST Dark amber 2 W The monitor has passed a certain amount of time with no video signal input when there is an active network signal input Wavering amber 0 5 W The monitor has passed a certain amount of time with no video signal input and there is no network signal input Off mode Off 0 5 Approx 10 W Turn off the monitor by the power key...

Page 18: ...l input touch the Input key NOTE The OSD must be closed in order to change signal input Some functions may not be available depending on the model or optional equipment Menu Pic L Lumi Volume Mute Input i Power Input source Main Menu Icons Main Menu Item Sub Menu Information Adjustment Settings The keys guide and their functions change when the OSD menu is open Control Panel Touch Down or Up key t...

Page 19: ...ite K Adjusts the white color by temperature or x y setting A lower color temperature will result in a reddish screen and a higher color temperature in a bluish screen A larger x value will result in a reddish screen a larger y value changes the screen to greenish and smaller x y values will change the screen to bluish white WHITE RANGE 0 25 0 30 0 35 0 40 0 25 0 30 0 35 0 40 0 45 x y WHITE TEMPER...

Page 20: ...the monitor to use when ambient light level is low L2 Lb L1 and L2 are the brightness levels set by the user to compensate for changes in ambient light dark bright room bright condition Screen Brightness value by Auto Brightness function Bright condition area Dark condition area Uniformity This function electronically compensates for the slight variations in the white uniformity level as well as d...

Page 21: ...sponding to the input signal level White Black Signal format Selects the color space setting for the HDMI DisplayPort signal Input settings Input detect Selects the method of input detection the monitor uses when more than one signal source is connected None The monitor will not search for signals at the other video input ports First When the current video input signal is not present the monitor s...

Page 22: ...harging does not start or is unstable try one of the other settings NOTE The selection of 15W 20W or 30W sets the maximum power wattage that can be supplied to a connected device Depending on the type of connected USB C device the actual wattage is lower than the selected option When 15W is selected output voltage is fixed to 5V When 30W is selected maximum luminance is decreased USB C information...

Page 23: ...s been detected for a period of time the monitor shifts to power saving mode automatically to reduce the power consumption When a person comes near the monitor again the monitor will automatically return to normal mode Custom You can set Backlight and Volume conditions Sensor setting Adjusts the threshold level of human sensing The current threshold is shown to the right of the adjustment slider T...

Page 24: ... Shows a marker by a frame or line NOTE When a line marker is displayed for a long time LCD panel may have image sticking phenomena To avoid it a frame marker is recommended Size Adjusts the size of the marker Aspect Adjusts the aspect ratio of the marker Color Selects the color of a line marker or the brightness of a frame marker Import Export Import Export Imports or exports the settings of your...

Page 25: ...ware allows you to control the monitor settings and get the monitor status including calibration information Please download the software from our web page and install it on your computer OSD control via web browser HTTP server function You can switch the picture modes and video inputs via a web browser To access this function enter the monitor s URL in the web browser on a connected smartphone or...

Page 26: ...espond if the buttons shown on the browser are repeatedly pressed in rapid intervals Should this happen wait a moment and repeat If you still can t get a response turn the monitor off and then back on The HTTP server function is confirmed on some major web browsers however it is not guaranteed to work with all web browsers If the HTTP server screen does not appear in the web browser refresh your w...

Page 27: ...asured Y x y data in the OSD All picture modes are calibrated when this calibration data is updated there is no need to re calibrate when you use other picture modes or edit the picture modes Reset calibration Deletes the result of the Self calibration function and initializes the internal optical data to the factory calibrated data Effective for all picture modes by single operation Validation Me...

Page 28: ...ng the calibration The results of the Self calibration and Validation functions are stored in the monitor and can be read by software on your computer Setting the monitor s time clock is required for this function Follow the instructions on the OSD menu and set the time After the time is set the monitor counts automatically while the AC power is active White copy will adjust only luminance and whi...

Page 29: ...d file are overwritten Please put the exported files on the root folder of the flash drive If you set the IP address of the monitor manually please make sure not to duplicate the IP address NOTE The monitor detects up to 15 files so do not put more than 15 files on the drive Update Firmware Updates the firmware of the monitor Please put the firmware updating file on the root folder of the USB driv...

Page 30: ...cification Revision 3 1 Gen 1 Upstream 3 incl 1 x USB C Port Downstream 3 Downstream Port 5V 0 9A Max USB C Port 30 W Max AUDIO AUDIO Input DisplayPort Connector HDMI Connector Digital Audio Digital Audio PCM 2ch 32 44 1 48 kHz 16 20 24bit PCM 2ch 32 44 1 48 kHz 16 20 24bit Headphone Output STEREO Mini Jack Headphone Impedance 32 Ohm Speaker Output Internal Speaker 1W 1W Stereo Control LAN SENS ME...

Page 31: ...1280 x 1440 60 Hz p For Multi picture 1440 x 900 60 Hz p 1600 x 1200 60 Hz p UXGA 1920 x 1080 24 25 30 50 60 Hz p 1080p 1920 x 1080 50 60 Hz i 1080i HDMI only 2560 x 1440 60 Hz p Recommend p Progressive i Interlace NOTE When the selected monitor resolution is not a native panel resolution the text contents appearance in the monitor screen is expanded in a horizontal or vertical direction to show t...

Page 32: ...on are Off Make sure the Picture mode setting is the same as the ICC profile on the PC Color irregularities on screen Reduce Luminance Set Uniformity to 5 Message Out of range is displayed screen is either blank or shows rough images only Image is displayed roughly pixels are missing and an OSD warning Out of range is displayed Either signal clock or resolution is too high Choose one of the suppor...

Page 33: ...hub does not operate Check to make sure that the USB cable is properly connected Refer to your USB device user s manual Check if the USB upstream port on the monitor is connected to the USB downstream port on the computer Please make sure the computer is ON Disconnect one upstream USB cable when using 2 upstream connections Turn the switches off and on again USB or LAN control is not available Che...

Page 34: ... Saving mode Mode Power consumption LED colour Normal Operation Maximum brightness Approx 60 W Blue Energy Saving Mode 2 W Glowing amber 0 5 W Dusky amber Off Mode 0 5 W Unlit For additional information visit http www necdisplay com in USA http www nec display solutions com in Europe https www nec display com global index html Global For Energy Saving information Default setting Quick recovery Off...

Reviews: