background image

English-4

Audio cable

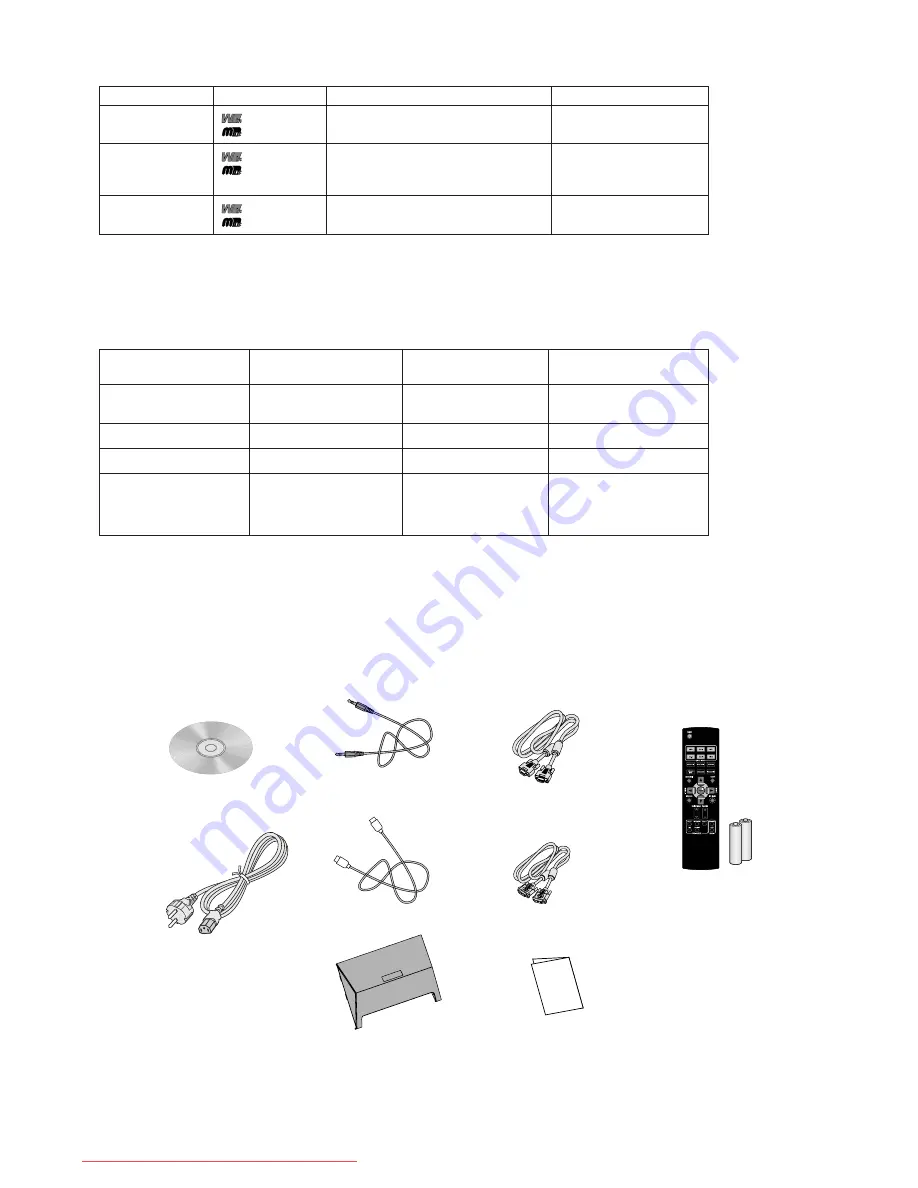
The following accessories are included in the shipment (Contact your dealer if anything is missing or damaged):

User’s Manual

Power cord

Rear cover

Audio cable

HDMI cable

Mini D-Sub 15 pin – Mini D-Sub 15 pin signal cable
(for analog connection)

DVI-D – DVI-D signal cable (for digital connection)

Remote controller with two AAA batteries

Setup Manual

PC Input

*1 Install the specified driver when using Windows.
*2 Macintosh’s output sockets may vary according to the model. Some models may require a commercially available adapter.

See “Connection Types” on page 10 for details.

*3 Analog connection using a DVI-I socket requires a commercially available adapter.

See “Connection Types” on page 10 for details.

Connection Type

Digital Connection

Analog Connection

Dual Input

Computer Type

       Windows*

1

       Macintosh*

2

       Windows*

1

       Macintosh*

2

       Windows*

1

       Macintosh*

2

Output from Computer

DVI-D socket or DVI-I socket

Mini D-Sub 15 pin socket,
DVI-I socket*

3

 or D-Sub 15 pin socket

Concurrent use of digital output and
analog output

Display Auto Control

Not required (plug and play)

Required (Page 17)

Required (for analog
connection only)

HDMI and Video Input

Output Signal from

Imaging Device

Component Video Output
(Y/Pb/Pr)

S-Video Output

Composite Video Output

HDMI Video Output

Imaging Device Type

Digital Tuners,
DVD Players, etc.

Video, game machine, etc.

Video, game machine, etc.

Game Machine,
DVD Player, etc.

Video Input Type

Y/Pb/Pr Input (VIDEO1)

S-Video Input (VIDEO2)

Video Input (VIDEO2)

HDMI Video Input
(HDMI1 and HDMI2)

Audio Input Type

Video/Audio Input (VIDEO1)

Video/Audio Input (VIDEO2)

Video/Audio Input (VIDEO2)

HDMI Audio Input
(HDMI1 and HDMI2)

* Shared with HDMI Video Input
Sockets

Accessories

CD-ROM

Power Cord

HDMI cable

Rear cover

Mini D-Sub 15 pin – Mini

D-Sub 15 pin signal cable

(for analog connection)

DVI-D – DVI-D signal cable

(for digital connection)

Remote controller with

two AAA batteries

Setup Manual

Downloaded from ManualMonitor.com Manuals

Summary of Contents for MultiSync 24WMGX3

Page 1: ...MultiSync 24WMGX3 User s Manual Downloaded from ManualMonitor com Manuals ...

Page 2: ...C Analog Connection Only English 17 Playing Games and Watching DVDs English 19 Monitor Settings OSD Functions English 20 OSD Screen Operations English 21 Options for OSD Functions for PC Input English 23 Options for OSD Functions for HDMI and Video Input English 30 When OSD Functions Are Required English 33 Other Functions English 34 Recommended use English 35 Troubleshooting English 37 If you are...

Page 3: ... it should be read carefully in order to avoid any problems Declaration of the Manufacturer We hereby certify that the color monitor MultiSync 24WMGX3 L248HU is in compliance with Council Directive 2006 95 EC EN 60950 1 Council Directive 2004 108 EC EN 55022 EN 61000 3 2 EN 61000 3 3 EN 55024 and marked with NEC Display Solutions Ltd 4 13 23 Shibaura Minato Ku Tokyo 108 0023 Japan CAUTION Please u...

Page 4: ...ared by the Federal Communications Commission helpful How to Identify and Resolve Radio TV Interference Problems This booklet is available from the U S Government Printing Office Washington D C 20402 Stock No 004 000 00345 4 Declaration of Conformity This device complies with Part 15 of FCC Rules Operation is subject to the following two conditions 1 This device may not cause harmful interference ...

Page 5: ... be connected when HDMI inputs are used at the same time Control brightness and colors On Screen Display OSD Function Page 20 On Screen Display OSD enables control of screen brightness image position size and colors via the screen This screen also enables you to set the OSD Function itself OSD auto off OSD lock etc Adjust monitor angle and height Monitor Stand Adjustment Page 16 The monitor is equ...

Page 6: ... DVI D socket or DVI I socket Mini D Sub 15 pin socket Mini D Sub 15 pin socket DVI I socket 3 or D Sub 15 pin socket Concurrent use of digital output and analog output Display Auto Control Not required plug and play Required Page 17 Required for analog connection only HDMI and Video Input Output Signal from Imaging Device Component Video Output Y Pb Pr S Video Output Composite Video Output HDMI V...

Page 7: ...Button When PIP Screen Not Shown Hot Key Function Pressing the button cycles MP Mode Four Levels Page 23 and 30 OFF LEVEL1 LEVEL2 and LEVEL3 Holding down the button turns on the PIP Function When PIP Screen Shown Pressing the button toggles the main screen and the sub screen Holding down the button turns off the PIP Function 2 DV MODE RESET Button When OSD Screen Not Shown Hot Key Function The but...

Page 8: ...tput to this input 2 Video Audio Input VIDEO1 Connect a commercially available audio cable from an imaging device with a component video output D Terminal to this input 3 Optical Digital Audio Output Outputs the optical digital audio signal Connect a cable to an audio amplifier etc from this output This socket outputs HDMI1 and HDMI2 audio only Use the analog audio output to send out the other typ...

Page 9: ...mute 1 POWER Button Turns the power on and off 2 VIDEO INPUT Button D SUB DVI D HDMI1 HDMI2 VIDEO1 and VIDEO2 Switches the image inputs 3 SCREEN SIZE Button Changes screen sizes Four Levels Page 25 and 30 FULL ASPECT REAL and 2X ZOOM 4 THROUGH MODE Button Turns Through Mode on and off Page 24 and 30 5 MENU EXIT Button Turns OSD Screen on and off While operating the OSD Screen the button returns to...

Page 10: ...monitor Replacing Batteries A Open the battery case cover by pressing the latch on the cover B Align the batteries according to the and indications inside the case C Close the cover Caution Incorrect use of batteries can result in leaks or an explosion Be especially careful about the following points The supplied batteries are not rechargeable Do not attempt to recharge them Make sure to align the...

Page 11: ...e until the monitor is set upright on its stand After the monitor is set upright remove the protect film before using Leaving the protective film may cause discoloration or other damage to the glossy surface Getting Started Prohibition Screws 2 Remove screws and Stand Holder A Remove screws B Remove Stand Holder C Lift the stand until it stops Screws Stand Holder Underside of the Stand Control But...

Page 12: ... Cables DVI I A DVI socket that works with both digital and analog input signals The data type can be selected by using a cable that transfers either digital or analog data DVI D A DVI socket that works with digital input only DVI A A DVI socket that works with analog input only Apple Macintosh pin shape for analog RGB output sockets varies according to the model It is not possible to connect two ...

Page 13: ...on DVI I Mini D Sub 15 pin 3 rows D Sub 15 pin 2 rows Adapter commercially available Adapter commercially available Use commercially available DVI A Mini D Sub 15 pin cable Use Mini D Sub 15 pin Mini D Sub 15 pin cable Use Mini D Sub 15 pin Mini D Sub 15 pin cable Connecting two computers Dual Input Monitor rear DVI D or DVI I Use DVI D DVI D cable Computer DVI I Mini D Sub 15 pin 3 rows D Sub 15 ...

Page 14: ...I D input instead 2 Connecting an imaging device NOTE For details of connecting imaging devices see the documentation supplied with your devices To Connect an HDMI Ready Imaging Device Monitor rear HDMI cable To HDMI Input 2 Or To HDMI Input 1 Game machine DVD player etc Output Commercially available HDMI DVI D cable To DVI D Input To connect an HDMI ready imaging device to the DVI D input set OSD...

Page 15: ...ent To Connect an Imaging Device without S Video Component Video Output Composite Video Output NOTE Some game or video machine may use a special socket or stereo jack for audio output If a designated cable is required purchase the model specified in the documentation supplied with the equipment Output Output R L L R To Y Pb Pr input VIDEO1 Output Commercially available S Video cable To Video Audio...

Page 16: ...o Connect Audio Amplifiers NOTE For details of connecting an audio amplifier see the documentation supplied with your amplifier Use a low impedance audio cable with stereo mini jack plug Using a high impedance audio cable may result in the audio not sounding or very low volume The optical digital audio output with this monitor is not capable for 5 1 channel Audio cable Audio output green Monitor r...

Page 17: ... Move the monitor up and down to confirm the cables are secured with sufficient allowance Caution Perform the reverse procedure when removing the cables and cord Start removing the cable from the point shown by the arrow in the following figure so that they can be removed easily Keep your face away from the rear cover and prevent your nails from getting caught in the cover when taking it on or off...

Page 18: ...d angle to a comfortable position Position the monitor as shown in the figure on the right Tilt Angle Tilt Angle Swivel Angle Do not push the LCD panel surface Caution Avoid trapping your hand or fingers between the display and the installation table or the stand when adjusting the tilt angle and height May cause an injury The monitor joints may be stiff at the initial tilting and height adjustmen...

Page 19: ... on the monitor and the computer 2 Press the INPUT SELECT button on the monitor or the D SUB button in the VIDEO INPUT area on the remote controller to change the video input to D Sub Setting Up Monitor Remote Control 4 Perform Auto Adjust for contrast 1 On Monitor Press the button to the direction five times to choose IMAGE SETTING AUTO CONTRAST On Remote Control Press the Control button five tim...

Page 20: ...hase is performed When the Adjusting message disappears Auto Adjust is complete Now all the Auto Adjust operations are complete 6 Press the MENU EXIT button on the monitor or the remote controller to exit the OSD Screen Monitor Remote Control Monitor Remote Control MONITOR SETTING AUTO ADJUST Monitor Remote Control or or TIP Auto Adjust may not function correctly when either a line based screen su...

Page 21: ...me To mute the sound press the middle of the button To cancel mute press the middle of the button again Playing Games and Watching DVDs NOTE Connect the game machine and imaging device first Page 12 to 14 before using these functions For details of connecting and operating a game machine or imaging device see the documentation supplied with your equipment 1 Press the power switch on the monitor fr...

Page 22: ...e 4 the appropriate screen is displayed automatically The appropriate screen can also be displayed automatically for analog connections if settings are specified in Auto Adjust Page 17 However flickering or blurring of the screen may occur depending on the computer In addition the screen may not be displayed properly depending on the input signal If this occurs use the OSD functions to make adjust...

Page 23: ...FILM MODE PHASE 5 TOOLS P33 INPUT SKIP OFF TIMER LED BRIGHTNESS DDC CI SIDE BORDER COLOR ECO METER ALL RESET OSD Screen Operations Here an explanation of how to perform basic OSD Screen operations is given using contrast adjustment as an example For details on other options refer to Options for OSD Functions Page 23 and 30 Example Adjust the contrast to 100 1 Press the MENU EXIT button on the moni...

Page 24: ...NTRAST SHARPNESS WHITE LEVEL BLACK LEVEL CR OPTIMIZER IV MODE INPUT TYPE MONITOR SETTINGS COLOR CONTROL 1 2 3 only AUDIO CONTROL PIP CONTROL OSD SCREEN DISPLAY POSITION OSD AUTO OFF OFF TIMER INFORMATION AUTO OFF LED BRIGHTNESS and SIDE BORDER COLOR can be restored to factory preset conditions with ALL RESET Page 28 5 Press the MENU EXIT button on the monitor or the remote control twice to clear t...

Page 25: ...oduces moving images clearly with suppressed blurriness and reduced shaking even for fast moving images The MP MODE can be switched according to the movement of the contents OFF The MP MODE is inactive LEVEL1 Best suited for moving images with little movement LEVEL2 Best suited for moving images with some movement LEVEL3 Best suited for moving images with fast movement such as racing games Improve...

Page 26: ...en is bright NOTE When STANDARD1 TEXT sRGB PHOTO or GAME1 is selected for DV MODE or LEVEL1 LEVEL2 or LEVEL3 is selected for MP MODE it is not possible to turn IV Mode on THROUGH MODE Mode that shortens the delay time of picture signals within the monitor Use this mode when you are concerned about the synchronization between the picture and audio NOTE THROUGH MODE realizes shortening of delay time...

Page 27: ...t be selected LEFT RIGHT For D SUB DVI AV input only The adjustment bar 0 0 to 100 0 is displayed Move the button of the monitor in the directions or press the control buttons on the remote control and adjust the display position in the horizontal direction DOWN UP For D SUB DVI AV input only The adjustment bar 0 0 to 100 0 is displayed Move the button of the monitor in the directions or press the...

Page 28: ...ressed and the volume on the right side becomes larger when is pressed SURROUND Switch the surround function on or off Off The surround function is disabled On The surround function is enabled AUDIO INPUT It is possible to switch only the audio input without changing the connection to a particular device MAIN SCREEN PRIORITY Default setting The audio input switches in conjunction with switches in ...

Page 29: ...e aspect ratio D SUB DVI D HDMI1 HDMI2 VIDEO1 VIDEO2 D SUB DVI D HDMI1 HDMI2 VIDEO1 VIDEO2 Sub Main Small Medium Large 4 3 picture signal 400 x 300 520 x 390 640 x 480 5 4 picture signal 400 x 320 520 x 416 640 x 512 Wide picture signal 16 9 400 x 225 520 x 292 640 x 360 Wide picture signal 16 10 400 x 250 520 x 325 640 x 400 PIP POSITION Move the button of the monitor in the horizontal and vertic...

Page 30: ...ts various operations through DDC CI Page 45 communication Move the button of the monitor in the directions or press the control buttons on the remote control and turn DDC CI communication on or off SIDE BORDER COLOR Adjust the color of the areas on both sides of the monitor where nothing is displayed when Screen Size is set to Aspect Move the button of the monitor in the directions or press the c...

Page 31: ...unction that prohibits OSD Screen operations in order to prevent adjustments made by mistake Even while OSD is locked brightness and contrast can be adjusted Operations to set disable OSD Lock cannot be carried out using the remote control Follow the procedure below to set disable OSD Lock using the buttons on the monitor NOTE It is possible to move the button in the directions to adjust the contr...

Page 32: ...tion of rights that are protected by the Copyright Law NOTE When Screen Size is set to a setting other than Full there may be cases where PIP is not able to be displayed In such cases set Screen Size to Full When Screen Size is set to FULL AV ASPECT RATIO does not function The picture is displayed over the entire screen When REAL is selected and AV ASPECT RATIO is 16 9 MODE or SIDE CUT SCREEN SIZE...

Page 33: ... is adjusted with AUTO 4 3 The screen is expanded in the vertical direction by 1 125 fold This makes a PAL 4 3 picture signal circular For other picture signals the circle becomes flattened horizontally PAL 4 3 picture signal Screen where a PAL 4 3 picture signal is adjusted with 4 3 16 9 The screen is scaled down in the vertical direction by 0 84 fold This makes a PAL Squeeze picture signal circu...

Page 34: ... the picture data For pictures with rapid movement such as games there may be cases where movements appear smoother when this function is set to OFF three dimensional I P conversion is not used On Interlaced signals are converted to progressive signals using three dimensional I P conversion Off Interlaced signals are converted to progressive signals using two dimensional I P conversion NOTE If the...

Page 35: ...1 1440 x 900 55 5kHz 60 0Hz 22 1600 x 1200 75 0kHz 60 0Hz 23 1680 x 1050 64 7kHz 60 0Hz 24 1920 x 1200 74 0kHz 60 0Hz 25 1920 x 1200 74 6kHz 60 0Hz Resolution Frequency Horizontal Vertical 26 720 x 480 interlaced 1 15 7kHz 59 9Hz 27 720 x 480 2 31 5kHz 59 9Hz 28 1920 x 1080 interlaced 3 33 7kHz 59 9Hz 29 1280 x 720 4 45 0kHz 59 9Hz 30 1920 x 1080 5 67 4kHz 59 9Hz Resolution Frequency If a signal o...

Page 36: ...nd initiates automatic adjustment of the display position in the horizontal direction the display position in the vertical position the horizontal size and the phase While automatic adjustments are being applied the message Adjusting is displayed NOTE This function is disabled for Y Pb Pr input Power Management Function only when PC input is selected Function that reduces the power consumption of ...

Page 37: ...e sure to install the monitor in a stable location and take measures to prevent falling Immediately unplug your monitor from the wall outlet and refer servicing to qualified service personnel under the following conditions When the power supply cord or plug is damaged If liquid has been spilled or objects have fallen into the monitor If the monitor has been exposed to rain or water If the monitor ...

Page 38: ...long periods of time to avoid image persistence after image effects Get regular eye checkups Ergonomics To realize the maximum ergonomics benefits we recommend the following Adjust the Brightness until the background raster disappears Do not position the Contrast control to its maximum setting Use the preset Size and Position controls with standard signals Use the preset Color Setting Use non inte...

Page 39: ...layed and you have adjusted BRIGHTNESS and CONTRAST check the connection with the computer as well as the computer s frequency resolution and type of output signal If an HDCP compliant device is connected and the screen is not displayed turn off the power of the connected device and then turn it back on again The Power Management function may be in operation Press any key on the keyboard or move t...

Page 40: ...e OSD Screen is displayed under normal conditions there is no malfunction Adjust the color ratio by selecting COLOR CONTROL or restore to factory settings using the DV MODE RESET button If the computer screen is not properly displayed even when the OSD Screen is properly displayed and you have adjusted COLOR CONTROL check the connection with the computer as well as the computer s frequency resolut...

Page 41: ...ut A signal for a resolution higher than that supported by the monitor is input The resolution signal output from the computer that you are using is set to a size other than the recommended sizes 1 Depending on the computer since a regular signal is not output immediately even when the resolution or input frequency is changed the Precautions screen may be displayed However if the screen is display...

Page 42: ...he audio cable is not properly connected to the monitor or the computer s socket There is no sound from the speakers when headphones are plugged in The volume may be minimized or muted When watching videos only for when HDMI VIDEO Input are selected Solutions For details refer to the operating manual for the imaging device Adjust HUE and SATURATION in the OSD function for COLOR CONTROL In order to...

Page 43: ...Save mode blue LED is blinking The blue LED lights and VIDEO INPUT screen is displayed When nothing is displayed on the main screen When the DVI EDID SELECT settings screen is displayed Displayed for DVI D input only Resets selected item Resets selected item When the Input Skip settings screen is displayed MENU EXIT button Clears OSD Screen Clears OSD Screen Clears OSD Screen Clears OSD Screen Up ...

Page 44: ...s power OFF Turns mute function on off Switches between main screen and sub screen Depending on input signal operations may not be possible Clears sub screen The DV MODE switches Displays main OSD Screen Switches input for the sub screen Depending on the combination of input signals operations may not be possible Turns power OFF Adjusts volume becomes louder Adjusts volume becomes softer Sets sele...

Page 45: ...t with surfaces such as tables etc or protruding objects Otherwise this may result in damage 3 Remove the 2 screws that fix the stand to the monitor body TIP If a rear cover is attached remove the rear cover first Page 15 Control buttons Monitor body no stand Mass 24WMGX3 Approx 7 9 kg 4 Remove the stand by sliding it 5 Remove the 2 screws on the back of the monitor TIP If attaching the stand do s...

Page 46: ...consult with the arm manufacturer regarding the installation location etc Attachment of the arm is carried out under the responsibility of the customer Please note that if an accident should occur NEC does not bear any responsibility Do not sleep in locations where it is possible that the monitor will fall during an earthquake etc To prevent fires and electric shocks When attaching the arm make su...

Page 47: ...ghtness that one feels based on age and the average brightness of the displayed picture based on ergonomic knowledge and alleviates fatigue of the eyes Since younger people have a higher sensitivity to brightness in general the IV MODE enables for settings that further suppress brightness Settings can be selected from among OFF JUNIOR MIDDLE and SENIOR MP MODE Motion Picture Mode Page 5 7 23 30 By...

Page 48: ...screen is displayed for a long period of time Residual images gradually disappear if the screen display changes However they eventually may not disappear if the same screen is displayed often for long periods of time avoid using the monitor where the same screen is displayed for long periods of time It is recommended to change the display screen by using Screensaver etc View angle Page 38 47 Refer...

Page 49: ...igital audio output SPDIF for HDMI input Compatible standard etc 3 Energy saving standards International Energy Star Program Safety Electrical Appliance and Material Safety Law UL60950 1 c UL Ergonomics ISO13406 2 compliant TCO 06 Plug play VESA DDC2B Other DDC CI Windows Vista Premium Usage environment conditions Temperature 5 C to 35 C Humidity 30 to 80 non condensing Storage environment conditi...

Page 50: ...r and the environment Electrical safety Emissions Low electromagnetic fields surrounding the display Ecology Product is designed for recycling Manufacturer must have a certified environmental management system such as EMAS or ISO 14 001 Restrictions on Chlorinated and brominated flame retardants and polymers Hazardous heavy metals such as cadmium mercury hexavalent chromium and lead All TCO labell...

Page 51: ...y com in Japan or http www necdisplay com in USA Energy Saving This monitor features an advanced energy saving capability When a VESA Display Power Management Signalling DPMS Standard signal is sent to the monitor the Energy Saving mode is activated The monitor enters a single Energy Saving mode Mode Power consumption LED colour Normal Operation Approx 110W Blue Energy Saving Mode 2W or less Blue ...

Reviews: