background image

To be certain your second AP20 is at default, consider going to its Management screen and clicking 

Default

Base Station

.

6. In your second AP20, go to the Multi cell screen, set Multi cell system: to Enabled and click 

Save and Reboot

You don't have to do any more programming in the second AP20.

7. Log back into the administrator in your first (primary) AP20 Access Point.

8. Wait a minute or two for the multicell DECT chain to set up. When it does, you'll see additional options in the

Multi cell screen:

DECT system settings

Base station settings

Base Station Group

DEC Chain

9. In the Base Station Group section, for ID 1 (which represents your second AP20), set DECT sync source to

Primary:RPN00 and click 

Save

.

10. Wait another minute or two for your AP20 Access Points to synchronize and your multicell installation should

be ready to use.

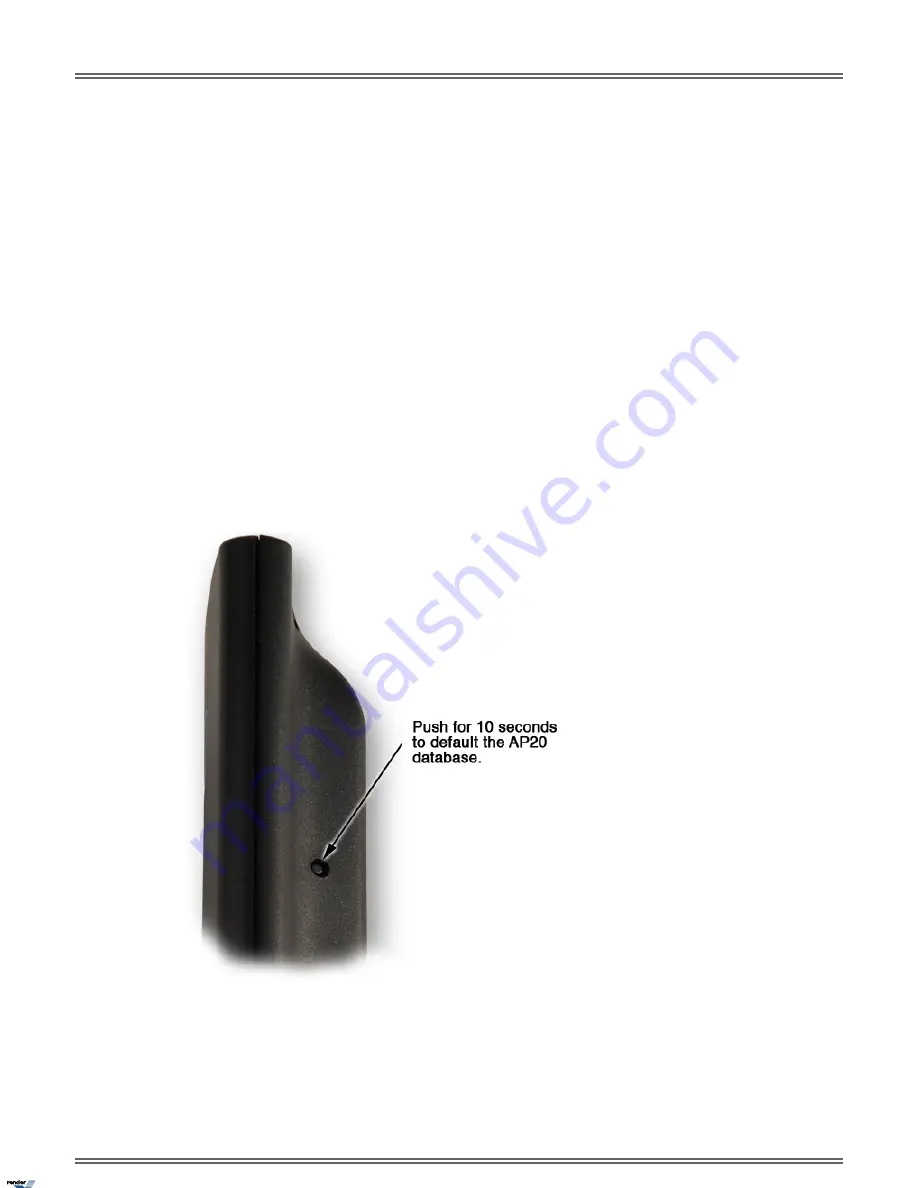
Step 9. (Optional) Default the AP20 Access Point Database.

If you make a mistake in your AP20 Access Point programming from which you can't recover, you can manually
default the database and start over.

This returns all the AP20 options to their factory-installed default values.

DSX | 

ML440 Wireless IP DECT Quick Reference Guide

 | 11

XML to PDF by RenderX XEP XSL-FO Formatter, visit us at 

http://www.renderx.com/

Summary of Contents for ML440

Page 1: ...For additional resources visit http www necdsx com Empowered by Innovation ML440 Wireless IP DECT Quick Setup Guide P N 1093100ML440 Printed in U S A ...

Page 2: ... has no obligation to provide any updates or corrections to this manual Further NEC Corporation of America also reserves the right without prior notice to make changes in equipment design or components as it deems appropriate No representation is made that this manual is complete or accurate in all respects and NEC Corporation of America shall not be liable for any errors or omissions In no event ...

Page 3: ...10 Step 9 Optional Default the AP20 Access Point Database 11 ML440 Handset 13 ML440 Handset Key Layout 13 ML440 Feature Key Assignments 14 ML440 Key Assignments Chart 14 ML440 Handset Features 18 Account Codes 18 Barge In Intrusion 18 Call Coverage Keys 18 Call Forwarding 19 Call Timer 20 Call Waiting Camp On 20 Callback 20 Caller ID 20 Central Office Calls Answering 21 Central Office Calls Placin...

Page 4: ...31 Park 31 Prime Line Preference 32 Privacy Release Groups 32 Removing Lines and Extensions From Service 33 Ringdown Extension 33 Ringing Line Preference 34 Save Number Dialed 34 Speed Dial 34 Tandem Calls Unsupervised Conference 35 Transfer 36 Voice Mail IntraMail 37 Voice Over 38 AP20 Programming Screens 40 ML440 Wireless IP DECT Frequently Asked Questions 51 Capacity 51 Installation 51 Technolo...

Page 5: ...ML440 Wireless IP DECT Quick Reference Guide ...

Page 6: ...y charged Once the site AP20 Access Point is up and running you ll use an ML440 handset to find the AP20 IP address for programming Step 2 Connect the AP20 Access Point to the Site Router 1 Verify that the PoE switch or DSX IPA is plugged into the site LAN 2 Using a CAT5 or higher Ethernet cable plug the AP20 Access Point into the PoE switch or DSX IPA Refer to the installation instructions that c...

Page 7: ... Set Plug n Play to Disabled NAT Settings NAT Traversal is currently not supported in theAP20Access Point Leave at default Disabled SIP RTP Settings Set Local SIP port to 5060 and SIP registration mode to Static Leave the other options at default Click Save to save your entries 6 In the Extensions screen click Add extension and make these entries for each ML440 Handset you want to register Extensi...

Page 8: ...e must match the entry in the AP20 Access Point Extensions screen 4 Program the extension name In Stations Config Setup Type Name 2102 02 enter a suitable name for each DSX IP extension that will have a corresponding ML440 handset After initial installation the ML440 handset will use this name not the one programmed in the AP20 Access Point Step 6 Register the ML440 handsets with the AP20 and the ...

Page 9: ...P20 Access Point 2 Place the AP20 Access Point in a central location plug it into an IPA or 802 3af 2003 PoE device and let it start up If the AP20 is not connected to the LAN the status LED will flash red after the AP20 boots This is OK and will not interfere with the survey 3 From an ML440 handset registered with the AP20 Access Point wake the handset and do the following a Press MENU b Dial SER...

Page 10: ...lticell Installation 1 Do not connect your second AP20 Access Point yet 2 From the Multi cell screen in your connected primary AP20 set Multi cell system to Enabled and click Save and Reboot 3 Wait for the AP20 to restart and log back into the primary AP20 Access Point administrator 4 Connect the second AP20 and wait for it to start up 5 At an ML440 handset press MENU and dial IP 47 to get the IP ...

Page 11: ... Multi cell screen DECT system settings Base station settings Base Station Group DEC Chain 9 In the Base Station Group section for ID 1 which represents your second AP20 set DECT sync source to Primary RPN00 and click Save 10 Wait another minute or two for your AP20 Access Points to synchronize and your multicell installation should be ready to use Step 9 Optional Default the AP20 Access Point Dat...

Page 12: ...n on the upper right side of the AP20 3 Using a pointed object such as a paper clip press the reset button for about 10 seconds The Status LED will be orange for about 8 seconds and red for about 2 seconds 4 Release the reset button The AP20 will restart with the factory installed default database 12 DSX ML440 Wireless IP DECT Quick Reference Guide ...

Page 13: ...ML440 Handset ML440 Handset Key Layout DSX ML440 Wireless IP DECT Quick Reference Guide 13 ...

Page 14: ...Line Busy Lamp Field BLF Off Line is idle or not installed On Line is busy or a co worker has placed it on Exclusive Hold Slow Flash Line is ringing Fast Flash Line on System Hold Press key to Park or retrieve parked call Park Orbit Busy Lamp Field BLF Off Orbit is idle Fast Flash Orbit is holding a parked call Press key to call Hotline partner Hotline Busy Lamp Field BLF Off Partner extension is ...

Page 15: ...ing into the assigned Page zone is busy Fast Flash A co worker is paging into the assigned Page zone Press key to dial stored number System Speed Dial There is no BLF for this key type Press key to dial stored number Personal Speed Dial There is no BLF for this key type Not available on ML440 Call Timer Press key to record conversation into mailbox Voice Mail Record You must have voice mail instal...

Page 16: ...l Account Code Busy Lamp Field BLF Off Not in Account Code mode or not entering Account Codes Fast Flash In the Account Code entry mode On On a call for which the user has entered an Account Code Not available on ML440 Call Forwarding Not available on ML440 Headset Press key to place or answer an Intercom call Intercom Busy Lamp Field BLF Off Intercom is idle Slow Flash Incoming Intercom call ring...

Page 17: ...key to manually activate the assigned schedule Manual Activation Mode Busy Lamp Field BLF Off Manual Activation Mode inactive On Manual Activation Mode active Press key to the Home Automation System control Automation Busy Lamp Field BLF Off Unit inactive On Unit active DSX ML440 Wireless IP DECT Quick Reference Guide 17 ...

Page 18: ...ode each time you place an outside call If your system also has Verified Account Codes enabled you must enter a code from the Verified Account Codes Table Barge In Intrusion Barge In is disabled by default To Barge In on a call 1 Place one of the following types of call a Call a busy extension b Press a line key for a busy line c Press TALK and dial a Line Group access code e g 9 d Press TALK and ...

Page 19: ... covered extension a The Call Coverage Feature Key lights while you are connected To Transfer your call using a Call Coverage Feature Key 1 Do not hang up 2 Press Transfer soft key 3 3 Press your Call Coverage Feature Key 4 Do one of the following a Announce the call to make a Screened Transfer Hang up if your co worker accepts the call b Hang up to send the call through as an Unscreened Transfer ...

Page 20: ...Callback at a busy co worker s extension 1 Call the busy extension a Listen for busy or busy ring tone b With IntraMail installed you will hear a voice prompt first 2 Dial 2 and hang up a Stay on the line without hanging up if you want to Camp On instead 3 When your busy co worker becomes free you hear Intercom ringing 4 Press TALK to answer the Intercom ring a The system automatically places a ca...

Page 21: ...oft key 3 3 Dial outside number a If the number doesn t dial out within 6 seconds your system probably has Store and Forward enabled Just dial to have the call go through right away To place an outside call using Line Dial up or Direct Line Access 1 Press TALK 2 Do one of the following a For Line Dial up dial 9 followed by the line number e g 01 for line 1 If you hear busy tone you may be able to ...

Page 22: ... have exceeded the system s Conference limit 5 Repeat steps 2 4 to add additional parties to your Conference a To optionally place a Conference on Hold press Hold soft key 1 b To retrieve the Conference from Hold press TALK to show the soft keys and then press Hold soft key 1 6 To exit the Conference press END a The remaining parties can continue their conversation uninterrupted b If you were in C...

Page 23: ...Disturb in your display b With IntraMail installed you will hear a voice prompt first c If you hear busy or ring busy tone instead your co worker is busy on a call 2 Dial 1 a You can alternately press the Hotline Feature Key for your co worker 3 The system automatically places a ringing Intercom call to your co worker Door Box Door Boxes are not installed and programmed by default In order to ring...

Page 24: ...your extension to your group b Dial 6 to remove your extension from your group Flash Flash is enabled by default but the ML440 handset does not have a specially programmed Flash Feature Key To Flash the outside line you are on 1 Press your specially programmed Flash Feature Key 2 The system will send a Flash signal to the outside line Forced Line Disconnect Forced Line Disconnect is disabled by de...

Page 25: ... Speak with the caller To answer a call ringing another Ring Group of which you are not a member 1 Press TALK 2 Dial and the Ring Group number e g 601 3 Speak with the caller To make an Intercom call to a Ring Group 1 Press TALK 2 Dial the Ring Group number e g 601 3 Wait for your co worker to answer To Transfer your call to a Ring Group 1 Press Transfer soft key 3 2 Dial the Ring Group number e g...

Page 26: ... example dial 01 for line 1 b You must know the number of the line that is on Hold To place an Intercom call Hold 1 Press Hold soft key 1 2 Press End to hang up a If you have a specially programmed Intercom Feature Key the key flashes to indicate that it is on Hold The call will recall if you leave it on Hold too long To pick up an Intercom call you placed on Hold 1 Press TALK 2 You connect to the...

Page 27: ... Screened Transfer Hang up if your co worker accepts the call b Hang up to send the call through as an Unscreened Transfer c Press the flashing line key to return to the call if your co worker doesn t want it 5 When you Transfer a call it will recall to you if it is unanswered at the destination If you don t answer the recall it diverts to Key Ring Intercom Intercom is enabled by default An Interc...

Page 28: ...epeatedly to answer additional waiting calls Last Number Redial Last Number Redial is enabled in the ML440 handset by default To redial a call 1 While idle press Calls idle soft key 3 2 Scroll down to the number you want to redial a If you are redialing an Intercom number press Call soft key 1 Do not go to steps 3 5 3 Press more soft key 3 and then scroll down to Edit before call 4 Press Select to...

Page 29: ...d 2 When the programmed start time for the manually activated schedule occurs the schedule will run To skip ahead to the next schedule entry 1 Press the Skip Ahead Feature Key for the schedule a The key is on when the Skip Ahead is activated 2 The Skip Ahead Feature Key goes out when the schedule to which the system has skipped becomes current Meet Me Conference Meet Me Conference is enabled by de...

Page 30: ...inues to flash you have additional messages waiting Microphone Mute Microphone Mute is available in the ML440 handset by default To mute your handset s microphone 1 While on a handset or speakerphone call press MUTE on the side of your handset 2 The Mute icon at the top of the handset display indicates that the microphone is muted a To cancel Microphone Mute press MUTE again b Microphone Mute also...

Page 31: ...at doesn t provide this feature 3 Talk to the caller Paging The capability to make a Page is enabled by default There are no Page Feature Keys assigned by default The ML440 handset cannot receive Paging announcements To make an Internal Paging Announcement 1 Press TALK 2 Dial 1 3 Dial the Page Zone number 1 7 or 0 for All Call a You can now place a new call on the line To talk to the Page initiato...

Page 32: ...n at which you want to Park the call 3 Press END to hang up a The line key flashes while the call is parked To retrieve a call parked at a co worker s extension Personal Park 1 Press TALK 2 Dial then the number of the extension at which the call is parked 3 Talk to the outside caller Prime Line Preference Prime Line Preference is set to Intercom by default To place a call on your Prime Line 1 Pres...

Page 33: ... service 1 Press TALK 2 Dial 40 3 Do one of the following a Dial the number of the extension you want to remove from service e g 302 b Dial the extension number of the line you want to remove from service e g 101 for line 1 4 Dial 6 to remove the line or extension from service a At the extension removed from service you see Out of Service b The line key for a line removed from service will be on r...

Page 34: ... to the ringing call Save Number Dialed Save Number Dialed is enabled by default The ML440 handset does not have any Save Number Dialed Feature Keys assigned To save the outside number you just dialed up to 20 digits 1 Press your Save Number Dialed Feature Key 2 The number is saved in memory To redial a saved number 1 Optional Press a line key to preselect a line for the call 2 Press your Save Num...

Page 35: ...ll 1 Place or answer an outside call 2 Press the Conf soft key soft key 2 a Your hear Intercom dial tone b Your caller hears Music on Hold if installed while they wait for you to set up the Conference 3 Place or answer another outside call a You can optionally retrieve a call from Park Orbit 4 Press Conf soft key 2 to set up the Conference a If you cannot add additional parties to your Conference ...

Page 36: ...ne a normal Tandem Call b The line loop keys for the outside lines stay on c If the outside parties immediately disconnect the lines you selected or your extension does not have Tandem Call capability Transfer Transfer is enabled by default To Transfer your call 1 Do not hang up 2 Press Transfer soft key 3 3 Do one of the following a Dial your co worker s extension b Press a Call Coverage or Hotli...

Page 37: ...to your co worker s speakerphone using Handsfree Transfer 1 While on an outside call do one of the following a Press Transfer soft key 3 and dial a co worker s extension number b Press Hotline Feature Key for your co worker 2 Listen for two beeps a If you hear ringing instead of two beeps you cannot use Handsfree Transfer 3 Press your Flash Feature Key to send the call directly to your co worker s...

Page 38: ... mailboxes for co workers b Your Voice Mail Record Feature Key lights while the system calls your mailbox Once recording begins the key flashes fast and you hear the voice prompt Recording 2 To stop the recording press your Voice Mail Record Feature Key again To call the Message Center 1 Press the Message Center Feature Key a The Message Center Feature Key flashes when there are new messages in th...

Page 39: ... don t hear busy ring you cannot Voice Over b If your system has IntraMail you will hear a voice prompt first 2 Dial 9 and then speak to your busy co worker a Your co worker at a keyset can press MUTE to respond to your Voice Over DSX ML440 Wireless IP DECT Quick Reference Guide 39 ...

Page 40: ...he AP20 the Operation time will restart Operation time The RFPI Radio Fixed Part Identity is a unique alphanumeric string that identifies the DECT radio inside the AP20 The AP20 unit itself is identified by its RPN Radio Part Number RFPI Address This is the MAC Media Access Control address of the AP20 Ethernet port The AP20 MAC Address can be helpful information when setting up the DSX site router...

Page 41: ...tup Type Name 2102 02 instead of your entry here The IPEI International Portable Equipment Identifier is a unique identifier programmed into each ML440 handset You cannot change it IPEI When a handset is successfully registered with the AP20 and the system this field will show SIP Registered RPNxx where RPNxx is the Radio Part Number of the associated AP20 Access Point State The ML440 handset firm...

Page 42: ...es the DSX system at IP address 172 16 3 3 and uses SIP port 5060 This is the frequency with which the AP20 Access Point reregisters with the DSX system Leave this value at default 300 seconds Reregistration time s Use this option to select the method the AP20 Access Point uses to convey DTMF information to the DSX system Choose RFC 2833 DTMF Signaling Only G711U should be available Delete all oth...

Page 43: ...mask network mask obtained from the site DHCP server When DHCP is enabled you cannot change this option Subnet Mask This field displays the AP20 Access Point Default Gateway router IP address obtained from the site DHCP server When DHCP is enabled you cannot change this option Default Gateway This is the IP address of the primary DNS server provided by the site DHCP server When DHCP is enabled you...

Page 44: ... Save Cancel any new entries you have made to the on screen settings The settings will return to their previously saved values Cancel Table 5 Management In addition to allowing you to enter a custom name for the AP20 Access Point the Management screen provides the options for setting up logs and traces If you want to take advantage of these maintenance options refer to Appendix A in the ML440 and ...

Page 45: ... the options to their factory set default values Default Base Station Table 6 Firmware Update The Firmware Update screen provides the options required for updating the ML440 handset and AP20 Access Point firmware If new firmware becomes available you can use a privately hosted TFTP Trivial File Transfer Protocol server for the update For more on setting up your TFTP server and loading the new firm...

Page 46: ... allows you to change the default login username and password to something more secure Optionally enter a new username for the AP20 administration program up to 15 characters The default setting is admin Username Optionally enter a new password for the AP20 administration program up to 15 characters The default setting is admin Password If you change the username and or password click this option ...

Page 47: ...A 31192 for more on the Central Directory Import Central Directory Click in the data entry area or click Browse to select the csv file on your PC hard drive to load into the Central Directory Filename Once you have selected the csv file in the Filename option click this option to load the csv file into the AP20 Access Point Load Table 10 Multi cell The Multi cell screen lets you extend the range o...

Page 48: ...e the same System chain ID System chain ID The AP20 Access Points in the chain automatically re synchronize after this interval Leave this setting at default 60 seconds Synchronization time s Select None Multi cell debug Click to save your changes and reboot the AP20 Save and Reboot Click to save your changes without rebooting Save Cancel your new entries The settings will return to their previous...

Page 49: ...Save This will download the file Settings cfg to your browser s download directory This is a plain text file that can be inspected in a standard text editor Save Table 12 Syslog The Syslog screen provides a log of AP20 Access Point events Each event contains a timestamp and human readable description of the event You may find this information helpful when troubleshooting For more on how you can ha...

Page 50: ...for all packets involving the AP20 Access Point The trace results are similar to the text portions of a Wireshark trace However with the SIP Log you don t have to have a separate PC with Wireshark installed an Ethernet hub and Ethernet cables Click to clear reset the SIP Log The SIP Log screen should go blank Clear Click to reload the current SIP Log data in the AP20 into the SIP Log screen Reload...

Page 51: ...wer the AP20 Access Point The AP20 does not have a separate external power supply and obtains power only from PoE What type of network is required at the installation site The router at the installation site must be set up as a DHCP server By default the AP20 Access Point is set as a DHCP client and can obtain an IP address for programming only from a DHCP server Additionally all AP20 Access Point...

Page 52: ...te key Off Hook Hold Transfer Conference Soft key call status No Text messaging AP20 Access Point 1920 1930 MHz Frequency Range Yes Omni directional Yes DECT authentication and encryption 10 single AP 8 multiple APs Concurrent calls per access point Yes LAN connection Yes Peer to peer Yes NEC iSIP support No NAT Traversal G 711 Codecs Supported 802 3af Power requirements Yes RoHS compliant Wall st...

Page 53: ......

Page 54: ... 1093100ML440 Printed in U S A NEC Corporation of America General Channel 4 Forest Parkway Shelton CT 06484 www necdsx com ...

Reviews: