background image

7

PiN Pocket PC 00 | User Manual

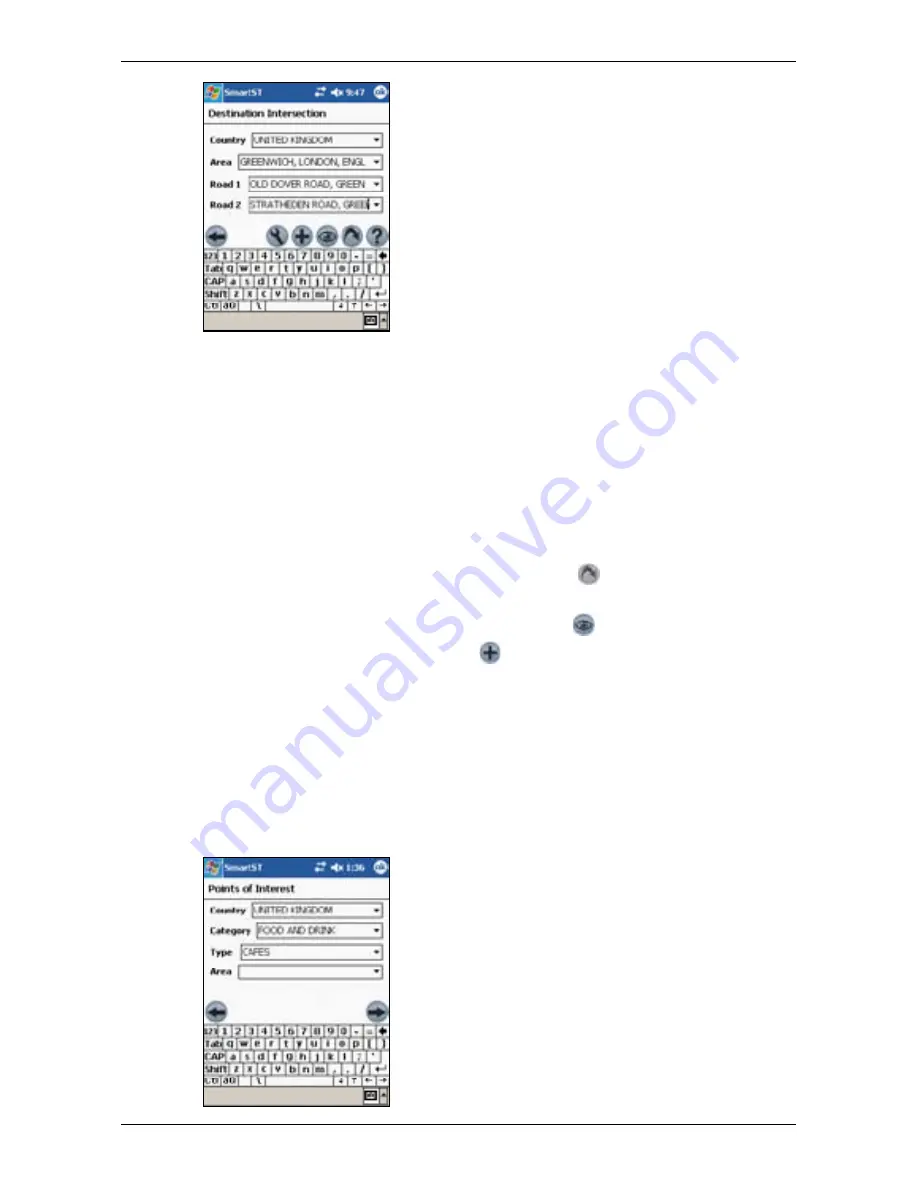
2. Select a country from the Country drop-down box.
. Type and select the destination address:

• To select an area, type the name of a geographical location such as a town, city, state or 

county in the Area box. Select the area from the list that displays.

• Type the name of one of the intersecting roads in the Road 1 box. Select the road from the 

list that displays.

• Tap the Road 2 box. A list of roads that intersect with the road specified in the Road 1 box 

will display. Select a road from the list that displays.

4. Complete one of the following:

• To calculate and display the route to the intersection, tap 

. The D Map screen will 

open.

• To display the address without calculating the route, tap 

. The Map screen will open. 

• To add the intersection as a favourite, tap 

.

To a Point of Interest (POI)

A POI is a named site, feature, landmark or public venue. POIs are stored in Categories, such as 

parks and museums. POIs can be displayed as icons on a map.
Note: You can also navigate to a POI via the pop-up Map menu. See page 2.

1. From the Main Menu, tap Destination, then Points of Interest. The Points of Interest screen 

will open.

Summary of Contents for PiN 300

Page 1: ...PiNPocketPC with SmartS TM 2005 Quick Start Guide and User Manual United Kingdom Australia New Zealand Edition...

Page 2: ......

Page 3: ...Card 6 Installing SmartS Desktop on Your Computer 7 Accessing SmartS Desktop 7 Updating SmartS 7 Installing Maps Using SmartS Desktop 8 Turning Your PiN On and Off 9 Positioning Your PiN in a Vehicle...

Page 4: ...Quick Start Guide PiN Pocket PC 300 Quick Start Guide...

Page 5: ...ad the vehicle mount installation instructions carefully Do not operate your PiN while driving Do not place your PiN in a position that obstructs the driver s view or interferes with the operation of...

Page 6: ...to display the Pop up menu Tap and drag the screen with the stylus to navigate the Map and 3D Map screens Opens the Main Menu screen Cycles through the Map 3D Map Next Instruction and Instruction Lis...

Page 7: ...e Indicator is green From AC Power 1 Slide the plug on to the AC adapter 2 Connect the USB cable to the bottom of the PiN 3 Connect the AC adapter to the power connector on the USB cable 4 Plug the ot...

Page 8: ...Zealand Warning If after installation any of the files on the memory card are deleted you will need to reinstall SmartS from the enclosed SmartS Application CD using SmartS Desktop on your computer 1...

Page 9: ...ion manually Start Run Type d setupSSP_PPC exe where d is the letter assigned to your CD ROM drive Click OK 3 Follow the screen prompts to install SmartS Desktop Select your preferred language for Sma...

Page 10: ...ilable maps will display 5 Click the map you want to install to your PiN Maps are of population areas and not of politi cal areas such as counties or states You may need to install multiple maps to co...

Page 11: ...l the bottom of the GPS receiver away from the PiN The receiver will lift out to a horizon tal position to allow it to obtain a GPS fix 2 Press the Power button Turn PiN Off 1 Press the Power button T...

Page 12: ...he PDA cradle to the PDA windshield suction mount by inserting the four tabs at the end of the suction mount arm in the four slots on the cradle Ensure that the Close arrow on the suction mount is poi...

Page 13: ...13 PiN Pocket PC 300 Quick Start Guide Quick Start Guide...

Page 14: ...tart Guide Main Menu Screen The Main Menu screen gives you access to all of SmartS s functions including navigating to a destination 1 From the Map screen push the 4 way toggle to open the Main Menu s...

Page 15: ...et PC User Manual Getting a GPS Fix 1 From the Map screen push the 4 way toggle to open the Main Menu screen 2 Tap then GPS Status to open the GPS Status screen 3 Tap the first drop down box and selec...

Page 16: ...post code or zip code type the up to five characters of the post code in the Post Code box or the zip code in the Zip Code box Select the post code or zip code from the list that displays Note When n...

Page 17: ...ints of Interest Results screen displaying your search results 5 Select a POI from the list of search results Only the first 40 search results will display If the list is long begin typing the name of...

Page 18: ...ect the area from the list that displays To select a road type the name of a road in the Road box Select the road from the list that displays To select a street number type the street number in the Ho...

Page 19: ...19 PiN Pocket PC 300 Quick Start Guide Quick Start Guide Tap OK The Trip Planner screen will reopen 11 Tap The 3D Map screen will open SmartS will calculate and display the trip...

Page 20: ...d the map by dragging the stylus across the screen Tap and hold to access the Map pop up menu 3D Map Screen The 3D Map screen displays when a route is calculated oriented to the travelling direction w...

Page 21: ...roll up and down the list of instructions using to scroll up and to scroll down Tap and hold to access the Pictorial Intersections menu to select whether to display pictorial intersection icons or nex...

Page 22: ...if you make a wrong turn The Rerouting symbol will display on the 3D Map and Next Instruction screens while the route recalculates Automatic rerouting is enabled on the Route screen For information on...

Page 23: ...a town city state or county in the Area box Select the area from the list that displays Type the name of a road in the Road box Select the road from the list that displays Type the street number in t...

Page 24: ...en Further Information For information on SmartS features not detailed in this Quick Start Guide such as customising settings installing SmartS Desktop Basemaps and Custom Points of Interest POIs see...

Page 25: ...artS 8 7 Main Menu Screen 9 8 GPS Status 10 9 Setting your Destination 12 10 Avoiding an Area 17 11 Viewing your Route 18 12 Map Screen Pop up Menu 23 13 Route Demonstrator 24 14 Trip Meter 24 15 Favo...

Page 26: ...26 PiN Pocket PC 300 User Manual...

Page 27: ...llites at any time only three are needed to provide the two dimensional position or fix latitude and longitude required for vehicle navigation systems GPS data is available free of charge for any user...

Page 28: ...to install SmartS Desktop Select your preferred language for SmartS Desktop when prompted Review and accept the License Agreement when prompted SmartS Desktop will open You are now ready to install a...

Page 29: ...of SmartS you are using 1 Open SmartS Desktop Start Programs Navman SmartS Desktop 2 On the Setup menu select Update software then Check for updates on the web Your computer will connect to the Inter...

Page 30: ...or your PDA came with a pre activated Map Product Key the map will change colour to indicate it has been selected Go to step 8 otherwise continue 6 Follow the prompts to activate the Map Product Key...

Page 31: ...Tapping the or in the top right corner of an application does not usually close the application but leaves it running in the background To close all applications see your Pocket PC manual 3 Tap Start...

Page 32: ...Map screen 3D Map screen Next Instruction screen Instruction List screen Up From the Map screen enables you to zoom in to view less of the street map but with more detail From the 3D Map screen with...

Page 33: ...Main Menu Screen The Main Menu screen gives you access to all of SmartS s functions including navigating to a destina tion 1 From the Map screen push the 4 way toggle to open the Main Menu screen 2 Ta...

Page 34: ...n GPS Status to open the GPS Status screen 3 Tap the first drop down box and select the COM port for your GPS receiver from the list that appears See your GPS receiver manual for the correct COM port...

Page 35: ...the first drop down box No GPS Data A GPS COM Port has been opened but no GPS data is being received Ensure the GPS receiver is turned on and connected Waiting for GPS A GPS COM Port has been opened...

Page 36: ...lays Note When navigating in the United Kingdom type the post code with spaces but without the last two letters To select an area type the name of a geographical location such as a town city state or...

Page 37: ...the Road 1 box will display Select a road from the list that displays 4 Complete one of the following To calculate and display the route to the intersection tap The 3D Map screen will open To display...

Page 38: ...route tap The Map screen will open To add the POI as a favourite tap To a Destination using Pocket PC Contacts Addresses stored in your Pocket PC Contacts database can be used to set a destination Th...

Page 39: ...n To display the address without calculating the route tap The Map screen will open Multiple Destination Points with the Trip Planner You can use the Trip Planner to set multiple destination points fo...

Page 40: ...r in the House No box Select the road from the list that displays 6 Tap The destination point is added to your trip To add another destination point go to step 4 7 Tap to return to the Destination scr...

Page 41: ...oute You can plan a route directly from the Map or 3D Map screen using the pop up Map menu For more information on the pop up Map Menu see page 23 1 From the Main Menu tap Map 2 Scroll the map by drag...

Page 42: ...e Avoid Area to the correct size and position To position the Avoid Area tap and drag it to the area you want to avoid To size the Avoid Area tap and drag the sizing boxes to the size required 5 Tap t...

Page 43: ...y dragging the stylus across the screen Tap and hold to access the Map pop up menu 3D Map Screen The 3D Map screen displays when a route is calculated oriented to the travelling direction with an adju...

Page 44: ...h the screens until the Instruction List screen is displayed Scroll up and down the list of instructions using to scroll up and to scroll down Your current position is marked with Your next turn is hi...

Page 45: ...ed To view the Turn List View screen tap Turn List View on the Main Menu Scroll up and down the list of instructions using to scroll up and to scroll down Tap an instruction to view the map for the tu...

Page 46: ...right corner of the screen Viewing the Location Summary A summary of a location can be displayed on the Map or 3D Map screen The location summary includes Name of street POI Favourite or Quick Nav De...

Page 47: ...47 PiN Pocket PC 300 User Manual Automatic rerouting is set on the Route Settings screen...

Page 48: ...splays a list of your Quick Navs Route Detour Reroutes your route to avoid the next 1 2 5 or 10 kilometres or miles Add To Trip Adds the selected point to your trip as a destination point Add to favou...

Page 49: ...up Map menu Step 2 Select Destination Point 1 Find your destination point by scrolling the map with the stylus 2 Tap and hold the road or POI icon that represents your destination 3 Select Navigate to...

Page 50: ...ain Menu tap then Trip Meter The Trip Meter Current Route screen will open The Trip Meter Totals screen is used to view the distance travelled average speed maximum speed time taken and stationary tim...

Page 51: ...elect an area type the name of a geographical location such as a town city state or county in the Area box Select the area from the list that displays To select a road type the name of a road in the R...

Page 52: ...rom the Main Menu tap Quick Nav 2 Tap your previously saved Quick Nav destination The 3D Map screen will open SmartS will calculate and display the route to the Quick Nav Using Favourites 1 From the M...

Page 53: ...Map screen select the Display Blocked Road Icons check box in the Map Detail section To display grid lines on the Map screen select the Display Map Grid check box in the Navigation Options section To...

Page 54: ...t these changes and open the Map screen Route Recording Routes can be saved to your PDA or memory card for future reference To record a route complete the following 1 From the Main Menu tap Setup then...

Page 55: ...ute Recording section to stop playing the route 8 Tap to open the Map screen Route Settings 1 From the Main Menu tap Setup then the Routing tab The Routing Settings screen will open 2 Modify the setti...

Page 56: ...ay be interested in entertainment venues only and want to disable other POI categories such as schools 1 From the Main Menu tap Setup then the POI tab The Points of Interest Settings screen will open...

Page 57: ...to a comma delimited file complete the following 1 From the Main Menu tap Setup then the Lists tab The Lists Settings screen will open 2 Select the Favourites option 3 Tap Export to export your favour...

Page 58: ...1 From the Main Menu tap Setup then the Active POI tab The Active POI Settings screen will open 2 Select the custom POI to be configured from the POI drop down box 3 Select the Active check box to act...

Page 59: ...ame of the City or Town The Desktop Map will rotate to center on the selected City or Town Map Colours and Textures To access the Desktop Colours section Desktop tab Settings Colours Adjust the settin...

Page 60: ...using the POI Editor A maximum of 25 Custom POIs can be saved on your iCN The Custom POI files are listed on the My POI screen Custom POIs can be set to announce when in close proximity at the Select...

Page 61: ...e Visual Alert check box To enable an audible chime when the POI is in close proximity select the Audio Alert check box To change the units used to measure distance for this POI select the Metric or I...

Page 62: ...es window will open displaying a list of custom POI files installed on your iCN 2 Click the File Name or Size of the POI file to delete 3 Click Delete The file is removed from the list but is not yet...

Page 63: ...detail You can add and remove Basemaps using the Basemap Installer Install Basemap 1 Connect the PDA to your computer Connect your PDA to your computer via Microsoft ActiveSync 3 5 or higher Close al...

Page 64: ...your PDA to your computer via Microsoft ActiveSync 3 5 or higher Close all open programs on your PDA 2 Open SmartS Desktop if it is not already open Start Programs Navman SmartS Desktop 3 On the Map...

Page 65: ...uire The Active Map Selection Settings screen allows you to specify which of the available maps are to be used See page 30 for more information Increasing Allocation of Program Memory SmartS requires...

Page 66: ...ernal Antenna Required for vehicles with heated windshields and to boost GPS performance in weak signal areas Memory Card Reader Connects to your computer and allows you to download maps to SD or MMC...

Page 67: ...e or Materials except that one copy of the Software may be made to the extent that such copying is necessary for the Customer s own backup purposes 5 Except for the warranty provided by the Licensor f...

Page 68: ...n makes no other warranties express or implied including any implied warranties of merchantability and fitness for a particular purpose If any limitation or exclusion or liability contained in this wa...

Page 69: ...ort for New Zealand Navman NZ Ltd 13 17 Kawana Street Northcote Auckland New Zealand Phone 0800 GONAVMAN pcnsupport nz navman com www navman com Support for Europe Navman Europe Limited 4G Gatwick Hou...

Reviews: