


Section 4-Common Module Functions
4. Common Module Functions
Module Startup
When the software starts, you should see this message:
For best results,
ensure measurement pedestal surfaces are clean
and load a water sample onto the lower
measurement pedestal and then click ‘OK’. After clicking OK, the message
“Initializing Spectrometer- please wait
” will
appear. When this message disappears, the instrument will be ready for use. All data taken will automatically be logged
in the appropriate archive file.
Common Functions
Measure (F1)
Each time a software module is opened (initiated), the Measure’ button is inactive as noted by its “grayed-out”
appearance. A blank must first be measured before the Measure button will become active.
The Measure button is used to initiate the measurement sequence for all samples (non-blanks). It is actuated by
depressing the F1 key or clicking the ‘Measure’ button. The entire measurement cycle takes approximately 10 seconds.
Blank (F3)
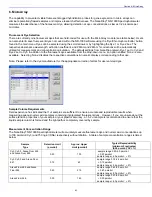
Before making a sample measurement, a blank must be measured and stored (see “Blanking and Absorbance
Calculations” in the appendix for more details on absorbance calculations). After making an initial blank measurement, a
straight line will appear on the screen; subsequent blanks will clear any sample spectrum and display a straight line as
shown in the following image:
For the most consistent results, it is best to begin any measurement session with a blanking cycle. This will assure the
user that the instrument is working well and that the pedestal is clean. To perform a blanking cycle, perform the following:
1. Load a blank sample (the buffer, solvent, or carrier liquid used with your samples) onto the lower measurement
pedestal and lower the sampling arm into the ‘down’ position.
2. Click on the ‘Blank’ (F3) button.
3. When the measurement is complete
,
wipe the blanking buffer from both pedestals using a laboratory wipe.
4-1


