background image

How the Various Functions Are Used

GT series

67

6.2 Basic Communication Area to PLC and Bit Device Functions (GT01)

6.2

Basic Communication Area to PLC and Bit Device

Functions (GT01)

6.2.1

Bit Device Functions

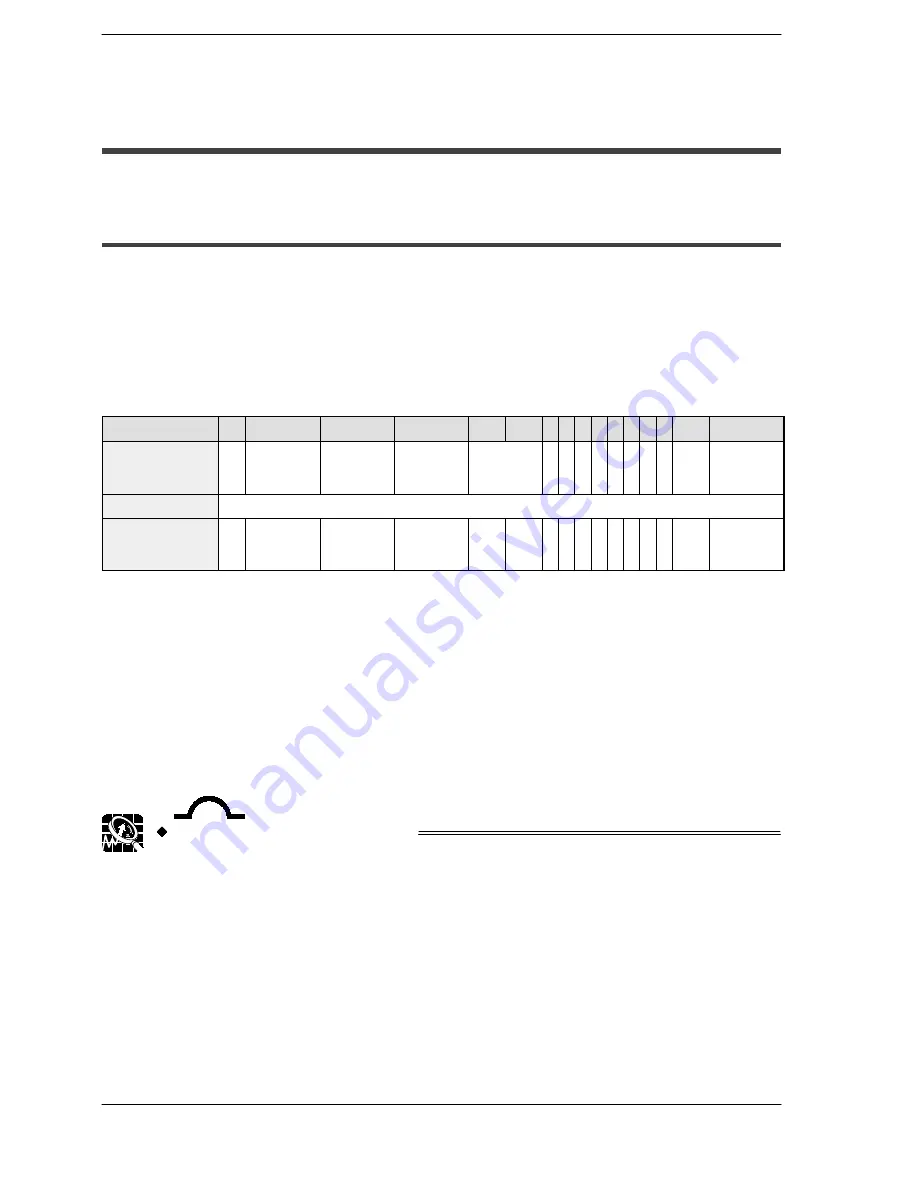
In order for communication to be carried out between the GT01 and PLC, an internal

device area like that shown below is provided in the PLC. This basic communication

area contains two types of devices: word devices, which are used to handle screen

numbers and other data, and bit devices, which are used for bit information. The various

bits of the bit devices are turned on and off from the PLC, and can be used to control

various GT01 operations.

Bit devices

Word position F

E

D

C

B

A

9 8 7 6 5 4 3 2 1

0

N+0

BZ Forced-

display

flag

Backlight

Valid flag

Backlight

Flashing

Backlight

Color

N+1

Usage prohibited

N+2

Data Input

In Prog-

ress flag

Explanation of system areas

BZ

- - - This turns on the buzzer.

Forced-Display flag

- - - At the rise when the bit is turned on, the screen specified by

the PLC is forcibly displayed. (This is executed only when at the rise of the bit.)

Backlight Valid flag

- - - When the bit is turned on, the backlight flashing/backlight

color control becomes effective.

Backlight Flashing

- - - 0: Lighted (normal), 1: Flashing

Backlight Color

- - - 00: Off, 01: Green, 10: Red, 11: Orange

Data Input In Progress flag

- - - This is 1 while data is being input, and 0 when data

input has been completed.

Explanation of this function

DT0 to DT2 and WR0 to WR2 are set as the default values for the basic

communication area.

For information on the contents of all areas of the basic communication

area, please see page 26.

Summary of Contents for GT01

Page 1: ...l Manual ARCT1F381E 03 4 http www naisplc com Programmable Display GT01 Technical Manual Applicable Product GT01 This manual was created using Adobe Acrobat Adobe the Adobe logo and Acrobat are tradem...

Page 2: ...an life or which may cause severe injury or damage Designs should include safety mechanisms for use in the event that switch functions do not function correctly Do not use this product in an environme...

Page 3: ...ith the PLC This chapter explains how to connect the GT series to the PLC and the FP series by Matsushita and how to set up communications between the units Chapter 5 GT series Configuration Settings...

Page 4: ...Display 3 1 1 3 Functions 4 1 1 4 Touch Key 4 1 1 5 Memory 1 4 1 1 6 Interface 5 1 2 GT01 Names and Functions of Parts 6 1 2 1 GT01 front 6 1 2 2 GT01 rear 6 1 2 3 Names and Functions of Parts 7 1 3...

Page 5: ...Table of Contents GT series iii 2 3 Wiring the COM Port 17 2 3 1 Wiring the COM Port 17 2 3 2 Wiring Method 17 2 3 3 Precautions Concerning Wiring 18...

Page 6: ...ngs Function 33 4 6 Through Function 35 Chapter 5 GT01 Configuration Settings 5 1 GT01 Configuration Settings 39 5 1 1 Two Types of GT01 Configuration Settings 39 5 2 Entering Configuration Settings f...

Page 7: ...Table of Contents GT series v 5 3 5 Setting Mode Memory Initialization Clear Memory 56 5 3 6 Test Mode Self Diagnosis 57 5 3 7 Inhibiting the System Menu Display 58...

Page 8: ...1 2 Replacing the Front Panel Protective Sheet 71 7 2 Replacing the Waterproof Packing 72 7 2 1 About the Waterproof Packing 72 7 2 2 Replacing the Waterproof Packing 72 Chapter 8 Troubleshooting 8 1...

Page 9: ...s vii Before Using the GT This section describes items that should be confirmed and precautions that should be observed before the GT series is used Make sure you read this section before using the GT...

Page 10: ...GT series viii...

Page 11: ...th specifications that enable connection to the FP series PLC If you plan to use the product without changing these settings nosetup isrequired but if youplanto changethe settings you willneed to foll...

Page 12: ...he screen contents using the Terminal GTWIN screen creation tool and send the screen to the GT main unit For information on creating screens and on operating GTWIN please refer to the Help function th...

Page 13: ...instructions carefully before using the product Waterproof packing One piece of waterproof packing has been attached to unit The following maintenance part isavail able AIGT081 10 piece set CAUTION Th...

Page 14: ...ting GTWIN Please read it carefully before using your product CAUTION About the software usage license agreement and user card Before using GTWIN read the Software usage license agreement carefully Th...

Page 15: ...necting and wiring the cables shown above and the PLC please refer to Chapter 4 Connecting and Communicating with the PLC Items Included with the Front Panel Protective Sheet AIGT080 Front panel prote...

Page 16: ...T0030H1 Main unit Communication cable PLC connecting cable 1 For connection to TOOL port of FP0 FP2 FP2SH FP M Mini DIN 5 pin loose wire cable 2 m 6 56 ft Product No AIGT8192 Connecting to the TOOL po...

Page 17: ...ft AIGT8142 PLC connecting cable 2 For connection to COM port of FP10SH and other PLC COM port D sub 9 pin loose wire cable 2 m 6 56 ft AIP81842 Front panel protective sheet Front panel protective she...

Page 18: ...makes it easy to grasp information at a glance Analog touch panel provided GT01 comes with a compact touch panel Switches and a keyboard can be laid out so operation is possible by simply touching the...

Page 19: ...nd the FP series PLC This significantly boosts efficiency in the workplace PLC GT01 Cable connected to the TOOL port of the PLC Screen transfer cable AFC8503 PLC debugging Screen data being sent and r...

Page 20: ...GT series An Overview of GT01 Functions xviii...

Page 21: ...Chapter 1 Specifications...

Page 22: ...GT series Specifications 2...

Page 23: ...RH non condensing Vibration resistance 10Hz to 55 Hz 1 minute cycle Amplitude 0 75 mm 10 min on 3 axes Shock resistance 98 m s2 min 4 times on 3 axes Protective construction IP65 in initial status Du...

Page 24: ...256 Note this includes the num ber of message part replacements Part functions Messages lamps switches data bar graphs clocks keyboard Contrast adjustment Contrast can be adjusted using touch panel o...

Page 25: ...ns with external devices Data bits 7 or 8 bits Parity None Odd Even Stop bits 1 bit Protocol FP series supported general purpose RS232C supported Connector Connector terminal base 8 pin Communications...

Page 26: ...Functions of Parts 1 2 GT01 Names and Functions of Parts 1 2 1 GT01 front F Liquid crystal display panel touch panel 1 1 2 2 GT01 rear FCOM port and power supply terminal 2 FWaterproof packing 5 F TO...

Page 27: ...rminal The GT01 is shipped with one communications connector 3 TOOL port GTWIN connection port This port is used to connect a personal computer in which the screen creation tool GTWIN has been install...

Page 28: ...rts 1 3 Internal Wiring Connections for Ports 1 3 1 COM Port Wiring and cables should be laid out in such a way that cables are not affected by external noise Also shielded wiring should be used for c...

Page 29: ...sions 1 4 Dimensions 1 4 1 GT01 Dimensions 45 1 77 110 4 33 72 2 83 4 0 16 4 0 16 1 0 04 37 7 1 48 Display unit 74 5 2 93 Display unit 2 0 08 Packing 66 2 60 24 0 94 104 4 09 9 5 0 37 Panel thickness...

Page 30: ...o 0 20inch 105 0 0 4 13 0 04 2 64 0 04 67 0 1 1 0 During installation when there will be other parts installed to the panel and wiring performed we recommend that you provide a 30 to 50 mm clearance a...

Page 31: ...Chapter 2 Installation and Wiring...

Page 32: ...GT series Installation and Wiring 12...

Page 33: ...mbient temperature of the from going over 50 C 122 F This prevents the temperature of the GT display unit from rising Locations where condensation may form because of sudden fluctuations in temperatur...

Page 34: ...nduced noise can be expected the use of shielded cable on all wiring and grounding of shield 1 point ground is recommended When wiring the equipment shielded wires should be electrically insulated to...

Page 35: ...ion panel Enlarged view CAUTION Screw tightening torque The screw tightening torque should be 0 1 N m to 0 25 N m Applicable panel thickness A panel with a thickness of 1 0 mm to 5 0 mm should be used...

Page 36: ...bnormal voltage from the power supply line the power supply should be an insulated type and should be enclosed within a protective circuit A non insulated regulator is used with the GT series If a pow...

Page 37: ...uld be used Applicable wiring twisted wiring Size Conductor Cross Section Surface Area AGW 28 to 16 0 08 mm2 to 1 25 mm2 Use a special tool to tighten the terminal base of the communication connector...

Page 38: ...it Vibration can sometimes cause soldered connections to break loose After connecting the wiring avoid subjecting the cable to stress Because of the construction of the terminal tightening the wire i...

Page 39: ...Chapter 3 Setup...

Page 40: ...GT series Setup 20...

Page 41: ...Bit area WR0 to WR2 Communication parameter COM port Communication speed 19200 bits s data length 8 bits stop bit 1 bit parity odd Communication error temporary processing Retries 3 error code displa...

Page 42: ...file from GTWIN Boot GTWIN and select Transfer on the File menu When the transfer function is selected a dialog box for file transfer is displayed At this point specify the type of data to be transfer...

Page 43: ...r cable AFC8503 GT01 Configuration file being transferred 4 Setup is completed If the transfer has been completed without any problems the setup is completed CAUTION Backup of the GT01 Configuration f...

Page 44: ...basis and communication is constantly being carried out Breakdown of the basic communication area Word devices DT FL etc 3 consecutive words Bit devices WR etc 3 consecutive words Word devices For re...

Page 45: ...ication Area to PLC displays the device settings dialog box shown below where the initial addresses for the word area and bit area can be changed GT01 Configuration Basic Setup dialog box Explanation...

Page 46: ...Screen no specified by PLC The screen number displayed on the GT01 is specified from the PLC in hexadecimal format No of currently displayed screen The number of the screen currently displayed on the...

Page 47: ...Chapter 4 Connecting and Communicating with the PLC...

Page 48: ...GT series Connecting and Communicating with the PLC 28...

Page 49: ...t code no STX Fixed 415 COM Port 1 Communication speed setting 19200 bits s PLC communication cable Mini DIN 5 pin loose wire cable AIGT8142 7 0 28 30 1 18 2000 78 74 Mini DIN plug side signals 1 SG B...

Page 50: ...LC communication cable Mini DIN 5 pin loose wire cable AIGT8142 7 0 28 30 1 18 2000 78 74 Mini DIN plug side signals 1 SG Brown 2 SD Red 3 RD Orange 4 5 5V White Pin no Abbreviation Wire color Specifi...

Page 51: ...ud rate setting 19200 bits s PLC communication cable Mini DIN 5 pin loose wire cable AIGT8142 7 0 28 30 1 18 2000 78 74 Mini DIN plug side signals 1 SG Brown 2 SD Red 3 RD Orange 4 5 5V White Pin no A...

Page 52: ...on No connection PLC communication cable Mini DIN 5 pin loose wire cable AIGT8142 7 0 28 30 1 18 2000 78 74 Mini DIN plug side signals 1 SG Brown 2 SD Red 3 RD Orange 4 5 5V White Pin no Abbreviation...

Page 53: ...a response from the PLC While it is repeating these steps it is in the Standby mode under GT01 Configuration a Communication Parameters a Handle Communication Error on GTWIN For information on how set...

Page 54: ...utomatic settings mode If the unit is connected to the COM port of the FP0 FP1 FP2 FP2SH FP M communication between the FP device and the PLC will not be possible if the target usage of the RS232C por...

Page 55: ...is booted PLC programs can be edited through the GT series The through function does not require any special settings and is always in the standby mode PLC GT01 Connected by cable to the TOOL port of...

Page 56: ...s software FPWIN GR or NPST GR A is larger than that of the GT01 COM port B meaning A B If the system is set up so that A B or A B the through function will not work properly Restrictions on COM port...

Page 57: ...Chapter 5 GT01 Configuration Settings...

Page 58: ...GT series GT01 Configuration Settings 38...

Page 59: ...nfiguration file sent 2 Entering configuration settings from the GT01 main unit page 52 Some of the settings such as the communication parameters the internal clock and adjustments of the liquid cryst...

Page 60: ...2 1 Opening the GT Configuration Settings The GT configuration settings are set by selecting Configuration on the menu displayed by clicking with the mouse on File or pressing the Alt F keys Then sele...

Page 61: ...between the GT01 and PLC and the environment required for GT01 operation Basic Setup screen Title The title of the configuration settings file is entered here Titles are convenient if each GT01 has i...

Page 62: ...box Clicking on the button displays a pull down menu Select the device for which settings are to be entered and use the ten keys to enter addresses The button functions as a backspace key when enteri...

Page 63: ...and personal computer GTWIN connected to the GT01 are set Communication Parameters screen COM port Connected to PLC External Device This is used to specify the communication speed and transmission for...

Page 64: ...tion Error Remedy dialog box For Retry and Waiting click the button and specify the values in the Value Set dialog box that is dis played For Display Error Code select Off On Hold or On Unhold by clic...

Page 65: ...en the cause of the error is eliminated For contents of error codes please see Error Codes and How to Handle Them on page 78 TOOL Port for GTWIN connection This is used to specify the communication sp...

Page 66: ...screen shown below Here settings can be entered for a functions that automatically switches the screens displayed on the GT01 Auto Paging screen Auto paging This is used to specify the Auto paging fu...

Page 67: ...e value and click the Save button to save values one at a time Screen No This specifies the screen targeted for auto paging Time This specifies the time for which the screen specified above is display...

Page 68: ...Value Set dialog box where the value for the start up screen number can be specified Display Time This specifies the time for which the startup screen specified above will be displayed The value can...

Page 69: ...GT series 49 5 2 Entering Configuration Settings from GTWIN Screen Creation Tool CAUTION Communication between the GT01 and the PLC external device cannot be carried out during the time specified by...

Page 70: ...estination for the clock displayed with the GT01 Select one of the radio buttons PLC Clock When the time is displayed the internal clock in the PLC is used as a reference for the value If the PLC Cloc...

Page 71: ...backlight feature clicking on the button displays a screen where the time until the backlight goes off can be specified Any time from one minute to 30 minutes can be specified Key points If the backli...

Page 72: ...up the system menu 1 Touch the LCD touch panel simultaneously 1 Press the top left corner A for more than one second 2 Next immediately press the top right corner B and the bottom right corner C in th...

Page 73: ...n with an external device PLC connected to the GT01 Each time the Function key is pressed the Baud rate switches in the sequence of 9600 19200 38400 57600 115200 bits s Set the speed to match that of...

Page 74: ...d the Baud rate switches in the sequence of 9600 19200 115200 bits s Set the speed to match that of the personal computer GTWIN connected to the GT01 Format Transmission format This sets the communica...

Page 75: ...then the Contrast key of the setting mode menu displays the contrast adjustment screen The contrast of the GT01 LCD is adjusted here Contrast adjustment screen Procedure for bringing up the screen In...

Page 76: ...of the above keys is touched a confirmation message reading is displayed To clear the data touch the key A buzzer sounds and the memory is cleared When the buzzer stops sounding the memory has been co...

Page 77: ...s B Light The color of the backlight changes at one second intervals in sequence from green a red a green a orange Buzzer This runs an operation check of the buzzer LCD This displays a pattern and run...

Page 78: ...ches can be used to make it impossible to display the system menu Switch no Function OFF ON 1 Usage inhibited Should always be in the OFF position when unit is used 2 Inhibits system menu shift Shift...

Page 79: ...Chapter 6 How the Various Functions Are Used...

Page 80: ...GT series How the Various Functions Are Used 60...

Page 81: ...screen no from PLC Second word usage prohibited area Third word no of screen currently displayed Internal PLC device Ongoing communication How screens are switched GT main unit PLC GT main unit PLC S...

Page 82: ...menu and then the Edit Attribute sub menu displays the dialog box shown above 1 Using the Change Screen operation mode Select the Change Screen operation mode and specify the number of the screen to...

Page 83: ...ce Value Number of screen to be changed to hexadecimal specification Each time the GT main unit switch part is pressed the screen number is forcibly written by the GT main unit to the first word of th...

Page 84: ...on area word device the number of the currently displayed screen changes to that of the new screen number but the contents of the first word the screen number specified by the PLC do not change For de...

Page 85: ...Currently display screen number changes Contents of basic communication area word device First word screen no instruction from PLC Third word currently displayed screen no Screen is switched in respon...

Page 86: ...evice meaning Screen No 1 is forcibly displayed at the point that step 1 takes place This is carried out only at the rise of the forced display flag 3 After the screen has been switched the forced dis...

Page 87: ...5 4 3 2 1 0 N 0 BZ Forced display flag Backlight Valid flag Backlight Flashing Backlight Color N 1 Usage prohibited N 2 Data Input In Prog ress flag Explanation of system areas BZ This turns on the bu...

Page 88: ...of the bit device is used to make the backlight flash The backlight status can be changed by turning this bit on and off To make this setting valid however Bit D Backlight Valid flag must always be tu...

Page 89: ...Chapter 7 Servicing and Maintenance...

Page 90: ...GT series Servicing and Maintenance 70...

Page 91: ...acement set of 10 For GT01 AIGT080 7 1 2 Replacing the Front Panel Protective Sheet Follow the steps below to replace the sheet 1 Remove the attached front panel protective sheet First peel off the fr...

Page 92: ...ber Waterproof packing Waterproof packings for replacement set of 10 For GT01 AIGT081 7 2 2 Replacing the Waterproof Packing Follow the steps below to replace the packing 1 Remove the currently attach...

Page 93: ...Chapter 8 Troubleshooting...

Page 94: ...GT series Troubleshooting 74...

Page 95: ...base screen data from GTWIN P 64 GTWIN HELP GTWIN HELP Screen displays Memory is Full The total capacity of transferred base screen data exceeds the 384kbyte ca pacity of the GT01 Delete part of the...

Page 96: ...acklight auto off timer setting is too short Change the backlight auto off timer set ting P 51 Date time display is incorrect 1 The PLC s internal calendar timer used as a reference is incorrect 1 Adj...

Page 97: ...transfer cable GTWIN HELP Screen is blank power supply and substitution settings above are correct An incorrect screen is displayed error codes and erroneous date and time items noted above do not ap...

Page 98: ...nd solution FF Time up error No response from the PLC 1 The PLC connection cable is disconnected Check the connection cable to make sure it is connected 2 There is a temporary error due to noise etc R...

Page 99: ...supply power to the PLC and GT01 2 There is an error in the CPU unit Re supply power to the PLC and GT01 41 Format error The PLC has been sent a command that doesn t match the protocol 1 There is a te...

Page 100: ...er to the GT01 When transferring data from GT01 to a personal computer This is displayed when data is being transferred from the GT01 to the computer When there is no base screen data This is displaye...

Page 101: ...Appendix Information...

Page 102: ...Information GT series 82 Matsushita Automation Controls...

Page 103: ...00 0001 0000 0000 0000 0001 0001 0000 0000 0001 0010 0000 0000 0001 0011 0000 0000 0001 0100 0000 0000 0001 0101 16 17 18 19 20 21 22 23 0010 0011 0012 0013 0014 0015 0016 0017 00000000 00010000 00000...

Page 104: ...3 4 5 6 7 0 0 0 0 0 NUL DEL SPACE 0 P p 0 0 0 1 1 SOH DC1 1 A Q a q 0 0 1 0 2 STX DC2 2 B R b r 0 0 1 1 3 ETX DC3 3 C S c s 0 1 0 0 4 EOT DC4 4 D T d t 0 1 0 1 5 ENQ NAK 5 E U e u 0 1 1 0 digit 6 ACK...

Page 105: ...ifications A 3 1 PLC Communication Cable Mini DIN 5 pin Loose Wire AIGT8142 7 0 28 30 1 18 2000 78 74 Mini DIN plug side signals 1 SG Brown 2 SD Red 3 RD Orange 4 5 5V White Pin no Abbreviation Wire c...

Page 106: ...Information GT series 86 Matsushita Automation Controls A 3 Cable Specifications...

Page 107: ...Record of changes GT series Record of changes Manual No Date Description of Changes ARCT1F381E APR 2003 First edition...

Page 108: ...Record of changes GT series...

Reviews: