background image

User’s Guide ViperTX Extreme

Periodical maintenance

AP-75340 - Revision 1.0

65

4

ͬ»° íæ

Open the front cover.

ͬ»° ìæ

Slide the carriage away from the capping station.

ͬ»° ëæ

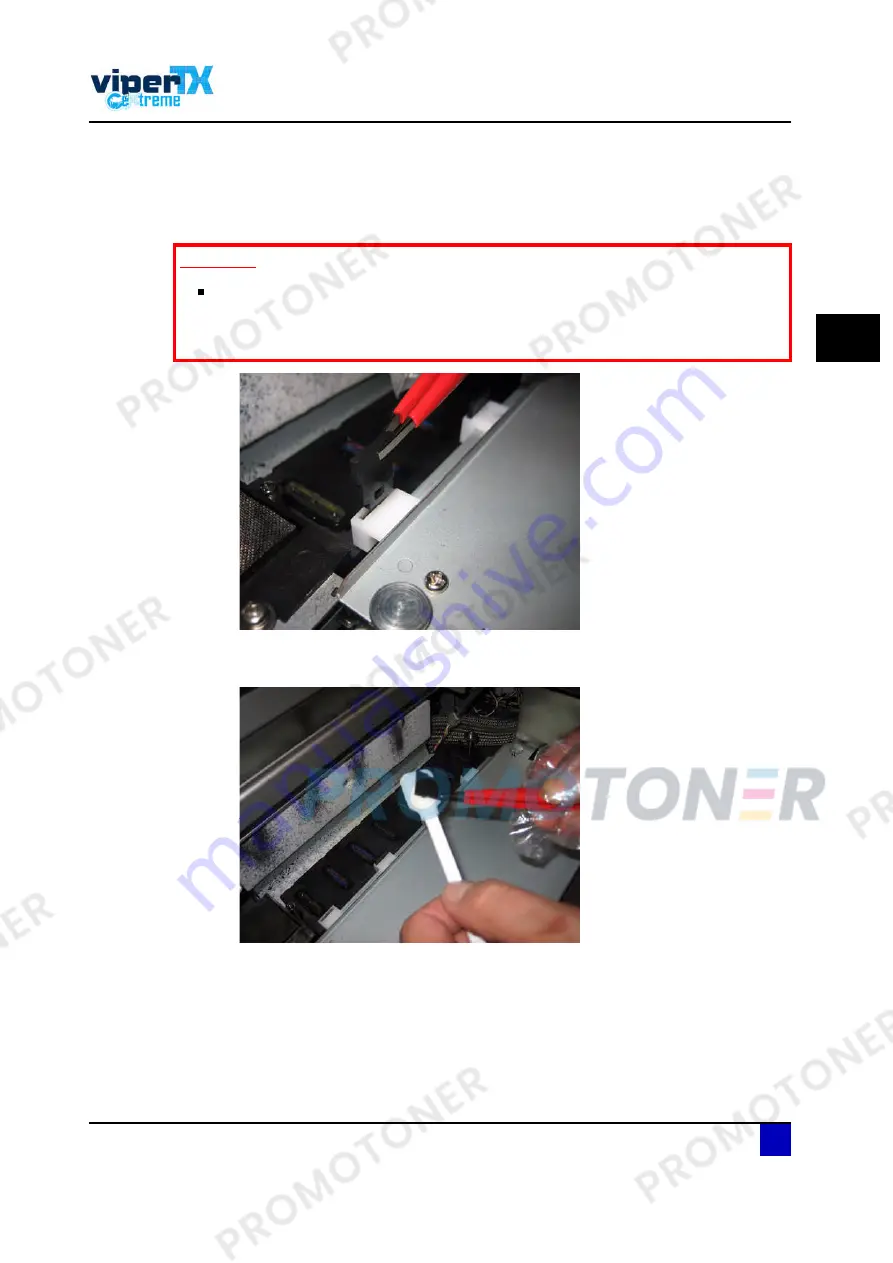
Remove the old wipers with a pair of tweezers.

ͬ»° êæ

Moisten the new wipers with Mutoh waterbased textile cleaning before installing
them.

׳°±®¬¿²¬

Do not touch the wipers with your bare hands to avoid grease or dirt to get in
contact with the wipers and automatically the nozzle plate. Use a pair of
tweezers to avoid this. Clean the wipers with appropriate cleaning liquid when
they are dirty.

Summary of Contents for ViperTX Extreme

Page 1: ...User s Guide ViperTX Extreme For Maintenance Kits Spares Service and Support Call 44 0 1628 588755 E mail support colourgen com ...

Page 2: ......

Page 3: ...ent to support the ViperTX Extreme series printers In consideration of the furnishing of the information contained in this document the party to whom it is given assumes its custody and control and agrees to the following The information herein contained is given in confidence and any part thereof shall not be copied or reproduced without written consent of Mutoh Europe nv This document or the con...

Page 4: ...User s Guide ViperTX Extreme 4 AP 75340 Revision 1 0 ...

Page 5: ...nstructions 12 1 5 Warning labels 14 Chapter 2 Product overview 17 2 1 Printer 18 Front 18 Rear connections 19 2 2 Operation panel 20 Printer 20 Winding system 22 2 3 Installation environment 23 Installation environment requirements 23 Chapter 3 Basics 25 3 1 Printing flow 27 3 2 Switching the power ON OFF 28 Switching the power ON 28 Switching the power OFF 28 3 3 Perfect fabric handling 29 Unwin...

Page 6: ...y 39 Nozzlecheck 39 Head cleaning 40 Fabric feed compensation step 41 Pause option 44 3 6 Refilling ink cassettes 45 3 7 Replacing the waste bottle 46 3 8 Relocating or transporting the printer 47 Relocating the printer 47 Transporting the printer 47 Chapter 4 Periodical maintenance 51 4 1 Done by the end user 52 Overview 52 Maintenance kits and cleaning 53 Daily maintenance at shutdown 54 Weekly ...

Page 7: ... 74 F2 Cleaning the heads 75 F3 Cancel print 76 F4 Operating the pressure rollers 76 ENTER Print mode check 76 5 3 Operation panel during printing 77 F1 Distance Adjustment 77 F2 Cleaning 77 F3 Cancel 77 F4 Pause 78 5 4 Menu overview 79 5 5 Setup menu 1 7 80 InkStatus 80 OriginSet 81 TestPrint 82 FabricSet 83 5 6 Setup menu 2 7 86 PrintMode 86 Command 94 Layout 95 Function 96 5 7 Setup menu 3 7 97...

Page 8: ...Clean 113 TankChange 113 TubingFlush 113 5 11 Setup menu 7 7 114 VersionCheck 114 Area 114 Chapter 6 Troubleshooting 115 6 1 Introductions 117 6 2 Failures and malfunctions of the printer 117 6 3 Error messages 123 Status messages 123 Message type error and solutions 124 Data errors 125 Command errors 125 Errors requiring a restart 125 6 4 When fabrics jams occur 126 6 5 Emergency capping procedur...

Page 9: ...ling inks and waste 11 Warnings cautions and notes 12 Safety instructions 12 Warning labels 14 This chapter explains the installation of ViperTX Extreme warning terms that operators need to know caution items and warning labels on the printer main unit When installing and operating this printer be sure to follow the directions and warnings in this guide ...

Page 10: ...gulation Please inform yourself about the local separate collection system for electrical and electronic products Please act according to local rules and do not dispose of your old products with your normal household waste The correct disposal of your old product will help prevent potential negative consequences for the environment and human health FCC This equipment has been tested and found to c...

Page 11: ...assembled ink holder cannot be used either When refilling ink use original manufacturer s ink Our Mutoh printers are designed to use original ink If you use ink which are not produced by the original manufacturer printing might become blurred and the end of the ink in the holder might not be detected correctly Any problems caused by using an ink holder other than those recommended above will not b...

Page 12: ... modify the cable Do not put heavy objects on the cable Do not bend twist knot or pull the cable Do not wire the cable near equipment that generates heat Do not use the cable with any other electrical device Do not handle the cable with wet hands Be aware of all caution and warning labels to avoid potentially hazardous situations To prevent fire or electrical shock machines must be connected to a ...

Page 13: ...nd fire Stop using your machine if a liquid has been spilled into it This may cause electrical shock or fire Switch the machine off as soon as possible unplug the power cord and contact your local MUTOH dealer Be sure to power OFF the machine and unplug the power cable from the outlet before cleaning the machine Use a damp cloth to clean the machine Do not use thinner benzene alcohol or other acti...

Page 14: ...r gasoline If a warning label is damaged lost or cannot be recognized replace the label When replacing warning labels contact your local Mutoh dealer Label Description This label warns you to be careful not to pinch your fingers To obtain a constant an good print quality it is highly recommended to leave the front cover closed during printing Be sure to disconnect both the printer as winder power ...

Page 15: ... be removed first before powering ON the print The swingbars are fragile and the complete winding system has been calibrated To avoid distortion of the printer it is prohibited to lift the printer with a forklift Serial label of the machine 1 Machine type xx 65 or 90 inch 2 Serial number 3 Electrical specs 4 CE mark 5 WEEE mark Label Description ËÒ Ì ó ÌÈÛèï ÓËÌÑØ Û ÒòÊò ß ïí Þ ó èìðð Ñ Í Òp ÛÈ Õó...

Page 16: ... ink configurations and ink cassette order Ink label order label To know in which order the ink cassettes have to be inserted An overview of all the necessary periodical maintenance by the end user Be sure to perform the maintenance properly Label Description ïÝïØ Û òî ì Þ µ Þ µ Þ µ ï è Ç Ý Ó Í î Ç Ó Ó Ç Ý Ý Í ï Í í Í ì ...

Page 17: ...verview AP 75340 Revision 1 0 17 Chapter 2 Product overview Printer 18 Front 18 Rear connections 19 Operation panel 20 Printer 20 Keys 20 LCD and LED s 21 Winding system 22 Installation environment 23 Installation environment requirements 23 ...

Page 18: ... of the printer while it is operating Only open and or close the cover to perform following operations Fabric setting and replacement Maintenance of the printer Cleaning the printer í Pressure rollers To press the fabric from above and keep it flat when printing ì Left maintenance cover 1 Cover which can be opened easily for periodical maintenance ë Stand Used to install the printer on a flat surf...

Page 19: ...k slots This is the place for installing ink cassettes ïð Swingbar To keep the fabric under tension ïï Roll unit Roll units of the UW W 100 to wind up the media ïî PCB box PCB Box of the UW W 100 ïí Operation panel UW W 100 Controls the UW W 100 N Description Function ï î í ì ë N Description ï Network interface connector î Centronics connector í Footswitch connector ì Power cable connector ë Optio...

Page 20: ... the setup menu ï Switch the power ON OFF Switch the power ON OFF î Executes the function assigned to F1 Executes the function assigned to F1 í Executes the function assigned to F2 Executes the function assigned to F2 ì Executes the function assigned to F3 Executes the function assigned to F3 ë Executes the function assigned to F4 Executes the function assigned to F4 ...

Page 21: ...ame In the main screen In the setup menu N Name Colour Status In the setup menu 10 Green ON The printer is ON OFF The printer is OFF 11 Red Flashin g An error has occurred The contents will be displayed on the LCD monitor OFF Either there is no error or the power is off 12 Orange ON The printer is receiving print data Flashin g The printer is analysing received data OFF The printer is waiting to r...

Page 22: ...The LED will burns continuously when unwinder motor accelerates ì Backwards button Outside printing roll off unwinder Inside printing roll up unwinder ë Forwards button Outside printing roll up unwinder Inside printing roll off unwinder ê Winder 100 switch Switch between automatic I and manual mode 0 é Winder 100 LED The LED will light up when pushing one of the winder buttons The LED will flash w...

Page 23: ...printer for over currents short circuits and earth faults the building installation should be equipped with an automatic breaker double pole of 20 A and an earth leakage switch of 300 mA Ambient conditions Recommended printing conditions Temperature 18 C to 30 C Humidity 35 80 without condensation Operational printing conditions Temperature 10 C to 35 C Humidity 20 to 80 without condensation Rate ...

Page 24: ...ity are expected even though the condition is within the range written above Places where direct sunlight or excessive lighting are experienced Places where air conditioners blow directly MUTOH recommends that the printer should be installed where air conditioning can be adjusted easily Please note that some inks require a humidity of more than 50 other inks can be used at 30 humidity Please conta...

Page 25: ...0 29 Purpose 29 Ink gutter 29 Purpose 29 Coated feeding cylinder 30 Purpose 30 Pressure roller disabler tool 30 Purpose 30 Installation procedure 30 Fabric retainers 31 Purpose 31 Installation procedure 31 Ink absorbents 32 Purpose 32 Installation procedure 32 Maintenance 32 Adjustable head height 32 Purpose 32 Handling and loading fabrics 33 Cautions on handling fabrics 33 Cautions on storing fab...

Page 26: ...s about the step 41 Underfeed 41 Overfeed 41 Repeatability step 42 Determining and setting the correct step 42 Change the step on the fly 43 Pause option 44 Refilling ink cassettes 45 Replacing the waste bottle 46 Relocating or transporting the printer 47 Relocating the printer 47 Transporting the printer 47 Replacing ink with shipping liquid 47 Packing the machine 49 ...

Page 27: ...nder winder 100 Refer to Ø º â Ô º íì Install the fabric tools delivered with the machine Refer to Ð º º â Ð íð Refer to Ð º º â Ú íï Refer to Ð º º â µ íî Perform a nozzlecheck Refer to Ú ª â Ò µ íç Perform a cleaning if necessary Refer to Ú ª â Ø ìð Set the step correctly Refer to Ú ª â Ú º ø ìï Select image Load dedicated profile choose print mode and rip the image Refer to the profile section ...

Page 28: ...the operational condition of the printer There is no printing operation being performed The operation panel is in the main screen Í îæ Press the power key to power OFF the printer Í íæ The operation panel displays the following message for a few seconds Power OFF wait for a while Í ìæ All the status LED s switch off Ý Before powering ON the printer make sure that the waste bottle is installed and ...

Page 29: ... 1 Unwinder winder 100 Purpose The UW W 100 system always provides an equal tension on the fabric when printing this ensures perfect fabric tracking 3 3 2 Ink gutter Purpose The gutter inhibits smearing of the ink at the backside of the fabric allowing printing onto fabrics with an open structure Ink printed through the fabric will be received in an ink gutter and will be drained away to the waste...

Page 30: ...e To lift a pressure roller from the fabric when the application and or fabric require it We recommend you to use two pressure roller disabler tools on both sides of the fabric According to your application it can be useful to disable more pressure rolls Be sure not to push the Pressure roller disabler tool too far Otherwise the pressure roller will break Installation procedure Push down the press...

Page 31: ...ace the fabric retainers before you perform the fabric detection otherwise the printer will print onto the fabric retainers When choosing edge printing the fabric retainers can t be used Verify if the fabric retainers are firmly fixed inside the gutter to prevent contact with the print head Make sure the fabric s border is positioned under the top plate of the fabric retainer Make sure the fabric ...

Page 32: ...h water when it is saturated with ink 3 3 7 Adjustable head height Purpose Some fabrics are very hairy and could touch the heads during printing Therefore different head heights can be set Low 1 2 mm Middle 2 0 mm High 4 0 mm Edge to edge printing Regular printing When printing edge to edge you will print wider than the fabric width Maximum 5 cm at both sides Position the absorbent until you have ...

Page 33: ...e of the fabric Please note that some inks require a humidity of more than 55 other inks can be used at 30 humidity Please contact your ink supplier for optimum printing conditions Do not touch the printable side of the fabric Moisture or oil from hands affects the printing quality Don t keep fabric in a wet or humid place because this can make the fabric bleed 3 4 2 Cautions on storing fabrics Wh...

Page 34: ...Consider the specifications of the printer before loading fabrics Í êæ Remove the packaging of the fabric Í éæ Check whether the fabric is inside or outside printable This affects the installation method on the unwinder at the rear of the machine Metrical Imperial Maximum loading capacity 100 kg 220 lb Maximum fabric width for 65 series printers for 90 series printers 1651 mm 2280 mm 65 89 76 Mini...

Page 35: ...rics between the two roll units at the back of the machine Í ïðæ Move the fabrics and roll units to the middle and tighten them with the handles Verification is easy via the yellow labels on the winding rails Just mount the left and right roll unit on the same distance x and y from the 0I0 label Í ïïæ Tighten the wheel at the side to fix the core between the two roll units ...

Page 36: ... central as described in previous step Tighten the wheel at the side to fix the core between the two roll units Í ïíæ Use the foot switch to release some fabric at the rear Í ïìæ Load the fabrics through the rear swingbar over the print platform under the pressure rollers as shown below Ò Make sure to remove the fabric retainers N Description ï Roll Unit î Fabrics í Rear swingbar ì Print platform ...

Page 37: ... Tape the fabric to the core installed between the front roll units Make sure to have an equal tension on both sides of the fabrics Í ïéæ Install the fabric retainers if necessary Refer to Ð º º â Ú íï Í ïèæ Close the front cover Í ïçæ Lower the pressure rollers by pressing the F4 key or using the footpedal Í îðæ The printer will show the following message Press enter to start the fabric initializ...

Page 38: ...o to its initial position Refer to Ñ â É îî Í îîæ Installation of the fabrics has been completed Ò Be sure to make the correct settings on the control panel of the winding system OUTSIDE or INSIDE Ò With a small intervention it is possible to reverse your winding direction Mount the twist cable between the control box and the front motorized unit cable ...

Page 39: ...ozzles are present before you start printing If there are some nozzles blocked a bad output resulting in lines in the print will be obtained To avoid that before every job print a nozzlecheck as follows Í ïæ Power ON the printer Í îæ Load fabric Refer to Ø º â Ô º íì Í íæ Go to setupmenu 1 7 Í ìæ Press F3 to open the test printing menu Í ëæ Press F2 to print a nozzlecheck Í êæ Evaluate the pattern...

Page 40: ...r is in normal status Í îæ Press F2 to open the cleaning menu Í íæ Select which heads should be cleaned with F1 ALL Pump 1 Pump 2 Pump 3 Pump 4 Í ìæ Select the power of the cleaning depending on the quantity of missing nozzles with F2 Little Normal Powerful Í ëæ Press enter to start the cleaning procedure Í êæ Perform another nozzlecheck to verify that all nozzles are back Refer to Ú ª â Ò µ íç If...

Page 41: ...ep Every image is printed in several print passes After every pass the fabric is fed an amount of millimetres When the step is not set correctly the passes will overlap each other or will not be printed precisely next to each other which results in white bands between two print passes Therefore a function distance adjust or step is added to the menu to control this feed operation Underfeed Step be...

Page 42: ...d setting the correct step The procedure below will explain how to change and interpret the step Í ïæ Power ON the printer Í îæ Load a roll of fabric and be sure to tighten it to an empty core in the front This because the step will be different when printing roll to roll or roll to sheet Refer to Ø º â Ô º íì Í íæ Verify that all nozzles are present Refer to Ú ª â Ò µ íç Í ìæ Go to FabricSet Fabr...

Page 43: ...hange the step on the fly However it is recommended to determine the step before you start a job on a new fabric it is also possible to adjust the step while printing as follows Í ïæ Press F1 while printing Í îæ Press F2 or F4 to change the step Raise the value when there are overlaps underfeed Lower the value when there are gaps visible overfeed Í íæ Press enter to save the changes ...

Page 44: ...ïæ Press F4 to pause the job Í îæ Press enter to unlock the carriage Í íæ Open the front and left maintenance cover Í ìæ Slide the carriage into the left maintenance area Í ëæ Clean the edges of the heads with a cleaning swab wetted with Mutoh waterbased textile cleaning Be sure not to touch nor clean the nozzle plate to avoid damage and bad printing quality Í êæ Close the front and left maintenan...

Page 45: ...he operation panel returns to normal status Ý When handling ink cassettes be careful that ink does not get in your eyes or on your skin However if this happens flush immediately with water Otherwise your eyes may become congested or inflamed slightly If you feel discomfort consult a doctor imfabrictely Do not disassemble ink cassettes Otherwise ink may get in your eyes or on your skin Do not shake...

Page 46: ...ttle need to be replaced Í ïæ Open the lid and remove the waste bottle Í îæ As soon as the waste bottle has been removed the following message appears Í íæ Pour the waste liquid in another bottle and dispose it according to the local regulations Í ìæ Replace the waste bottle Í ëæ Be sure to close the lid Í êæ Press ENTER to confirm that waste bottle is empty ...

Page 47: ...butor Í êæ Secure all the covers which can be opened with tape Use a tape that does not leave any glue marks after removal Í éæ If transporting the unit on its stand secure all bars of the Unwinder Winder 100 with tape Í èæ Remove the waste bottle or secure it with tape Í çæ Tape the cassettes to the printer to fix them during the transfer Í ïðæ Turn in all levelling feet of both the printer as un...

Page 48: ...f the printer will be activated for 11 minutes This is the time necessary to switch between the ink loaded and Mutoh waterbased textile cleaning Ò The ViperTX Extreme is shipped with 16 open cassettes Eight cassettes are used for the ink and the other 8 can be used for this procedure It is no problem to switch from Mutoh waterbased cleaning and Mutoh shipping liquid These liquids are fully compati...

Page 49: ...s of the printer will be activated for 11 minutes This is the time necessary to switch between Mutoh waterbased textile cleaning and Mutoh shipping liquid Í ïèæ As from the moment the main screen appears the machine is ready to be packed Packing the machine Follow the procedure described for Î and pack the machine in its original box to protect it from vibration or impact Ò Mutoh shipping liquid c...

Page 50: ...User s Guide ViperTX Extreme Basics 50 AP 75340 Revision 1 0 ...

Page 51: ...ly maintenance at shutdown 54 Clean the wipers 54 Perform a tubing flush 55 Clean the caps in the maintenance station 56 Rinse and clean the gutter 58 Weekly maintenance 59 Clean around bottom of the heads 59 Clean spitting box mesh 60 Rinse spitting box waste tube 61 Other maintenance 62 Clean the printer 62 Replace capping station absorbent 62 Replace wipers 64 Done by an authorized Mutoh techni...

Page 52: ...caused by use of non original Mutoh inks spare parts consumables will not be covered by the warranty Ò This maintenance is based on use 8 hours day 5 days week and 44 weeks year If a machine is used more maintenance periods will come earlier Frequency Procedure Tools necessary Daily at shutdown Clean the wipers Mutoh waterbased textile cleaning swabs pipettes polyknit wipers Perform a tubing flush...

Page 53: ...l maintenance a kit has been made available This kit will have enough tools to maintain your printer for 6 months Contents Good shape kit N Description Qty ï Absorbent change plate 2 î Wipers 4 í Rinse bottle 500 ml 1 ì Mutoh waterbased textile cleaning liquid of 500 ml 2 ë Instruction sheet 1 ê Good shape kit 1 N Description Qty ï Gloves 300 î Pipettes 12 í Swabs 150 ì Polyknit wipers 300 ...

Page 54: ...orning Please see below to know how to clean the wipers At the end of the day when you will shut down the printer the ink also needs to be removed from other parts so it cannot harden Otherwise some parts will break down or cause bad print quality Clean the wipers When Before shutting down the printer in the evening Tools necessary Mutoh waterbased textile cleaning Polyknit wiper Gloves Procedure ...

Page 55: ...Í êæ Press enter to make the carriage go back to its home position Í éæ Perform a tubingflush Refer to Ð º º Perform a tubing flush When After cleaning the wipers Tools necessary Mutoh waterbased textile cleaning Pipette Gloves Procedure Í ïæ Browse to the tubingflush menu z Í îæ Press F4 to start the tubingflush The carriage will move away from the capping station and the pumps will be activated ...

Page 56: ...g a pipette until the caps do not change colour anymore Í ëæ Press enter to activate the pumps of cap 2 3 6 7 cycle 2 and inject cleaning in the same way Í êæ Clean the edges of the caps in the maintenance station Refer to Ý Clean the caps in the maintenance station When After a tubingflush Tools necessary Mutoh waterbased textile cleaning Cleaning swab Polyknit wiper Gloves ...

Page 57: ...dure Í ïæ Clean the edges of the caps with a cleaning swab and use some Mutoh waterbased textile cleaning if necessary Í îæ Clean the area around the caps with a polyknit wiper Í íæ Press enter to end the tubingflush Í ìæ Shut down the printer Í ëæ Rinse and clean the gutter Refer to Î ...

Page 58: ... AP 75340 Revision 1 0 Rinse and clean the gutter When After cleaning the caps Tools necessary Water Rinse bottle Gloves Paper Procedure Í ïæ Drain the gutter with water using the rinsing bottle Í îæ Dry the gutter with some paper until it is dry and clean ...

Page 59: ...ab Gloves Procedure Í ïæ Power ON the printer and browse to the WiperClean F2 menu Í îæ Press F2 to unlock the carriage Í íæ Open the left maintenance cover Í ìæ Clean the edges of the heads with a cleaning swab wetted with Mutoh waterbased textile cleaning Be sure not to touch nor clean the nozzle plate to avoid damage and bad printing quality Í ëæ Close the left maintenance cover Í êæ Clean the ...

Page 60: ...dges of the heads Tools necessary Mutoh waterbased textile cleaning Pipette Polyknit wiper Gloves Empty bottle Procedure Í ïæ Carefully remove the spitting box mesh Try not to touch the middle of the mesh but only the supported sides Í îæ Rinse the mesh with Mutoh waterbased textile cleaning using a pipette Do this until all the ink has been removed ...

Page 61: ...t wiper for 1 minute to drain most of the cleaning Í ìæ Rinse the spitting box waste tube Refer to Î Rinse spitting box waste tube When At the end of the week after cleaning the spitting box mesh Tools necessary Water Empty bottle Procedure Í ïæ Rinse the spitting box waste tube with water using the rinse bottle ...

Page 62: ... Soft brush Cloth Water Procedure Í ïæ Remove dust and smudges from the covers with a wet soft cloth Í îæ Use a soft brush to carefully clean away and dust dirt and ink mist Í íæ Wipe off the pressure rollers with a humid cloth Replace capping station absorbent When Every 3 months Tools necessary Absorbent Do not use thinner benzene alcohol or other active agents Doing so may result in damage or p...

Page 63: ...wer ON the printer and browse to the headunlock F1 menu Í îæ Press F2 to unlock the carriage Í íæ Open the front cover Í ìæ Slide the carriage away from the capping station Í ëæ Loosen the 2 screws fixing the capping station sponge assembly Í êæ Remove the complete capping station sponge assembly ...

Page 64: ... the 2 screws Í èæ Close the front cover Í çæ Press enter to make the carriage go back to its home position Replace wipers When Every 6 months Tools necessary Tweezers Gloves Swab Mutoh waterbased textile cleaning Procedure Í ïæ Power ON the printer and browse to the headunlock F1 menu Í îæ Press F2 to unlock the carriage ...

Page 65: ...the old wipers with a pair of tweezers Í êæ Moisten the new wipers with Mutoh waterbased textile cleaning before installing them Do not touch the wipers with your bare hands to avoid grease or dirt to get in contact with the wipers and automatically the nozzle plate Use a pair of tweezers to avoid this Clean the wipers with appropriate cleaning liquid when they are dirty ...

Page 66: ...ision 1 0 Í éæ Install the new wipers with a pair of tweezers Í èæ Close the front cover Í çæ Press enter to make the carriage go back to its home position Orientation of the wiper when standing in front of the machine Be sure that the wiper clicks in the wiper holder ...

Page 67: ...ician should do 4 2 1 Overview 4 2 2 Partnumbers of the maintenance kits Maintenance cycle kit 12 months KY 80224 Ò Please use Original Mutoh spare parts Any problems caused by use of non original Mutoh inks spare parts consumables will not be covered by the warranty Ò This maintenance is based on use 8 hours day 5 days week and 44 weeks year If a machine is used more maintenance periods will come...

Page 68: ...User s Guide ViperTX Extreme Periodical maintenance 68 AP 75340 Revision 1 0 ...

Page 69: ...n 73 Operation panel in standby mode 74 F1 Feeding and Distance adjust 74 F2 Cleaning the heads 75 F3 Cancel print 76 F4 Operating the pressure rollers 76 ENTER Print mode check 76 Operation panel during printing 77 F1 Distance Adjustment 77 F2 Cleaning 77 F3 Cancel 77 F4 Pause 78 Menu overview 79 Setup menu 1 7 80 InkStatus 80 OriginSet 81 TestPrint 82 FabricSet 83 InkDryTime 83 HeadHeight 84 Thi...

Page 70: ... Weaving 90 ScanWidth 93 Command 94 OnlineTimer 94 Layout 95 Joint 95 Function 96 CMY K 96 Setup menu 3 7 97 RollSetup 97 Centronics 97 Network 98 IP address 98 SubnetMask 99 Gateway 99 Setup menu 4 7 100 Utility 100 ErrorDisplay 101 FabricDetection 101 StartPosition 102 FabricWidth 102 OnCleaning 103 SlantCheck 103 AutoClean 104 EdgePrinting 104 RemPanel and Remoteconn 104 ...

Page 71: ...nguage 105 Initialization 105 Setup menu 5 7 106 DataDump 106 InkManager 106 Smart Chip 107 Manual mode 107 HeadWash 110 InkLoad 111 InkSupply 111 Setup menu 6 7 112 Head Unlock 112 WiperClean 113 TankChange 113 TubingFlush 113 Setup menu 7 7 114 VersionCheck 114 Area 114 ...

Page 72: ...rent status of the printer Depending on the status the contents may be displayed in 2 to 4 lines î Second line left Displays the function assigned to F1 key í Second line right Displays the function assigned to F2 key ì Third line left Displays the function assigned to F3 key ë Third line right Displays the function assigned to F4 key ê Fourth line left Displays the currently set fabric type é Fou...

Page 73: ...switch from a menu screen to the main screen following actions can be taken Press cancel on the operation panel Leave the printer for 3 minutes when the status is in the setting menu display N Position Description ï First line Displays the menu currently set î Second line left Displays the function assigned to F1 key í Second line right Displays the function assigned to F2 key ì Third line left Di...

Page 74: ...t there is fabric loaded the printer is standby the mainscreen is displayed Í îæ Press F1 to open the feed menu Í íæ Use F3 and F4 to feed the fabric forwards or backwards When you want to adjust the step follow the steps below Í ïæ Be sure that there is fabric loaded the printer is standby the mainscreen is displayed Í îæ Press F1 to open the feed menu Í íæ Press F2 to open the step adjustment me...

Page 75: ...ainscreen is displayed Í îæ Press F2 to open the cleaning menu Í íæ Select with head s to clean and how powerful the cleaning should be depending on the number of block nozzles Press ENTER to start the cleaning cycle Menu Keyname Parameters Description Cleaning F1 ALL Clean all heads Pump 1 Only clean head 2 and 3 Pump 2 Only clean head 6 and 7 Pump 3 Only clean head 1 and 4 Pump 4 Only clean head...

Page 76: ...sure rollers Press this key to either lower or higher the pressure rollers 5 2 5 ENTER Print mode check Í ïæ Be sure that the printer is standby the mainscreen is displayed Í îæ Press ENTER to view the current setup of the printer Í íæ The setup menu will automatically close after a few seconds Ò It is also possible to operate the pressure rollers with the footpedal ...

Page 77: ...step when encountering a step mismatch overfeed or underfeed during printing Refer to Ú ª â Ú º ø ìï for all information regarding the step how to analyse and how to adjust 5 3 2 F2 Cleaning It is possible to clean the heads when encountering missing nozzles during printing Refer to Ñ â Úî ó Ý éë 5 3 3 F3 Cancel Press this key to cancel the print or data transfer ...

Page 78: ... ïæ Press F4 to pause the job Í îæ Press enter to unlock the carriage Í íæ Open the front and left maintenance cover Í ìæ Slide the carriage into the left maintenance area Í ëæ Clean the edges of the heads with a cleaning swab wetted with Mutoh waterbased textile cleaning Be sure not to touch nor clean the nozzle plate to avoid damage and bad printing quality Í êæ Close the front and left maintena...

Page 79: ...ction Make function settings F1 RollSetup Set roll details F2 Centro Set centronics communication mode F3 Network Set network details such as IP address and subnetmask F1 Utility Make advanced utility settings F3 Initial Return all parameters to factory default F1 DataDump For authorized Mutoh technician F2 InkManager Make advanced ink related settings such as ink supply ink load wash F1 H Unlock ...

Page 80: ... the ink cassette slots 1 8 Display Line 2 Ink cassette 1 3 Line 3 Ink cassette 4 6 Line 4 Ink cassette 7 8 Symbols Ink colour K black C cyan M magenta Y yellow c light cyan m light magenta G green O orange Ink remaining 0 100 Cancel Go back to the previous menu Ò Depending on the settings in de smartchip menu another output is possible When working in manual mode the ink level mode will always sh...

Page 81: ...e printed fabric by changing the layout of the printing data Menu Parameter Description OriginSet L fabric feed value W print head movement unit mm Change the print head position and fabric feed amount by operating the following keys F1 move origin up F2 move origin to the left F3 move origin down F4 move origin to the right ENTER Confirm the new values CANCEL Go back to the previous menu øðôð Ç È...

Page 82: ...tart to print Menu Parameter Description Testprint 1 3 Dist Check Print step adjustment pattern Refer to Ú º ø NozzleCheck Print nozzlecheck Refer to Ò µ Setup Print setup list Maintenance Print maintenance list TestPrint 2 3 UniDir Print uni directional adjustment pattern BiDir 300 Print bi directional test pattern at 300 cps BiDir 400 Print bi directional test pattern at 400 cps BiDir 480 Print ...

Page 83: ... Parameter Description FabricSet Fabric Choose between the 8 profiles user 1 8 of which you want to change store the following settings µÜ Ì Ø Ø Ì µ Ü TopFeed Set the distance to be fed before the printer starts to print Typical used in combination with roll fabrics CANCEL Go back to the previous menu Menu Key Description InkDryTime 0 sec 60 min F2 Increase value F4 Decrease value ENTER Store set ...

Page 84: ...thickness of the fabric Distance adjustment Preferably use the distance adjust test pattern described in the following chapter Refer to Ú ª â Ú º ø ìï Menu Parameter Description HeadHeight Low Distance between head and fabric will be 1 2 mm Middle Distance between head and fabric will be 2 mm High Distance between head and fabric will be 4 mm CANCEL Go back to previous menu without storing the men...

Page 85: ...TopFeed Set the distance to be fed before the printer starts to print Typical used in combination with roll fabrics Menu Key Description TopFeed 0mm 400 mm F2 Increase value F4 Decrease value ENTER Store set value CANCEL Go back to previous menu without storing the menu ...

Page 86: ...s feature is only accessible as from the moment the ink configuration dye pig4 has been selected in the smartchip manual mode menu Refer to Í ëñé â µÓ â Ó ïðé Menu Parameter Description PrintMode Fabric Choose between the 8 profiles user 1 8 of which you want to change store the following settings Ý Ó Ý Ü Ø Í Î Ð Ø Í É ª CANCEL Go back to the previous menu ...

Page 87: ... 720x360 horizontal 28 720x360 variable dot 14 28 41 5 720x360 DD variable dot 28 56 83 Fast 720x360 variable dot 14 28 41 5 360x720 vertical 41 5 540x720 variable dot 11 5 25 540x720 DD variable dot 11 5 23 50 Fast 540x720 variable dot 11 5 25 720x720 diagonal 28 720x720 variable dot 11 5 25 720x720 DD variable dot 11 5 23 50 720x720 normal 11 5 Fast 720x720 variable dot 11 5 25 Print resolution ...

Page 88: ...de the interlace menu will be displayed Decide in how many passes you want to print 720 x 360 dpi 360 x 720 dpi Diag 720 dpi Condition 2 5 540 x 720 720 x 720 1080 x 1080 1440 x 720 Condition 3 5 720 x 1440 Diag 1440 1440 x 1440 2160 x 1080 Condition 4 5 1080 x 2160 Diag 2160 2880 x 1440 1440 x 2280 Condition 5 5 Diag 2280 CANCEL Go back to the previous menu ...

Page 89: ...ve For 4 6 or 8 colour modes the printer will use respectively 4 6 or 8 heads This mode is not recommended when printing in 4 colour mode but necessary when printing in mixed cassette setup dye pigment For the 6 and 8 colour modes it is only possible to print in this head set Fast HD This menu option will allow you to use the following FAST highest speed modes FAST HD 360 360x360 dpi FAST 540 540x...

Page 90: ...ectangular shaped stripes bands swaths passes Inherent to classic inkjet printing is that ink drying effects stepping mismatch miss firing nozzles show up in the printed image via ink bleeding and various types of banding By switching ON one of the weave patterns you will give the traditional rectangular print swaths a wave shaped look that will save you time and boost your output quality Difficul...

Page 91: ...a steam and wash after treatment Weaving 2 4 Weave set 3 Optimized for applications requiring a dry hot air after treatment Stitch For high speed applications This setting creates a small blurry line instead of a straight line when printing This small blurry line may not always be visible on fabrics Weaving 3 4 Off Switches off any of these settings Sign Quality Optimized for signage applications ...

Page 92: ...tch Picture Sign Weave set 1 Weave set 2 Weave set 3 360x360 Native 1 2 4 4p picture Double Density 1 2 4 4p picture Fast HD 1 1p stitch 1p stitch 1p off 1p off 1p off 2 1 pass 2p picture 2p sign 2p sign 2p sign 4 1 pass 2p picture 4p sign 4p sign 4p sign 720x360 Native 2 4 2p stitch 4p picture Double Density 2 4 2p stitch 4p picture Fast HD 2 2p sign 2p sign 2p sign 4 2 pass 2p stitch 4p sign 4p ...

Page 93: ...fect on the drying time Please find more details below Menu Parameter Description ScanWidth DataWidth Carriage moves only over the printing area Result in short drying time FabricWidth Carriage moves over the fabric Drying time depends on FabricWidth Full Width Carriage moves over the full width of printer Longest possible drying time CANCEL Go back to the previous menu Ú É Ó É Ü É ...

Page 94: ...l print the received data It is recommended to disable OFF this feature The printer will wait until the rest of the data is received Menu Parameter Description Command Step Not applicable Resolution Not applicable OnlineTimer Makes settings for the time between the end of receiving printing data from a computer and recognizing the end of printing data CANCEL Go back to the previous menu Menu Key D...

Page 95: ...led stitching print Ò The layout function automatically determines the size of printing data sent from the computer and then determines the amount of roll fabric required without wasting fabric Menu Parameter Description Layout Joint Makes settings for stitching print CANCEL Go back to the previous menu Menu Parameter Description Joint On Performs stitching print Off Does not perform stitching pri...

Page 96: ... Black Menu Parameter Description Function CMY K Makes settings for printing method to present black CANCEL Go back to the previous menu Menu Parameter Description CMY K No Always use K black ink Yes If MH GL GL2 are set on the Command Settings menu be sure to use CMY mixed colours ink If RTL PASS is set use both CMY mixed colours ink and K black ink CANCEL Go back to the previous menu ...

Page 97: ... screen the remaining length will be displayed 5 7 2 Centronics To set communication mode to Centronics interface Menu Key Description Roll 1 m 999 m F2 Increase value F4 Decrease value ENTER Store set value CANCEL Go back to previous menu without storing the menu Menu Parameter Description Centronics Centro To set communication mode to Centronics mode Bicentro To set communication mode to Bi Cent...

Page 98: ...efore making the settings in the Network Setup menu Menu Parameter Description Network IPaddress To set the IP address of the product SubnetMask To set the subnet mask of the product Gateway To set the IP address of the connected gateway CANCEL Go back to the previous menu Menu Key Description IPaddress 000 000 000 000 223 255 255 254 F1 Move one digit to the left F2 Increase the value F3 Move one...

Page 99: ... 255 F1 Move one digit to the left F2 Increase the value F3 Move one digit to the right F4 Decrease the value ENTER Store set value CANCEL Go back to previous menu without storing the menu Menu Key Description Gateway 000 000 000 000 223 255 255 254 F1 Move one digit to the left F2 Increase the value F3 Move one digit to the right F4 Decrease the value ENTER Store set value CANCEL Go back to previ...

Page 100: ... position of the fabric FabricWidth Manually set the width of the fabric Utility 2 3 OnCleaning Performs automatically a normal cleaning when the printer is powered on Slantcheck Whether to perform a slant check after each print or not Autoclean Performs cleaning cycle while printer is idle at the set temperature EdgePrinting Allows the user to print wider than the fabric edge into the gutter Util...

Page 101: ...n Fabric detection Normal The fabric detection will be done automatically As well the left right as front side of the fabric will be measured Off No automatic fabric detection will be done You should also set the fabric width and start position manually Refer to Ú É and Í Ð TakeUpRoll Use this setting when working with Mutoh s Unwinder Winder 100 and the fabric is loaded at the right side Only the...

Page 102: ...t the start position in mm FabricWidth When the fabric detection is disabled it is necessary to set the fabric width of the fabric Menu Key Description Roll 0m 825mm F2 Increase value F4 Decrease value ENTER Store set value CANCEL Go back to previous menu without storing the menu Menu Key Description FabricWidth 210 mm 1651 mm F2 Increase value F4 Decrease value ENTER Store set value CANCEL Go bac...

Page 103: ...ng printing it might be possible that the fabric slants To avoid continuing printing in such a situation an automatic slant check after every print of at least 1 meter can be performed Menu Parameter Description OnCleaning Off Do not perform an automatic cleaning at start up On Perform an automatic cleaning at start up CANCEL Go back to the previous menu Menu Parameter Description SlantCheck Off D...

Page 104: ...meter can vary between 5 mm and 50 mm Minus 5 mm is the standard margin 0 is the edge of the fabric and is overprinting RemPanel and Remoteconn These functions are meant for internal use only Menu Parameter Description AutoClean Waiting To perform a little normal powerful cleaning while printer is idle for 1 2 1 2 3 4 5 6 9 12 18 or 24 hours Printing To perform a little normal powerful cleaning af...

Page 105: ...ce in your native tongue The extra languages will only be added to this menu when one or maximum 2 language packs have been installed 5 8 2 Initialization It is possible to reset the set values to the factory default One by one or all at once Menu Parameter Description Language English Work with the English user interface Nederlands Work with the Dutch user interface CANCEL Go back to the previous...

Page 106: ...the functions of the printer Do not use this function for normal printing All CANCEL Go back to the previous menu Menu Parameter Description InkManager 1 2 Smart Chip Set the ink configuration of the printer when not working in SmartChip mode Wash Use this function to clean the ink tubings with Mutoh direct textile cleaning InkLoad Use this function to load ink into the printer InkManager 2 2 InkS...

Page 107: ...he ink consumption When operating in this mode the ink configuration needs to be set Menu Parameter Description Smart Chip Mutoh The printer can only keep track of the ink consumption when the smartchips are enabled Manual In this mode the smart chips are disabled The printer does NOT recognize the ink and does NOT keep track of the ink consumption When operating in this mode the ink configuration...

Page 108: ...colour modes are not advised but still supported as they offer backwards compatibility with the previous model ViperTX This to ensure you can use all your profiles made previously Refer to Ð Ó â Ý èé Ø Í É ª for more information about the fast and double density modes Ç ìô ê è á ì ê è Ý æ Ü ê Ð ê Ð êÑÙ Ý æ Ü è Ð è º º á Ç Ò Ý æ Ü ïÝïØÁÈ Ð ïÝïØÁÈ Ç á Ý Ü ñÐ ì Ý æ Ü ì øö Ð ì øö Ü ì øö Ð ì øö Ç Ò ...

Page 109: ...g4 Mixed setup 4 x dye sublimation and 4 x pigmented waterbased ink CMYK CMYK Dye6cm 1 x 6 dye sublimation ink CMYKLcLm Manual Mode 2 3 Pig6cm 1 x 6 pigmented waterbased ink CMYKLcLm Pig6OG 1 x 6 pigmented waterbased ink CMYK and 2 spotcolors Dye8 1 x 8 dye sublimation ink CMYKLcLm and 2 spot colors Pig8 1 x 8 pigmented waterbased ink CMYKLcLm and 2 spot colors Õ Ý Ó Ç Õ Ý Ó Ç Õ Ý Ó Ç Õ Ý Ó Ç Õ Ý ...

Page 110: ...mode 2 x4 dye sublimation ink 1 colour 1 head KYCM MCYK Pig1C1H_X highly recommended mode 2 x4 pigmented waterbased ink 1 colour 1 head KYCM MCYK CANCEL Go back to the previous menu Menu Parameter Description Õ Ý Ó Ç Ç Ó Ý Õ Õ Ý Ó Ç Ç Ó Ý Õ Õ Ç Ó Ý Ý Ó Õ Ç Õ Ç Ó Ý Ý Ó Õ Ç Menu Parameter Description HeadWash Pump 1 2 Wash cycle for tubings of ink slots 1 4 5 8 Pump 3 4 Wash cycle for tubings of ink...

Page 111: ...with Mutoh s bulk ink system Menu Parameter Description InkLoad Pump 1 2 Ink load cycle of ink slots 1 4 5 8 Pump 3 4 Ink load cycle of ink slots 2 3 6 7 ALL Ink load cycle of all ink slots CANCEL Go back to the previous menu Menu Parameter Description InkSupply Off Use Mutoh direct textile ink cassettes On Use Mutoh s bulk ink system CANCEL Go back to the previous menu ...

Page 112: ...5 10 1 Head Unlock Especially for periodical maintenance purposes the head need to be unlocked Refer to Ð Menu Parameter Description Head unlock No Do not unlock the head Yes Unlock the head Press enter to lock the head again after servicing the printer CANCEL Go back to the previous menu ...

Page 113: ...nter will ask you to empty the waste bottle However when replacing the bottle yourself before the firmware asks you go to this menu This will reset the counter Press enter after you have emptied the waste bottle Refer to Î 5 10 4 TubingFlush Refer to Ü â Ð º º ëë for all information on how and why to perform a tubingflush Menu Parameter Description Head unlock No Do not unlock the head to perform ...

Page 114: ...eme Printer menu 114 AP 75340 Revision 1 0 5 11 Setup menu 7 7 5 11 1 VersionCheck Check which firmware has been installed on your printer 5 11 2 Area Check the total amount of the printed area x xx m in the printer s life time ...

Page 115: ...is not used though you performed initial ink charge 119 The fabric is damaged when loading it 119 Thin fabric or transparent fabric cannot be detected 119 Fabric is crooked while printing 120 The printheads touch the fabric or fabric edges 120 Fabric is damaged during fabric Initial 120 Fabric size is wrong during fabric Initial 120 Printing via the Centronics interface does not work 121 The print...

Page 116: ...de ViperTX Extreme Troubleshooting 116 AP 75340 Revision 1 0 Other error messages 124 Data errors 125 Command errors 125 Errors requiring a restart 125 When fabrics jams occur 126 Emergency capping procedure 126 ...

Page 117: ...ntenance service contract please show the agreement or other documents N Possible cause Solution s ï You did not plug the power cable in Plug in the power cable î The AC power does not match the specified voltage Use the printer at the specified voltage í The front cover is open Close the front cover N Possible cause Solution s ï The front cover is open Close the front cover î The pressure rollers...

Page 118: ... setting or command mode on computer and printer do not match N Possible cause Solution s ï The fabric is damp Replace with new fabric î You used folded creased or curled fabric í Check the fabric for curling When using fabric set the following items in the fabric setting menu Fabric Increase head height ì Wrong fabric Use pre treated fabric for direct inkjet printing ë The printed surface is not ...

Page 119: ...al ink charging Turn on the printer to continue the initial ink charging í The printer rarely prints correctly only after initial ink charging Let the printer rest for at least 30 minutes Perform cleaning a few times and check again Ò Be sure to remove the jammed fabric before continuing Refer to É º N Possible cause Solution s ï The loading position of the fabric is not correct Load the fabric co...

Page 120: ...o the printer Load the fabric straight into the printer í Foreign material such a piece of fabric is attached to the pressure rollers Clean the pressure rollers ì The printer is used in a location with air conditioner or other circumstances not appropriate for the specified environment Use the printer in the specified environment ë Fabric folded creased damaged tore curled is used Replace the fabr...

Page 121: ...tly set does not match the command of a computer or a driver Match the command setting of the printer to the environment of a computer or a driver N Possible cause Solution s ï Too thick or Too thin fabric is used Set the correct fabric thickness î The printed surface is not the printable side Pay attention to the printable side to load fabric correctly í Dirty heads Perform head cleaning Clean ar...

Page 122: ... Possible cause Solution s ï Dripping excess ink appears on fabric Ink level is higher than needle level Print at a correct and stable ink level needle level at all times or use Mutoh original ink cassettes î Ink falls out resulting into white lines Ink level is lower than needle level Print at a correct and stable ink level needle level at all times or use Mutoh original ink cassettes ...

Page 123: ...tion panel N Display Solution s ï Ready to print Waiting for the next operation A fabric has been loaded î Fabric End There is no fabric loaded Printing will be impossible í Receiving The printer is receiving print data ì Converting The printer is converting print data ë Printing The printer is printing ê Warning waste ink tank The waste bottle is almost full you should empty it é Warning ink tube...

Page 124: ... Reload the fabric î Fabric slant The fabric is loaded slantwise into the printer Reload the fabric í End of roll Roll of fabric runs out Load a new roll ì Cover open The front cover is open Close the front cover ë Set fabric The pressure rollers are raised and no fabrics are detected Load fabrics and or lower the pressure rollers ê Fabric jam error The fabric is jammed Remove the jammed fabric N ...

Page 125: ...sor failure has occurred An error on the control program has occurred If error requiring a restart has occurred the printer stops 1 Power relating to the driving system is shut off automatically 2 All indicator lights on the operation panel are turned on and beeps sound continuously 3 An error message is displayed on the operation panel Press any key on the operation panel to stop the beep sounds ...

Page 126: ...ine due to a fabric crash Failure of electricity grid A machine failure In most cases The carriage will still be away from the capping station above the printing platform The capping station will be in the down position It is important to immediately take action and reboot the machine The machine will then automatically re initialize and put the carriage back on the capping station to protect the ...

Page 127: ... a down time for longer than 1 day Print heads might dry out and can be damaged Í îæ Remove the wiper arm assembly by loosening the 4 thumb screws Í íæ Move the carriage close to the capping station Warning if you feel obstruction turn up the head height slide gear up The carriage is probably obstructed by the pressure rollers ...

Page 128: ...er most right position Make sure the slide gear is not blocking Í êæ To protect the print heads turn the small brass gear counterclockwise The capping station will suddenly move upwards Just continue to turn until you cannot go further Í éæ Verify if the carriage is properly capped Try to move the carriage If it is properly capped it should not be possible Now your machine is temporarily protected...

Page 129: ...nections 19 D Daily maintenance 54 DataDump menu 106 Direction menu 89 Distance adjustment menu 84 E EdgePrinting menu 104 Error messages 123 ErrorDisplay menu 101 F Fabric feed compensation step 41 Fabric retainers 31 FabricDetection menu 101 Fabrics Loading procedure 34 Storage 33 FabricSet menu 83 FabricWidth menu 102 Function menu 96 G Gateway menu 99 Gutter Cleaning procedure 58 H Head cleani...

Page 130: ...enu and selection 105 Layout menu 95 Loading fabrics 34 M Maintenance Daily 54 Done by an Mutoh technician 67 On monthly base 62 Weekly 59 Maintenance kits 53 Partnumbers 54 67 Manual mode menu 107 Menu Main screen 72 Overview 79 Printer 69 Setup menu 1 7 80 Setup menu 2 7 86 Setup menu 3 7 97 Setup menu 4 7 100 Setup menu 5 7 106 Setup menu 6 7 112 Setup menu 7 7 114 Standby mode 74 While printin...

Page 131: ...nu 104 RepeatPrint menu 90 Replacement procedure Waste bottle 46 Replacing ink with shipping liquid 47 RollSetup menu 97 S Safety instructions 12 ScanWidth menu 93 Setup menu 1 7 80 Setup menu 2 7 86 Setup menu 3 7 97 Setup menu 4 7 100 Setup menu 5 7 106 Setup menu 6 7 112 Setup menu 7 7 114 Shipping liquid Loading procedure 47 Partnumber 54 SlantCheck menu 103 Smart Chip menu 107 Software proble...

Page 132: ...inder winder 100 29 Utility menu 100 V VersionCheck menu 114 W Warning labels 14 Waste Handling and disposal 11 Waste bottle Replacement procedure 46 Weaving menu i technology 90 Weekly maintenance 59 WiperClean menu 113 Wipers Cleaning procedure 54 Replacement procedure 64 ...

Reviews: