26
MultiVOIP 200 User Guide
For FXO-to-FXO communications, you can enable a specific type of FXO Disconnect -- either
current loss, tone detection, or silence detection. (Check with your in-house phone
personnel to verify the preferred type of disconnect to use.) For tone detection, you can
select from drop-down lists either one or two tones that will cause the line to be disconnected;
the person hanging up a call must then hit the key(s) that will produce those tones. For
silence detection, select One Way or Two Way, then set the timer for the number of sec-
onds of silence before disconnect. Note: the default value of 15 seconds may be shorter than
desired for your application.
If you choose the E&M interface, then the E&M Options group is enabled. Check with your
local in-house phone personnel to determine if the signaling is Dial Tone or Wink and if the
connection is 2-wire or 4-wire. If Wink signaling is used, then the Wink Timer is enabled with
a default of 250 milliseconds. The range of the Wink Timer is from 100 to 350 milliseconds.
Consult with your local in-house phone personnel for this timer setting.
If you want to dedicate a local voice/fax channel to a remote voice/fax channel (so you will not
have to dial the remote channel), click the Auto Call Enable option in the Auto Call group.
Then enter the phone number of the remote MultiVOIP in the Phone Number field.
Note: After configuring a given channel (1 or 2), you can copy that channel’s configuration to
the other channel by clicking the Copy button. Everything on the Interface tab will be copied
to the other channel.
14
Repeat the above step to configure the interface type for voice/fax channel 2.
15
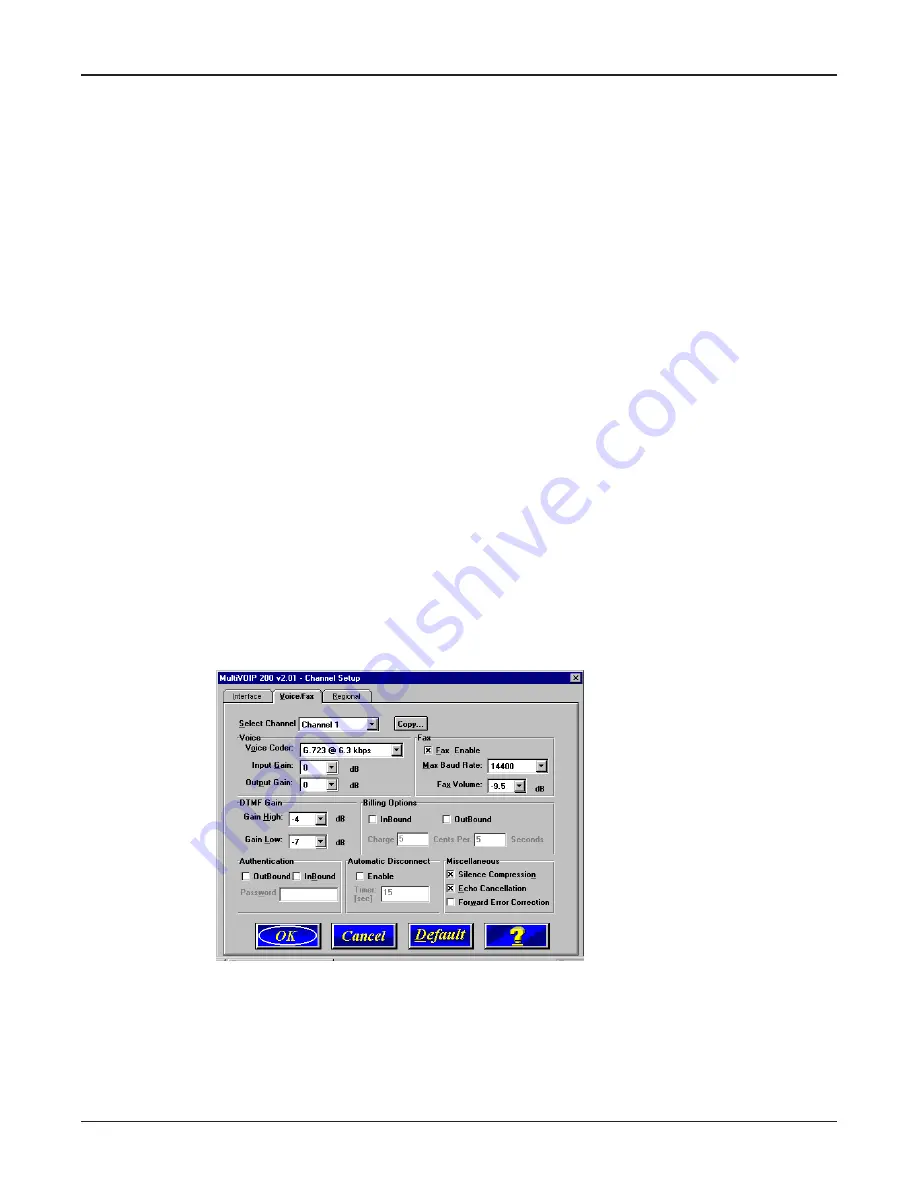
The Voice/Fax tab displays the parameters for the voice coder, faxing, DTMF gain, billing
charges for inbound and/or outbound calls, password authentication on inbound and/or
outbound calls, and auto disconnect which limits call duration.
16
To change the voice coder, first select the channel by clicking the Select Channel down arrow
and highlighting the channel number, then click the Voice Coder down arrow and highlight
your new voice coder entry.
If you changed the voice coder, ensure that the same voice coder is used on the voice/fax
channel you are calling; otherwise, you will always get a busy signal.
17
If you selected the FXO interface and are using touchtone dialing, you can set up the DTMF
gain (or output level in decibels - dB) for the higher and lower frequency groups of the DTMF
tone pair. Make your selections in the drop-down lists in the DTMF Gain group.
Summary of Contents for MultiVOIP 200
Page 1: ...Voice Fax over IP Networks Voice Fax Over IP Networks Model MVP200 User Guide...
Page 5: ...Voice Fax over IP Networks Chapter 1 Introduction and Description...
Page 14: ...14 MultiVOIP 200 User Guide...
Page 15: ...Voice Fax over IP Networks Chapter 2 Installation...
Page 21: ...Voice Fax over IP Networks Chapter 3 Software Loading and Configuration...
Page 40: ...40 MultiVOIP 200 User Guide...
Page 41: ...Voice Fax over IP Networks Chapter 4 MultiVOIP Software...
Page 59: ...Voice Fax over IP Networks Chapter 5 Remote Configuration and Management...
Page 67: ...Voice Fax over IP Networks Chapter 6 Warranty Service and Tech Support...
Page 73: ...Voice Fax over IP Networks Appendixes...
Page 82: ...82 MultiVOIP 200 User Guide...
Page 83: ...Voice Fax over IP Networks Glossary...
Page 96: ...96 MultiVOIP 200 User Guide...


