18
MultiVOIP 200 User Guide
Cabling Your MultiVOIP
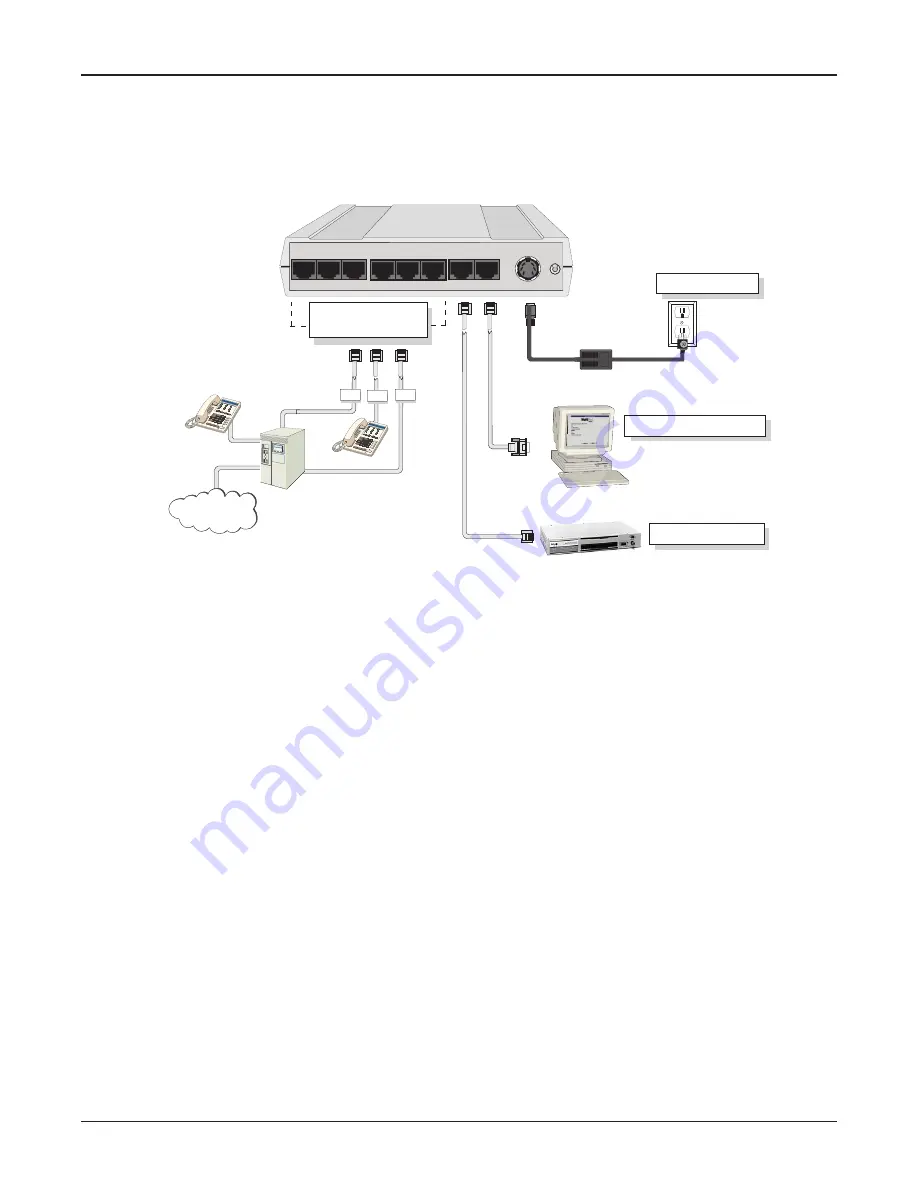
Cabling your MultiVOIP involves making the proper Power, Command Port, and Internet connections.
Figure 2-2 shows the back panel connectors and the associated cable connections. The Cabling
Procedure has step-by-step instructions for cabling your MultiVOIP.
Voice/Fax Channel
1 & 2 Connections
Network Connection
Power Connection
FXS
E&M
FXO
PSTN
Command Port Connection
Hub
PBX
Voice/Fax Channel 1
E&M
FXS
FXO
Voice/Fax Channel 2
FXO
FXS
E&M
1
0
Power
Ethernet RS232
Command
10Base-T
Figure 2-2. Cable Connections
Note: Before starting to cable your MultiVOIP, perform the E&M Jumper Block Positioning
Procedure if either voice/fax channel (1 or 2) will be connected to an E&M trunk that is a Type
1,3,4, or 5 rather than a Type 2 (the default).
Cabling Procedure
1
Using the supplied cable, connect the power supply to a live AC outlet, then plug the power
supply into the MultiVOIP as shown in Figure 2-2. The power connector is a 6-pin circular
DIN connector.
2
Connect the MultiVOIP to a PC using the RJ-45 to DB9 (female) cable provided with your
unit. Plug the RJ-45 end of the cable into the Command port of the MultiVOIP and connect
the other end to the PC serial port you’re using. See Figure 2-2.
3
Connect a network cable to the Ethernet 10Base-T connector on the back of the MultiVOIP.
Connect the other end of the cable to your network.
4
If you are connecting a station device; e.g., analog telephone, fax machine, or Key Telephone
System (KTS); to your MultiVOIP, connect the smaller end of a special adapter cable (sup-
plied) to the Voice/Fax Channel 1 FXS connector on the back of the MultiVOIP and the other
end to the station device.
If you are connecting a PBX extension to your MultiVOIP, connect the smaller end of a special
adapter cable (supplied) to the Voice/Fax Channel 1 FXO connector on the back of the
MultiVOIP and the other end to the PBX extension.
If you are connecting an E&M trunk from a telephone switch to your MultiVOIP, connect one
end of an RJ-45 phone cord to the Voice/Fax Channel 1 E&M connector on the back of the
MultiVOIP and the other end to the trunk. Note: Appendix B has a pinout diagram for the E&M
back panel connector on the MultiVOIP.
Summary of Contents for MultiVOIP 200
Page 1: ...Voice Fax over IP Networks Voice Fax Over IP Networks Model MVP200 User Guide...
Page 5: ...Voice Fax over IP Networks Chapter 1 Introduction and Description...
Page 14: ...14 MultiVOIP 200 User Guide...
Page 15: ...Voice Fax over IP Networks Chapter 2 Installation...
Page 21: ...Voice Fax over IP Networks Chapter 3 Software Loading and Configuration...
Page 40: ...40 MultiVOIP 200 User Guide...
Page 41: ...Voice Fax over IP Networks Chapter 4 MultiVOIP Software...
Page 59: ...Voice Fax over IP Networks Chapter 5 Remote Configuration and Management...
Page 67: ...Voice Fax over IP Networks Chapter 6 Warranty Service and Tech Support...
Page 73: ...Voice Fax over IP Networks Appendixes...
Page 82: ...82 MultiVOIP 200 User Guide...
Page 83: ...Voice Fax over IP Networks Glossary...
Page 96: ...96 MultiVOIP 200 User Guide...


