


32
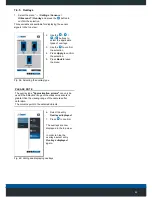
1.
Select the menu “
... / Settings / Calibration / Manual"
and press the
button to confirm the selection.
2. Use the
/
button
to select the relevant
camera.
3. Use the
button to
open the respective
live image.
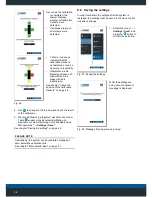
Fig. 32: Select the camera for manual calibration
Overview
Zoom
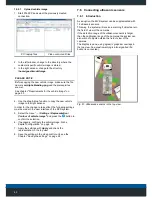
Fig. 33: Positioning the target cross
The monitor now shows the live image of the selected
camera. The orientation of the image corresponds to the
viewing direction of the respective camera.
The positions of the 8 target crosses must be checked for
each camera. The positions must correspond to the
presentation in Fig. 31.
If the positions do not correspond to the representation in
Fig. 31, the positions of the target crosses must be
corrected.
2. Use the arrow keys near the corresponding marker in
order to position the active target cross.
3. Use
in order to activate the zoom function.
4. Position the target cross at the respective marker
positions as shown in Fig. 31. The target cross must lie
exactly as possible on the appropriate corner of the
marker.
5. Press
to confirm the position.
6. Position the remaining target crosses according to
steps 2 to 5.
7. In order to leave the manual calibration function, press
the
or
button. Press the
button if the
positioning of the target cross must be re-started.
8. Select the entry
All
cameras.
9. Use the
button to
confirm the selection.
The calibration is now
being processed.
PLEASE NOTE
Alternatively, individual cameras can be manually
calibrated.
To do this, go to the
"
Settings / Calibration / Manual
"
menu and select the entry
Current camera
.