


21
TriStar MPPT-600V-TR Operator's Manual
3.4 Controller Installation
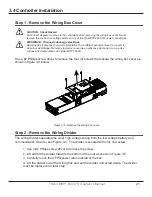
Step 1 - Remove the Wiring Box Cover
CAUTION: Shock Hazard
Disconnect all power sources to the controller before removing the wiring box cover. Never
remove the cover when voltage exists on any of the TS-MPPT-600V-TR power connections.
PRUDENCE : Risque de décharge électrique
Déconnectez toutes les sources d’alimentation du contrôleur avant d’enlever le couvercle
du boîtier de câblage. Ne retirez jamais le couvercle en présence de tension sur une des
connexions d’alimentation du TriStar MPPT 600V.
Use a #2 Phillips screw driver to remove the four (4) screws that secure the wiring box cover as
shown in figure 3-4 below.
Figure 3-4. Remove the wiring box cover.
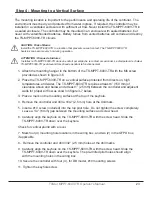
Step 2 - Remove the Wiring Divider
The wiring divider separates the solar high voltage wiring from the low voltage battery and
communication circuits - see Figure 3-5. The divider is secured with only one screw.
1. Use a #2 Philips screw driver to remove the screw.
2. Lift and tilt the divider towards the bottom of the unit as shown in Figure 3-5.
3. Carefully move the GFPD power wires outside of the box.
4. Lift the divider out of the wiring box and set the divider and screw aside. The divider
must be replaced in a later step.


