background image

Cool

cooler colour presentation

sRGB

usual standard for computer applica-
tions

User

individual adjustment
If 

User

has been selected, select the

lines 

R

(red component), 

G

(green

component) and 

B

(blue component)

successively with the button 

or 

and adjust the value with the button 

or 

. When changing the value, the

menu is deactivated and only the scale
is displayed at the bottom of the pic-
ture. After adjusting the value, press
the button EXIT to return to the menu.

To exit the submenu, press the button EXIT.

Auto

Automatic adjustment of the picture position

After activating the menu item with the button 

,

an automatic adjustment of the picture position
is made. Then values adjusted manually for

H-Position

and 

V-Position

on the menu page

FUNCTION

are corrected.

Color Auto

without function for this model

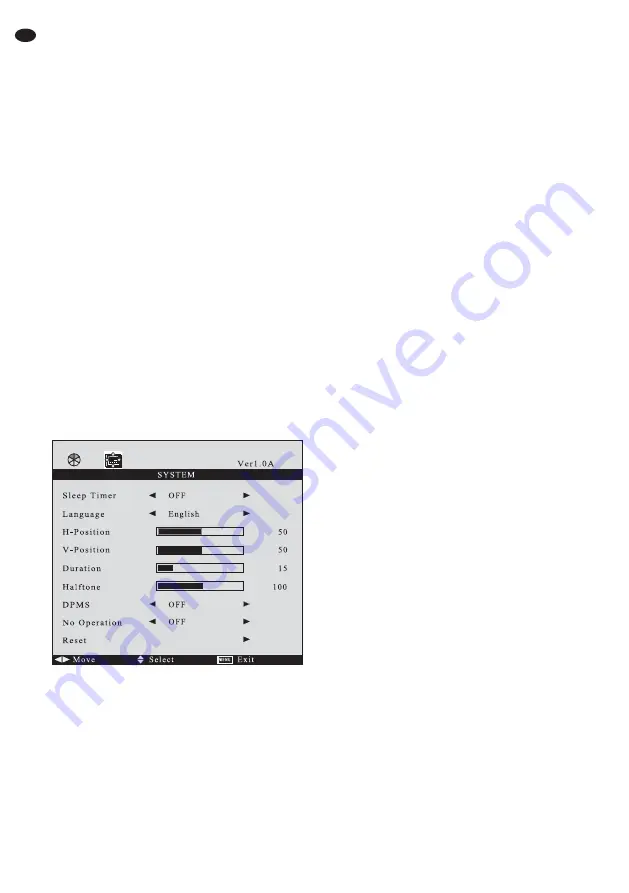
6.5.2 Page 

SYSTEM

Sleep Timer

timer-controlled change to stand-by

Via this menu item a duration can be defined.
After it has elapsed, the monitor will automati-
cally go to stand-by mode. Select the duration
(15 min. … 60 min.) or 

OFF

(function deacti-

vated) with the button 

or 

.

One minute before changing to stand-by, the

time is counted down (display 

Sleep Time Left

).

It is not possible to call the on-screen menu, the
source list and the volume scale during this
countdown.

Language

menu language

Select English, French, Spanish, Italian or Ger-
man with the button 

or 

.

H-Position

horizontal position of the menu

Move the menu to the left with the button 

or to

the right with the button 

.

V-Position

vertical position of the menu

Move the menu upwards with the button 

or

downwards with the button 

.

Duration

time of insertion

This menu item defines the time the menu
remains inserted after the last button has been
pressed. The adjusted duration also applies to
the insertion of the source list and the volume
scale. Reduce the duration with the button 

or

increase it with the button 

(adjusting range

5 – 60  seconds).

Halftone

transparency of the menu

Via this menu item the transparency of the menu
and the source list and volume scale inserted
can be adjusted. Increase the transparency with
the button 

or reduce it with the button 

.

DPMS

power saving mode for the use as a 
computer monitor 
(not for the sources 

AV1

AV2

SVIDEO

)

The function can be activated (

ON

) or deacti-

vated (

OFF

) with the button 

or 

. If the graph-

ics card of the computer supports the VESA
power saving standard DPMS (Display Power
Management Signaling), it is possible to define
the time in the computer adjustments after
which, in case of inactivity, the system will send
a signal to the monitor to go to the power saving
mode. If the monitor receives the corresponding
signal from the computer, it goes to the power
saving mode after approx. 1 minute:  the screen
becomes dark and the power indication (7)
shows yellow. Even in the power saving mode, it
is possible to switch over to another source or to
call the on-screen menu.

No Operation

change to stand-by in case of 
inactivity

The monitor can be adjusted so that it is auto-
matically switched to stand-by mode when no
button has been actuated for a defined time.
Select the duration (1

S

= 1 hour without actuat-

ing a button … 

4S

= 4 hours without actuating a

button) or 

OFF

(function deactivated) with the

button 

or 

.

One minute before going to stand-by the time

is counted down (indication 

Power Time Left

).

Switching over to stand-by can still be stopped if

14

GB

Summary of Contents for Security TFT-900LED

Page 1: ...DIENUNGSANLEITUNG INSTRUCTION MANUAL MODE D EMPLOI ISTRUZIONI PER L USO VEILIGHEIDSVOORSCHRIFTEN CONSEJOS DE SEGURIDAD RODKI BEZPIECZE STWA SIKKERHEDSOPLYSNINGER S KERHETSF RESKRIFTER TURVALLISUUDESTA...

Page 2: ...2 1 2 3 4 5 6 7 8 9 12 10 11 13 14 15...

Page 3: ...de la utilizaci n Le deseamos una buena utilizaci n para su nuevo aparato MONACOR Por favor lea los consejos de seguridad detalladamente antes de hacer funcionar el aparato para protejerse y pro teje...

Page 4: ...4 polig 13 Stereo Audio Eingang 3 5 mm Klinkenbuch se f r die am VGA Eingang 14 angeschlos sene Quelle 14 VGA Eingang 15 polige Sub D Buchse 15 Stromversorgungsbuchse zum Anschluss des beiliegenden N...

Page 5: ...osite Video Signalquellen An die Eing nge VIDEO 1 und VIDEO 2 9 k n nen ber BNC Verbindungskabel z B BNC 100 die Video Ausg nge zweier Signalquellen ange schlossen werden die ein Composite Video Signa...

Page 6: ...nung und eine Kurzinformation eingeblendet Kapitel 6 1 Wird die Wahl einer Quelle nicht best tigt blendet sich die Liste automatisch aus wenn nach dem letzten Dr cken einer Taste die im Men ein gestel...

Page 7: ...tellung des Werts zum Zur ckkehren in das Men die Taste EXIT dr cken Color Tone Farbdarstellung Mit der Taste oder w hlen zwischen Normal Standardeinstellung f r den Monitor 6500K w rmere Farbdarstell...

Page 8: ...der Taste nach unten verschieben Duration Einblenddauer ber diesen Men punkt wird festgelegt wie lan ge das Men nach dem letzten Bet tigen einer Taste eingeblendet bleibt Die eingestellte Dauer gilt...

Page 9: ...takt Zur Feinjustierung der Bildbreite treten vertikale Streifen im Bild auf die Bildbreite reduzieren oder erh hen Phase Die Phase mit der Taste oder so einstellen dass eine optimale Sch rfe z B von...

Page 10: ...15 Power supply jack for connection of the power supply unit provided 2 Safety Notes The units monitor and power supply unit corre spond to all relevant directives of the EU and are therefore marked w...

Page 11: ...onnected to the inputs VIDEO 1 and VIDEO 2 9 via BNC con nection cables e g BNC 100 For audio repro duction connect the audio output of one of the sources to the RCA jacks AUDIO 11 R right channel L l...

Page 12: ...source the iden tification of the source and short information are briefly inserted chapter 6 1 If the selection of a source is not confirmed the list is automatically deactivated when the insertion...

Page 13: ...the value press the button EXIT to return to the menu Color Tone colour presentation Select Normal standard adjustment for the monitor 6500K warmer colour presentation or 9300K cooler colour presentat...

Page 14: ...e button Duration time of insertion This menu item defines the time the menu remains inserted after the last button has been pressed The adjusted duration also applies to the insertion of the source l...

Page 15: ...e width if verti cal lines appear in the picture reduce or increase the picture width Phase Adjust the phase with the button or so that a perfect sharpness e g of the display of let ters is reached an...

Page 16: ...la source reli e l entr e VGA 14 14 Entr e VGA prise Sub D 15 p les 15 Prise d alimentation pour brancher le bloc sec teur livr 2 Conseils d utilisation et de s curit Les appareils moniteur et bloc s...

Page 17: ...urface de l cran 5 Branchements 5 1 Sources de signal vid o composite On peut relier aux entr es VIDEO 1 et VIDEO 2 9 via des cordons BNC p ex BNC 100 les sorties vid o de deux sources de signal d liv...

Page 18: ...ment si apr s la der ni re pression sur une touche la dur e d affichage r gl e dans le menu point menu Duration cha pitre 6 5 2 est coul e La liste peut galement tre d sactiv e avec la touche EXIT 1 6...

Page 19: ...u menu Color Tone r glage couleur Avec la touche ou s lectionnez entre Nor mal r glage standard pour le moniteur 6500K affichage plus chaud des couleurs et 9300K affichage plus froid des couleurs Scal...

Page 20: ...touche vers le bas Duration dur e d affichage Via ce point du menu vous pouvez d terminer la dur e d affichage du menu apr s la derni re acti vation d une touche La dur e r gl e vaut gale ment pour le...

Page 21: ...ge si l image pr sente des traits verticaux diminuez la largeur d image ou augmentez la Phase R glez la phase avec la touche ou de mani re obtenir une nettet optimale par exemple des affichages de let...

Page 22: ...Ingresso stereo audio presa jack 3 5 mm per la fonte collegata all ingresso VGA 14 14 Ingresso VGA presa Sub D a 15 poli 15 Presa d alimentazione per il collegamento del l alimentatore in dotazione 2...

Page 23: ...a superficie 5 Collegamenti 5 1 Fonti con segnale video composito Agli ingressi VIDEO 1 e VIDEO 2 9 per mezzo di cavi BNC di collegamento p es BNC 100 si possono collegare le uscite video di due fonti...

Page 24: ...il tasto SELECT 5 Dopo il cambio della fonte si vede brevemente l indicazione della stessa e un informazione breve Capitolo 6 1 Se non si conferma la scelta della fonte l elenco si spegne automaticam...

Page 25: ...o la scala di regolazione Dopo l impo stazione del valore per ritornare al men pre mere il tasto EXIT Color Tone Rappresentazione dei colori Con il tasto o scegliere fra Normal impo stazione standard...

Page 26: ...asso con il tasto Duration Durata della visualizzazione Con questa voce si stabilisce quanto tempo il men rimane visibile dopo l ultimo azionamento di un tasto La stessa durata vale anche per la visua...

Page 27: ...presentano strisce verticali nel l immagine ridurre la larghezza o aumen tarla Phase Con il tasto o impostare la fase in modo tale da raggiungere una nitidezza ottimale p es nelle scritte senza interf...

Page 28: ...as relevantes de la UE y por lo tanto est n marcados con el s mbolo Preste atenci n a los siguientes puntos bajo cualquier circunstancia G Los aparatos est n adecuados para su utilizaci n s lo en inte...

Page 29: ...af enheden Bortset fra sikker hedsoplysningerne henvises til den engelske tekst Vigtige sikkerhedsoplysninger Enhederne monitor og str mforsyning overholder alle n dvendige EU direktiver og er derfor...

Page 30: ...on my nnetty hyv ksynt Huomioi seuraavat seikat G N m laitteet soveltuvat k ytett v ksi ainoastaan sis tiloissa Suojele laitetta kosteudelta vedelt ja kuumuudelta sallittu ymp r iv l mp tila 0 40 Cel...

Page 31: ...MONACOR INTERNATIONAL GmbH Co KG Zum Falsch 36 28307 Bremen Germany Copyright by MONACOR INTERNATIONAL All rights reserved A 1366 99 01 11 2012...

Reviews: