14: Plate Dispenser
Setting the plate diameter by using one plate only, set the guides to their correct positions for the size of plate.
Plate Diameter
8” (203mm)9” (229mm)
10” (254mm)
11” (279mm)
12” (305mm
Plate Guide position
89
10
11
12
27
Page 1: ...Manual 008 Issue 001 April 2020 Versicarte Pro Operating Service Manual...
Page 2: ...he time to read and follow all safety installation and maintenance guidelines carefully before proceeding to install Keep this manual in a safe place for future consultation These appliances are CE ma...
Page 3: ...lay Specification Operation Neutral Display Specification Operation Soup Station Specification Operation Carvery Station Specification Operation Convection Regeneration Oven Specification Operation Po...
Page 4: ...wn X X Blue Yellow Green Striped 3 Phase Cable Brown Black Grey Blue Yellow Green Striped This appliance must be earthed and damaged cables must be replaced by a suitably qualified person A mains cabl...
Page 5: ...the Supervisor or equivalent to instruct users provide suitable P P E show the mains isolating switch location and inform users that parts may become hot causing injury if touched 1 Remove all packagi...
Page 6: ...an unrestricted air flow through the under slung compressor and condensing coil Proper venting must be provided ensuring cool air from the room can be pumped in through the condensing coil and out th...
Page 7: ...ts where there is high radiated heat e g direct sunlight room heaters or bright spot lights Do not install units in draughty conditions where the air movement is greater than 0 2mtr sec e g near doors...
Page 8: ...00 1486 x 680 x 1700 1814 x 680 x 1700 Electrical Supply 13amp 13amp 13amp 13amp 13amp 13amp 13amp 13amp Power Rating kw 1 5 1 7 1 7 1 7 1 5 1 7 1 7 1 7 4 Refrigeration well specification Model VC2RW...
Page 9: ...n The green switch can be switched off when the cooling is no longer required however do not un plug the unit from the mains power 4 Refrigeration model operation The Display unit is controlled by a g...
Page 10: ...11 for details on how to remove Sahara fan heating cell for door and shelving adjustment and removal see page 12 The correct Holding temperature is dependent on the food type amount of food in contai...
Page 11: ...cleaning or maintenance due to a simple IEC type fastening system Access to the Plug socket is via the underside of the unit Locate the locking button on the plug and cable push in a pull to release...
Page 12: ...door fully to the left The fitment of the outer door Door B is the same as above except when lowered into the bottom track slide it fully to the right Note It s imperative the doors must be fitted in...
Page 13: ...They are fitted with either easy to clean Neo Ceram thermo panels or a solid stainless steel top with a solid state element under The self regulated surface temperature is controlled at around 90 The...
Page 14: ...serving is complete all switches should be turned off To maintain the life clean regularly with a damp cloth The correct serving temperature is dependent on the food type amount of food in container...
Page 15: ...rs or a solid back with front controls These units are not designed to heat up cold food The correct serving temperature is dependent on the food type quantity and packaging etc The Display unit is co...
Page 16: ...ler Press the L1 key The display will show 1SP for 1 second and then the current temperature it is set for Use the L1 and L2 keys to adjust the temperature L1 for a lower or L2 for a higher temperatur...
Page 17: ...con fectionery cakes muffins doughnuts biscuits chocolate crisp and nuts with adjustable perforated shelving for maximum flexibility Complete with either sliding glass rear doors or a solid back with...
Page 18: ...power indicator and an energy regulator dial Connect plug to 13 Amp socket and switch on at mains socket Fit empty pans and lids into their openings Power on with green illuminated Switch Turn contro...
Page 19: ...eplace lids Do not remove lids until service is due to commence The Bain marie Gantry are both controlled by a green neon on off switches The energy efficient Bain marie and Hot cupboard work in sync...
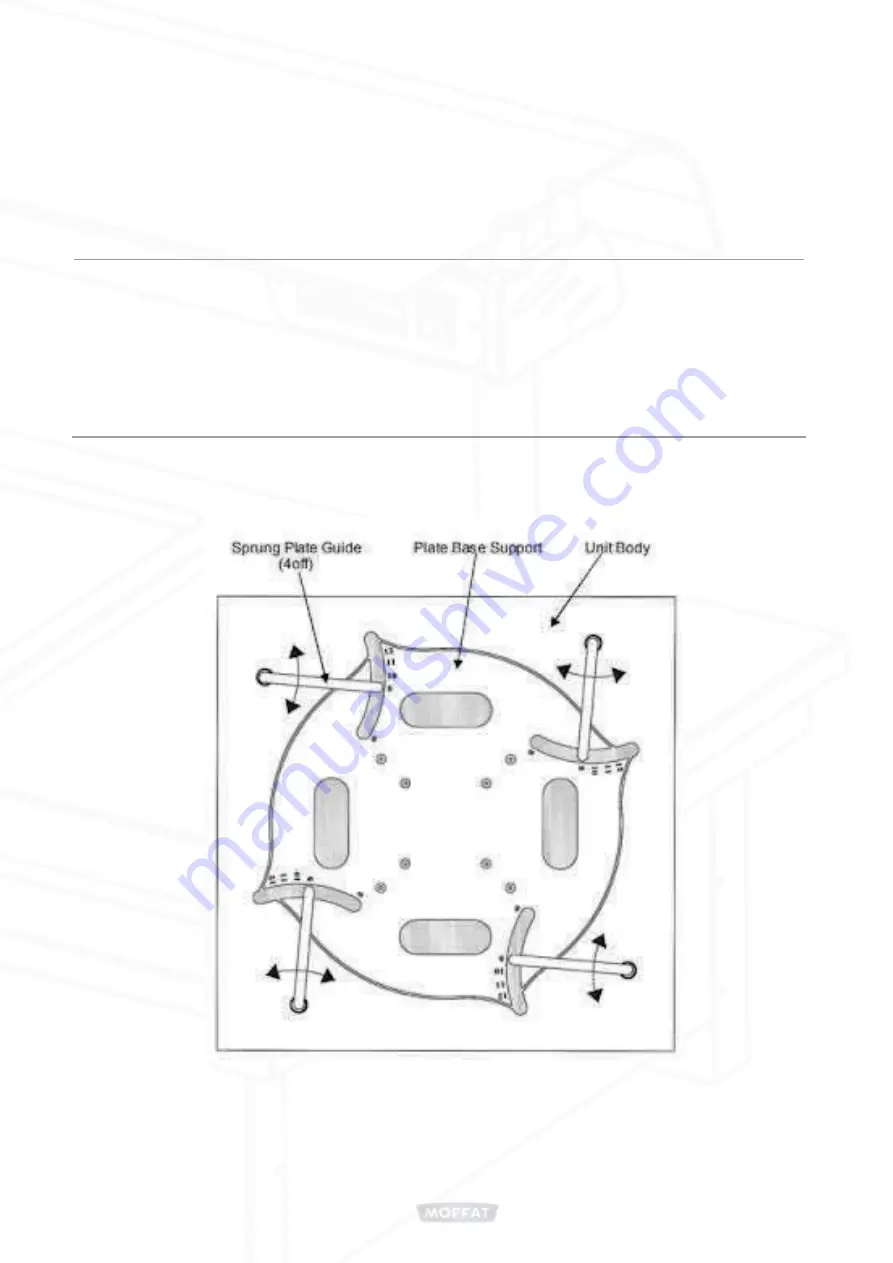
Page 20: ...Base Support which in turn rests on a floating platform This Floating Platform in turn is supported by several tension springs The tension springs are fastened symmetrically on two sides In order to...
Page 21: ...e in each corner until the top plate is at the required serving level The Springs are held in place using a hook eye arrangement top bottom They can be easily attached or detached by just hooking or u...
Page 22: ...ture as required for your application See pages 23 for instructions on time and temperature setting These ovens all have a 20 minute pre heat cycle This is switched on by pressing the 3 position switc...
Page 23: ...n At the end of the cook time a buzzer will sound and the ready light will illuminate Cancel both of these by switching the Regen button off 12 Convection Regeneration Oven Changing the Temperature Se...
Page 24: ...y the food 5 Start the Regen cycle by pressing the switch to the Regen position 6 At the end of the time ready light will illuminate and the internal buzzer will sound Bake Off Application 1 pre heate...
Page 25: ...must firstly be charged for 8 to 12 hours in a deep freeze If longer periods of operation are required extra polar plates can be charged in deep freeze and used in rotation Polar Plates weigh 5 5kg an...
Page 26: ...ube can take a maximum of 65 plates Depending on type of plate used Heated Models Thermostat controlled internal air temperature approximately 60 Complete with ergonomic black ABS plate cover Supplied...
Page 27: ...nser Setting the plate diameter by using one plate only set the guides to their correct positions for the size of plate Plate Diameter 8 203mm 9 229mm 10 254mm 11 279mm 12 305mm Plate Guide position 8...
Page 28: ...d symmetrically on two sides In order to access the tension springs the Plate Base Support needs to be removed 1 Pull up the spring loaded Plate Guides and swivel anticlockwise to their extreme outer...
Page 29: ...out of the corresponding hole on the Floating support Arm There must be an equal amount of springs on all four corners The four corner springs should not be removed When removing springs start from th...
Page 30: ...late weights Each tube can take a maximum of 65 plates Depending on type of plate used Heated Models Thermostat controlled internal air temperature approximately 60 Complete with ergonomic stainless s...
Page 31: ...ulbs Only use replacement bulbs that match the wattage and design of the fixture 1 Isolate appliance from power supply and allow cooling down before commencing lamp replacement 2 Carefully slide mesh...
Page 32: ...ernal clean Ensure all panels and fixings are replaced after cleaning operation 4 Refrigeration compartment should be washed and then dried with a cloth after each service 5 The chilled well has remov...
Page 33: ...at Ltd Bonnybridge FK4 2BS Scotland Scan the QR code below to visit the E R Moffat website for further information www ermoffat co uk 44 0 1324 812272 sales ermoffat co uk Thank you for choosing E R M...