- 11 -
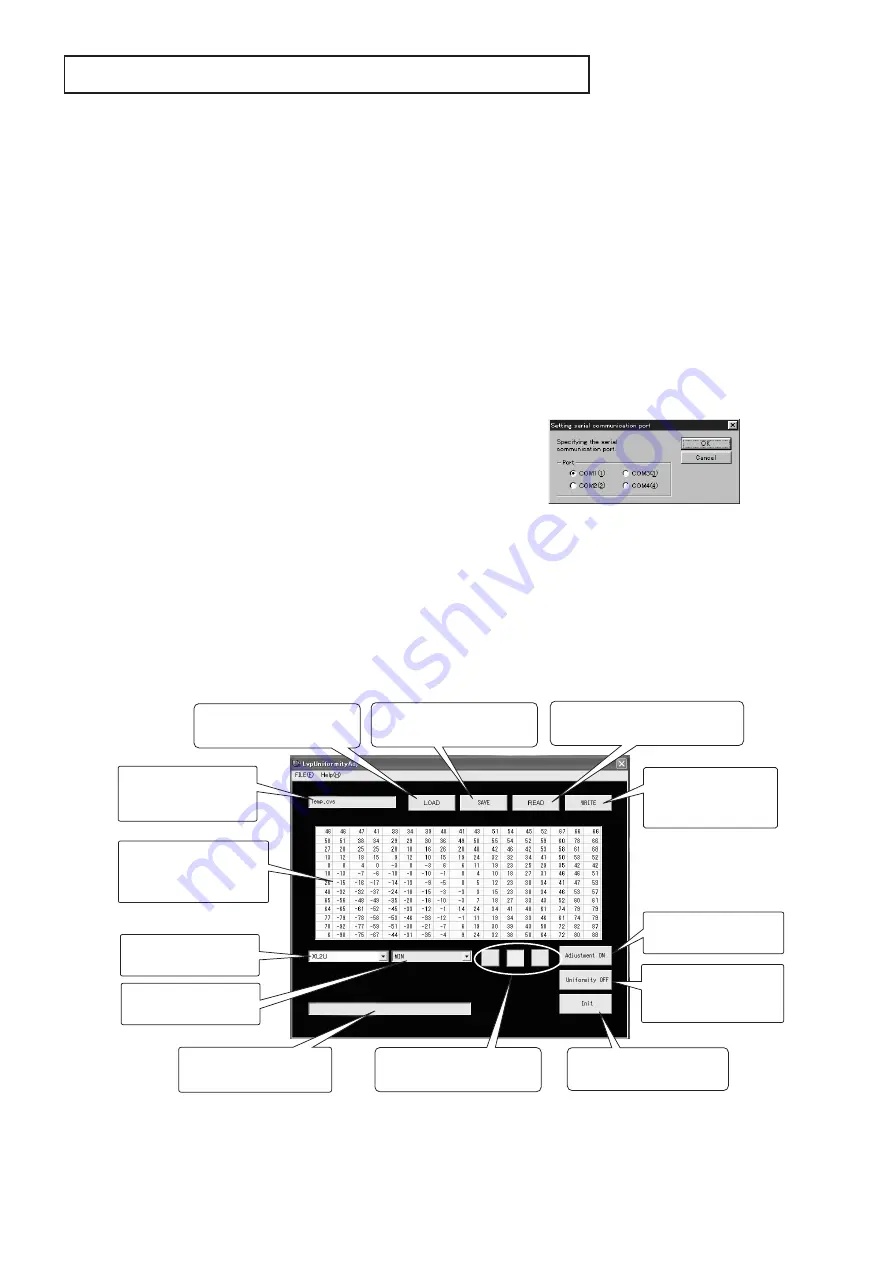
Saves the current
adjustment values.
Reads the current adjustment
values from the projector.
Loads the adjustment
values from the file.
Select the color to be
adjusted.
Initializes the adjustment
values.
Writes the
adjustment values
into the projector.
Projects the built-in
signal for adjustment.
Shows the adjustment
values of the selected
level and color.
Switches ON or OFF
the application of the
adjustment result.
A message for the user
will appear.
File name of the
selected adjusment
values.
Select the model to be
used.
Select the level to be
adjusted.
Main dialog window
COLOR UNIFORMITY ADJUSTMENT
1. Outline
When color unevenness is still remarkable in the image
after you performed “UNIFORMITY DATA TRANSFER,”
carry out this adjustment.
Note:
When replacing the LCD block and the PCB MAIN
ASSY at the same time, be sure to transfer the
factory adjustment data of the old PCB to the new
PCB referring to “REPLACEMENT OF THE MAIN
PCB ASSY.”
2. Preparation
The LvpUniformityAdj program runs on Microsoft
®
Windows
®
98/Me/2000/XP. Use a PC with Windows
®
98/Me/2000/XP.
1. Load the CD-ROM into the CD drive and select the CD
drive.
2. Copy the “UniformityAdj.” folder from the CD-ROM to the
desktop.
3. Double-click the “UniformityAdj.” folder.
4. Double-click the “setup.exe.” file. Installation will start.
Note1:
Select C:\Program Files\LvpUniformityAdj as a
directory for installation (or setup). (Select the
drive corresponding to the C drive depending on
your PC.)
Note2:
When your PC doesn't have Microsoft
®
Windows
®
Installer, exit all the running applications before
installing the file (because you will be asked to
reboot your PC according to the instructions
displayed on the screen). After your PC reboots,
the installer will automatically start operating.
3. Operation
(1) Connection
Connect your PC with the projector using the attached RS-
232C cable.
(2) Starting the adjustment program
Double-click “LvpUniformityAdj.exe.” in the
“LvpUniformityAdj.” folder. The adjustment program will
start.
(3) Main dialog window
1. When “LvpUniformityAdj.exe” starts, the main dialog
window will appear.
2. Turn on the projector and project an image.
3. Select Comm Port in the FILE menu. The COM port
switching dialog window will appear. (If the selected
port is unavailable, “Unable to open COM port.” will be
displayed on the screen.)
4. Select the COM port to be used and click the “OK” button.
COM port switching dialog window
(4) Adjustment process
Note:
Wait at least two minutes after turning on the
projector before you start adjustment.
1. Select the model to be used.
2. Click the READ button.
(The PC starts reading the current adjustment values
from the projector.It is about one minute before reading
of the adjustment values completes. Messages will
appear during and at the completion of the reading.)


