background image

26

F1

F2

F3

F4

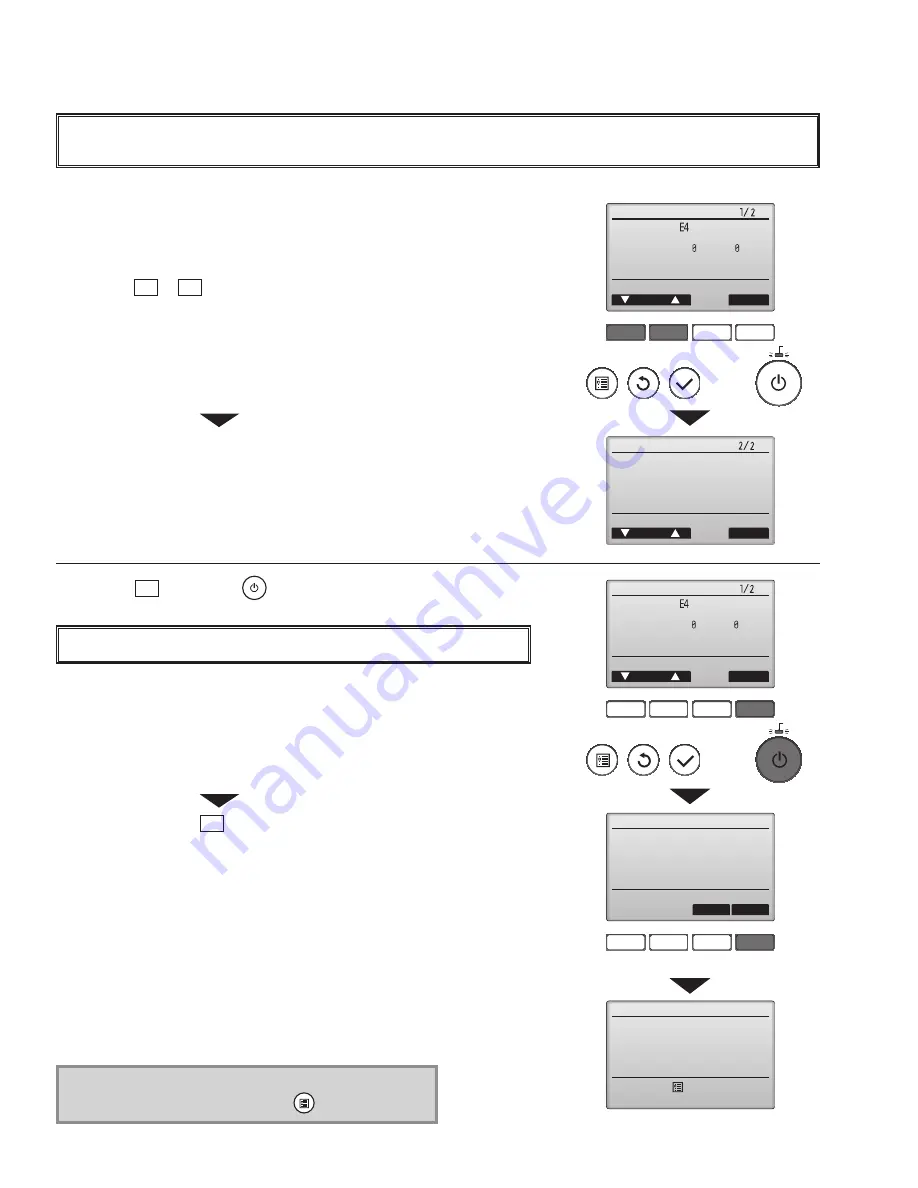
Error information

Error code

Error unit     IU

Ref. address       Unt#

Model name

Serial No.

Reset

Page

Error information

Contact information

Dealer

    Tel

Reset

Page

Reset error: Reset button

Reset error: Reset button

blinks

1

  Check code, error unit, refrigerant address, unit model name, and serial 

number will appear.

The model name and serial number will appear only if the information has 

been registered.

Press the F1 or F2 button to go to the next page.

When an error occurs, the following screen will appear.

Check the error status, stop the operation, and consult your dealer.

Contact information (dealer's phone number) will appear if the information has 

been registered.

F1

F2

F3

F4

F1

F2

F3

F4

Error information

Error reset

Error reset

Error code

Error unit     IU

Ref. address       Unt#

Model name

Serial No.

Reset

Page

Reset current error?

Error reset

OK

Cancel

Main menu:

Reset error: Reset button

blinks

2

 Press the F4 button or the

button to reset the error that is occurring.

Errors cannot be reset while the ON/OFF operation is prohibited.

Select "OK" with the F4 button.

Navigating through the screens

• To go back to the Main menu ..........

button

<Error information>

OCH636A

Summary of Contents for PUY-A12NKA7

Page 1: ...7 PUY A12NKA7 BS PUY A18NKA7 BS PUY A24NHA7 BS PUY A30NHA7 BS PUY A36NKA7 BS PUY A42NKA7 BS Service Ref PUZ A12NKA7 PUZ A18NKA7 PUZ A24NHA7 PUZ A30NHA7 PUZ A36NKA7 PUZ A42NKA7 PUZ A12NKA7 BS PUZ A18NKA7 BS PUZ A24NHA7 BS PUZ A30NHA7 BS PUZ A36NKA7 BS PUZ A42NKA7 BS PUY A12NKA7 PUY A18NKA7 PUY A24NHA7 PUY A30NHA7 PUY A36NKA7 PUY A42NKA7 PUY A12NKA7 BS PUY A18NKA7 BS PUY A24NHA7 BS PUY A30NHA7 BS PU...

Page 2: ... repair service Prepare the proper tools Prepare the proper protectors Provide adequate ventilation After stopping the operation of the air conditioner turn off the power supply breaker Discharge the condenser before the work involving the electric parts Precautions during the repair service Do not perform the work involving the electric parts with wet hands Do not pour water into the electric par...

Page 3: ...can cause deterio ration of refrigerant oil etc Do not use refrigerant other than R410A If other refrigerant R22 etc is used chlorine in refrige rant can cause deterioration of refrigerant oil etc Use a vacuum pump with a reverse flow check valve Vacuum pump oil may flow back into refrigerant cycle and that can cause deterioration of refrigerant oil etc Use the following tools specifically designe...

Page 4: ...or for R134a R407C or R410A 5 Adaptor for reverse flow check Attach on vacuum pump 6 Refrigerant charge base 7 Refrigerant cylinder Only for R410A Top of cylinder Pink Cylinder with syphon 8 Refrigerant recovery equipment Although BS model has been designed to be resistant to salt damage observe the following precautions to maintain the performance of the unit 1 Avoid installing the unit in a loca...

Page 5: ...de diameter mm Dimension A 0 0 4 inch mm R410A R22 mm Gauge manifold Charge hose Gas leak detector Refrigerant recovery equipment Refrigerant cylinder Applied oil Safety charger Charge valve Vacuum pump Flare tool Bender Pipe cutter Welder and nitrogen gas cylinder Refrigerant charging scale Vacuum gauge or thermis tor vacuum gauge and vacuum valve Charging cylinder Air purge refrigerant charge an...

Page 6: ...l the unit turn on the main power and perform service in an environment where the ambient temperature is 0 F or higher In order to protect the compressor and electrical components do not turn off the circuit breaker if the unit is installed in an environment where the ambient temperature is 0 F or lower It needs at least 12 hr standby to operation in order to warm the electrical parts Note During ...

Page 7: ... additional refrigerant charging work during installation often causes problems It is completely eliminated by chargeless system This unique system improves the quality and reliability of the work done It also helps to speed up the installation time PUZ A24NHA7 PUZ A30NHA7 PUZ A24NHA7 BS PUZ A30NHA7 BS PUY A24NHA7 PUY A30NHA7 PUY A24NHA7 BS PUY A30NHA7 BS PUZ A36NKA7 PUZ A42NKA7 PUZ A36NKA7 BS PUZ...

Page 8: ...ices HP switch HP switch HP switch HP switch HP switch HP switch Comp shell thermo Comp shell thermo Comp shell thermo Comp shell thermo Comp shell thermo Comp shell thermo Dimension W inch 31 13 16 2 7 16 31 13 16 2 7 16 37 12 32 37 12 32 41 5 16 41 5 16 D inch 11 3 16 11 3 16 13 1 3 16 13 1 3 16 13 1 3 16 13 1 3 16 H inch 24 13 16 24 13 16 37 1 8 37 1 8 52 11 16 52 11 16 W mm 809 62 809 62 950 9...

Page 9: ... switch HP switch HP switch HP switch HP switch Comp shell thermo Comp shell thermo Comp shell thermo Comp shell thermo Comp shell thermo Comp shell thermo Dimension W inch 31 13 16 2 7 16 31 13 16 2 7 16 37 12 32 37 12 32 41 5 16 41 5 16 D inch 11 3 16 11 3 16 13 1 3 16 13 1 3 16 13 1 3 16 13 1 3 16 H inch 24 13 16 24 13 16 37 1 8 37 1 8 52 11 16 52 11 16 W mm 809 62 809 62 950 950 1050 1050 D mm...

Page 10: ... 78 oz 79 oz 80 oz 81 oz 82 oz 83 oz 84 oz 85 oz 86 oz 87 oz 87 oz 78 oz 2 2 kg 2 2 kg 2 2 kg 2 2 kg 2 3 kg 2 3 kg 2 3 kg 2 3 kg 2 4 kg 2 4 kg 2 4 kg 2 5 kg 2 5 kg 2 2 kg PUY A24NHA7 PUY A24NHA7 BS 123 oz 123 oz 123 oz 126 oz 129 oz 132 oz 135 oz 138 oz 141 oz 144 oz 147 oz 150 oz 152 oz 153 oz 156 oz 159 oz 162 oz 165 oz 168 oz 170 oz 123 oz 3 5 kg 3 5 kg 3 5 kg 3 6 kg 3 7 kg 3 8 kg 3 8 kg 3 9 kg...

Page 11: ...HEARING FOR CONTINUOUS NOISE NC 60 NC 50 NC 40 NC 30 NC 20 NC 70 90 80 70 60 50 40 30 20 10 63 125 250 500 1000 2000 4000 8000 OCTAVE BAND SOUND PRESSURE LEVEL dB 0 dB 0 0002 µbar BAND CENTER FREQUENCIES Hz PUZ A12 18NKA7 BS PUY A12 18NKA7 BS COOLING MODE HEATING 46 SPL dB 47 LINE 90 80 70 60 50 40 30 20 10 63 125 250 500 1000 2000 4000 8000 APPROXIMATE THRESHOLD OF HEARING FOR CONTINUOUS NOISE NC...

Page 12: ...ing temperature _F 111 102 114 102 114 104 120 113 111 104 114 108 Suction temperature _F 49 36 51 42 58 50 57 48 50 38 57 33 Ref pipe length ft 25 25 25 25 25 25 25 25 25 25 25 25 Discharge pressure MPa 2 62 2 32 2 73 2 32 2 67 2 35 2 88 2 56 2 62 2 37 2 72 2 53 Suction pressure MPa 1 08 0 72 0 99 0 69 1 00 0 68 0 88 0 65 0 94 0 72 0 88 0 69 Discharge temperature 61 1 68 2 65 9 70 5 68 5 77 1 80 ...

Page 13: ...pressure PSIG 157 143 145 128 136 127 Discharge temperature _F 142 151 155 176 144 167 Condensing temperature _F 111 114 114 120 111 114 Suction temperature _F 49 51 58 57 50 57 Ref pipe length ft 25 25 25 25 25 25 Discharge pressure MPa 2 62 2 73 2 67 2 88 2 62 2 72 Suction pressure MPa 1 08 0 99 1 00 0 88 0 94 0 88 Discharge temperature 61 1 65 9 68 5 80 2 62 1 75 0 Condensing temperature 43 9 4...

Page 14: ...upply wiring Right Indoor Outdoor wiring 23 2 15 16 99 5 3 15 16 164 5 6 1 2 492 19 3 8 185 5 7 5 16 4 3 3 5 2 ø22 2 7 8 1 2 conduit hole Installation bolt pitch Handle for moving 22 7 8 320 12 5 8 809 31 7 8 62 2 15 32 154 5 6 3 32 310 12 7 32 8 5 11 32 22 3 29 32 630 24 13 16 Min 100mm 3 15 16 Basically open Min 350mm 13 25 32 Max Foundation bolt height 18 mm 23 32 Free space around the outdoor ...

Page 15: ...connection FLARE ø15 88 5 8F Refrigerant LIQUID pipe connection FLARE ø 9 52 3 8F 1 Indication of STOP VALVE connection location Example of Notes Power supply wiring hole 2 ø27 1 1 16 knockout Rear trunking hole knockout Rear piping hole knockout 63 2 1 2 73 2 7 18 23 29 32 55 2 3 16 27 1 1 16 92 3 5 18 65 2 9 16 45 1 25 32 40 1 9 16 ø 9 2 3 5 8 Power supply wiring hole 2 ø27knockout Front trunkin...

Page 16: ...26 1 1 32 92 3 5 8 27 1 1 16 55 2 3 16 73 2 7 8 75 2 15 16 55 2 3 16 60 2 3 8 ø 92 3 5 8 Right trunking hole Knockout Conduit hole ø 37 1 15 32 knockout Conduit hole ø 24 15 16 knockout Right piping hole Knockout 73 2 7 8 61 2 3 8 5 3 16 29 1 5 32 27 1 1 16 26 1 1 32 92 3 5 8 53 2 3 32 60 2 3 8 55 2 3 16 92 3 5 8 ø 9 2 3 5 8 Min Min Min Min Service space Min 150 5 29 32 500 19 11 16 500 19 11 16 1...

Page 17: ...17 7 WIRING DIAGRAM PUZ A12NKA7 PUZ A18NKA7 PUY A12NKA7 PUY A18NKA7 PUZ A12NKA7 BS PUZ A18NKA7 BS PUY A12NKA7 BS PUY A18NKA7 BS OCH636A ...

Page 18: ...18 PUZ A24NHA7 PUZ A30NHA7 PUY A24NHA7 PUY A30NHA7 PUZ A24NHA7 BS PUZ A30NHA7 BS PUY A24NHA7 BS PUY A30NHA7 BS OCH636A ...

Page 19: ...19 PUZ A36NKA7 PUZ A42NKA7 PUY A36NKA7 PUY A42NKA7 PUZ A36NKA7 BS PUZ A42NKA7 BS PUY A36NKA7 BS PUY A42NKA7 BS OCH636A ...

Page 20: ...C 208 230 V AC 208 230 V AC 208 230 V AC Indoor unit Outdoor unit S2 S3 single 5 24 V DC 24 V DC 24 V DC 24 V DC 24 V DC 24 V DC Remote controller Indoor unit 5 12 V DC 12 V DC 12 V DC 12 V DC 12 V DC 12 V DC 1 2 Max 50 m 164 ft S3 separated Max 262 ft 80 m 3 Max 100 ft 30 m 4 The 30 ft 10 m wire is attached in the remote controller accessory 5 The figures are NOT always against the ground S3 term...

Page 21: ...top valve Refrigerant GAS pipe 5 8 15 88 mm Refrigerant flow in cooling Refrigerant flow in heating Thermistor TH32 Suction 3 8 9 52 mm Refrigerant flow in cooling Refrigerant flow in heating Thermistor TH7 Outdoor Heat exchanger Refrigerant GAS pipe 1 2 12 7 mm Refrigerant LIQUID pipe 1 4 6 35 mm Stop valve Strainer 100 Strainer 100 Power receiver Linear expansion valve B Thermistor TH6 Outdoor 2...

Page 22: ...g Thermistor TH32 Suction 3 8 9 52 mm PUY A12NKA7 PUY A18NKA7 PUY A12NKA7 BS PUY A18NKA7 BS Refrigerant flow in cooling Refrigerant flow in heating Thermistor TH7 Outdoor Heat exchanger Refrigerant GAS pipe 1 2 12 7 mm Refrigerant LIQUID pipe 1 4 6 35 mm Stop valve Strainer 100 Strainer 100 Power receiver Linear expansion valve B Thermistor TH6 Outdoor 2 phase pipe Thermistor TH3 Outdoor pipe Char...

Page 23: ...ere is a gas leak Look for the source of the gas leak AStop valve Liquid side BStop valve Gas side CService port DOpen Close section A B H I C D E F G D B A C ELocal pipe FSealed same way for gas side GPipe cover HDo not use a wrench here Refrigerant leakage may result IUse 2 wrenches here 1 Refrigerant collecting pump down Perform the following procedures to collect the refrigerant when moving th...

Page 24: ...ere is no abnormality concerning of parts such as electrical component controller board remote controller etc 1Re check the abnormal symptom 2Conduct troubleshooting and ascertain the cause of the trouble according to 10 5 TROUBLESHOOTING OF PROBLEMS 3Continue to operate unit for the time being if the cause is not ascertained 4There is no abnormality concerning of parts such as electrical componen...

Page 25: ...Remain Vane Cool mode Check the cold air blows out Heat mode Check the heat blows out Press the F1 button to go through the operation modes in the order of Cool and Heat Check the auto vane with the F1 F2 buttons Press the button to return to Test run operation Press the button When the test run is completed the Test run menu screen will appear The test run will automatically stop after 2 hours Te...

Page 26: ... the following screen will appear Check the error status stop the operation and consult your dealer Contact information dealer s phone number will appear if the information has been registered F1 F2 F3 F4 F1 F2 F3 F4 Error information Error reset Error reset Error code Error unit IU Ref address Unt Model name Serial No Reset Page Reset current error Error reset OK Cancel Main menu Reset error Rese...

Page 27: ... Unt dd mm yy Error history Cancel OK Delete error history Error history Check menu Error history deleted 2 Select Error history with the F1 or F2 button and press the button Select Check with the F1 or F2 button and press the button 3 Select Error history from the Check menu and press the button to view up to 16 error history records 4 records are shown per page and the top record on the first pa...

Page 28: ...f status of remote controller display and current operation mode are displayed 3 Press the button to activate mode then check whether cool air blows out from the unit 4 Press the button to activate mode then check whether warm air blows out from the unit 5 Press the button and check whether strong air blows out from the unit 6 Press the button and check whether the auto vane operates properly 7 Pr...

Page 29: ... Self check with the F1 or F2 button and press the button 1 Select Service from the Main menu and press the button 3 Check code unit number attribute will appear will appear if no error history is available 4 Resetting the error history Press the F4 button Reset on the screen that shows the error history A confirmation screen will appear asking if you want to delete the error history Press the F4 ...

Page 30: ...e remote controller display if the correct voltage 8 5 12 V DC is not supplied to the remote control ler If this is the case check the remote controller wiring and indoor units OK No problems are found with the remote controller Check other parts for problems E3 6832 There is noise on the transmission line or the indoor unit or another remote controller is faulty Check the transmission line and th...

Page 31: ...t board 7 Defective outdoor controller circuit board 1 Check following items a Power supply breaker b Connection of power supply terminal block TB1 c Connection of power supply terminal block TB1 2 Check following items a Connection of power supply terminal block TB1 b Connection of terminal on outdoor power circuit board A12 A24N Disconnection of connector R or S Refer to 10 9 TEST POINT DIAGRAM ...

Page 32: ... Check diameter and length of indoor outdoor unit connecting wire Total wiring length 262 ft 80 m including wiring connecting each indoor unit and between indoor and outdoor unit Also check if the connection order of flat cable is S1 S2 S3 3 Check the number of indoor units that are connected to one outdoor unit If EA is detected 4 6 Turn the power off once and on again to check Replace outdoor co...

Page 33: ...HE COMPONENTS 8 Replace outdoor controller board U2 TH4 1102 TH33 1132 High discharge temperature High comp surface temperature 1 Abnormal if discharge temperature ther mistor TH4 exceeds 257 F 125 or 230 F 110 continuously for 5 minutes Abnormal if condenser evaporator tem perature thermistor TH5 exceeds 104 F 40 during defrosting and discharge temperature thermistor TH4 exceeds 230 F 110 2 Abnor...

Page 34: ...r to 10 8 EMERGENCY OPERATION U5 4230 Temperature of heat sink Abnormal if heat sink thermistor TH8 detects temperature indicated below A12 18N 183 F 84 A24 30N 170 F 77 A36 42N 190 F 83 1 The outdoor fan motor is locked 2 Failure of outdoor fan motor 3 Air flow path is clogged 4 Rise of ambient temperature 5 Defective thermistor 6 Defective input circuit of outdoor power circuit board 7 Failure o...

Page 35: ...board 2 Defective outdoor controller circuit board 1 Replace outdoor power circuit board 2 Replace outdoor controller circuit board 08 Abnormal power synchronous signal No input of power synchronous signal to power circuit board Power synchronous signal of 44 Hz or less or 65 Hz or more is detected on power circuit board 1 Distortion of power source voltage noise superimposition 2 Disconnection or...

Page 36: ... minutes has passed after the compressor operation TH32 TH4 20 C and TH32 80 C Thermistors TH3 Liquid pipe temperature TH33 Comp Surface temperature TH4 Discharge temperature TH5 Indoor 2 phase pipe temperature TH7 Ambient temperature Thermistor TH3 Outdoor liquid pipe temperature TH4 Discharge temperature TH5 Indoor cond eva temperature TH6 Outdoor 2 phase pipe temperature TH7 Outdoor temperature...

Page 37: ...abnormal 30 continuous times Check code E3 1 Abnormal if indoor controller board could not find blank of transmission path Check code E5 2 Indoor controller board receives transmitted data at the same time compares the data and when detecting it judges different data to be abnormal 30 continuous times Check code E5 1 2 remote controller are set as main In case of 2 remote controllers 2 Remote cont...

Page 38: ...controller circuit board and the outdoor power circuit board 3 Defective communication circuit of outdoor power circuit board 4 Defective communication circuit of outdoor controller circuit board for outdoor power circuit board 12 Check connection of each connector CN2 and CN4 between the outdoor controller circuit board and the outdoor power circuit board 3 Replace outdoor power circuit board 4 R...

Page 39: ... rate on trans mission wire rose because of defective repeater a function to connector or disconnect transmis sion of control and central control system of outdoor unit then abnormality is detected 1 Check if transmission wire of indoor unit FRESH MASTER LOSSNAY or remote con troller is not connected to terminal block for central control TB7 of outdoor unit 2 Check if transmission wire of indoor u...

Page 40: ...ot in 1 5 above in different refrigerant system 2 or more outdoor units judge with 6 6 If address of abnormality source is the address that should not exist there is the unit that memorizes nonexistent address informa tion Delete useless address information with manual setting function of remote controller Only the system FRESH MASTER or LOSSNAY are connected to or the system that is equipped with...

Page 41: ... 5 Defective transmitting receiv ing circuit of indoor unit or LOSSNAY 7 If displayed address or attribute is nonex istent 1 The unit of former address does not exist as address switch has changed while the unit was energized 2 Abnormality is detected when indoor unit transmitted because the address of FRESH MASTER and LOSSNAY are changed after sequential opera tion of FRESH MASTER and LOSSNAY by ...

Page 42: ...wiring Converse wiring of S1 and S2 or break of S3 wiring 2 When LED3 is blinking Indoor outdoor connecting wire is normal 4 Check LED display on outdoor controller circuit board Refer to 10 10 FUNCTION OF SWITCHES CONNECTORS AND JUMPERS Check protection device connector 63L and 63H for contact failure Refer to 10 9 TEST POINT DIAGRAM 3 When pressing the remote controller operation switch the OPER...

Page 43: ...piping 4 Filter clogging 5 Heat exchanger clogging 6 Air duct short cycle 7 Bypass circuit of outdoor unit fault 1 Discharging temperature and indoor heat exchanger temperature does not rise Inspect the failure by checking discharging pressure Replace linear expansion valve 2 If refrigerant leaks discharging temperature rises and LEV opening increases Inspect leakage by checking the tempera ture a...

Page 44: ... after turning on the main power Normal The startup diagnosis will be over in around 2 minutes Miswiring of indoor outdoor connecting wire Breaking of indoor outdoor connecting wire S3 Defective indoor controller board Defective outdoor controller circuit board Refer to Self diagnosis action table in order to solve the trouble In case of communication errors the display of remote controller may no...

Page 45: ... outdoor unit Check if the wiring is bad Check if the fuses are blown The fuses on the outdoor controller circuit board will be blown when the indoor outdoor connecting wire short circuits Bad wiring of the outdoor controller board The fuses on the outdoor controller circuit board are blown Check if miswiring breaking or poor contact is causing this problem Indoor outdoor connecting wire is polari...

Page 46: ...ce the outdoor controller circuit board Normal Only the unit which has the refrigerant address 0 supplies power to the remote controller Set the refrigerant address to 0 In case of the multiple grouping system recheck the refrigerant address again Defective indoor power board Replace the indoor power board Defective outdoor power circuit board Replace the outdoor power circuit board Defective indo...

Page 47: ...ct of the remote controller wire Check the voltage of the terminal block TB5 connecting the remote controller wire If it is not between 10 and 16 V DC the indoor controller board must be defective The remote controller wire short circuits Check if the remote controller wire is short circuited Defective indoor controller board Replace the indoor controller board Diagnosis flow Cause Inspection meth...

Page 48: ... twice to clear FILTER from the display See the operation manual that came with the product for how to clean the filters 3 STANDBY is displayed on the screen 3 This is displayed when the unit starts HEAT operation when the thermostat puts the compressor in operation mode or when the outdoor unit ends DEFROST operation and returns to HEAT operation The display will automatically disappear around 10...

Page 49: ...outdoor unit is controlling the airflow amount in order to keep the optimum operating condition 5 A sound similar to water flowing is heard from the unit 5 This is not a malfunction This is the sound which is heard when the refrigerant is flowing inside the indoor unit 2 The fan speed does not match the setting of the remote controller in HEAT operation The up down vane will be automatically set t...

Page 50: ...he airflow direction does not change Up down vane left right louver 3 1 Check if the vane is set to a fixed position Check if the vane motor connector is removed 2 Check if the air conditioner has a function for switching the air direction 3 If the air conditioner does not have that function NOT AVAILABLE will be displayed on the remote controller when AIR DIRECTION or LOUVER button is pressed Som...

Page 51: ...s down HEAT water drips down from the heat exchanger Note Use optional parts Drain Socket and Drain pan if these water needs to be collected and drained out for once Water or moisture is expelled from the outdoor unit Batteries are being exhausted Replace them and press the reset button of remote controller The display of IR wireless remote controller gets dim or does not come on The indoor unit d...

Page 52: ...er to 10 6 5 Check method of DC fan motor fan motor outdoor controller circuit board Fan motor MF1 MF2 2350 i 170 1435 i 150 A12 18 A36 42 0 64 A24 30 1 34 0 88 Measure the resistance between the terminals with a tester Winding temperature 68 F 20 Normal Abnormal Open or short W V U Normal Gray Black Gray Red Gray Yellow Gray Orange Abnormal 46 i 3 Open or short 160 to 410 k 4 3 to 9 6 k 1 2 3 4 5...

Page 53: ...of bus var voltage between DS1 and 280 350 V DC Check the breaker and power supply Turn off the incoming power supply and check the resistance of PTC1and PTC2 on the PNC board Replace the PNC board Check wiring Replace the PNC board Check the indoor controller board wiring Did the fuse F3 and F4 blow Check the wiring for 21S4 Is the voltage of the compressor U V U W and V W balanced Check model se...

Page 54: ...ircuit board to CNDC PNK connector No No Yes lit No No lit Yes No Outdoor controller circuit board check Yes blow Yes blow Outdoor controller circuit board CNDC PNK Power circuit board F1 F2 Conv Circuit CNDC PNK 280 380 V DC F2 CNAC WHITE CNAC1 WHT TB1 208 230 V AC 10 F3 F4 CNAC2 RED 1 3 LI NI L1 N2 1 3 1 3 208 230 V AC 10 208 230 V AC 10 F2 21S4 is for PUZ only PUZ A24NHA7 PUZ A30NHA7 PUZ A36NKA...

Page 55: ...wer board Is the voltage of CNDC PNK on outdoor controller circuit board 280 380 V DC Yes Yes Yes No No No Power board check 198 253 V AC Check wiring Check power board Turn off the incoming power supply and check the resistance of PTC1 and PTC2 on the noise filter circuit board PTC1 or PTC2 open Yes open Replace the power board No normal Power supply 52C relay Bus bar voltage DC COMP Hz OFF ON OF...

Page 56: ...98 253 V AC Check wiring Check power board Turn off the incoming power supply and check the resistance of PTC1 and PTC2 on the noise filter circuit board PTC1 or PTC2 open Yes open Replace the power board No normal Power supply 52C relay Bus bar voltage DC COMP Hz OFF ON OFF ON 0 Hz ex 48 Hz 0 V 290 325 V 370 390 V 208 230 V min Hz 290 325 V TIME CHART power on starts stop CNDC PNK 7 6 5 4 3 2 1 C...

Page 57: ... F5 open No Yes Check the operation of fan END Yes OK Check the operation END OK FAN MOTOR MF1 Inverter driver Ground power supply inverter drive power supply gate drive rotation signal control voltage 7 6 5 4 1 3 1 CNF1 CNDC F5 15 V DC 0 6 5 V DC 0 15 V DC pulse C5E Motor TESTS POINT V A36 A42 only DC TESTS POINT Vcc CHECK POINT 280 380 V DC TESTS POINT Vsp PC5D C5B TESTS POINT VFG C5D TESTS POIN...

Page 58: ... k 104 F 40 104 k 122 F 50 70 k 140 F 60 48 k 158 F 70 34 k 176 F 80 24 k 194 F 90 17 5 k 212 F 100 13 0 k 230 F 110 9 8 k High temperature thermistor Thermistor Comp surface TH33 Thermistor Discharge TH4 0 10 20 30 40 50 20 10 0 10 20 30 40 50 4 14 32 50 68 86 104122 F Temperature Resistance k 500 400 300 200 100 0 25 50 75 100 120 77 122 167 212 248 F Temperature Resistance k 32 F 0 180 k 77 F 2...

Page 59: ...an be heard than normal situation No sound is heard when the pulse number moves from B to A in case coil is burn out or motor is locked by open phase Sound can be detected by placing the ear against the screw driv er handle while putting the screw driver to the linear expansion valve LEV M 1 6 4 4 3 2 1 1 Red Blue Orange Yellow White 2 3 4 5 Connector LEV A LEV B 12 V DC Outdoor controller board D...

Page 60: ...nd can be heard than normal situation No sound is heard when the pulse number moves from B to A in case coil is burn out or motor is locked by open phase Sound can be detected by placing the ear against the screw driv er handle while putting the screw driver to the linear expansion valve LEV M 1 6 4 4 3 2 1 1 Gray Orange Red Yellow Black 2 3 4 Connector LEV A LEV B 12 V DC Outdoor controller board...

Page 61: ...s Be sure to attach the stopper to pipe B B A How to attach the coil Hold the lower part of the main body shown as A firmly so that the main body does not move and attach the coil by inserting it downward into the main body Then securely attach the coil stop per to pipe B At this time be careful that stress is not added to lead wire and main body is not wound by lead wire If the stop per is not fi...

Page 62: ...er to main body At this time be careful that stress is not added to lead wire and main body is not wound by lead wire If the stopper is not firmly attached to main body coil may be detached from the main body and that can cause defective operation of lin ear expansion valve To prevent piping stress be sure to attach the coil holding the main body of linear expansion valve firmly Otherwise pipe may...

Page 63: ... more than 10 hours Neglecting this could result in freezing the heat exchanger in indoor unit 3 Emergency operation procedure 1 Turn the main power supply off 2 Turn on the emergency operation switch SWE on indoor controller board 3 Set the shorting pins of emergency operation connector CN31 on outdoor controller board to ON 4 Use SW4 2 on outdoor controller board to set the operation mode coolin...

Page 64: ... 54 F 30 54 F 30 2 Sub cool SC 9 F 5 9 F 5 2 1 If the thermistor temperature data is normal not open short that data is loaded into the control as valid data When the unit enters emergency operation and TH values are mismatched set the thermistors to open short And the unit runs emergency operation with the values listed above 2 If one thermistor is set to open short the values of SHd SC will be d...

Page 65: ... Liquid TH6 7 Thermistor 2 Phase Pipe Ambient 7 6 5 4 1 63H High pressure switch CN3 Thermistor Heat sink Connect to compressor U V W Voltage among phases 5 180 V W V U IPM P U V W N N P Q1 Connect to AC Reactor 21S4 4 way valve CAUTION TEST POINT CNF11 is high voltage P N1 L1 N P L1 N1 N Diode DS2 Diode DS1 Brief Check of POWER MODULE Usually they are in a state of being short circuited if they a...

Page 66: ...c recovery compressor frequency setting SW1 manual defrost delete error history and refrigerant address setting SWP Pump down CNM A control service kit CNSW Connect to outdoor con troller board Switch board PUZ A12NKA7 PUZ A18NKA7 PUY A12NKA7 PUY A18NKA7 PUZ A12NKA7 BS PUZ A18NKA7 BS PUY A12NKA7 BS PUY A18NKA7 BS OCH636A ...

Page 67: ...4 V DC CNF1 CNF2 CNF2 A36 42 only Connect to the fan motor 1 4 250 380 V DC 5 4 15 V DC 6 4 0 6 5 V DC 7 4 15 V DC When stopped 7 5 V DC When operated 0 15 V pulse CNS S1 S2 230 V AC CNAC 2 to 4 Power supply for outdoor controller circuit board 230 V AC 1 to 3 Power supply for indoor and outdoor unit connection wire 230 V AC 21S4 4 way valve CN51 Water heater Comp protect CNDM 1 to 2 Input of low ...

Page 68: ...onnect to the outdoor controller circuit board CN4 NI LI Voltage of 230 V AC is input Connected to the terminal block TB1 EI E2 E3 E4 Connected to the ground CNDC 280 380 V DC 1 3 connect to the outdoor controller circuit board CNDC TB1A TB3A TB1B TB3B Connected to DCL CNAC1 CNAC2 230 V AC Connected to the outdoor controller circuit board CNAC CN2 Connect to the outdoor controller circuit board CN...

Page 69: ...o the outdoor controller circuit board CN2 1 5 Transmitting signal to outdoor controller circuit board 0 5 V DC 2 5 Zero cross signal 0 5 V DC 3 4 16 V DC 6 5 16 V DC 7 5 16 V DC P3 U V W N3 P2 L1 L2 L3 N2 S R P1 N1 Brief Check of POWER MODULE Usually they are in a state of being short circuited if they are broken Measure the resistance in the following points connectors etc If they are short circ...

Page 70: ... ON 1 2 3 4 5 6 ON 1 2 3 4 5 6 ON 1 2 3 4 5 6 ON No function 1 Manual defrost should be done as follows 1 Change the DIP SW1 1 on the outdoor controller board from OFF to ON 2 Manual defrost will start by the above operation 1 if all these conditions written below are satisfied Heat mode setting 10 minutes have passed since compressor started operating or previous manual defrost is finished Pipe t...

Page 71: ...r supply ON 3 4 6 No function SW7 4 1 Mode select 3 Demand function Low noise mode Always 2 No function 3 Max Hz setting cooling Max Hz cooling o 0 8 Normal Always 4 Max Hz setting heating Max Hz heating o 0 8 Normal Always 5 No function 6 Defrost setting For high humidity Normal Always SW9 1 No function 2 Function switch Valid Normal Always 3 4 No function SW6 1 No function 2 3 4 Model select The...

Page 72: ...ng example 1 Wire a circuit as shown above using an adaptor for external input PAC SC36NA 2 Use SW7 1 on the outdoor controller circuit board to select the low level noise priority mode or the demand control function 3 In the demand control function set the maximum power consumption power rating ratio by combination of two switch settings as shown in the table below Relay power supply CNDM SW1 SW1...

Page 73: ...etected by indoor unit E6 1 Check if indoor outdoor connecting wire is connected correctly 2 Check if noise entered into indoor outdoor connecting wire or power supply 3 Check if noise entered into indoor outdoor controller board 4 Re check error by turning off power and on again 2 Indoor outdoor unit communication error transmitting error is detected by indoor unit E7 2 Indoor outdoor unit commun...

Page 74: ...ance value of outdoor thermistors P 34 Open short of outdoor thermistors TH3 TH6 TH7 TH8 and TH33 U4 P 34 6 blinking Abnormality of Heat sink temperature U5 1 Check if indoor outdoor units have a short cycle on their air ducts 2 Measure resistance value of outdoor Heat sink thermistor TH8 P 34 7 blinking Abnormality of voltage U9 1 Check looseness disconnection and converse connection of compresso...

Page 75: ...r is being postponed 3 When the display blinks Inspection code is displayed when compressor stops due to the work of protection devices Display Contents to be inspected When power is turned on F3 F5 F9 E8 E9 EA Eb EC E0 E7 63L connector red is open 63H connector yellow is open 2 connectors 63H are open Indoor outdoor communication error Signal receiving error Outdoor unit Indoor outdoor communicat...

Page 76: ... 2 3 4 5 6 Compressor integrating operation times 0 to 9999 0 to 9999 When it is 100 hours or more hundreds digit tens digit and ones digit are displayed by turns Example When 2450 hours 245 10 hours 0 5 s 0 5 s 2 s 2 45 10 hours 1 ON 2 3 4 5 6 Compressor operating current 0 to 50 0 to 50 Note Omit the figures after the decimal fractions A 1 ON 2 3 4 5 6 Compressor operating frequency 0 to 255 0 t...

Page 77: ...1 30 F 1 ON 2 3 4 5 6 Compressor operating current on error occurring 0 to 50 Compressor operating current on error occurring 0 to 50 A 1 ON 2 3 4 5 6 Error history 1 latest Alternate display of abnormal unit number and code When no error history 0 and are displayed by turns Code display 1 ON 2 3 4 5 6 Error history 2 Alternate display of error unit num ber and code When no error history 0 and are...

Page 78: ...and defrosting normal are set up 20 is displayed Code display 1 ON 2 3 4 5 6 Indoor pipe temperature Liquid TH2 1 Indoor 1 38 to 190 38 to 190 39 to 88 When the temperature is 0ºF or less and temperature are displayed by turns F 1 ON 2 3 4 5 6 Indoor pipe temperature Cond Eva TH5 1 Indoor 1 38 to 190 38 to 190 39 to 88 When the temperature is 0 F or less and temperature are displayed by turns F 1 ...

Page 79: ... tens digit and ones digit are displayed by turns F 1 ON 2 3 4 5 6 Number of defrost cycles 0 to FFFE 0 to FFFE in hexadecimal notation When more than FF in hex 255 in decimal the num ber is displayed in order of 163 s and 162 s and 161 s and 160 s places Example When 5000 cycles 0 5 s 0 5 s 2 s C4 9 2 cycles 1 ON 2 3 4 5 6 Input current of outdoor unit 0 to 500 When it is 100 or more hundreds dig...

Page 80: ...nt Code display 1 ON 2 3 4 5 6 Error postponement code history 3 of outdoor unit Postponement code display Blinking During postponement Lighting Cancellation of postponement 00 is displayed in case of no postponement Code display 1 ON 2 3 4 5 6 Check code history 3 Oldest Alternate display of abnormal unit number and code When no error history 0 and are displayed by turns Code display 1 ON 2 3 4 5...

Page 81: ...5 on error occurring 38 to 190 38 to 190 39 to 88 C When the temperature is 0 F or less and temperature are displayed by turns Example When 15 F 0 5 s 0 5 s 2 s 15 F 1 ON 2 3 4 5 6 Outdoor pipe temperature 2 phase TH6 on error occurring 38 to 190 38 to 190 39 to 88 C When the temperature is 0 F or less and temperature are displayed by turns Example When 15 F 0 5 s 0 5 s 2 s 15 F 1 ON 2 3 4 5 6 Out...

Page 82: ...e hundreds digit tens digit and ones digit are displayed by turns Example When 415 minutes 0 5 s 0 5 s 2 s 15 4 Minute 1 ON 2 3 4 5 6 Pipe temperature Suction TH32 58 to 194 58 to194 50 to 90 When the coil thermistor detects 0 F or below and temperature are displayed by turns Example When 10 F 0 5 s 0 5 s 2 s 10 F 1 ON 2 3 4 5 6 Indoor pipe temperature Liquid TH2 3 Indoor 3 38 to 190 38 to 190 39 ...

Page 83: ...ive temperature rise of discharge temperature Preventive control for excessive temperature rise of condensing temperature Frosting preventing control Preventive control for excessive temperature rise of heatsink Example The following controls are activated Primary current control Preventive control for excessive temper ature rise of condensing temperature Preventive control for excessive temper at...

Page 84: ...age COMP current COMP run time COMP On Off COMP frequency A Hz Hr times Hr Ref address Cool Ref address Cool Ref address Cool Sub cool OU TH4 temp OU TH6 temp OU TH7 temp IU air temp IU HEX temp IU filter time Select Smooth maintenance with the F1 or F2 button and press the button Select Check with the F1 or F2 button and press the button Select Service from the Main menu and press the button Set ...

Page 85: ... Indoor heat exchanger temperature 7 Indoor intake air temperature Cool Classification Item Result Inspection Temperature difference Heat Inspection Temperature difference Stable Unstable F F Stable Unstable F F Notes Fixed Hz operation may not be possible under the following tempera ture ranges A In cool mode outdoor intake air temperature is 104 For higher or indoor intake air temperature is 73 ...

Page 86: ...e approx 20 minutes 3 The operation data will appear The following value is the reference for the refrigerant volume check If the refrig erant is leaking NG will appear The refrigerant volume check reference value can be changed with the func tion selection Default value RP71 80 RP50 70 Resetting the initial learning data If the unit has been relocated or if refrigerant has been additionally charg...

Page 87: ...2 03 04 15 16 17 12 1 UNIT FUNCTION SETTING BY THE REMOTE CONTROLLER Each function can be set as necessary using the remote controller The setting of function for each unit can only be done by the remote controller Select function available from the table 1 1 Functions available when setting the unit number to 00 Select 00 referring to 4 setting the indoor unit number Table 1 Function selections M...

Page 88: ... to make the maintenance setting Maintenance password is required Note The initial maintenance password is 9999 Change the default password as necessary to prevent unauthorized access Have the password available for those who need it If you forget your maintenance password you can initialize the password to the default password 9999 by pressing and holding the F1 and F2 buttons simultaneously for ...

Page 89: ...ange the setting number with the F3 or F4 button 1 Select Service from the Main menu and press the button Checking the indoor unit No When the button is pressed the target indoor unit will start fan operation If the unit is common or when running all units all indoor units for the selected refrigerant address will start fan operation F1 F2 F3 F4 Function setting Ref address Sending data Grp 5 When...

Page 90: ...et 50 Direct the IR wireless remote controller toward the receiver of the indoor unit and press the button 3 Set the unit number Press the TEMP button to set the unit number Press 01 to specify the indoor unit whose unit number is 01 Direct the IR wireless remote controller toward the receiver of the indoor unit and press the button Notes 1 If a unit number that cannot be recognized by the unit is...

Page 91: ... the backlight on and it will stay lit for a certain period of time depending on the screen Backlit LCD This lamp lights up in green while the unit is in operation It blinks while the remote controller is starting up or when there is an error ON OFF lamp Main display Press to change the operation mode Main menu Press to move the cursor down Function button F1 Main display Press to decrease tempera...

Page 92: ...nt Lossnay High power Weekly timer Restriction Maintenance Initial setting ON OFF timer Auto Off timer Temp range Operation lock Manual vane angle Main sub Timer Main display Contrast Display details Auto mode Administrator password Language selection Service Input maintenance info Function setting Check Self check Maintenance password Remote controller check Test run Clock Menu structure Filter i...

Page 93: ...ance to be displayed Maintenance Manual vane angle Use to set the vane angle for each vane to a fixed position 3D i see Sensor Use to set the following functions for 3D i see Sensor Air distribution Energy saving option Seasonal airflow Initial setting Main Sub When connecting 2 remote controllers one of them needs to be designated as a sub controller Clock Use to set the current time Main display...

Page 94: ...inks 2 Press the button F blinks 3 Press the button C blinks 4 Press the set button with something sharp at the end MODEL SELECT is lighted for 3 seconds then turned off AUTO START ON OFF TEMP FAN VANE TEST RUN AUTO STOP AUTO START h min LOUVER MODE CHECK RESET SET CLOCK MODEL SELECT NOT AVAILABLE SWING CHECK FAN TEST RUN F C AMPM STOP START AMPM COOL DRY AUTO FAN HEAT 1 4 1 4 2 2 3 3 OCH636A ...

Page 95: ... with the F1 or F2 button and press the button 2 Set the Refrigerant address and Request code Select the item to be changed with the F1 or F2 button Select the required setting with the F3 or F4 button Ref address setting 0 15 Request code setting Press the button Data will be collected and displayed F1 F2 F3 F4 Request code Request Request Request code Ref address Request code Cursor Ref address ...

Page 96: ...t Intake air temperature Unit No 1 Heat mode 4 deg correction Indoor unit Intake air temperature Unit No 2 Heat mode 4 deg correction Indoor unit Intake air temperature Unit No 3 Heat mode 4 deg correction Indoor unit Intake air temperature Unit No 4 Heat mode 4 deg correction Indoor unit Liquid pipe temperature Unit No 1 Indoor unit Liquid pipe temperature Unit No 2 Indoor unit Liquid pipe temper...

Page 97: ...history 1 latest Outdoor unit Error postponement history 2 previous Outdoor unit Error postponement history 3 last but one 0000 Not connected Examples Ver 5 01 Auxiliary information displayed after version information Examples Ver 5 01 A000 Displays postponement code is displayed if no postponement code is present Displays postponement code is displayed if no postponement code is present Displays ...

Page 98: ...f error Compressor Accumulated operating time at time of error Compressor Number of operation times at time of error Discharge temperature at time of error Outdoorunit Liquidpipe1temperature TH3 attimeoferror Outdoor unit Liquid pipe 2 temperature at time of error Outdoor unit 2 phase pipe temperature TH6 at time of error Outdoor unit Outside air temperature TH7 at time of error Outdoor unit Heats...

Page 99: ...er 5 01 A000 A000 1 hour 10 hours Ver For indoor fan phase control For indoor fan pulsation control For indoor DC brushless motor control Indoor Fan operating time After filter is reset Indoor Total operating time Fan motor ON time Indoor fan output value Sj value Indoor fan output value Pulsation ON OFF Indoor fan output value duty value Indoor unit Capacity setting information Indoor unit SW3 in...

Page 100: ...a A B C D C 4 Relay output state Operation mode Indoor unit Control state Request code 50 Data display Operation mode Display Operation mode 0 STOP FAN C COOL DRY H HEAT d DEFROST Relay output state Display Power currently Compressor Four way valve Solenoid valve supplied to compressor Unit No 4 state Unit No 3 state Unit No 2 state Unit No 1 state Display State 0 Normal 1 Preparing for heat opera...

Page 101: ...way valve Compressor 0 1 2 3 4 5 6 7 8 9 A b C d E F ON ON ON ON ON ON ON ON ON ON ON ON ON ON ON ON ON ON ON ON ON ON ON ON ON ON ON ON ON ON ON ON Actuator output state 2 Display 52C SV2 SS 0 1 2 3 4 5 6 7 ON ON ON ON ON ON ON ON ON ON ON ON Error content U9 Request code 55 Refer to 10 4 SELF DIAGNOSIS ACTION TABLE Data display Error content 1 Error content 2 0 0 Error content 1 Detected Display...

Page 102: ...ng display Request code 70 Refer to P71 Data display Capacity 10 18 9 12 11 24 14 30 20 36 25 42 Outdoor unit Setting information Request code 71 Refer to P71 Data display Setting information 1 Setting information 2 0 0 Setting information 1 Display Defrost mode 0 Standard 1 For high humidity Setting information 2 Display Single Heat pump 3 phase cooling only 0 Single phase Heat pump 1 Cooling onl...

Page 103: ...ing state 00 10 42 01 11 02 12 03 13 04 14 05 15 06 12 16 07 17 08 18 09 18 19 0A 1A 0b 24 1b 0C 1C 0d 30 1d 0E 1E 0F 36 1F Display Pair No setting state 00 No 0 01 No 1 J41 disconnected 02 No 2 J42 disconnected 03 No 3 J41 J42disconnected Wireless pair No indoor control board side setting Request code 165 Data display 0 0 See the table on the right OCH636A ...

Page 104: ... fan motor 1 Remove the top panel See Photo 1 2 Remove the front panel See Photo 1 3 Remove 1 nut M6 left screw and detach the propeller 4 Disconnect the connector CNF1 on the controller circuit board in the electrical parts box 5 Loosen the clamp for the lead wire in the motor sup port 6 Remove 4 fan motor fixing screws 5 20 and detach the fan motor See Photo 4 Photo 3 Photo 4 104 14 DISASSEMBLY ...

Page 105: ...parts box by pulling it upward Photo 5 4 Removing the thermistor 2 phase pipe TH6 and thermistor Liquid TH3 1 Remove the service panel See Photo 2 2 Remove the top panel See Photo 1 3 Remove the front panel See Photo 1 4 Remove the back panel fixing screws 5 from the right and 2 from the rear side and detach the back panel See Photo 1 5 Disconnect the connector TH3 white or TH6 7 red on the contro...

Page 106: ... sound proof cover from the compressor Thermistor Discharge TH4 7 Pull out the thermistor Discharge TH4 from the sensor holder See Photo 8 Thermistor Suction TH32 7 Pull out the thermistor Suction TH32 from the sensor holder See Photo 8 Thermistor Comp surface TH33 7 Pull out the thermistor Comp surface TH33 from the sensor holder See Photo 8 Photo 8 7 Removing the 4 way valve coil 21S4 and LEV co...

Page 107: ...ling the LEV cover it with a wet cloth to prevent it from heating 120 C or more then braze the pipes so that the inside of pipes are not oxidized 10 Removing the high pressure switch 63H 1 Remove the service panel See Photo 2 2 Remove the top panel See Photo 1 3 Remove the front panel See Photo 1 4 Remove the back panel See Photo 1 5 Remove the electrical parts box See Photo 5 6 Pull out the lead ...

Page 108: ...ch 12 Remove the welded pipe of compressor inlet and outlet Note Recover refrigerant without spreading it in the air Photo 12 13 Removing the power receiver 1 Remove the service panel See Photo 2 2 Remove the top panel See Photo 1 3 Remove the front panel See Photo 1 4 Remove the back panel See Photo 1 5 Remove the electrical parts box See Photo 5 6 Recover refrigerant 7 Remove 4 welded pipes of p...

Page 109: ...V B on the controller circuit board Symbols on the board CNF1 Fan motor LEV A LEV B LEV 5 Disconnect the pipe side connections of the following parts Thermistor Liquid TH3 Thermistor Discharge TH4 Thermistor 2 phase pipe Ambient TH7 6 Thermistor Heat sink TH8 High pressure switch 63H 4 way valve coil 21S4 Thermistor Suction TH32 Thermistor Comp surface TH33 6 Remove the terminal cover and disconne...

Page 110: ...mbined together Refer to procedure No 4 above to remove thermistor 2 phase pipe Photo 6 6 Removing the thermistor Discharge TH4 and thermistor Comp surface TH33 1 Remove the service panel See Photo 1 2 Disconnect the connectors TH4 white and TH33 yellow on the controller circuit board in the electrical parts box 3 Loosen the clamp for the lead wire in the rear of the electrical parts box See Photo...

Page 111: ...rant without spreading it in the air Note 2 The welded part can be removed easily by removing the right side panel Note 3 When installing the 4 way valve cover it with a wet cloth to prevent it from heating 120 C or more then braze the pipes so that the inside of pipes are not oxidized 10 Removing the LEV 1 Remove the service panel See Photo 1 2 Remove the top panel See Photo 1 3 Remove the electr...

Page 112: ...he welded part can be removed easily by removing the right side panel Note 3 When installing the high pressure switch cover it with a wet cloth to prevent it from heating 100 C or more then braze the pipes so that the inside of pipes are not oxidized Photo 9 12 Removing the reactor DCL 1 Remove the service panel See Photo 1 2 Remove the top panel See Photo 1 3 Remove the electrical parts box See P...

Page 113: ...ompressor Note Recover refrigerant without spreading it in the air Photo 11 14 Removing the power receiver 1 Remove the service panel See Photo 1 2 Remove the top panel See Photo 1 3 Remove 2 front cover panel fixing screws 5 12 and remove the front cover panel See Photo 1 4 Remove 2 back cover panel fixing screws 5 12 and remove the back cover panel 5 Remove the electrical parts box See Photo 4 6...

Page 114: ... Disconnect the indoor outdoor connecting wire from ter minal block 4 Remove all the following connectors from controller circuit board fan motor linear expansion valve thermistor Liquid thermistor 2 phase pipe thermistor Ambient high pres sure switch 4 way valve coil Then remove a screw 4 8 from the valve bed to remove the lead wire Pull out the disconnected wire from the electrical parts box Dia...

Page 115: ...ar of the electrical parts box See Photo 5 5 Pull out the thermistor Ambient TH7 from the sensor holder Note In case of replacing thermistor Ambient TH7 replace it together with thermistor 2 phase pipe TH6 since they are combined together Refer to No 4 above to remove thermistor 2 phase pipe Photo 6 6 Removing the thermistor Liquid TH3 thermistor Discharge TH4 thermistor Comp surface TH33 and ther...

Page 116: ...preading it in the air Note 2 The welded part can be removed easily by removing the right side panel Note 3 When installing the 4 way valve cover it with a wet cloth to prevent it from heating 250 F or more then braze the pipes so that the inside of pipes are not oxidized 9 Removing linear expansion valve 1 Remove the service panel See Photo 1 2 Remove the top panel See Photo 1 3 Remove 3 valve be...

Page 117: ...ze the pipes so that the inside of pipes are not oxidized Photo 9 1 PUZ model 11 Removing the reactor DCL and capacitor CE 1 Remove the service panel See Photo 1 2 Remove the top panel See Photo 1 3 Remove the electrical parts box See Photo 3 Removing the reactor 4 Remove the reactor fixing screws 6 places 4 10 and remove the reactor Removing the capacitor 4 Remove 2 capacitor band fixing screws 4...

Page 118: ... the compressor Note Recover refrigerant without spreading it in the air Photo 11 13 Removing the power receiver 1 Remove the service panel See Photo 1 2 Remove the top panel See Photo 1 3 Remove 2 front cover panel fixing screws 5 12 and remove the front cover panel See Photo 3 4 Remove 2 back cover panel fixing screws 5 12 and remove the back cover panel 5 Remove the electrical parts box See Pho...

Page 119: ...119 OCH636A ...

Page 120: ... 3 MARUNOUCHI CHIYODA KU TOKYO 100 8310 JAPAN CCopyright 2016 MITSUBISHI ELECTRIC CORPORATION Issued Feb 2017 No OCH636 REVISED EDITION A Published Oct 2016 No OCH636 Made in Japan Specifications are subject to change without notice ...

Reviews: