background image

20

Specifications are subject to change without notice.  

                                                                              © 2021 Mitsubishi Electric US, Inc.

1.   You may choose to attach the Wireless Sensor to a wall 

or lay it on a table.

Wherever you decide to put it, we recommend that it not 

be moved to ensure maximum benefit from the device

.

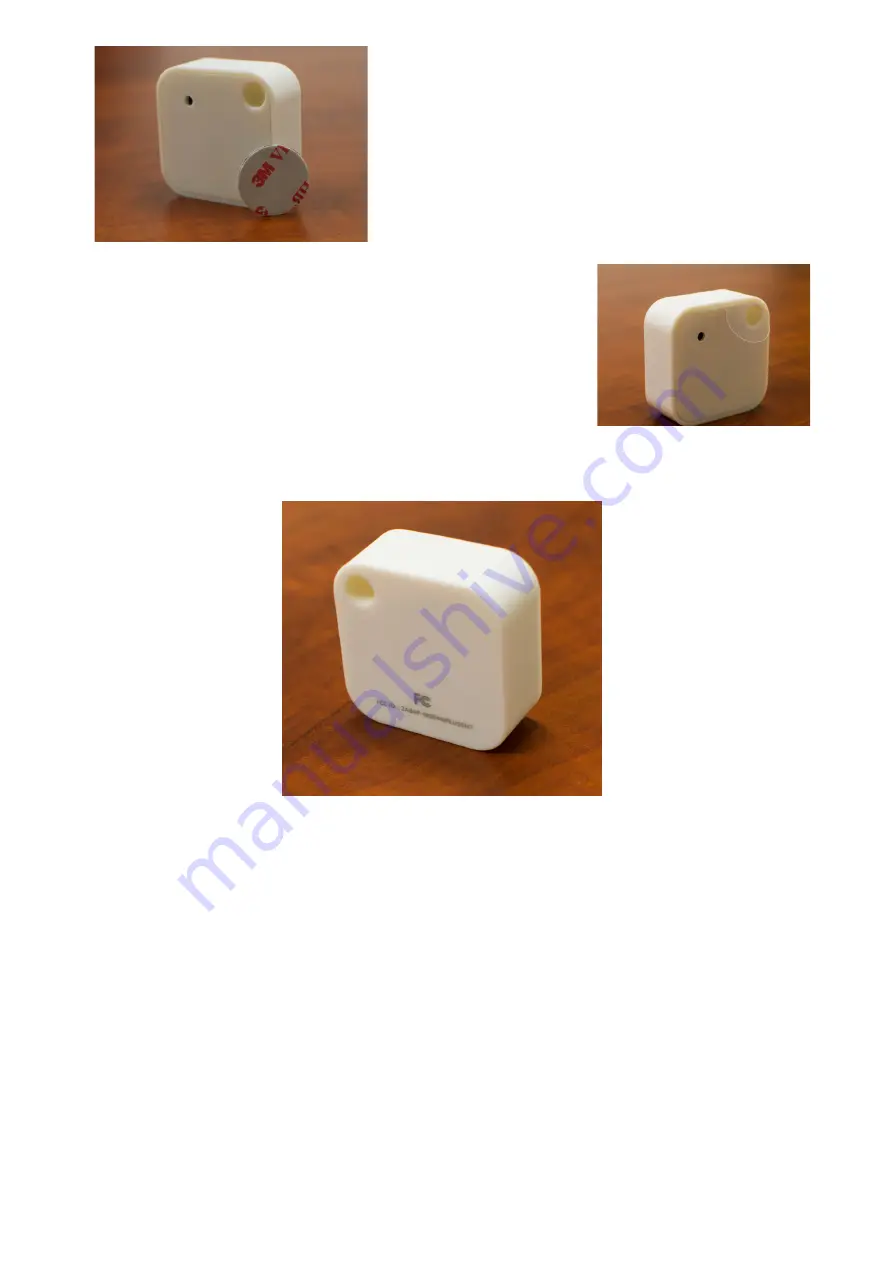
2.   Remove the Wireless Sensor and double-sided adhesive 

strip from the packaging.

3.   To activate the Wireless Sensor, pull the insulator tab 

completely out and it will put the sensor into discovery mode. 

See above to commission the sensor.

4.   Peel away one side of the adhesive strip and apply it to the 

backside of the Wireless Sensor, pressing firmly. The backside 

can be identified by the side with the FCC ID printed on it.

The small hole on the front should be facing the room. This 

hole should remain unimpeded for sensing purposes.

5.   Find a location to install your sensor. The device should be placed in an area allowing it to monitor 

and sense the room. (Recommended placement is within 10 ft of the Wireless Interface or indoor unit, 

unobstructed.)

The Wireless Sensor will work best when placed in an open area of the room allowing it to sense the greatest 

area without obstruction.

Do not place the Wireless Sensor in direct sunlight, near vents or window openings, or in enclosed areas 

such as drawers, cabinets, behind furniture or curtains, drafts, radiators, fireplaces, or on exterior walls.

Peel away the other side of the adhesive strip and press firmly to the wall or surface to mount. Allow to remain 

undisturbed at least 24 hours to ensure it is bonded securely to surface. Bond should be 100% after 72 hours 

from application. Do not move it once adhered.

Ensure the surface is clean and dry before adhering. Substrates are best prepared by cleaning with 50:50 

mixture of isopropyl alcohol and water.

Rigid surfaces may require 2 or 3 times more pressure to ensure adhesion. 

Ideal application temperature range is 

70°F

 to 

100°F

 (

21°C

 to 

38°C

).

To check sensor battery life or battery replacement, refer to the Owner Manual at 

kumocloud.com

 under 

Additional Resources.

Summary of Contents for PAC-USWHS002-WF-1

Page 1: ...rify if your multi band Wi Fi router can manage 2 4 GHz only devices Note The set up of the Wireless Interface to the kumo cloud app requires a Wi Fi network with a live internet connection NOTE This manual reflects the installation of the Wi Fi Interface PAC WHS01WF E Wireless Interface 1 PAC USWHS002 WF 1 and Wireless Interface 2 PAC USWHS002 WF 2 for the 2 12 and 2 14 kumo cloud app release upd...

Page 2: ...r 14 More Settings 15 Advanced Indoor Unit Settings 15 Set Prohibits 16 Select a Time Zone 17 Accessories 18 Add Accessories 18 Add Wireless Sensor 19 kumo station 21 Add kumo station Accessory 21 Backup Heater 2nd Stage 22 Backup Heater 3rd Stage 23 Dehumidifier 24 Humidifier 25 Ventilation 26 Hydronic Heater 27 Airflow for Static Pressure 29 First Generation Wireless Interfaces 30 Install 30 Add...

Page 3: ...for each indoor unit Only a professional should complete installation to prevent electric shock or personal injury See the Install section For more information regarding the WI 2 see the WI 2 Installation manual at https qrco de WI2InstallManual 2 The home wireless network should already be set up Note the network name and password Network name Password 3 Use the kumo cloud app to Connect a New Si...

Page 4: ...haracters john sample com Back Create Account Terms and Conditions Terms Last updated August 11 2015 Please read these Terms and Conditions Terms Terms and Conditions carefully before using the http app kumocloud com link is external website and the kumo cloud mobile application together or individually the Service operated by Mitsubishi Electric US Inc us we or our I AGREE 1 2 1 The Create Accoun...

Page 5: ... up of the Wireless Interface to the kumo cloud app requires a Wi Fi network with a live internet connection Only a professional should complete installation to prevent electric shock or personal injury Outdoor and indoor units should already be installed Make sure a wireless network is set up with a live internet connection In a new construction this may be a temporary network The homeowner may s...

Page 6: ... WHS01WF E skip to First Generation Wireless Interfaces Otherwise continue below Connect a New Site ATTENTION The Wireless Interface 1 and 2 must connect to a 2 4 GHz Wi Fi network The Wireless Interface 1 and 2 will not work on a 5 GHz Wi Fi network The Wireless Interface 1 and 2 can only connect to Wi Fi channels 1 11 For the best performance connect the Wireless Interface 1 and 2 to a 2 4 GHz o...

Page 7: ...to continue to advanced settings Installer Login INSTALLER LOGIN GET HELP Connect Program Settings Home Back Let the owner know whom to call about problems Technician or company SKIP Phone 123 456 7890 NEXT 2 ABC HVAC INC Home 1 1 To proceed to advanced settings enter the installer login 9999 and then tap Installer Login 2 Enter your Contact Information This will make it easy for the owner to cont...

Page 8: ...nterface to the kumo cloud app requires a Wi Fi network with a live internet connection 1 Enter the Name and Password for the local wireless network This field is case sensitive so be sure that all lower case and capital letters are entered accurately Tap Next Note To ensure proper functioning of the kumo station equipment controller and the System Changeover function you must connect all the Wire...

Page 9: ...ngeover group A Changeover group can be used to coordinate the heating and cooling demands of indoor units connected to the same outdoor unit This feature specific to some MXZ systems allows kumo cloud to manage the mode of the outdoor unit based on the conditions and priorities of zones within the same changeover group If you tap No the zone will operate independently Skip to Finish Setup See the...

Page 10: ...ack Standby How long does an indoor unit wait in standby before the system switches to cool or heat Home Program Settings 4 30 minutes 3 hours 1 hour 2 hours 4 hours Back Run How long should the system stay in cool or heat before switching Home Program Settings 5 10 minutes 20 minutes 30 minutes 40 minutes 3 On the Priority screen select the required priority zone s There is no limit to the number...

Page 11: ...itsubishi Electric IT Extender PAC WHS01IE E The Wireless Interface signal generally reaches beyond the average size of a home without interference or obstructions 2 Enabling Auto Mode allows the new unit to regulate its heating and cooling without the direct interaction of the user The unit will be able to operate automatically within a range of selected temperature values Note The dual setpoint ...

Page 12: ...e and Humidity Sensor Wireless Sensor backup heater humidifiers dehumidifiers ventilation units etc See the Accessories section for more information Test Run 7 Tap Test Run to perform a test run operation to ensure that the site and its units are running correctly For more information regarding test runs see the Test Run section Add Indoor Unit 8 Tap Add Indoor Unit to connect more indoor units Se...

Page 13: ...3 When a check mark appears next to the selected zone it indicates that the corresponding indoor unit has entered test run operation Based on your Run Cooling or Run Heat selection the cooling or heating icon appears next to the selected zone s Follow directions in the indoor units installation manuals The equipment will continue in test run operation until turned Off or up to two hours 4 Addition...

Page 14: ... s email 3 2 1 1 Tap Transfer to Owner to give the end user control of the system 2 Enter the New Owner s email 3 Tap Finish Setup An email will be sent to the new owner informing them that system has been set up however the site will remain in your account until the new owner creates an account or logs in using their email address If needed tap the name of the job site to resend the email Or 4 Ta...

Page 15: ... all the indoor units have been added to access settings for a particular unit tap Settings 2 Tap System Setup 3 Tap Installer Settings 4 Enter 9999 for installer login 5 Tap Installer Login 6 Tap the name of the Home or Job site Signal Strong Auto Mode No Display Offset 0º Connect Program Settings Home Cancel Back Living Room SAVE ADVANCED 9 8 Unit Program Settings Home Site Living Room Signal St...

Page 16: ...ohibits Any prohibits set through a central controller are also displayed on the Prohibits screen with a check mark next to the active prohibit You cannot change these prohibits through kumo cloud To set prohibits after a zone is provisioned 1 In the kumo cloud app tap Settings System Setup Installer Settings 2 Enter the installer login 9999 3 Tap the required site and then tap the zone 4 Tap Proh...

Page 17: ...st Run Time Zone 3 Jones House Pacific Hawaii Home Settings You can specify the default time zone that the Wireless Interfaces in a site should use Note The specified time zone will apply to all Wireless Interfaces in the site you cannot specify time zones for individual interfaces in the site 1 In the kumo cloud app tap Settings System Setup Installer Settings 2 Enter 9999 for installer login 3 T...

Page 18: ...RANSFER TO USER Accessories 1 Accessory Home Program Settings Back Add Wireless Sensor Add Backup Heater Add Humidifier Add Dehumidifier Add Ventilation Add Hydronic Heater 2 Accessories such as the Wireless Sensor and kumo station can be configured to work with the Wireless Interface to provide whole home control To add an accessory to an existing site 1 Tap Accessories 2 Tap the Accessory you wo...

Page 19: ...or be commissioned to kumo cloud BEFORE affixing to a wall or other surface This will ease set up 1 Tap Add Wireless Sensor 2 Wait for kumo cloud to locate your Wireless Temperature and Humidity Sensor device View devices located and tap the appropriate sensor to connect Be sure the smartphone tablet is within close proximity to the sensor while searching If the sensor cannot be located try puttin...

Page 20: ...e the room Recommended placement is within 10 ft of the Wireless Interface or indoor unit unobstructed The Wireless Sensor will work best when placed in an open area of the room allowing it to sense the greatest area without obstruction Do not place the Wireless Sensor in direct sunlight near vents or window openings or in enclosed areas such as drawers cabinets behind furniture or curtains drafts...

Page 21: ... i e humidifiers dehumidifiers etc Note For the system to function properly the kumo station that is not connected to an indoor unit must be the final wireless interface to be provisioned Add kumo station Accessory Connect 2 2 Strong signal For stronger signal move closer to the unit s Home Program 4 Heater Program Settings Home NEXT Channel 1 Cancel Outside air temperature None How is the heater ...

Page 22: ...ings System Setup Installer Settings b Enter 9999 for installer login c Select the required site and then the required zone d Tap Advanced e For Enable Heating Mode Temperature Offset select No 1 Verify that the Outside air temperature value is valid If not install and or reposition the temperature sensor Indicate whether the indoor unit fan should be Interlocked with this heater Note Only the ind...

Page 23: ...ogram SAVE Outside air temperature 71 Heater 3 Wired to Kitchen Interface Channel 3 Backs up Heater 2 Delay 5 minutes 5 6 3 1 First add Backup Heater 2nd stage as per previous instructions Next Add kumo station accessory from the Accessory screen Then 2 Indicate whether the indoor unit fan should be Interlocked with this heater Tap Next Note Only the indoor unit physically attached to the kumo sta...

Page 24: ...er as needed to meet the target relative humidity percentage 2 Set the target relative humidity percentage for Auto mode See the Save Unit Settings section Tap Next 3 Select the zone that will provide the humidity reading Note This zone must have been previously configured with a Wireless Sensor Zones with connected MHK2 controllers also appear as options in the list of zones that provide humidity...

Page 25: ...sent and configured to relay its own room temperature and humidity reading kumo cloud uses humidity readings from the MHK2 instead of the wireless sensor to control a humidifier display humidity readings in the app etc Add kumo station Accessory Then 1 Select the mode for the humidifier OFF Disable the dehumidifier Auto Runs the humidifier as needed to meet the target relative humidity percentage ...

Page 26: ...d Humidity Sensor see the Add Wireless Sensor section for more information Add kumo station Accessory Then 1 Select the Vent Duration to run the ventilation system Any duration other than OFF will require a scheduled start time below 2 Vent Schedule Start The duration you selected above is the number of hours your system will run Indicate the start and end times in the appropriate fields Set these...

Page 27: ...ccessory section Note The hydronic heater cannot be used with another in duct accessory In case of multi position units for proper functioning of in duct backup heaters ensure that the heating offset is disabled To do this a Go to Settings System Setup Installer Settings b Enter 9999 for installer login c Select the required site and then the required zone d Tap Advanced e For Enable Heating Mode ...

Page 28: ...tes Cleaning Duration 1 minute Cleaning Start Time 4AM Advanced Settings Home Program Outside air temperature 71 Sensor 1 Kitchen Ventilation 1 2 20 0m m Hydronic 2 Bedroom Site Home Add Accessory Back Hydronic Heater Heater 2 How long should the hydronic heater wait to turn on 5 4 Select the time delay after which the hydronic heater should turn on Tap Next 5 To specify the duration of the cleani...

Page 29: ...odels see the install manual and set the dip switches before adding the units in kumo cloud 1 To Add Indoor Units see the Add Indoor Units section Then tap No Set Airflow Or 2 Access the indoor unit settings as shown in the Access Unit Settings section then tap Advanced 3 Tap Static Pressure 4 Tap Set Airflow SEZ or PEA PEAD MVZ or PVA AA models MVZ or PVA AA4 Connect Program Settings Home Cancel ...

Page 30: ...See the Installation Instruction Manual and the Compatibility Charts at http mylinkdrive com USA Controls Note kumo cloud requires access to a wireless network with a live internet connection for set up Add Unit Installer Program Settings Home More Setup Connect New Site Jones House 2 2 z zo on ne es s ReliableAir Office 2 2 z zo on ne es s More Program Settings Home Installer Connect with first g...

Page 31: ...first generation WHS01WF E Wireless Interfaces Find new zones Manual setup Manual Setup Program Settings Home Back Adapter ID MAC Address ADD ZONE 3 4 4 5 5 6 6 Setup Program Settings Home Units F Fa ah hr re en nh he ei it t Wi Fi P Pr ro ob bl le em m Lock to single zone Transfer Ownership Installer Settings Settings Edit IFTTT 2 2 1 1 Connect New Site Jones House 2 zones ReliableAir Office 2 zo...

Page 32: ...2 e er rr ro or rs s Settings Settings Home Program Filters D Di ir rt ty y i in n 2 2 z zo on ne es s Help 2 2 e er rr ro or rs s Legal System Setup My Account 1 3 3 2 4 4 5 1 When an error occurs kumo cloud displays an alert with the installer s contact information See the Create a New Site section to enter contact info 2 To view errors tap Settings 3 Then tap Help 4 Tap Equipment 5 If there is ...

Page 33: ...ccount 2 1 4 Setup Settings Home Program Units Fahrenheit Wi Fi Problem Lock to single zone Transfer Ownership Installer Settings Settings Edit IFTTT 3 Site Settings Home Program Back Jones House Upstairs Dining Room Living Area Add Indoor Unit Test Run Transfer to Owner 6 7 1 Tap Settings 2 Tap System Setup 3 Tap Installer Settings 4 Tap the name of the Job Site 5 Tap the name of the required zon...

Page 34: ...Pr ro ov vi id de er r 8 9 10 10 11 11 Delete Unit 8 To remove a unit tap Delete Unit The unit with the adapter can now be discovered by any kumo cloud account If it s re added to a different account the app will require the WPA key from the back of the Wireless Interface Check Signal 9 Tap Signal 10 If there is No Signal or a Very Weak Signal from the unit to the network consider relocating the W...

Page 35: ...ol only or Cool and Heat Dehumidify Dry Enable Dehumidify Dry mode Optimal Start Enable Optimal Start to start heating or cooling early to reach a programmed setting Restart After Outage Automatically restart unit after a power outage Ventilation Air Intake outdoor air through LOSSNAY Power Voltage 230V or 208V Auto Energy save Enable auto energy savings operation Filter Alerts How often should fi...

Page 36: ...me experience with kumo cloud however below are answers to some frequently asked questions that may be helpful How do I set the mode and temperature range Mode and temperature ranges depend upon the specific unit being controlled meaning that if you attempt to command a cool only unit into heat mode Google will respond That mode is unavailable Similarly if you attempt to command a setpoint outside...

Page 37: ...on 3 In the Search all skills box type Mitsubishi Electric US kumo cloud and select the kumo cloud skill from the drop down list 4 From the list of results displayed click or tap Mitsubishi Electric US kumo cloud The Enable button and the Account linking required message are displayed on the Mitsubishi Electric US kumo cloud skill page 5 Click or tap the Enable button The kumo cloud sign in page i...

Page 38: ...y kumo cloud mobile app If you relabeled the Zone name s in your kumo cloud mobile app you have to rediscover your devices via your Alexa account or app as follows 1 On your computer using any browser go to the Alexa portal at alexa amazon com and sign in to your account On your smartphone or tablet sign in to the Amazon Alexa app 2 In the left pane of the Alexa portal go to Smart Home Devices On ...

Page 39: ...39 2021 Mitsubishi Electric US Inc Specifications are subject to change without notice NOTES ...

Page 40: ...uary 2022 www metahvac com Toll Free 800 433 4822 MITSUBISHI ELECTRIC US INC 2021 Mitsubishi Electric US Inc kumo cloud is a registered trademark of Mitsubishi Electric US Inc iPhone Apple and AirPort are trademarks of Apple Inc registered in the U S and other countries App Store is a service of Apple Inc Android and Google Play are trademarks of Google Inc Amazon Alexa and all related logos are t...

Reviews: