This is the primary display of the project.
The project navigation window on the left hand side of the screen enables the user to rapidly
access any portion of the project by double clicking on the selection.
4.2.3
Creating a new “POU”
햲
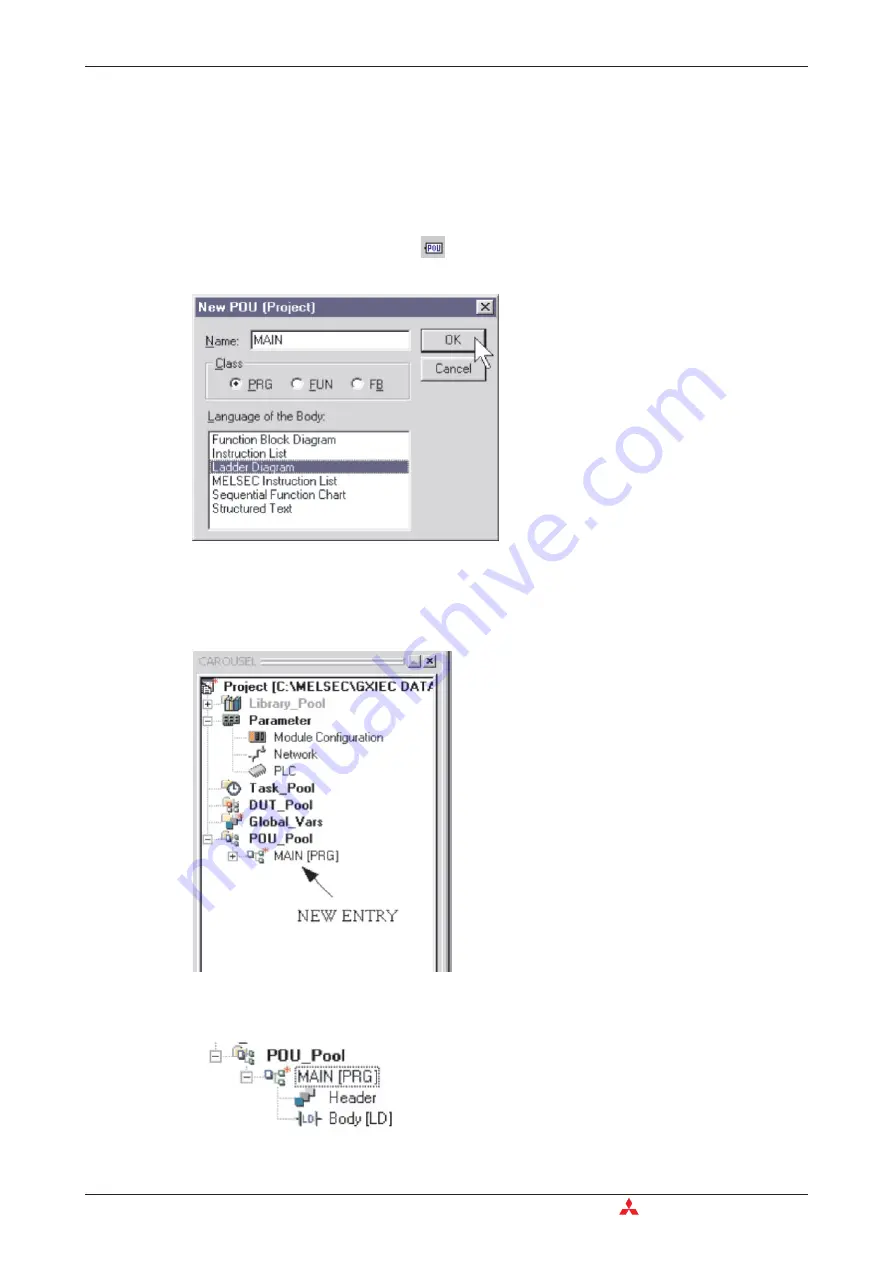
Click on the “New POU” button
(or “Right Click” on POU Pool) on the tool bar. The new
POU specifications are to be entered as follows:
The name of the POU will be ‘MAIN’ and it should be specified as a
Ladder Diagram
of type
PRG
(Program).
햳
Click
OK
and note the addition to the POU Pool in the ‘Project navigation window’:
햴
Double click on
MAIN
program icon or click the symbol on the POU Pool in order to expand
the directory branch and display the Header and Body entries:
Application Program
Building a Project
4 - 8
MITSUBISHI ELECTRIC
Summary of Contents for FX2N-32CAN
Page 1: ...MITSUBISHI ELECTRIC FACTORY AUTOMATION Programmable Logic Controllers GX IEC Developer ...
Page 2: ......
Page 4: ......
Page 6: ......
Page 10: ...IV MITSUBISHI ELECTRIC ...
Page 18: ...Modular PLC Training Hardware Course Overview and Requirements 1 2 MITSUBISHI ELECTRIC ...
Page 176: ...Device Edit 8 4 MITSUBISHI ELECTRIC ...
Page 190: ...Assigning DUT Variables to Function Blocks Data Unit Types DUT 10 10 MITSUBISHI ELECTRIC ...
Page 198: ...Array Example Single Dimension Array Arrays 11 8 MITSUBISHI ELECTRIC ...
Page 219: ...Sequential Function Chart SFC SFC Elements Training Manual GX IEC Developer 14 3 ...
Page 230: ...Structured Text Program Example IEC Structured Text 16 4 MITSUBISHI ELECTRIC ...
Page 278: ...PLC Components Glossary Appendix A 18 MITSUBISHI ELECTRIC ...
Page 283: ......


