background image

4. Setting up MELDASMAGIC64 System 

4.4 Setting Up Runtime Library 


65 


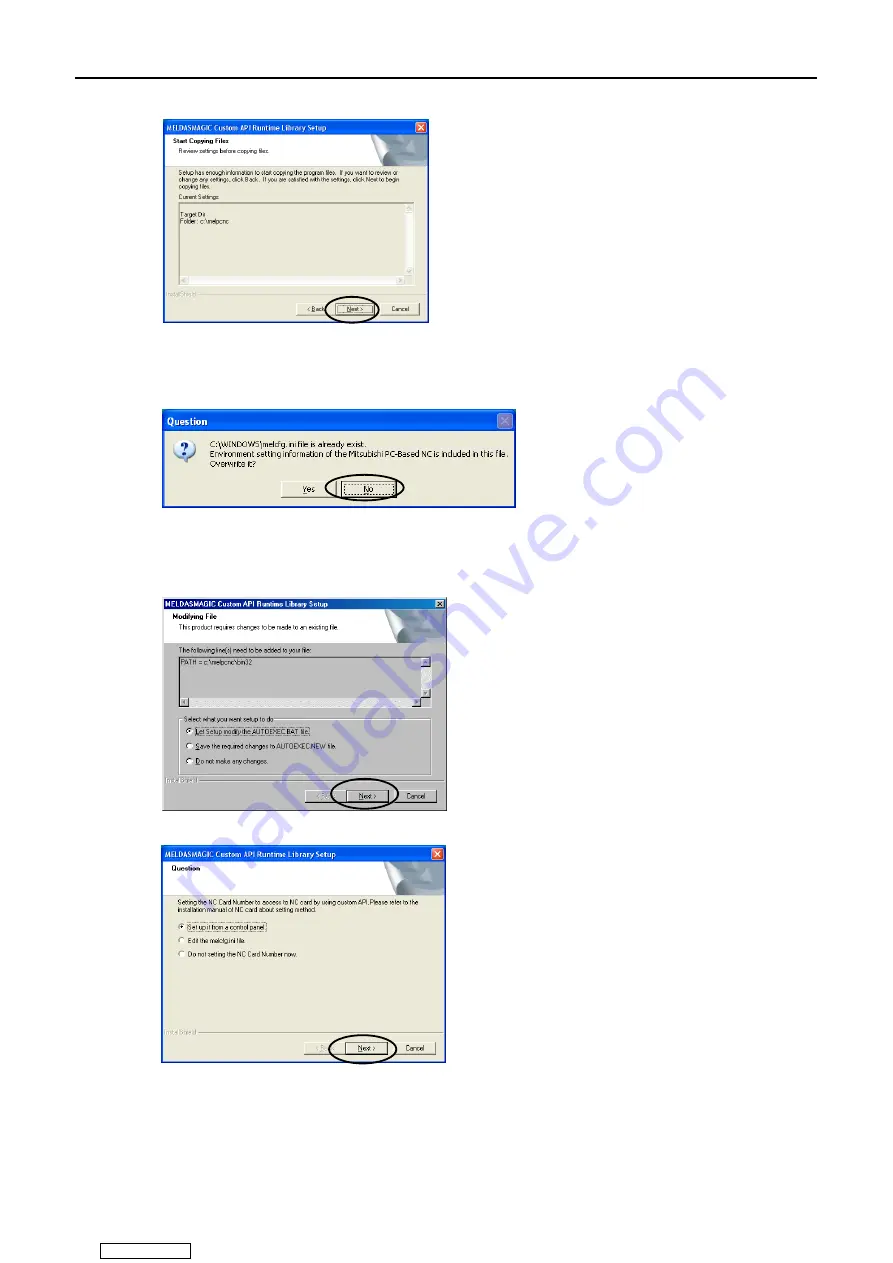
(5) If a window confirming overwriting the environment setup files used by Runtime Library is 

displayed, select “No.” 

* When the software is installed for the first time, this window is not displayed. 


(6) For Windows95, Windows98 (including Second Edition), and WindowsNT, since the location for 

saving Runtime Library is specified in AUTOEXEC.BAT, the window below is displayed. 

When the window is displayed, select “Let Setup modify the AUTOEXEC.BAT file” and click [Next 
>]. (This window is not displayed for windows2000/XP.) 


(7) Select “Set up it from a control panel,” and then click [Next >]. 


Downloaded from 

ManualsNet.com

 search engine

Summary of Contents for CNC MELDASMAGIC Series

Page 1: ...CNC 64 SETUP INSTRUCTION MANUAL BNP B2191A ENG Downloaded from ManualsNet com search engine ...

Page 2: ...lectric Corporation Microsoft and Windows are the registered trademarks of Microsoft Corporation U S A Other product and company names are either trademarks or registered trademarks of their respective companies Downloaded from ManualsNet com search engine ...

Page 3: ...ing method software installation method etc Before starting NC card connection or software installation please read this manual carefully To use the MELDASMAGIC series safely please use the product after fully understanding the SAFETY PRECAUTIONS on the next page Downloaded from ManualsNet com search engine ...

Page 4: ...el may lead to a serious consequence according to the circumstances Always follow the instructions because they are important DANGER Not applicable in this manual WARNING Not applicable in this manual CAUTION Items related to product and manual If the descriptions relating to the restrictions and allowable conditions conflict between this manual and the machine manufacturer s instruction manual th...

Page 5: ...ver Operation 29 4 2 2 5 Initializing the NC Card Memory 31 4 2 2 6 Confirming NC Card Operation 32 4 3 Setting up NC Card and Device Driver ISA NC Card 33 4 3 1 Installing NC System Device Driver for Windows 95 33 4 3 1 1 Installing NC System Device Driver 33 4 3 1 2 Mounting NC Card 38 4 3 1 3 Confirming NC System Device Driver Operation 40 4 3 1 4 Initializing NC Card Memory 42 4 3 1 5 Confirmi...

Page 6: ...roubleshooting 75 6 1 Checklist PCI NC Card 75 6 2 Checklist ISA NC Card 76 6 3 Troubleshooting 77 7 Appendices 82 7 1 How to Remove NC Card PCI NC Card 82 7 1 1 Removing NC Card 82 7 1 2 Removing NC Card Temporarily 82 7 1 3 Resuming Using NC Card Removed Temporarily 82 7 2 How to Remove NC Card ISA NC Card 83 7 2 1 Removing NC Card 83 7 2 2 Removing NC Card Temporarily 85 7 2 3 Resuming Using NC...

Page 7: ...w to install the software Before setup read the instruction manuals attached to the products and the README_E TXT English README_J TXT Japanese files on the respective floppy disks These files include the latest information not described in this instruction manual Downloaded from ManualsNet com search engine ...

Page 8: ...al the former type is referred to as PCI NC Card and the latter type as ISA NC Card System requirements for using NC Card are different between PCI NC Card and ISA NC Card Check 2 2 System Requirements to set up NC Card Figure2 1 PCI NC Card BAT HR655A HR183 card Figure2 2 ISA NC Card BAT IRQ DPADR CIO CF61 CF10 HR623C card BAT SODIMM1 SODIMM2 CIO CF61 CF10 HR621B card Downloaded from ManualsNet c...

Page 9: ...r more Pentium 233 MHz or more recommended 24 MB or more 32 MB or more recommended Windows2000 Pentium 300 MHz or more 64 MB or more 128 MB or more recommended WindowsXP Pentium 300 MHz or more 128 MB or more Applicable OS Applicable OS 5V 2 5A or more 12V 0 5A or more Drooping characteristic of internal power supply when PC is turned off It must take 1 ms or more for 5V voltage to drop from 4 5V ...

Page 10: ...rd and Device Driver Confirm NC System Device Driver operation Attach NC Card Initialize NC Card memory Confirm NC Card operation Install the standard software Install Runtime Library p 64 Assign an NC Card No to NC Card Install the utilities p 68 Install the MELDASMAGIC monitor p 69 Set up NC parameters Install NC standard parameters p 70 Install NC option functions p 71 Set up NC parameters p 72...

Page 11: ...ver Use the Change Driver button on the property sheet of NC System Device Driver to change NC System Device Driver In this case personal computer s resources memory I O port and IRQ used by the NC Card is not changed Therefore setting up NC Card is not needed Method 2 Reinstall NC System Device Driver Reinstall NC System Device Driver by deleting the currently used device driver once and then ins...

Page 12: ...n using ISA NC Card be sure to save the personal computer s environment files before setup The files saved here will be necessary for restoration in case the further installation operations cause failure in the personal computer The backup methods of environment files depend on the OS type For Windows 95 or Windows 98 including Second Edition proceed to chapter 4 1 1 1 For Windows NT proceed to ch...

Page 13: ...lder titled backup in the C folder 1 Select drive C and click File New Folder 2 Select the created New folder click File Rename 3 Input backup and press the Enter key 3 Copy the following files from the C folder and C Windows folder to C backup folder Note Be sure to copy these file If these files are moved return to the original location autoexec bat file in the C folder config sys file in the C ...

Page 14: ...file you must log in Windows NT as Administrator When all the setup operations have completed without failure delete the copied hardware profile Procedures 1 Click the Settings Control Panel menus on the Start menu 2 The Control Panel window is displayed Double click the System icon 3 Click the Hardware Profiles tab Downloaded from ManualsNet com search engine ...

Page 15: ...Setup 9 4 Select Original Configuration Current from Available Hardware Profiles and click the Copy button 5 Enter Backup Configuration in the To field of the profile and click the OK button 6 Click the OK button Downloaded from ManualsNet com search engine ...

Page 16: ...Card and the MELDASMAGIC64 NC System Software are installed For the details of the method for mounting NC Card refer to Connection Manual BNP B2203 The installation procedures of NC System Device Driver differ by each Windows model For Windows 2000 XP refer to chapter 4 2 1 For Windows 98 Second Edition refer to chapter 4 2 2 PCI NC Card cannot be used for any OS other than Windows 2000 XP or Wind...

Page 17: ... procedures below Install Device Driver by executing Setup on NC System Disk Procedures 1 Turn on the personal computer After Windows starts up insert the floppy disk titled NC System Disk 1 into drive A 2 Click Run on the Start menu of the task bar Display sample for WindowsXP Display sample for Windows2000 3 The Run window appears Fill in the Open field as below and then click OK a setup exe Dow...

Page 18: ...the installation program With the default screen displayed select Next and then click Finish at the end 5 The following message is displayed Click Continue Anyway 6 If the Insert Disk window is displayed insert the next disk into drive A and then click OK The screen does not exist for Windows2000 Downloaded from ManualsNet com search engine ...

Page 19: ...onfirming the shutdown of the personal computer exit Windows and turn off the personal computer is displayed Click Yes 8 Exit Windows and turn off the personal computer In some cases the personal computer is turned off automatically Take out the floppy disk Downloaded from ManualsNet com search engine ...

Page 20: ...efer to the following NC Card layout and set the rotary switch CDNO If there is only one NC Card to be mounted set 0 If there is more than one NC Card to be mounted set the switches on the respective NC Cards to different values Symbol Description No of pins Factory setting CF61 Connector relay board connection connector 26 pins CF10 Connector relay board connection connector 50 pins CF62 CF63 PCI...

Page 21: ...ures 1 Mount the battery on NC Card 2 Attach NC Card to the personal computer s PCI bus When mounting two or more NC cards mount all the NC cards at once 3 Connect peripheral devices For the details of NC Card mounting and peripheral device connection refer to Connection Manual BNP B2203 Downloaded from ManualsNet com search engine ...

Page 22: ...ration The following message appears on the lower right corner of the screen and then the Found New Hardware wizard is opened Display sample for WindowsXP Display sample for Windows2000 This message disappears after a period of time 2 Click Next In some cases it takes several minutes for this screen to appear For Windows2000 uncheck all the boxes under Optional search locations and click Next This...

Page 23: ...dowsXP Click Continue Anyway 4 Completing the Found New Hardware Wizard is displayed Click Finish Now the installation of NC System Device Driver has been completed This screen does not exist for Windows2000 This screen does not exist for WindowsXP This screen does not exist for WindowsXP Downloaded from ManualsNet com search engine ...

Page 24: ... Panel menus of the Start menu For Windows2000 click the Settings Control Panel menus of the Start menu 2 The Control Panel window is displayed For WindowsXP click the Performance and Maintenance icon on Control Panel and click System icon on the Performance and Maintenance window For Windows2000 Double click the System icon on Control Panel Display sample for WindowsXP Display sample for Windows2...

Page 25: ...tus of NC System Device Driver Procedures 1 Select Mitsubishi PC Based NC MELDASMAGIC64 HR655A below Other devices and then click the Action Properties menus 2 The Mitsubishi PC Based NC MELDASMAGIC64 HR655A Properties window is displayed If the message of This device is working properly is displayed in the Device status field the device is in the normal condition Downloaded from ManualsNet com se...

Page 26: ... the memory of the NC Card in use be sure to back up the parameters and so on as needed prior to initialization Initialize the NC Card memory according to the procedures below Open the Settings page of Mitsubishi PC Based NC MELDASMAGIC64 HR655A Properties screen and clear the memory of NC Card Procedures 1 Display the Mitsubishi PC Based NC MELDASMAGIC64 HR655A Properties window Refer to chapter ...

Page 27: ...ely 1 minute to clear the memory When the memory clear has finished the Memory clear complete message is displayed 4 Close all the open windows 4 2 1 6 Confirming NC Card Operation Confirm the installed Device Driver operating normally according to the procedures below Confirm the display status of the 7 segment LED on NC Card Procedure 1 NC Card is working normally if the 7 segment LED on the NC ...

Page 28: ...stem Device Driver according to the procedures below Install Device Driver by executing Setup on NC System Disk Procedures 1 Turn on the personal computer After Windows starts up insert the floppy disk titled NC System Disk 1 into drive A 2 Click Run on the Start menu of the task bar 3 The Run window appears Fill in the Open field as below and then click OK a setup exe Downloaded from ManualsNet c...

Page 29: ...stall the software according to the directions from the installation program With the default screen displayed select Next and then click Finish at the end 5 If the Insert Disk window is displayed insert the next disk into drive A and then click OK Downloaded from ManualsNet com search engine ...

Page 30: ...onfirming the shutdown of the personal computer exit Windows and turn off the personal computer is displayed Click Yes 7 Exit Windows and turn off the personal computer In some cases the personal computer is turned off automatically Take out the floppy disk Downloaded from ManualsNet com search engine ...

Page 31: ...efer to the following NC Card layout and set the rotary switch CDNO If there is only one NC Card to be mounted set 0 If there is more than one NC Card to be mounted set the switches on the respective NC Cards to different values Symbol Description No of pins Factory setting CF61 Connector relay board connection connector 26 pins CF10 Connector relay board connection connector 50 pins CF62 CF63 PCI...

Page 32: ...ures 1 Attach the battery to NC Card 2 Mount NC Card on the personal computer s PCI bus When mounting two or more NC Cards mount all the NC Cards at once 3 Connect peripheral devices For the details of NC Card mounting and peripheral device connection refer to Connection Manual BNP B2203 Downloaded from ManualsNet com search engine ...

Page 33: ...llation of the device driver is continued automatically Procedures 1 Check the connection of the NC Card and then turn on the personal computer When Add New Hardware Wizard opens click Next 2 Click Next 3 Uncheck all the check boxes as shown in the figure below and then click Next 4 Click Next Downloaded from ManualsNet com search engine ...

Page 34: ...GIC64 System 4 2 Setting Up NC Card and Device Driver PCI Card 28 5 The installation has been completed When you click Finish a message confirming restart is displayed Click Yes Downloaded from ManualsNet com search engine ...

Page 35: ...ting normally according to the procedures below Open Device Manager Procedures 1 After the personal computer is restarted click Settings Control Panel menus of the Start menu 2 The Control Panel window is displayed Double click the System icon on Control Panel 3 The System Properties window is displayed Click the Device Manager tab 5 Downloaded from ManualsNet com search engine ...

Page 36: ...ect Mitsubishi PC Based NC MELDASMAGIC64 HR655A below Other devices and then click the Properties button 2 The Mitsubishi PC Based NC MELDASMAGIC64 HR655A Properties window is displayed If the message of This device is working properly is displayed in the Device status field the device is in the normal condition Downloaded from ManualsNet com search engine ...

Page 37: ...is initialized When initializing the memory of the NC Card in use be sure to back up the parameters and so on as needed prior to initialization Initialize the NC Card memory according to the procedures below Open the Settings page of the NC System Device Driver s Properties screen and clear the memory of NC Card Procedures 1 Display the Mitsubishi PC Based NC MELDASMAGIC64 HR655A Properties window...

Page 38: ...y is cleared It takes approximately 1 minute to clear the memory When the memory clear has finished the Memory clear complete message is displayed 4 Close all the open windows 4 2 2 6 Confirming NC Card Operation Using the procedures below to confirm whether the installed NC Card is working normally Confirm the display status of the 7 segment LED on NC Card Procedure 1 NC Card is working normally ...

Page 39: ...m Device Driver the device driver for the NC Card and MELDASMAGIC64 NC System Software are installed The installation procedures of NC System Device Driver differ by each Windows model For Windows95 refer to chapter 4 3 1 For Windows98 including Second Edition refer to chapter 4 3 2 For WindowsNT refer to chapter 4 3 3 4 3 1 Installing NC System Device Driver for Windows 95 4 3 1 1 Installing NC S...

Page 40: ...rd window appears Click Next 4 A window confirming the automatic detection of new hardware is displayed Select the No option button and then click Next 5 A window for selecting the type of the hardware to be installed is displayed Click Other devices and then click Next Downloaded from ManualsNet com search engine ...

Page 41: ...on 7 The Install From Disk window is displayed Insert the floppy disk titled NC System Disk 1 into drive A and then click the OK button 8 A window for selecting the manufacturer and model of the hardware is displayed Select Mitsubishi PC Based NC MELDASMAGIC64 HR62xx and then click Next Specify the xx of HR62xx according to the NC Card to be used Downloaded from ManualsNet com search engine ...

Page 42: ...e necessary for the future installation 4 3 1 2 Mounting NC Card be sure to make a note of it 10 Here if the message of The software for this device is now installed but this device conficts with one or more other devices is displayed installation cannot be continued Click Cancel In this case refer to Problem 2 of chapter 6 3 Troubleshooting and fix the hardware conflict before installing the soft...

Page 43: ...indow is displayed Click Yes 14 Windows is shutdown and you can turn off the computer 15 Turn off the personal computer In some cases the personal computer is turned off automatically Take out the floppy disk Now the installation of NC System Device Driver has been completed Proceed to chapter 4 3 1 2 Mounting NC Card CAUTION Do not turn on the personal computer until you mount NC Card according t...

Page 44: ...ings of the rotary switch to the resource settings of the personal computer of which you made a note in chapter 4 3 1 1 Installing NC System Device Driver BAT SODIMM1 SODIMM2 CIO CF61 CF10 Symbol Description No of pins Factory setting CIO Expansion IO connector 80 pins CF61 Connector relay board connection connector 26 pins CF10 Connector relay board connection connector 50 pins ISA ISA bus connec...

Page 45: ...63 2 260 263 A 180 183 3 280 283 B 1A0 1A3 4 2A0 2A3 C 1C0 1C3 5 2C0 2C3 D 1E0 1E3 6 2E0 2E3 E 200 203 7 300 303 F Settings of the DPADR rotary switch 2 port memory Switch on the NC Card DPADR D8000 DFFFF 0 D0000 D7FFF 1 C8000 CFFFF 2 C0000 C7FFF 3 Mount NC Card on the personal computer Procedures 1 Attach the battery to NC Card 2 Mount NC Card on the personal computer s ISA bus 3 Connect peripher...

Page 46: ...layed for the version B5 or later of NC System reboot Windows Press the OK button and wait for about 30 seconds then Windows starts up After the startup of Windows has finished reboot Windows once Caution The operation above is necessary only once right after installation Since this message is not displayed for the NC System version B4 or older the operation above is not necessary 2 Click the Sett...

Page 47: ... Click the Device Manager tab Select Mitsubishi PC Based NC MELDASMAGIC64 HR62xx below Other devices and then click the Properties button 2 The Mitsubishi PC Based NC MELDASMAGIC64 HR62xx Properties window is displayed If the message of This device is working properly is displayed in the Device status field the device is in the normal condition Downloaded from ManualsNet com search engine ...

Page 48: ...ry is initialized When initializing the memory of the NC Card in use be sure to back up the parameters and so on as needed prior to initialization Initialize the NC Card memory according to the procedures below Open the Settings page of the NC System Device Driver Properties screen and clear the NC Card memory Procedures 1 Display the Mitsubishi PC Based NC MELDASMAGIC64 HR62xx Properties window F...

Page 49: ...y is cleared It takes approximately 1 minute to clear the memory When the memory clear has finished the Memory clear complete message is displayed 4 Close all the open windows 4 3 1 5 Confirming NC Card Operation Confirm the installed Device Driver operating normally according to the procedures below Confirm the display status of the 7 segment LED on NC Card Procedure 1 NC Card is working normally...

Page 50: ...rding to the procedures below Install Device Driver using the hardware wizard Hardware is not detected automatically Procedures 1 Click the Settings Control Panel menus of the Start menu on the task bar 2 When the Control Panel window is displayed double click the Add New Hardware icon 3 The Add New Hardware Wizard window appears Close all the open applications then click Next Downloaded from Manu...

Page 51: ...ce to be installed is displayed Select the No the device isn t in the list option button and then click Next This window may not be displayed according to environments 6 A window confirming the automatic detection of new hardware is displayed Select the No option button and then click Next Downloaded from ManualsNet com search engine ...

Page 52: ...hardware is displayed Click Other devices and then click Next 8 A window for selecting the manufacturer and model of the hardware is displayed Click the Have Disk button 9 The Install From Disk window is displayed Insert the floppy disk titled NC System Disk 1 into drive A and then click the OK button Downloaded from ManualsNet com search engine ...

Page 53: ... of HR62xx according to the NC Card to be used 11 A window confirming the setup conditions of the hardware to be installed is displayed Fill in Resource type The rotaty switch of card Setting IRQ IRQ I O port address IOPADR Memory range DPADR The setting may differ per installation CAUTION Since the setting is necessary for the future installation chapter 4 3 2 2 Mounting NC Card be sure to make a...

Page 54: ...played installation cannot be continued Click Cancel In this case refer to Problem 2 of chapter 6 3 Troubleshooting and fix the hardware conflict before installing the software again CAUTION If hardware conflict occurs be sure to click the Cancel button to abort installation If you click Next to continue to install the software the personal computer may not start up properly Downloaded from Manual...

Page 55: ...nge window is displayed Click Yes 16 Windows is shutdown and you can turn off the computer 17 Turn off the personal computer In some cases the personal computer is turn off automatically Take out the floppy disk Now installing NC System Device Driver has finished Proceed to chapter 4 3 2 2 Mount NC Card CAUTION Do not turn on the personal computer until you mount NC Card according to the procedure...

Page 56: ...ngs of the rotary switch to the resource settings of the personal computer of which you made a note in chapter 4 3 2 1 Installing NC System Device Driver BAT SODIMM1 SODIMM2 CIO CF61 CF10 Symbol Description No of pins Factory setting CIO Expansion IO connector 80 pins CF61 Connector relay board connection connector 26 pins CF10 Connector relay board connection connector 50 pins ISA ISA bus connect...

Page 57: ...63 2 260 263 A 180 183 3 280 283 B 1A0 1A3 4 2A0 2A3 C 1C0 1C3 5 2C0 2C3 D 1E0 1E3 6 2E0 2E3 E 200 203 7 300 303 F Settings of the DPADR rotary switch 2 port memory Switch on the NC Card DPADR D8000 DFFFF 0 D0000 D7FFF 1 C8000 CFFFF 2 C0000 C7FFF 3 Mount NC Card on the personal computer Procedures 1 Mount the battery on NC Card 2 Attach NC Card to the personal computer s ISA bus 3 Connect peripher...

Page 58: ...layed for the version B5 or later of NC System reboot Windows Press the OK button and wait for about 30 seconds then Windows starts up After the startup of Windows has finished reboot Windows once Caution The operation above is necessary only once right after installation Since this message is not displayed for the NC System version B4 or older the operation above is not necessary 2 Click the Sett...

Page 59: ...s Click the Device Manager tab Select Mitsubishi PC Based NC MELDASMAGIC64 HR62xx from Other devices and then click the Properties button 2 The Mitsubishi PC Based NC MELDASMAGIC64 HR62xx Properties window is displayed If the message of This device is working properly is displayed in the Device status field the device is in the normal condition Downloaded from ManualsNet com search engine ...

Page 60: ...y is initialized When initializing the memory of the NC Card in use be sure to back up the parameters and so on as needed prior to initialization Initialize the NC Card memory according to the procedures below Open the Settings page of the NC System Device Driver s Properties screen and clear the NC Card memory Procedures 1 Display the Mitsubishi PC Based NC MELDASMAGIC64 HR62xx Properties window ...

Page 61: ...ry is cleared It takes approximately 30 seconds to clear the memory When the memory clear has finished the Memory clear complete message is displayed 4 Close all the open windows 4 3 2 5 Confirming NC Card Operation Using the procedures below to confirm whether the installed NC Card is working normally Confirm the display status of the 7 segment LED on NC Card Procedure 1 NC Card is working normal...

Page 62: ...detected automatically When you install NC System Device Driver be sure to log in Windows NT as Administrator Procedures 1 Insert the floppy disk titled NC System Disk 1 into drive A 2 Click Run on the Start menu of the task bar 3 Fill in the Open field as below and then click OK a setup exe 4 The Welcome window is displayed Click Next 5 The Select Device window is displayed Select Mitsubishi PC B...

Page 63: ... depends on the status of the personal computer to which the software is installed The status of the resource in the destination personal computer can be confirmed via the Resource tab page on the Start Program Management Tool Common Windows NT Diagnostic Program menus Assign a resource not used by other device currently to the NC Card Make a note of the selected resource type and setting and then...

Page 64: ... displayed Click Yes 10 Windows is shutdown 11 Turn off the personal computer In some cases the personal computer is turned off automatically Take out the floppy disk Now installing NC System Device Driver has finished Proceed to chapter 4 3 3 2 Mounting NC Card CAUTION Do not turn on the personal computer until you mount NC Card according to the procedures of chapter 4 3 3 2 Mounting NC Card If y...

Page 65: ...ngs of the rotary switch to the resource settings of the personal computer of which you made a note in chapter 4 3 3 1 Installing NC System Device Driver BAT SODIMM1 SODIMM2 CIO CF61 CF10 Symbol Description No of pins Factory setting CIO Expansion IO connector 80 pins CF61 Connector relay board connection connector 26 pins CF10 Connector relay board connection connector 50 pins ISA ISA bus connect...

Page 66: ...63 2 260 263 A 180 183 3 280 283 B 1A0 1A3 4 2A0 2A3 C 1C0 1C3 5 2C0 2C3 D 1E0 1E3 6 2E0 2E3 E 200 203 7 300 303 F Settings of the DPADR rotary switch 2 port memory Switch on the NC Card DPADR D8000 DFFFF 0 D0000 D7FFF 1 C8000 CFFFF 2 C0000 C7FFF 3 Mount NC Card on the personal computer Procedures 1 Attach the battery to NC Card 2 Mount NC Card to the personal computer s ISA bus 3 Connect peripher...

Page 67: ...en Device Manager Procedures 1 Turn on the personal computer Operation Windows starts up 2 Click the Settings Control Panel menus of the Start menu The Control Panel window appears Double click the Devices icon 3 The Devices window appears Confirm that Mitsubishi PC Based NC is found on the Devices list If Status indicates Started the device is working properly 4 Click the Close button Downloaded ...

Page 68: ...e to back up the parameters and so on as needed prior to initialization Initialize the NC Card memory according to the procedures below Open the Settings page of the NC System Device Driver s Properties screen and clear the NC Card memory Procedures 1 Double click the Numerical Controller icon on Control Panel The Numerical Controller window appears Click MELDASMAGIC64 HR62xx on the Devices field ...

Page 69: ...to an hourglass and the NC Card memory is cleared It takes approximately 1 minute to clear the memory When the memory clear has finished the Memory clear complete message is displayed 4 Close all the open windows 4 3 3 5 Confirming NC Card Operation Using the procedures below to confirm whether the installed NC Card is working properly Confirm the display status of the 7 segment LED on NC Card Pro...

Page 70: ...ustom API Library Runtime Disk 1 floppy disk Procedures 1 Insert the floppy disk titled Custom API Library Runtime Disk 1 into drive A 2 Click the Run menu of the Start menu on the task bar Operation The Run window appears 3 Enter the following in the Open and then click OK A setup exe Operation The installation program is started up 4 Install the software according to the directions from the inst...

Page 71: ...window is not displayed 6 For Windows95 Windows98 including Second Edition and WindowsNT since the location for saving Runtime Library is specified in AUTOEXEC BAT the window below is displayed When the window is displayed select Let Setup modify the AUTOEXEC BAT file and click Next This window is not displayed for windows2000 XP 7 Select Set up it from a control panel and then click Next Download...

Page 72: ...perties window Procedures 1 Double click Other Device on Device Manager and Mitsubishi PC Based NC MELDASMAGIC64 HR6xxx Properties For WindowsNT Numerical Controller window is displayed Click MELDASMAGIC64 HR62xx on Devices and then click Settings button Display sample for WindowsXP Display sample for WindowsNT For the method of displaying the Device Manager refer to each chapter as follows For Wi...

Page 73: ...ystem Device Driver set the same NC Card No as the one used so far If a different NC Card No is set the environment setup may be erased 3 Click the OK button Operation The Properties window is closed 4 Close Device Manager After the operation is finished the following window is displayed 5 Take out the floppy disk and then click Finish button Proceed to chapter 4 5 after rebooting the personal com...

Page 74: ...lity according to the procedures below Install the utilitiy by executing setup exe in the Utility Software Disk 1 floppy disk Procedures 1 Insert the floppy disk titled Utility Software Disk 1 into drive A 2 Click the Run menu of the Start menu on the task bar Operation The Run window appears 3 Enter the following in the Open and then click OK A setup exe Operation The installation program is star...

Page 75: ...itor 4 6 1 Installing MELDASMAGIC Monitor Install MELDASMAGIC Monitor according to the procedures below Install MELDASMAGIC Monitor by executing setup exe on the MELDASMAGIC Monitor floppy disk Procedures 1 Insert the floppy disk titled MELDASMAGIC Monitor into drive A 2 Click the Run menu of the Start menu on the task bar Operation The Run window appears 3 Enter the following in the Open and then...

Page 76: ...sk to the PRM PARAMET BIN file on NC Card using the file transfer utility magictrs exe Here select M L D or G for the x of 64x Procedures 1 Insert the floppy disk titled NC Data 64x into drive A Here select M L D or G for the x of 64x 2 Click Programs MELDASMAGIC File Transfer menus from the taskbar Start menu and then start the file transfer utility 3 Select the A paramet bin file on the PC side ...

Page 77: ...setup exe of NC option data on the floppy disk Procedures 1 Insert the floppy disk titled NC Option into drive A 2 Click the Run menu from the taskbar Start menu Operation The Run window appears 3 Enter the following in the Open and then click OK A setup exe Operation The installer of NC option data starts Install NC option data according to the directions on the screen Exit Windows and restart th...

Page 78: ...or MELDASMAGIC Monitor handling Refer to MELDAS60 60S series Operation Manual BNP B2180 for the screens and parameters Exit Windows and restart the personal computer Start the MELDASMAGIC monitor again Format the NC file system Procedures 1 Open the Setup Parameters menu from MELDASMAGIC Monitor 2 Set 1 on the 1060 Setup parameter of BASE SPEC PARAM and then press the Enter key Operation The messa...

Page 79: ...exe to copy the PRM PARAMET BIN file on NC Card to the A drive of the personal computer Procedures 1 Click the Programs MELDASMAGIC File Transfer menus from the taskbar Start menu to start the file transfer utility 2 Select the Mxx PRM PARAMET BIN file on the NC side of the File Transfer window Specify the NC Card No being set up on the xx of Mxx 3 Select the A directory on the PC side 4 Click the...

Page 80: ... B2194 5 2 Installing Custom API Library The Custom API Library is a software development kit for creating applications to operate MELDASMAGIC Refer to the following document attached to the software for the installation method of Custom API Library Custom Application Interface Library Instruction Manual Programming Edition BNP B2197 5 3 Installing Personal Computer Direct Operation Function Perso...

Page 81: ...onal computer is turned on Refer to 1 Check that NC System Device Driver has been installed 4 2 Setting Up NC Card and Device Driver PCI NC Card 2 Check that Runtime Library has been installed 4 4 Setting Up Runtime Library 3 Check that an NC Card number has been set properly 4 4 2 Assigning an NC Card No of PCI NC Card 4 Check that the utility and MELDASMAGIC Monitor have been installed 4 5 1 Ins...

Page 82: ...sonal computer is turned on Refer to 1 Check that NC System Device Driver has been installed 4 3 Setting Up NC Card and Device Driver ISA NC Card 2 Check that Runtime Library has been installed 4 4 Setting Up Runtime Library 3 Check that an NC Card number has been set properly 4 4 3 Assigning an NC Card No of ISA NC Card 4 Check that the utility and MELDASMAGIC Monitor have been installed 4 5 1 In...

Page 83: ...l appears and installation is stopped for ISA NC Card Examine the vacancy of the resources memory I O port and IRQ used by the personal computer and adjust the resources used by each expansion card Procedures 1 Click Settings Control Panel menus from the Start menu Operation The Control Panel window appears 2 Double click the System icon of Control Panel Operation The System Properties window appe...

Page 84: ...rting up Windows The wallpaper appears however the mouse cursor stays as an hourglass and other symptoms Possible causes are as follows NC Card is not mounted on the personal computer properly The rotary switch on NC Card is not set up properly Device Driver was added before the older version of Device Driver was removed Check the settings and mounting of the NC Card In addition check the installa...

Page 85: ...ntrol Panel and confirm that NC System Device Driver is installed Install Device Driver if it has not been installed In addition confirm that the Device usage checkbox is checked on the General page of the Properties sheet of NC System Device Driver Check the checkbox if it has not been checked Problem 7 Although Windows starts up normally when the personal computer is turned on the LED of NC Card...

Page 86: ... the path of the directory to which Runtime Library was installed is found Example When C melpcnc is specified on the destination This directory is the default destination Check that there is a search path of C melpcnc bin32 3 Add the setting of the PATH environment variable if it is not found at step 2 4 Check the order of search paths if the PATH environment variable is found at step 2 If C melp...

Page 87: ...ton or NcPccom is found on the task list displayed by pressing Ctrl Alt Delete exit these applications You can exit PC Direct file server via the pop up menu displayed by pointing to and right clicking the icon on the indicator Problem 14 A message indicating NC card setting error PCI channel number is conflict CDNO xx is displayed on the way to starting Windows for PCI NC Card The PCI NC Card s s...

Page 88: ...ard temporarily out of the personal computer according to the procedures below Exit Windows and turn off the personal computer Remove NC Card 7 1 3 Resuming Using NC Card Removed Temporarily Resume the use of temporarily removed NC Card according to the procedures below Exit Windows and turn off the personal computer Mount NC Card and connect peripheral devices CAUTION Mount NC Card on the same sl...

Page 89: ...y not start Remove the NC Card according to the procedures below 7 2 1 Removing NC Card Remove the NC Card out of the personal computer according to the procedures below Open Device Manager Procedures 1 Turn on the personal computer Operation Windows starts up 2 Click the Settings Control Panel menus from the Start menu Operation The Control Panel window appears 3 Double click the System icon of C...

Page 90: ...he Delete button Operation The Confirm Device Removal window is displayed 2 Click the OK button Operation The Mitsubishi PC Based NC MELDASMAGIC64 HR62xx device is deleted 3 Click the OK button on the System Properties window Operation The System Properties window is closed Exit Windows and turn off the personal computer Remove NC Card Downloaded from ManualsNet com search engine ...

Page 91: ...gs Control Panel menus of the Start menu Operation The Control Panel window appears 3 Double click the System icon of Control Panel Operation The System Properties window appears 4 Click the Device Manager tab Quit using NC System Device Driver Procedures 1 Select Mitsubishi PC Based NC MELDASMAGIC64 HR62xx below Other devices and click the Properties button Operation The Mitsubishi PC Based NC ME...

Page 92: ...the OK button Operation The Mitsubishi PC Based NC MELDASMAGIC64 HR62xx Properties window is closed 4 Click the OK button on the System Properties window Operation The System Properties window is closed Exit Windows and turn off the personal computer Remove NC Card Downloaded from ManualsNet com search engine ...

Page 93: ...al computer Mount NC Card and connect peripheral devices Open Device Manager Procedures 1 Turn on the personal computer Operation Windows starts up 2 Click the Settings Control Panel menus of the Start menu Operation The Control Panel window appears 3 Double click the System icon of Control Panel Operation The System Properties window appears 4 Click the Device Manager tab Downloaded from ManualsN...

Page 94: ...es button Operation The Mitsubishi PC Based NC MELDASMAGIC64 HR62xx Properties window appears 2 Check the check boxes in the Device Usage group 3 Click the OK button Operation The Mitsubishi PC Based NC MELDASMAGIC64 HR62xx Properties window is closed 4 Click the OK button of the System Properties window Operation The System Properties window is closed Downloaded from ManualsNet com search engine ...

Page 95: ...ARAMET BIN USERPLC LAD PRG USERPLC LAD TOOL OFS WORK OFS MMI 1 cnv4bmm 4 USERPLC LAD LAD1 2 chgcx LAD1 LAD2 Files other than above Not available Caution Since files other than USERPLC LAD or machining programs are not compatible with MAGIC50 files output by MAGIC50 cannot be used cnv4bmm and chgcx are DOS applications They are packaged with the ladder creation tool File transfer utility MAGIC64 da...

Page 96: ...C Monitor Operation Manual BNP B2192 MELDASMAGIC MMI Operation Manual D M BNP B2193 MELDASMAGIC MMI Operation Manual L G BNP B2194 Personal Computer Direct Operation Instruction Manual BNP B2195 Utility Instruction Manual BNP B2196 Custom Application Interface Library Instruction Manual Programming Edition BNP B2197 Downloaded from ManualsNet com search engine ...

Page 97: ... revision Manual No Revision details Mar 1998 BNP B2191 First edition Aug 2003 BNP B2191A Description on ISA NC Card for Windows 98 NT was added Description on PCI NC Card was added Downloaded from ManualsNet com search engine ...

Page 98: ...n is not possible Please contact your Mitsubishi Electric dealer with any questions or comments regarding the use of this product Duplication Prohibited This instruction manual may not be reproduced in any form in part or in whole without written permission from Mitsubishi Electric Corporation 1996 2003 MITSUBISHI ELECTRIC CORPORATION ALL RIGHTS RESERVED Downloaded from ManualsNet com search engin...

Page 99: ... subject to change without notice Printed in Japan on recycled paper MITSUBISHI ELECTRIC CORPORATION HEAD OFFICE MITSUBISHI DENKI BLDG 2 2 3 MARUNOUCHI CHIYODA KU TOKYO 100 8310 JAPAN MODEL Manual No MODEL CODE Downloaded from ManualsNet com search engine ...

Reviews: