Changing Cartridges
4-28
M
a
in
ta
in
in
g
Y
o
u
r
P
ri
n
te
r
Cha
p
te
r
4
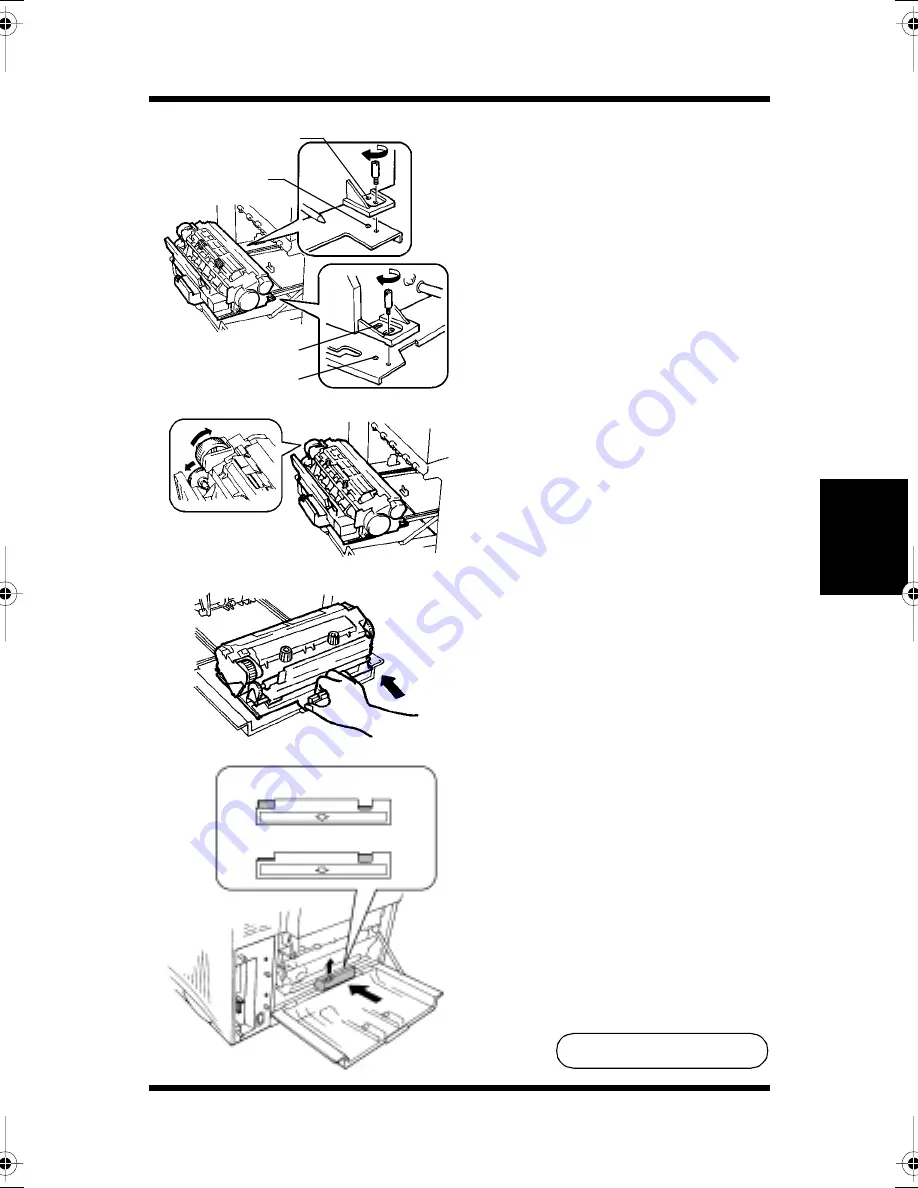
16. Install the fusing unit by
inserting the dowel of the
mount into the fusing unit’s
installation hole.
17. Secure the fusing unit with
the installation screws.
18. Turn the misfeed clearing
dial of the fusing unit coun-
terclockwise and make sure
that the white gear shown
rotates smoothly.
19. Holding the lock release
lever, insert the fusing unit
until it clicks into place.
20. Make sure that the button of
the fusing unit lock
release lever is pushed up as
shown.
Installation hole
Dowel
Installation hole
Dowel
OK (LOCKED)
NG (UNLOCKED)
To Be Continued
▼
CPP-L.book Page 28 Tuesday, July 20, 1999 7:43 AM
Summary of Contents for PAGEPRO L
Page 17: ...Chapter 1 Introduction Introduction Chapter 1...
Page 23: ...Chapter 2 Using the Printer Using the Printer Chapter 2...
Page 30: ...The Printer Parts and Supplies 2 7 Using the Printer Chapter 2 6 Oiling roller 7 Fusing unit...
Page 57: ...Loading Paper Loading Transparencies and Labels 2 34 Using the Printer Chapter 2 MEMO...
Page 65: ...Loading Paper Loading Special Paper 2 42 Using the Printer Chapter 2 MEMO...
Page 69: ...Chapter Printer Driver and Status Display 3 Printer Driver and Status Display Chapter 3...
Page 84: ...Driver Settings Windows 95 Windows 98 3 16 Printer Driver and Status Display Chapter 3 MEMO...
Page 104: ...Driver Settings Windows NT 4 0 3 36 Printer Driver and Status Display Chapter 3 MEMO...
Page 116: ...Chapter 4 Maintaining Your Printer Maintaining Your Printer Chapter 4...
Page 146: ...Changing Cartridges 4 30 Maintaining Your Printer Chapter 4 MEMO...
Page 159: ...Chapter 5 Troubleshooting Troubleshooting Chapter 5...
Page 195: ...Chapter 6 Specifications Specifications Chapter 6...
Page 203: ...Glossary Appendix A Appendix A Glossary...
Page 207: ...Quick Reference Appendix B Appendix B Quick Reference...
Page 214: ...Index Appendix C Appendix C Index...
Page 217: ...General Information...
Page 229: ...General Information 12...


