background image

Loading Paper: Loading Transparencies and Labels

2-36

Usi

n

g

the

Pr

in

te

r

Ch

apter

2

4.

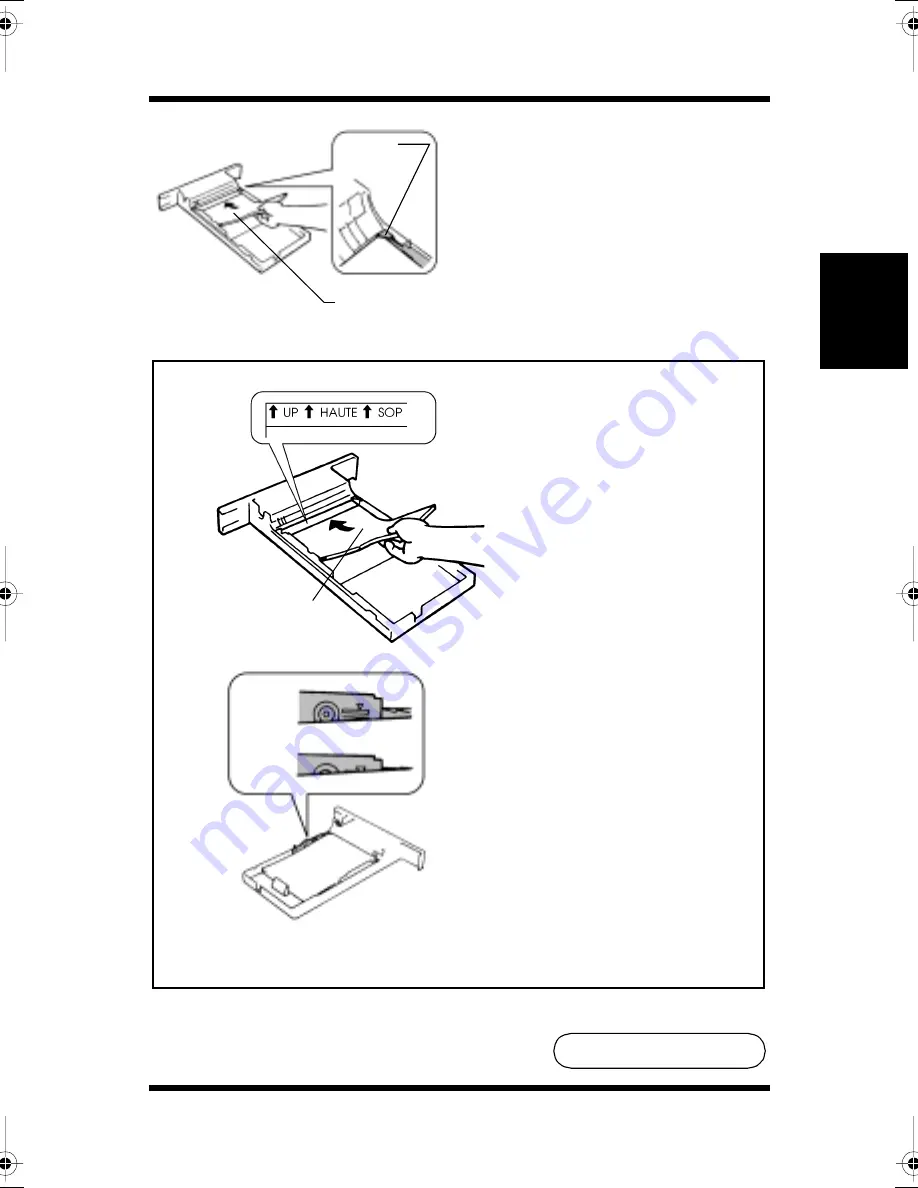
Load the transparency stack
into the cassette, print side
down, under the paper
separator
, and flush with the
front side of the cassette.

Note

• Load the recommended

transparencies (Minolta CF
200-(D), 3MCG3710,
Minolta CF-100 (D) or 3M
PP2500) into the cassette so
that their front sides are

facing up

.

• The transparencies should be

loaded no higher than the
maximum level indicator.

• Do not load additional transparencies on top of those remaining in the tray.

• Loading the transparencies with force may cause a misfeed.

Paper
separator

Face down

Face-side up

The face of the

transparency should
be facing up

OK

NG

To Be Continued

CPP-L.book Page 36 Tuesday, July 20, 1999 7:43 AM

Summary of Contents for PAGEPRO L

Page 1: ...the ENERGY STAR Guidelines for energy efficiency What is an ENERGY STAR Printer ENERGY STAR Printers have a feature that allows them to automatically go to sleep after a period of inactivity This auto...

Page 2: ...marks of Adobe Systems Incorporated or its subsidiaries and may be registered in certain juridictions Agfa and Agfa Intelifont Agfa Font Manager are registered trademarks of Agfa Corporation TrueType...

Page 3: ...laser There is no pos sibility of danger from the laser provided the printer is operated accord ing to the instructions in this manual Since radiation emitted by the laser is completely confined withi...

Page 4: ...Laitteen K ytt minen muulla kuin t ss k ytt ohjeessa mainitulla tavalla saattaa altistaa k ytt j n tuvallisuusluokan 1 ylitt v lle n kym t t rm lle lasers teiylle Om apparaten anv nds p annat s tt n i...

Page 5: ...or laser The maximum power of the laser diode is 1 0 10 3 W and the wavelength is 770 810 nm Dersom apparatet brukes p annen m te enn spesifisert i denne bruksan visning kan brukeren utsettes for unsy...

Page 6: ...may cause radio interference in which case the user may be required to take adequate measures This device must be used with shield interface cables The use of non shielded cable is likely to result in...

Page 7: ...quirements and user s guide EMC EN 55 022 Class B 1994 with A1 1995 Limits and method for measurement of radio disturbance characteristic of information technology equipment ITE EN61000 3 2 ClassA 199...

Page 8: ...e is released This amount is not large enough to harm anyone adversely However be sure the room where the printer is being used has adequate ventilation espe cially if you are printing a high volume o...

Page 9: ...ing Fine MT developing system 8 m small particle toner Color matching technology Windows 95 Windows 98 ICM Printer embedded color matching 2 Printer Description Language PDL Windows Adobe PostScript L...

Page 10: ...ght 403mm 15 3 4 6 Network ready with option Ethernet Server Windows NT NetWare 3 X 4 X Bindery NDS Client Windows 95 Windows 98 Windows 3 1 Windows NT Workstation 4 0 7 Easy maintenance and operation...

Page 11: ...g the Oiling Roller Changing the Fusing Unit and Image Transfer Roller Unit Cleaning the Printer and Clearing a Paper Misfeed Note This indicator is used to identify sections that require special atte...

Page 12: ...es 1 4 Moving the Printer 1 5 Chapter 2 Using the Printer The Printer Parts and Supplies 2 1 Printer 2 1 Supplies and Units 2 5 Control Panel 2 9 Indicator Lights 2 10 Action Key 2 10 Operation and Wa...

Page 13: ...Print Job Directly at the Printer 2 45 Chapter 3 Printer Driver and Status Display Using the Printer Driver Under Windows 95 Windows 98 3 2 Displaying the Printer Driver Window 3 3 Exiting the Printer...

Page 14: ...Menu Settings 3 26 Driver Settings 3 27 Paper 3 27 Page Layout 3 31 Image 3 37 Device Option 3 41 About 3 42 Using the Printer Status Display 3 43 Opening the Printer Status Display 3 43 Using the Pr...

Page 15: ...4 23 Changing the Image Transfer Belt Unit 4 31 Cleaning the Printer 4 39 Cleaning the Outside 4 39 Cleaning the Inside 4 40 Chapter 5 Troubleshooting How to Troubleshoot 5 1 Diagnosing Your Printer...

Page 16: ...of Printer 6 1 Specifications of 250 sheet Third Cassette Unit 6 7 Appendix A Glossary Appendix B Quick Reference Appendix C Index General Information End User License Agreement 1 Addresses MINOLTA Pa...

Page 17: ...Chapter 1 Introduction Introduction Chapter 1...

Page 18: ...C 18 F per hour Humidity 15 to 85 RH with a fluctuation of 20 per hour The environmental zone marked X on the left represents a critical environment in which the printer can be left to stand However t...

Page 19: ...re or causing an electrical shock ALWAYS unplug the power cord when the printer is not to be used for an extended period of time NEVER remove any panel or cover unless the procedure is described in th...

Page 20: ...owed to run without taking necessary action Note Remarque Locate the printer in a Well Ventilated Room A negligible amount of ozone is generated during normal operation of this printer An unpleasant o...

Page 21: ...open flame A humid place A dusty place Surplus paper which has been removed from its protective pack aging but not yet loaded into the printer tray should be sealed in a plastic bag and stored in a co...

Page 22: ...rt the printer over a long distance consult your technical representative Note Moving the printer with a third cassette unit option The third cassette unit is attached to the printer through the coupl...

Page 23: ...Chapter 2 Using the Printer Using the Printer Chapter 2...

Page 24: ...s tray The tray can hold up to 250 sheets of paper p 2 43 2 Power switch Use to turn the printer ON and OFF p 2 17 1 Output tray 2 Power switch 3 Front cover 4 Control panel 5 Front cover lock release...

Page 25: ...cover 6 Tray 1 multipurpose tray Swing open toward you to load paper Holds up to 150 sheets of paper p 2 19 7 Tray 2 250 sheet second cassette Holds up to 250 sheets of paper p 2 19 8 Tray 3 250 sheet...

Page 26: ...The Printer Parts and Supplies 2 3 Using the Printer Chapter 2 12 Rear cover lock release lever 13 Rear cover 15 Interface connector 14 Power cord socket 11 Network card panel...

Page 27: ...card 12 Rear cover lock release lever Pull down to swing open the rear cover 13 Rear cover Swing open to change the oiling roller assembly or clear a paper misfeed 14 Power cord socket Connect the pow...

Page 28: ...The Printer Parts and Supplies 2 5 Using the Printer Chapter 2 Supplies and Units 2 Toner cartridge 4 Drum cartridge 1 Waste bottle 5 Image transfer roller unit 3 Image transfer belt unit...

Page 29: ...ges in a plastic bag or according to local regulations p 4 1 3 Image transfer belt unit Transfers the image created by the drum cartridge onto paper Handle with care p 4 31 Dispose of the old unit in...

Page 30: ...The Printer Parts and Supplies 2 7 Using the Printer Chapter 2 6 Oiling roller 7 Fusing unit...

Page 31: ...the fusing rollers Replace the oiling roller with a new one when necessary p 4 11 Dispose of the old roller in a plastic bag or according to local reg ulations 7 Fusing unit Permanently fixes the imag...

Page 32: ...d BLINKING A recoverable error has occurred OFF Normal Toner Empty LED ON One or more of the toner cartridges is empty BLINKING One or more of the toner cartridges is almost empty OFF Normal Paper Emp...

Page 33: ...cator lights turn on off or blink in combination to let you know the current status of the printer You can find out details of the printer s status by checking the information that appears on your com...

Page 34: ...2 When the Ready LED is on LED Display Description Response Required Initializing Power on initializ ing Wait a few moments Warming Up Printer is warming up Wait a few moments for the printer to warm...

Page 35: ...mode Please wait a few moments Paper Low Tray 2 or Tray 3 is almost out of paper Press the Action key and check to see which tray is almost out of paper For details see Chapter 5 Trouble shooting p 5...

Page 36: ...Toner Low The supply of toner inside of the toner cartridge is low but printing is still pos sible Press the Action key and check to see which color of the toner cartridges is almost empty For details...

Page 37: ...ll resume using the paper size currently loaded in the printer by pressing the Action key p 2 23 Size Mismatch The wrong size of paper has been detected in Tray 2 or Tray 3 Replace Toner Put Toner Car...

Page 38: ...es 2 15 Using the Printer Chapter 2 Operation and Warning Labels 3 Clearing paper misfeeds 1 Installing the toner cartridge 4 Loading paper 5 WARNING HIGH TEMPERATURE 2 Changing the waste bottle drum...

Page 39: ...bottle drum cartridge and oiling roller are preset to be replaced simultaneously Replace these three units at the same time 3 Clearing paper misfeeds Describes how to clear the paper path after a mis...

Page 40: ...Printer Chapter 2 Turning the Printer ON and OFF Turning the Printer ON and OFF Turning the printer ON Press the power switch to the I ON position Turning the printer OFF Press the power switch to the...

Page 41: ...rinter is On The printer is ready to print approximately 90 seconds after the power switch is turned ON Note If no print commands are sent from the host computer to the printer within 15 min the print...

Page 42: ...r Recycled paper weighing 60 to 90 g m2 16 to 24 lbs Trans parency sheet Labels Letter head Enve lopes J Post Postcard size 100 148 mm 4 5 3 4 Thick paper weighing 90 to 157 g m2 24 to 41 1 4 lbs Tray...

Page 43: ...60 to 90 g m2 16 to 24 lbs Special Paper Recycled paper weighing 60 to 90 g m2 16 to 24 lbs Trans parency sheet Labels Letter head Enve lopes J Post Postcard size 100 148 mm 4 5 3 4 Thick paper weigh...

Page 44: ...margins of the document increase to 6mm 0 24 Paper Supplies Use the following precautions when handling the paper Avoid storing paper in any of the following places A place subject to direct sunlight...

Page 45: ...on right angles Paper bound by glue staples or clips Paper affixed with labels which are easily removed Post cards that are warped or bent Envelopes should meet the following requirements Sharp folds...

Page 46: ...r a failure Paper already used in a thermal transfer printer or ink jet printer Paper that is too thin under 60 g m2 16 lbs or too thick over 157 g m2 41 1 4 lbs Paper folded curled or torn Paper havi...

Page 47: ...24 Using the Printer Chapter 2 2 Adjust the paper guides to fit the size of the paper Load the paper stack on the tray print side facing up 3 When loading a long stack of paper open the paper support...

Page 48: ...he level indicator When paper remains in the tray do not stack more paper on top Loading with force may cause a paper misfeed To replenish the paper supply take out the remaining paper from the tray a...

Page 49: ...26 Using the Printer Chapter 2 Tray 2 second cassette Tray 3 third cassette optional 1 Slide out Tray 2 second cassette or Tray 3 third cassette 2 Press down on the paper lifting plate until it locks...

Page 50: ...the Printer Chapter 2 3 Install the trailing edge guide to fit the size of the paper to be loaded Note When loading legal size paper the trailing edge guide is not used Return it to the guide space in...

Page 51: ...d no higher than the maximum on the level indi cator Do not load additional paper on top of the remaining paper in the paper tray Loading the paper with force may cause a paper misfeed To replenish th...

Page 52: ...guides to fit the size of the paper 6 Set the paper size indicator to the size of the paper used Note If the paper size indicator is not reset to the corresponding size the document may not print corr...

Page 53: ...per 2 30 Using the Printer Chapter 2 7 Slide in the cassette Note Make sure that Tray 2 is completely loaded into the printer whenever you print from Tray 3 Printing from Tray 3 is not possible if Tra...

Page 54: ...int quality a misfeed or a failure Labels which are easily or partially peeled Labels which are leaking adhesives It is highly recommended to test any label s compatibility with the printer before pur...

Page 55: ...1 Swing open Tray 1 multipurpose tray 2 Adjust the paper guides to fit the size of the transparency or label sheets to be loaded When loading a stack of long paper open the paper support Load the stac...

Page 56: ...ore than 50 sheets on the tray Do not load additional labels or transparencies on top of those remain ing in the tray Loading with force may cause a misfeed To replenish the transparency or label shee...

Page 57: ...Loading Paper Loading Transparencies and Labels 2 34 Using the Printer Chapter 2 MEMO...

Page 58: ...or Tray 3 third cassette 2 Press down on the paper lifting plate until it locks 3 Install the trailing edge guide to fit the size of the transparencies to be loaded Note When loading Legal size transp...

Page 59: ...sparencies Minolta CF 200 D 3MCG3710 Minolta CF 100 D or 3M PP2500 into the cassette so that their front sides are facing up The transparencies should be loaded no higher than the maximum level indica...

Page 60: ...e lock lever adjust the paper guides to the size of the transparencies To replenish the transparen cies take out those that remain in the tray and add them to the new supply Straighten the edges on a...

Page 61: ...If the paper size indicator is not reset to the corresponding size the document may not print correctly When you have changed the paper size always reset the paper size indicator Make sure that Tray 2...

Page 62: ...ch as carbon paper heat sensitive paper and pressure sensitive paper Sheets of various sizes Paper not cut on right angles Paper bound by glue staples or clips Paper affixed with labels which are easy...

Page 63: ...ck on the tray print side facing up 3 When printing envelopes fold their flaps securely and load them on the tray with their flap side down When printing letterhead load it on the tray with the header...

Page 64: ...more than 50 sheets on the tray at one time Do not load additional sheets of paper on top of those remaining in the tray If you load them forcibly it may cause a misfeed To replenish the tray take out...

Page 65: ...Loading Paper Loading Special Paper 2 42 Using the Printer Chapter 2 MEMO...

Page 66: ...ter from either Tray 1 multi purpose tray Tray 2 second cassette or Tray 3 third cassette This will allow you to use the paper port that best suits your application 1 Turn the printer on See Turning t...

Page 67: ...the Printer Chapter 2 2 Load the paper Tray 1 multipurpose tray pp 2 23 2 32 2 40 Tray 2 second cassette Tray 3 third cassette pp 2 26 2 35 3 To print long paper open the paper support in the output t...

Page 68: ...y at the Printer All print jobs can be cancelled directly at the printer by pressing the Action key continuously for 10 seconds The output tray can hold up to 250 sheets of paper Be careful not to exc...

Page 69: ...Chapter Printer Driver and Status Display 3 Printer Driver and Status Display Chapter 3...

Page 70: ...an make For detailed information regarding the items contained in the tabs please refer to the printer driver s online help Note Memory In order to achieve the best results for your printed documents...

Page 71: ...gs and then Printers to display the Printers dialog box 2 Click Minolta Color PageWorks Pro L to highlight it and then select Properties from the File menu Exiting the Printer Driver After you are fin...

Page 72: ...The 6 tabs of the driver are contained in the 32 bit SuperDriver Setup tab Click on one of the tabs and enter settings for the items contained in the tab The following sections show the contents of ea...

Page 73: ...ick to save any changed settings without closing the dialog Help Click to view online help Choosing Menu Settings The following standard Windows procedures can be used when making settings in the prin...

Page 74: ...Using the Printer Driver Under Windows 95 Windows 98 3 6 Printer Driver and Status Display Chapter 3 MEMO...

Page 75: ...s you can make with this printer driver Paper The Paper tab is the opening dialog of the printer driver It contains functions that effect the format and output of your printed documents Paper Size The...

Page 76: ...9 1 2 inches Envelope DL 110 220 mm Envelope C5 162 229 mm Envelope Monarch 3 7 8 7 1 2 inches Copies This item specifies the number of copies to be printed You can specify any value from 1 to 999 Or...

Page 77: ...e The Paper Source item specifies the tray from which paper is fed from the printer To change this setting just select the desired paper source from the drop down list If the desired tray is an option...

Page 78: ...ed and either Tray2 or Tray3 runs out of paper the printer will automatically go to the next tray if it con tains the same size and type of paper Note 2 Manual The manual feed mode allows you to revie...

Page 79: ...sible selections Off This default setting specifies one document per sheet of paper 2 up This setting will print two documents onto one sheet of paper 4 up This setting will print four documents onto...

Page 80: ...ck on the Detail of N up button to open a dialog that will allow you to specify the order in which N up documents are placed on the page There are four patterns to choose from horizontal ascending hor...

Page 81: ...mark pop up dialog Watermarks can be specified to appear on the first page only of a multi page document by clicking the First Page only box Otherwise a watermark that is specified to appear will be p...

Page 82: ...e These settings can be used to specify the style of the watermark s font Font The typeface and point size of the watermark are specified here Angle Rotate the angle of the watermark s placement throu...

Page 83: ...the area of a document through the Scaling feature The maximum percentage of enlargement is 200 The maximum percentage of reduction is 50 Default Click the Default button to reset the functions of the...

Page 84: ...Driver Settings Windows 95 Windows 98 3 16 Printer Driver and Status Display Chapter 3 MEMO...

Page 85: ...int resolution Color Enable this setting when generating documents that contain color images or text Legal paper or larger sizes are not supported when this setting is enabled Colors to Patterns This...

Page 86: ...efault setting produces a standard finish that should be optimal for most applications The High setting produces a glossy finish that is appropriate for high quality high resolution document printing...

Page 87: ...Driver Settings Windows 95 Windows 98 3 19 Printer Driver and Status Display Chapter 3 Detail Click this button to open the Graphics pop up dialog...

Page 88: ...Usually the median values toward the center of the bars will provide the best display To fine tune these settings click and hold on the sliders in order to make left and right adjustments Value change...

Page 89: ...add an available option from the Installable Options list to the Installed Options list select the option and click the Add button The Installed Options list catalogs the optional accessories that ha...

Page 90: ...Driver Settings Windows 95 Windows 98 3 22 Printer Driver and Status Display Chapter 3 About This tab displays version and copyright information about this printer driver...

Page 91: ...Windows 95 Windows 98 3 23 Printer Driver and Status Display Chapter 3 Processing When Show Status is checked a pop up dialog will appear that displays the printing status of jobs as they are output...

Page 92: ...driver For detailed information regarding the items contained in the tabs please refer to the printer driver s online help Note Memory In order to achieve the best results for your printed documents...

Page 93: ...alog box 2 Select the Minolta Color PageWorks Pro L driver icon by clicking on it with the mouse pointer Next open the file menu and click on the Document Defaults item Exiting the Printer Driver You...

Page 94: ...Properties dialog without saving any changes made Help Click to view online help Choosing Menu Settings The following standard Windows procedures can be used when making settings in the printer driver...

Page 95: ...ou can make with this printer driver Paper The Paper tab is the opening dialog of the printer driver It contains functions that effect the format and output of your printed documents Paper Size The va...

Page 96: ...1 2 inches Envelope DL 110 220 mm Envelope C5 162 229 mm Envelope Monarch 3 7 8 7 1 2 inches Copies This item specifies the number of copies to be printed You can specify any value from 1 to 999 Orien...

Page 97: ...he Paper Source item specifies the tray from which paper is fed from the printer To change this setting just select the desired paper source from the drop down list If the desired tray is an option an...

Page 98: ...and either Tray2 or Tray3 runs out of paper the printer will automatically go to the next tray if it con tains the same size and type of paper Note 2 Manual The manual feed mode allows you to review e...

Page 99: ...e selections Off This default setting specifies one document per sheet of paper 2 up This setting will print two documents onto one sheet of paper 4 up This setting will print four documents onto one...

Page 100: ...n the Detail of N up button to open a dialog that will allow you to specify the order in which N up documents are placed on the page There are four patterns to choose from horizontal ascending horizon...

Page 101: ...k pop up dialog Watermarks can be specified to appear on the first page only of a multi page document by clicking the First Page only box Otherwise a watermark that is specified to appear will be plac...

Page 102: ...ese settings can be used to specify the style of the watermark s font Font The typeface and point size of the watermark are specified here Angle Rotate the angle of the watermark s placement through t...

Page 103: ...area of a document through the Scaling feature The maximum percentage of enlargement is 200 The maximum percentage of reduction is 50 Default Click the Default button to reset the functions of the tab...

Page 104: ...Driver Settings Windows NT 4 0 3 36 Printer Driver and Status Display Chapter 3 MEMO...

Page 105: ...resolution Color Enable this setting when generating documents that contain color images or text Legal paper or larger sizes are not supported when this setting is enabled Colors to Patterns This sett...

Page 106: ...lt setting produces a standard finish that should be optimal for most applications The High setting produces a glossy finish that is appropriate for high quality high resolution document printing Reso...

Page 107: ...Driver Settings Windows NT 4 0 3 39 Printer Driver and Status Display Chapter 3 Detail Click this button to open the Graphics pop up dialog...

Page 108: ...lly the median values toward the center of the bars will provide the best display To fine tune these settings click and hold on the sliders in order to make left and right adjustments Value changes ar...

Page 109: ...an available option from the Installable Options list to the Installed Options list select the option and click the Add button The Installed Options list catalogs the optional accessories that have b...

Page 110: ...Driver Settings Windows NT 4 0 3 42 Printer Driver and Status Display Chapter 3 About This tab displays version and copyright information about this printer driver...

Page 111: ...o Programs point to Minolta Printer Utilities and then click Minolta Color PageWorks Pro L Status The operation described above opens the screen shown on page 3 44 To close the Printer Status Display...

Page 112: ...of what you need to do in order to correct problems and recover from error conditions Warning Status This area displays text messages that warn you of such conditions as low toner Printer Status figu...

Page 113: ...or conditions that do not cause popup error messages to appear To move an error condition from the Inactivate Popup list to the Activate Popup list click on the error condition to highlight it and the...

Page 114: ...educe to reduce the size of the display or Expand to expand it The expanded view is shown on page 3 44 The reduced view is shown below Note that the Expand command is dimmed while the expanded view is...

Page 115: ...tput by the printer Black Cyan Magenta Yellow Counters These counters allow you to keep track of the documents that have been output by the printer according to toner color All monochrome documents ar...

Page 116: ...Chapter 4 Maintaining Your Printer Maintaining Your Printer Chapter 4...

Page 117: ...ge as a replacement When any color toner cartridge runs out of toner REPLACE TONER is displayed and the printing functions of the printer will cease to operate You can still print by pressing the Acti...

Page 118: ...ge 1 Check the control panel to see that the Toner Empty LED message is displayed 2 Press the Action key The LED display will change to indicate which of the toner cartridges require replacement Black...

Page 119: ...toner cartridge rack dial clockwise to turn the toner cartridge rack the dial will not rotate counter clockwise The toner cartridges are attached to the rack in the order of Black Yellow Magenta Red a...

Page 120: ...e dial tighten while turning it This is the position for removing the cartridge CYN MAG BLK YEL Yellow toner cartridge Black toner cartridge Toner cartridge rack Cyan Blue toner cartridge Toner cartri...

Page 121: ...l position indicator will alert the user to the proper removal position Note 6 Hold the handle of the used toner cartridge and pull it toward you Before installing or removing the toner cartridge alwa...

Page 122: ...toner cartridge from its carton and holding the cartridge as shown shake it well Note 9 Make sure that the label on the toner cartridge rack is the same color as the toner cartridge Never touch the r...

Page 123: ...g the cartridge hold the rack dial with your hand to prevent the rack from rotating 11 Holding the new cartridge as shown insert the green pin on the right side of the cartridge into the green install...

Page 124: ...uide of the rack 13 Firmly insert the cartridge into the rack until it clicks into place Make sure that the toner cartridge is installed properly and is held in position by the toner cartridge lock pl...

Page 125: ...serted into the printer Note 15 Gently close the front cover Do not slam the front cover to avoid causing damage to the printer 16 Make sure that the front cover is completely closed You will hear the...

Page 126: ...idges 4 10 Maintaining Your Printer Chapter 4 17 Wait until the sound of the printer operation has stopped indicating that the printer is ready Check the control panel to see that the Ready LED messag...

Page 127: ...onochrome print ratio image conditions etc Change the drum cartridge together with the waste bottle and oiling roller these parts are preset to be replaced at the same time When it is time or almost t...

Page 128: ...e and oiling roller are designed for the same cycle of service replace all three units using the instructions provided on the following page Note Dispose of the old drum cartridge waste bottle and oil...

Page 129: ...pter 4 Changing the Drum Cartridge 1 Grasp and pull down the front cover lock release lever and swing open the front cover 2 Holding onto the grip pull out the drum cartridge Front cover lock release...

Page 130: ...h the drum protective shutter of the drum cartridge Also never touch the internal PC drum This will reduce print quality If the drum cartridge will not be immediately installed in the printer be sure...

Page 131: ...will lock into place when it has been correctly inserted into the printer Note When the drum cartridge is correctly installed into the printer the drum protective shutter will automatically open Be c...

Page 132: ...ld waste bottle from the printer 7 Remove the cap from the old toner waste bottle and place it into the mouth of the old bottle to prevent spills 8 Make sure that the shutter of the image transfer bel...

Page 133: ...mage transfer belt unit on the left side of the printer Install the waste bottle behind the image transfer belt drawn in the diagram with dash marks inside of the printer 10 Press down on the waste bo...

Page 134: ...transfer belt unit 12 Gently close the front cover Do not slam the front cover to avoid causing damage to the printer 13 Make sure that the front cover is completely closed You will hear the sound of...

Page 135: ...it lock release lever and pull out the fusing unit ATTENTION The fusing unit is hot Be careful not to touch the area surrounding the WARNING HIGH TEMPERATURE label Before changing the oiling roller wa...

Page 136: ...stallation screws 17 Holding onto the grip take out the oiling roller 18 Remove the new oiling roller from its carton Install the new oiling roller by inserting the tabs on its front end under the edg...

Page 137: ...press down on the green tab while tightening the screws of the oiling roller Tighten the screws so that the spring action of the cover is completely closed 20 Holding the lock release lever insert the...

Page 138: ...Make sure that the button of the fusing unit lock release lever is pushed up as shown 22 Close the rear cover until it clicks locking into place 23 Make sure that the rear cover lock release lever is...

Page 139: ...etc Change the fusing unit and image transfer roller unit at the same time Dispose of the old fusing unit and image transfer roller unit in plastic bags according to your local regulations or return t...

Page 140: ...the new image transfer roller unit from its carton 5 Insert both bearings of the image transfer roller unit into the shafts as shown 6 Install the image transfer roller unit Do not touch the surface o...

Page 141: ...tly inserted into the printer Note 8 Gently close the front cover Do not slam the front cover to avoid causing damage to the printer 9 Make sure that the front cover is completely closed You will hear...

Page 142: ...g unit lock release lever and slide out the fusing unit ATTENTION The fusing unit is hot Be careful not to touch the area surrounding the WARNING HIGH TEMPERATURE label Before changing the fusing unit...

Page 143: ...the fusing unit 13 Slide out the fusing unit in the direction shown Remove the fusing unit from its mount 14 Remove the new fusing unit from its carton 15 Insert the guide of the fusing unit mount int...

Page 144: ...allation screws 18 Turn the misfeed clearing dial of the fusing unit coun terclockwise and make sure that the white gear shown rotates smoothly 19 Holding the lock release lever insert the fusing unit...

Page 145: ...Maintaining Your Printer Chapter 4 21 Close the rear cover The rear cover will click when it is closed completely 22 Make sure that the button of the rear cover lock release lever is pushed up as sho...

Page 146: ...Changing Cartridges 4 30 Maintaining Your Printer Chapter 4 MEMO...

Page 147: ...nsfer belt unit operates four times four images per color print When 150 000 images are calculated in terms of color prints about 37 500 sheets can be printed This value will vary accord ing to the co...

Page 148: ...the printer Do not touch the drum cartridge s protective shutter Also never touch the internal PC drum to do so will reduce print quality If the drum cartridge will not be immediately installed in th...

Page 149: ...ton Caution Note When removing the image transfer belt unit from the box NEVER DROP or SUBJECT THE UNIT TO SHOCKS When installing the image transfer belt unit be sure to hold onto the grips NEVER hand...

Page 150: ...t to the position shown to unlock the bracket 2 Pull out the belt fixing bracket Unlock and pull out the belt fixing bracket from the right side of the image transfer belt unit following the same proc...

Page 151: ...r Chapter 4 8 Check that the connector from the image transfer belt unit is securely connected to the printer s connector 9 Make sure that the shutter of the image transfer belt unit is closed OK NG S...

Page 152: ...ansfer belt unit on the left side of the printer Install the waste bottle behind the image transfer belt drawn in the diagram with dash marks inside of the printer 11 Press down on the waste bottle un...

Page 153: ...um cartridge when installing it into the printer Note 14 Align the drum cartridge s pins with the slots inside the printer for easy installation DO NOT HANDLE the drum protective shutter during instal...

Page 154: ...the front cover Do not slam the front cover to avoid causing damage to the printer 17 Make sure that the front cover is completely closed You will hear the sound of the printer operating DO NOT PRESS...

Page 155: ...aning the Outside 1 Using a soft cloth and a mild dishwashing detergent wipe the outside of the printer Before cleaning be sure to turn OFF the power switch and unplug the power cord from the outlet U...

Page 156: ...the front cover lock release lever to swing open the front cover Note 2 Lift the misfeed clearing lever Whenever the printer is open drape the front cover with a cloth so that the drum cartridge is n...

Page 157: ...3 Using a soft cloth wipe dirt and paper debris off the roller as shown Note 4 Return the misfeed clearing lever to the down position Do not touch the surface of the image transfer roller as it may ca...

Page 158: ...d into the printer Note 6 Gently close the front cover Do not slam the front cover to avoid causing damage to the printer 7 Make sure that the front cover is completely closed You will hear the sound...

Page 159: ...Chapter 5 Troubleshooting Troubleshooting Chapter 5...

Page 160: ...on should be taken for different trouble symptoms First find out which one of the following categories your printer s symptom fits into then go to the corresponding action pages Troubleshooting prior...

Page 161: ...Troubleshooting Chapter 5 Improving Print Quality Typical symptoms include Poor print quality Print results are not consistent with settings The printer requires excessive time in order to complete th...

Page 162: ...r lights is blank and the printer makes no sound but the printer can be turned ON The voltage of the printer does not match the power outlet volt age Check the power out let for correct voltage Sympto...

Page 163: ...low the instructions provided For the types of paper that can be used see Paper p 2 19 Reload the transpar encies paper p 2 31 To clear a paper misfeed see Clear ing a Paper Mis feed p 5 21 Reinstall...

Page 164: ...he LED chart p 5 6 On or blinking Error LED See the explanation for Error on the LED chart p 5 12 The LED display will change as you push the Action key The appearance of this icon throughout this man...

Page 165: ...Chapter 5 When the Ready LED is on 1 6 LED Display Description Response Required Initializing Power on initializ ing Wait a few moments Warming Up Printer is warming up Wait a few moments for the pri...

Page 166: ...Printing is possible The printer will go into the Ready mode as soon as it receives the next print job Send a print job It takes some time before the printer can print while in the power conserva tion...

Page 167: ...pter 5 When the Ready LED is on 3 6 LED Display Description Response Required Tray 1 Paper Empty Tray 1 is out of paper Add paper pp 2 23 2 32 2 40 Tray 2 Paper Empty Tray 2 is out of paper Add paper...

Page 168: ...is on 4 6 LED Display Description Response Required No Tray 2 Tray 2 is not in place Load Tray 2 No Tray 3 Tray 3 is not in place Load Tray 3 Wait Action Press the Action key in the event of a paper s...

Page 169: ...er 5 When the Ready LED is on 5 6 LED Display Description Response Required Black Toner Low The supply of toner inside of the toner cartridge is low but printing is still pos sible Ready a new toner c...

Page 170: ...s on 6 6 LED Display Description Response Required Drum Cartridge Almost Used It is almost time to replace the drum cartridge Ready a drum car tridge replacement Since the drum car tridge is on the sa...

Page 171: ...Response Required Paper Misfeed 1 A paper misfeed occurred near the paper intake area Remove the misfed sheet of paper For details see Clear ing a Paper Misfeed p 5 21 Paper Misfeed 2 A paper misfeed...

Page 172: ...n Cancel the print job through the printer driver and resend it Warning Cover Open The front or rear cover is open Close the front or rear cover pp 2 1 2 3 Paper Size Error The wrong size of paper has...

Page 173: ...rint at a time by pressing the Action key How ever the image den sity will gradually become lighter It is recommended that you change the toner cartridge as soon as possible p 4 1 Replace Yellow Toner...

Page 174: ...Bottle The waste bottle is full The drum cartridge waste bottle and oil ing roller are on the same replacement cycle Replace all three units together p 4 11 The waste bottle has not been installed In...

Page 175: ...5 When the Error LED is on 5 9 LED Display Description Response Required Fatal Error Transfer Roller Requires servicing Turn the power to the printer off and then on again If the same LED message cont...

Page 176: ...D Display Description Response Required I O Error Network A network port error occurred Switch power off and on The printer will return ready Run the print cycle again p 2 17 Turn the power to the pri...

Page 177: ...5 When the Error LED is on 7 9 LED Display Description Response Required Fatal Error Laser Unit Requires servising Turn the power to the printer off and then on again If the same LED message continues...

Page 178: ...5 When the Error LED is on 8 9 LED Display Description Response Required Fatal Error Toner Rack Requires servising Turn the power to the printer off and then on again If the same LED message continue...

Page 179: ...oubleshooting Chapter 5 When the Error LED is on 9 9 LED Display Description Response Required Fatal Error Toner Motor Requires servising Turn the power to the printer off and then on again If the sam...

Page 180: ...r remove the paper according to the following procedure 1 Pull the paper from the paper exit port out toward you 2 Swing open the rear cover 3 Pull down the paper from the paper exit port ATTENTION Th...

Page 181: ...5 While turning the misfeed clearing dial of the fusing unit counterclockwise pull out the paper from the fusing unit ATTENTION The fusing unit is hot Be careful not to touch the area surrounding the...

Page 182: ...7 Lift the misfeed clearing guide of the fusing unit and pull out the paper 8 Hold the lock release lever button and push in the fusing unit until it locks back into position 9 Make sure that the but...

Page 183: ...n of the lock release lever is pushed up as shown 12 Grasp and pull down the front cover lock release lever and swing open the front cover Note Whenever the printer is open drape the front cover with...

Page 184: ...Lift the misfeed clearing lever 14 Pull out the paper from the rear rollers Note 15 Push down on the misfeed clearing lever Do not touch the surface of the image transfer roller It may lead to reduced...

Page 185: ...Paper Misfeed 5 26 Troubleshooting Chapter 5 16 Lift the misfeed clearing guide 17 Pull out the paper from the rollers toward the top 18 Close the misfeed clearing guide Misfeed clearing guide To Be...

Page 186: ...o the printer Note 20 Gently close the front cover Do not slam the front cover to avoid causing damage to the printer 21 Make sure that the front cover is completely closed You will hear the sound of...

Page 187: ...er Misfeed 5 28 Troubleshooting Chapter 5 22 Pull out the paper misfed in Tray 1 23 Slide out the second cassette 24 Pull out the paper from the paper path toward you 25 Replace the second cassette To...

Page 188: ...Clearing a Paper Misfeed 5 29 Troubleshooting Chapter 5 26 Slide out the third cassette option 27 Pull out the paper from the paper path toward you 28 Replace the third cassette...

Page 189: ...aded in the tray is damp Replace the old paper with fresh dry paper p 2 23 The toner cartridge is running out of toner Remove the toner cartridge and shake it to better dis tribute the toner p 4 1 Rep...

Page 190: ...efective The image transfer belt unit may be defective The image transfer roller unit requires replacement Change the image transfer roller unit p 4 23 The toner smudges The toner cartridge may be def...

Page 191: ...rtridge p 4 1 See Drum Cartridge p 4 11 See Image Transfer Belt Unit p 4 31 The drum cartridge may be defective The image transfer belt unit may be defective The image transfer roller unit requires re...

Page 192: ...th is dirty Run several prints to flush out the debris The toner cartridge may be defective Change the cartridges and or the transfer belt unit See Toner Cartridge p 4 1 See Drum Cartridge p 4 11 See...

Page 193: ...artridge may be defective Change the cartridges and or the transfer belt unit See Drum Cartridge p 4 11 See Image Transfer Roller Unit p 4 23 See Image Transfer Belt Unit p 4 31 The image transfer rol...

Page 194: ...t Change the fusing unit p 4 23 Incorrect image registration lines are bro ken or characters are out of posi tion The print parameters and paper settings of the application soft ware are different fro...

Page 195: ...Chapter 6 Specifications Specifications Chapter 6...

Page 196: ...i 2 400 dpi 600 dpi dpi dot inch Paper feeding system 2 way system TRAY 1 multipurpose tray TRAY 2 250 sheet second cassette Paper size Standard size A4 A5 JIS B5 Letter 8 1 2 11 Legal 8 1 2 14 Execut...

Page 197: ...r capacity 5 Does not support legal size thick paper 6 Optional 250 sheet third cassette unit Paper feeding port Plain paper Special paper Recycled paper Transpar ency sheet Labels Letter head Envelop...

Page 198: ...ess None paper size print type A4 Letter Legal Monochrome plain paper 12 0 s m or more 6 0 s m or more Monochrome thick paper 1 3 s m or more None Full color plain paper 3 0 s m or more None Full colo...

Page 199: ...20 MHz Memory ROM 64 KB DRAM 16 512 MB SRAM 64 KB for mode settings and counters PM 2mj buffer Interpreters GDI Interface Parallel type C connector IEEE 1284 for Windows 95 Windows 98 and Windows NT...

Page 200: ...ow Magenta Cyan after 3 500 sheets when the color to white ratio is 20 on multi prints Waste bottle Monochrome prints to 20 000 sheets when the black to white ratio is 5 on multi prints Full color pri...

Page 201: ...r hour Humidity 15 to 85 RH with a fluctuation of 20 per hour The environmental zone marked by X on the left represents a critical environment in which the printer can be left to stand However the man...

Page 202: ...system 1 way system Paper types Plain paper recycled paper 60 90 g m2 16 to 24 lbs transparency sheet Paper size A4 letter 8 1 2 11 legal 8 1 2 14 All paper sizes are lengthwise only Paper capacity P...

Page 203: ...Glossary Appendix A Appendix A Glossary...

Page 204: ...verall image CMY Cyan magenta and yellow These color toners are used to create the subtractive system array of printed colors Default A setting automatically used when you or your application software...

Page 205: ...twork interface card A part that is installed in the computer in order for the computer to be connected to a network environment Orientation The direction of print on a page Printing such that the sho...

Page 206: ...ll data stored in RAM is lost when the printer is turned off Resolution Refers to printing clarity Resolution depends on the number of dots per inch High resolution more dots is finer and more precise...

Page 207: ...Quick Reference Appendix B Appendix B Quick Reference...

Page 208: ...ter Use the LED display in combination with the Troubleshooting chapter of this manual to maintain the high level of performance that your printer was engineered to provide Indicator lights Action key...

Page 209: ...ady LED is on 1 2 Initializing p 5 6 Warming Up p 5 6 Ready p 5 6 Power Save p 5 7 Tray 2 Paper Low p 5 7 Tray 3 Paper Low p 5 7 Tray 1 Paper Empty pp 2 23 2 32 2 40 5 8 Tray 2 Paper Empty pp 2 26 2 3...

Page 210: ...endix B When the Ready LED is on 2 2 No Tray 2 p 5 9 No Tray 3 p 5 9 Wait Action p 5 9 Black Toner Low pp 4 1 5 10 Yellow Toner Low pp 4 1 5 10 Magenta Toner Low pp 4 1 5 10 Cyan Toner Low pp 4 1 5 10...

Page 211: ...endix B When the Error LED is on 1 2 Paper Misfeed 1 pp 5 12 5 21 Paper Misfeed 2 pp 5 12 5 21 Paper Misfeed 3 pp 5 12 5 21 Video Under Run p 5 13 Warning Cover Open pp 2 1 2 3 5 13 Paper Size Error p...

Page 212: ...llow Toner Car tridge pp 4 1 5 14 Replace Magenta Toner Put Magenta Toner Car tridge pp 4 1 5 14 Replace Cyan Toner Put Cyan Toner Car tridge pp 4 1 5 14 Need Oiling Roller pp 4 11 4 23 5 15 Replace W...

Page 213: ...Appendix B When the Error LED is on Fatal Error 1 1 Transfer Roller p 5 16 SRAM Drum ROM Engine I F CPU p 5 16 Laser Unit p 5 18 Fan Motor p 5 18 Main Motor p 5 18 Toner Rack p 5 19 Fuser p 5 19 Tran...

Page 214: ...Index Appendix C Appendix C Index...

Page 215: ...dows NT 4 0 3 41 Displaying Printer Information 3 47 Displaying the Printer Driver Window Windows 95 Windows 98 3 3 Displaying the Printer Driver Window Windows NT 4 0 3 25 Driver Settings Windows 95...

Page 216: ...6 4 1 Safety information ii Specifications of printer 6 1 Specifications of 250 sheet third cassette unit 6 8 Switching Between the Expanded and Reduced Views 3 46 Toner cartridge 2 5 4 1 The LED Dis...

Page 217: ...General Information...

Page 218: ...ary business or personal purposes 3 make a copy of the Software for backup or installation purposes only in support of the normal and intended use of the Software 4 transfer possession of copies of th...

Page 219: ...LAW This Agreement shall be governed by the laws of the country where the delivery is made to the original customer 9 GOVERNMENT END USERS If you are acquiring the Software on behalf of any unit or ag...

Page 220: ...t non transf rable ce qui vous autorise 1 Installer et utiliser le logiciel sur un ordinateur reli une imprimante unique 2 Utiliser le logiciel pour vos propres besoins professionnels et personnels 3...

Page 221: ...et toutes ses copies comme pr vue dans le contrat Minolta peut mettre fin votre licence en cas de non respect du contrat Dans ce cas vous acceptez de d truire toutes vos copies du logiciel 8 La loi C...

Page 222: ...ware befindenden Vermerke ber Urheberrecht und Warenzeichen entsprechend anzubringen 3 das Eigentum an Kopien der Software an Dritte zu bertragen durch berlassung dieser Vertragsausfertigung und des s...

Page 223: ...genannten Zwecken zu vermieten zu verleasen zu bertragen oder eine Unterlizenz hiervon zu erteilen ist nichtig Der Lizenznehmer erkennt hiermit an da er f r die sich aus diesem Vertrag etwa ergebenden...

Page 224: ...sente contratto in base alla quale il licenziatario 1 avr facolt d installare ed usare il Software su un solo computer e su una stampante associata 2 avr facolt di usare il Software solo per la sua at...

Page 225: ...oppure come altrimenti descritto in questi termini Minolta pu porre termine alla vostra licenza in caso mancaste di rispettare questi termini Resta inteso che all atto di tale termine voi distruggere...

Page 226: ...olta spol s r o Vever 102 659 10 Brno 05 41 558 511 Fax 05 41 212 681 Denmark Minolta Danmark a s Valh js All 160 2610 R dovre 36 37 04 50 eller 36 37 04 52 e mail printer minolta dk Finland Renatus O...

Page 227: ...586 2555 Fax 07 586 2313 Slovenia Minolta Slovenia d o o Ptujska 19 1000 Ljubljana 061 168 11 05 Fax 061 168 10 28 Spain Minolta Business Equipment Spain S A Paseo de la Castellana 254 28046 Madrid 91...

Page 228: ...General Information 11 Zagreb Minolta Zagreb d o o Supilova 7 41000 Zagreb 01 611 6655 Fax 01 611 6656...

Page 229: ...General Information 12...

Page 230: ...d by the purchaser to MINOLTA within the Unit Guarantee Period 2 2 SOFTWARE Subject to Clause 2 3 this Guarantee covers all faults with the Software which are noti fied by the purchaser to MINOLTA wit...

Page 231: ...faulty Software MINOLTA reserves the right to verify the validity of the receipt 6 REIMBURSEMENT OF COSTS If Units or Software presented to MINOLTA for repair or replacement show either no fault sympt...

Page 232: ...driver updates and answers to various questions Minolta s hotline see pages 10 and 11 in chapter Gener al Information supports you with the solution to many problems Your technical representative wil...

Reviews: