


7.6 Setting Up the Fax Registration
7
Di1610f
7-33
Us
in
g th
e Uti
lit
y
Mod
e
Chap
ter
7
Setting Up One-Touch Dialing (“ONE-TOUCH DIAL” function)
If the one-touch dial keys are programmed with fax numbers, the recipient can be
specified easily and accurately without the need to manually enter the number
using the 10-Key Pad.
A maximum of 15 numbers can be programmed.
To program a one-touch dial key
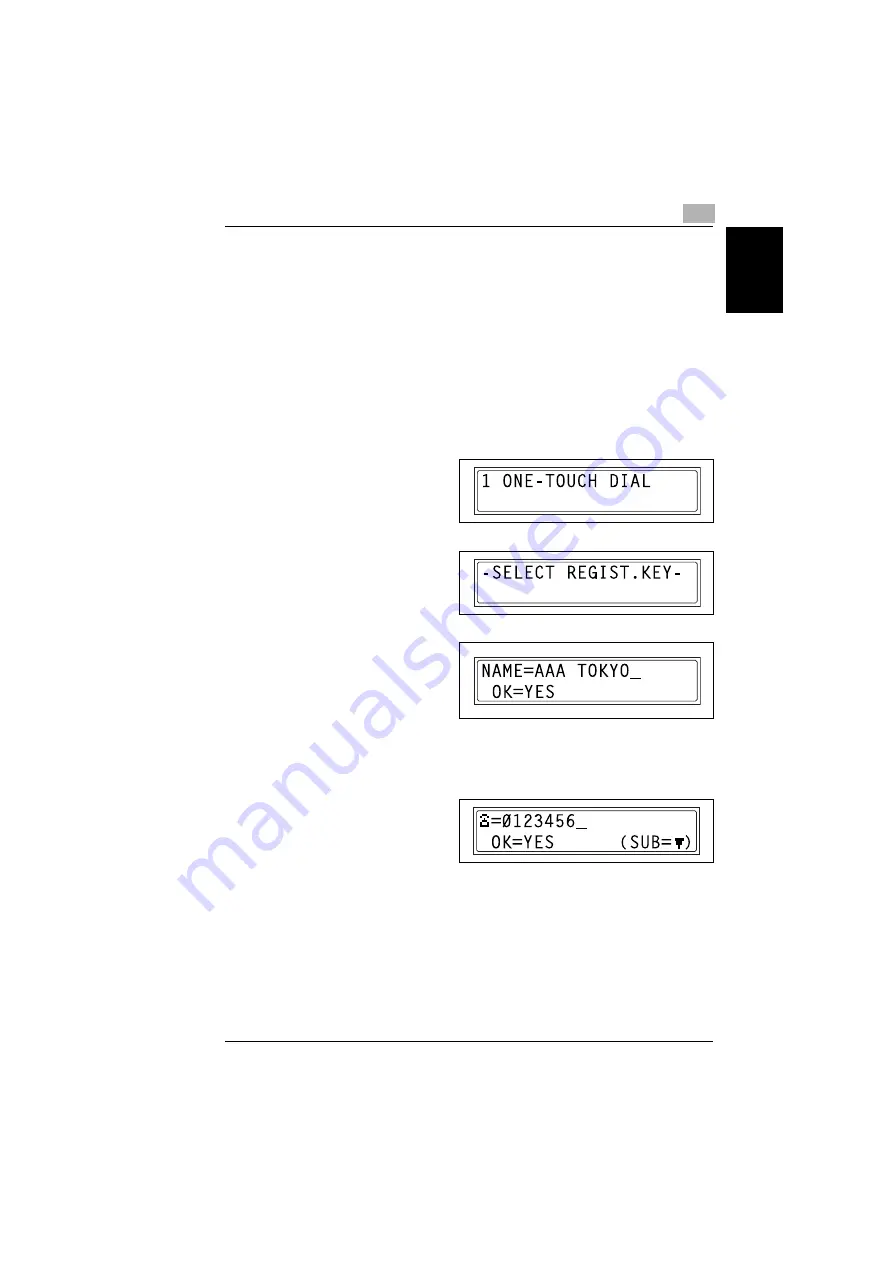
1
Select the “FAX REGISTRATION”.
❍
Refer to
“Selecting the “FAX REGISTRATION” menu” on page 7-32
2
Press the [1] key from the 10-Key
Pad to select “ONE-TOUCH
DIAL”.
3
Press the one-touch dial key that
you wish to program.
4
Enter the name of the
programmed number.
❍
For details on entering text,
refer to
❍
Text up to 20 characters long can be entered for the name.
5
Press the [Yes] key.
6
Using the 10-Key Pad, enter the
fax number of the recipient.
❍
The fax number can contain a
maximum of 30 digits.
For details on the characters that can be entered. Refer to
entering the fax number directly using the 10-Key Pad” on page 5-2
.
❍
To enter a SUB, continue with step 7.
❍
If a SUB will not be entered, press the [Yes] key after entering the fax
number, and then skip to step 4.
❍
If you wish to change the fax number, press the [No] key, and then enter the
correct number.
❍
For details on F codes (SUB and SID), refer to
Summary of Contents for DI1610F
Page 1: ...Di1610f User Manual 1 0 2 3 4 5 6 7 8 9 ...
Page 10: ...Introduction Chapter 1 1 1Introduction ...
Page 27: ...1 1 6 Explanation of Basic Concepts and Symbols 1 18 Di1610f Introduction Chapter 1 ...
Page 28: ...Precaution Chapter 2 2 2Precaution ...
Page 34: ...Before Making Copies Chapter 3 3 3Before Making Copies ...
Page 76: ...Making Copies Chapter 4 4 4Making Copies ...
Page 92: ...Faxing Chapter 5 5 5Faxing ...
Page 106: ...Fax Transmission Reception Methods Chapter 6 6 6Fax Transmis sion Reception Methods ...
Page 132: ...Using the Utility Mode Chapter 7 7 7Using the Utility Mode ...
Page 210: ...When a Message Appears Chapter 8 8 8When a Message Appears ...
Page 241: ...8 8 11 When Faxing Is Not Performed Correctly 8 32 Di1610f When a Message Appears Chapter 8 ...
Page 242: ...Miscellaneous Chapter 9 9 9Miscellaneous ...
Page 253: ...9 9 5 Paper Size and Zoom Ratio Tables 9 12 Di1610f Miscellaneous Chapter 9 ...
Page 254: ...Index Chapter 10 10 10Index ...


