background image

General 

7


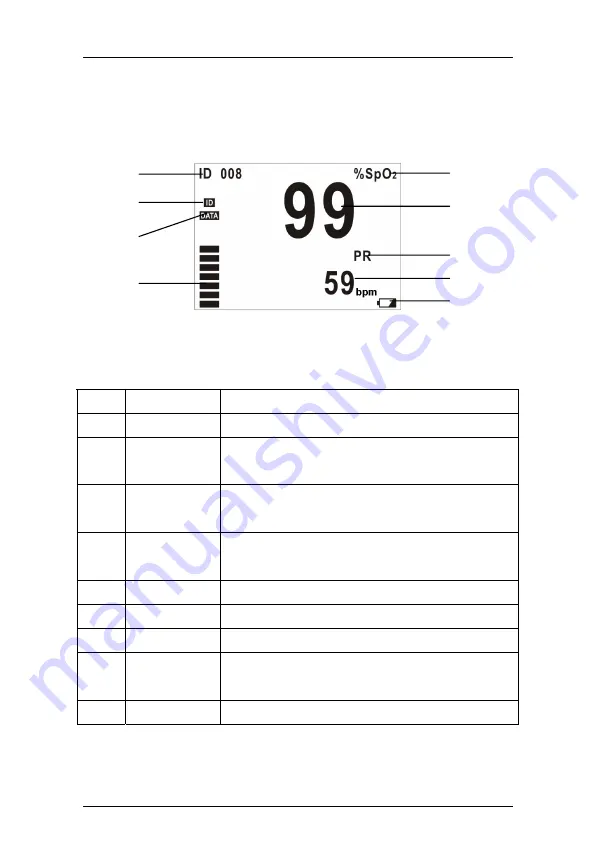
2.4 Displayed Information 

Figure 2-3 shows information displayed on the LCD screen. 


Figure 2-3 Displayed Information 


Table 2-2 Description of displayed information 

No. 

Description 

Remarks 


ID number 

It displays current ID number ranging from 000 to 100


ID Full   

It appears when ID

95 and blinks when stored ID is 

being covered by new ID. 


Memory Full  

It appears when previous data is to be covered by 

new data. Please refer to 

5.1.1 Data Storage


Pulse Strength

It can display 7 segments at most to indicate real time 

pulse strength.   


%SpO

2


It displays “%SpO

2

”. 


SpO

2

 value 

It displays SpO

2

 value and is refreshed every second. 


PR 

It displays “PR”. 


PR value   

It displays PR value and is refreshed every second. 

Unit: bpm (beats per minute) 


Low battery 

It appears only when the battery energy is low.   

Please refer to 

Chapter 3 Installation

 for displayed information of 

startup and standby modes. 


Summary of Contents for PM-50

Page 1: ...Pulse Oximeter Operation Manual ...

Page 2: ......

Page 3: ...aution A Caution indicates that failure to follow proper instructions may cause serious injury to the patient the operator or may cause damage to the equipment Note A Note is an indication of supplemental information to the operation or handling of the equipment or associated accessories This symbol indicates type BF applied part according to IEC 60601 1 This symbol indicates the dual purpose sock...

Page 4: ...Illustrations All illustrations in this manual are provided as examples only They may not necessarily reflect your setup or data displayed on your Pulse Oximeter ...

Page 5: ... 4 Delete ID Button 9 Chapter 3 Installation 11 3 1 Unpacking and Inspection 11 3 2 Install Batteries 11 3 3 Power on 13 3 4 Connect SpO2 Sensor 13 3 5 Connect Computer 14 Chapter 4 Measurement 15 4 1 Measuring Principle 15 4 2 Precautions 16 4 3 Measuring Steps 18 4 3 1 Adult Measurement 18 4 3 2 Neonatal Measurement 19 4 3 3 Placing Neonatal SpO2 Sensor 19 4 4 Measuring Restrictions 21 Chapter 5...

Page 6: ...fection 32 6 4 Disposal 32 Chapter 7 Pulse Oximeter Management System 33 7 1 Installation and Uninstall 33 7 1 1 Installation 33 7 1 2 Uninstall 34 7 2 Main Interface 35 7 2 1 Menu Bar 35 7 2 2 Tool Bar 38 7 2 3 Data Area 38 7 3 Functions 39 7 3 1 Data Output 39 7 3 2 Software Upgrade 41 7 3 3 File Management 44 7 3 4 Modify Patient Information 45 7 3 5 Print Data 46 7 3 6 Prompt Message 47 Chapte...

Page 7: ...r home use Federal Law USA restricts this device to sale by or on the order of a physician The Pulse Oximeter complies with Class A requirements of the EN55011 standard Warning This device is not intended as a device used for treatment purposes It is important for the hospital or organization that uses this equipment to carry out a reasonable maintenance schedule Failure to do so may result in equ...

Page 8: ...r together with the electrical surgery equipment the user should pay attention to and guarantee safety of the patient being measured To avoid fire or explosion hazards do not use the Pulse Oximeter at places where such flammable material as anesthesia gas is present Do not pull or lift the Pulse Oximeter by its connection cable That may lead to device falling and consequent patient injuries It is ...

Page 9: ...eep it from falling strong vibration or other mechanical damage The Pulse Oximeter is a commonly sealed device The user should keep its surface dry and clean and prevent any liquid from infiltrating it Don t use mobile phones around when the Pulse Oximeter is in operation The Pulse Oximeter should only be maintained by personnel approved by our company Before use the Pulse Oximeter on patients the...

Page 10: ...Safety Information 4 FOR YOUR NOTES ...

Page 11: ...er button Backlight button and Confirm ID button The Pulse Oximeter is also capable of managing measured data and transmitting the patient s trend through the dual purpose socket to a PC for printing 2 2 Functions The Pulse Oximeter has the following functions Measuring SpO2 PR and pulse strength Prompting Memory full ID full low battery standby and technical error etc Power managing automatic sta...

Page 12: ...connects SpO2 sensor or PC communication cable LCD It displays information listed in Table 2 2 Power It turns on or off the device Confirm ID It confirms the patient ID for current measurement Delete ID A key combination of and Backlight It turns on or off the backlight Caution Refer to this manual Battery door Open it to install or remove batteries ...

Page 13: ...w ID Memory Full It appears when previous data is to be covered by new data Please refer to 5 1 1 Data Storage Pulse Strength It can display 7 segments at most to indicate real time pulse strength SpO2 It displays SpO2 SpO2 value It displays SpO2 value and is refreshed every second PR It displays PR PR value It displays PR value and is refreshed every second Unit bpm beats per minute Low battery I...

Page 14: ...he descriptions in 3 2 Install Batteries In case the SpO2 cable becomes disconnected or the finger moves away from the sensor the Pulse Oximeter will automatically enter the standby mode Under this mode when a finger is inserted into the sensor the Pulse Oximeter will automatically resume the operation mode Otherwise if no finger is inserted in 5 minutes the Pulse Oximeter will be automatically sh...

Page 15: ...mber to a re test for the same patient after the sensor is accidentally disconnected Refer to section 5 1 Data Management for detailed use of this button 2 5 4 Delete ID Button The Delete ID button is a key combination of the Backlight button and the Confirm ID button Refer to section 5 1 Data Management for detail use of this button ...

Page 16: ...General 10 FOR YOUR NOTES ...

Page 17: ... for future transportation or storage use Warning The user should keep the packing materials at places out of children s reach Before disposing the packing materials check with your local waste officials for details in your area for recycling options or proper disposal 3 2 Install Batteries The Pulse Oximeter is powered by four batteries Follow the steps below to install batteries before use 1 Hol...

Page 18: ...per disposal Caution Please use AA alkaline batteries or rechargeable batteries Do not use carbon or poor quality batteries Remove the batteries if the device is not to be used for a long time During use replace batteries of insufficient energy in time with good ones abnormal power supply may lead to product damages or even personnel injuries Figure 3 1 Install battery 1 Figure 3 2 Install battery...

Page 19: ... as shown in Figure 3 3 After that the Pulse Oximeter will automatically switch to the standby mode as shown in Figure 3 4 Figure 3 3 Startup interface 3 Figure 3 4 Standby interface 3 4 Connect SpO2 Sensor As the Figure 3 5 shows you can connect the SpO2 sensor to the Pulse Oximeter by simply inserting the sensor s connector to the dual purpose socket Figure 3 5 Connect SpO2 sensor ...

Page 20: ...cation cable to transmit patient s trend to the computer for printing Simply connecting one end of the PC communication cable to the dual purpose socket and the other end to the PC s serial port This symbol will be display in the LCD screen indicating that the Pulse Oximeter has connected with the PC successfully ...

Page 21: ...r on the other side The amount of light transmitted is determined by multiple factors most of which are fixed The blood flow in arteries is one of the factors that change with time because it is pulsating Usually the wavelength of the light transmitted by a red light LED can be detected by the sensor is 660nm and by an infrared LED is 940nm Maximum power output of the LED is 4mW The Pulse Oximeter...

Page 22: ... use Do not use damaged parts Don t use the Pulse Oximeter to measure patients whose pulse rate is lower than 25bpm which may cause incorrect results Remove the SpO2 sensor from the patient after measurement As with any medical equipment carefully route patient cabling to reduce the possibility of patient entanglement or strangulation Cables of electrical surgical equipment should not be winded ar...

Page 23: ...ion or skin sensitive to light Check the sensor location every 2 3 hours and move to another location if the skin deteriorates Make sure no contamination or scar exists in the site where the sensor is placed Otherwise the measured result may be incorrect because the signal received by the sensor is affected When used on different patients the Pulse Oximeter is prone to crossed contamination which ...

Page 24: ...the sensor s connector to the dual purpose socket 2 Turn on the Pulse Oximeter to enter the standby mode 3 Attach the sensor to an appropriate site on the patient Figure 4 1 How to place the adult SpO2 sensor 4 The readings will be displayed on the LCD screen a moment later Note During measurement make sure that the light window is over the fingernail and the cable should be on the backside of the...

Page 25: ...sor refer to 4 3 3 Placing Neonatal SpO2 Sensor 4 The readings will be displayed on the LCD screen a moment later 4 3 3 Placing Neonatal SpO2 Sensor Neonate SpO2 sensor consists of a Y shape SpO2 sensor and its sheath Insert t he LED and PD ends of the Y shape SpO2 sensor respectively into the upper and lower grooves on the sheath Figure 4 2 The figure 4 3 shows us the neonate SpO2 sensor after in...

Page 26: ...he V groove of the other side of the sheath Then loosen the belt After the V edges of the two sides of the belt fit well into the V grooves on the two sides of the sheath put the belt into the first lock bar to fasten the belt See figure 4 4 If the belt is too long you may put it into the second lock bar You must position the SpO2 sensor in this way so as to make the photoelectric component face t...

Page 27: ...correct sensor application or use Significant levels of dysfunctional hemoglobins e g carboxyhemoglobin or methemoglobin Intravascular dyes such as indocyanine green or methylene blue Exposure to excessive illumination such as surgical lamps especially ones with a xenon light source bilirubin lamps fluorescent lights infrared heating lamps or direct sunlight exposure to excessive illumination can ...

Page 28: ...sor is too tight There is excessive illumination from light sources such as a surgical lamp a bilirubin lamp or sunlight A blood pressure cuff is inflated on the same extremity as the one with a SpO2 sensor attached The patient has hypotension severe vasoconstriction severe anemia or hypothermia There is arterial occlusion proximal to the sensor The patient is in cardiac arrest or in shock ...

Page 29: ...m the earliest stored data ID001 data ID002 data ID003 data ID100 data One ID data include Number of the SpO2 and pulse rate values stored to this ID Maximum SPO2 value of this ID Minimum SPO2 value of this ID Average SPO2 value of this ID Maximum PR value of this ID Minimum PR value of this ID Average PR value of this ID Trend Data Zone is capable of storing 200 trend data TD as shown below at mo...

Page 30: ... data will not be deleted 5 1 2 Data Adding The previously stored ID number appears on the screen when a finger is inserted into the SpO2 sensor It will keep blinking for 8 seconds after the pulse is found Press the Confirm ID button before the ID number stops blinking the Pulse Oximeter will set the ID number as current patient ID The data measured thereafter will be superadded to the previous ID...

Page 31: ...ALL will be displayed as shown in figure 5 1 Figure 5 1 Delete data1 Figure 5 2 Delete data2 To delete all stored data Press the Delete ID button again As shown in figure 5 2 the message ALL DELETED will be displayed for 2 seconds Then the Pulse Oximeter will switch back to the previous standby mode the ID number restores to 000 symbols of memory full as well as ID Full disappears Not to delete al...

Page 32: ...lmost full Stored data is to be covered Export data in time Blinking Memory Full Memory is full Stored data is being covered Export data in time ID Full ID number Stored is greater than 95 ID data is to be covered Export data in time Blinking ID Full ID data is being covered Export data in time Standby The device is in standby mode None Communication The device is in communication mode None DELETE...

Page 33: ...f test Please shut down the device if can t remove the batteries and contact our Customer Service Table 5 2 Error indications Error Message Cause Solution Initiate Error Failed self test Shut down the device if can t remove the batteries and contact us for service Please Release the Button Button error Check for jammed button If problem remains contact us for service Pulse Not Found Searching Puls...

Page 34: ...ching to the standby mode automatically when the finger disconnects from the sensor or the sensor disconnects from the Pulse Oximeter shutting down automatically if no finger is inserted into the sensor within 5 minutes under the standby mode Note The Pulse Oximeter will automatically switch from the standby mode to the normal operation mode when a finger is inserted into the sensor Note Please re...

Page 35: ...dicine engineers of the hospital or our Customer Service immediately The overall check of the Pulse Oximeter including function and safety check should be performed by qualified personnel every 6 12 months depending on the policy of your institution and each time after maintenance Any check involving opening the back plate should be performed by qualified maintenance personnel only Function and sa...

Page 36: ... or cotton ball for cleaning Warning Before cleaning the Pulse Oximeter or its associated cables or sensors make sure the Pulse Oximeter is turned off and the batteries are taken out Optional detergents are Clean Water Soapy Water Medical Alcohol Diluted Ammonia Water Diluted Sodium Hypochlorite Bleaching agent Diluted Formaldehyde 35 to 37 Hydrogen Peroxide 3 Ethanol Isopropanol Note The diluted ...

Page 37: ...ton ball Do not expose the device to environment with strong sunlight or high temperature If the device is contaminated by chemical products please clean the polluted device with proper methods Contact the biomedicine engineers of the hospital or our Customer Service Absorb certain amount of medical alcohol with dry and soft cloth or cotton ball to clean the SpO2 sensor s surface LED and photodete...

Page 38: ...he cable connector into the above mentioned solutions Caution Dilute the solution per manufacture instructions or adopt concentration as low as possible Clear of the device s surface of residual solution immediately with wet cloth Do not use EtO or formaldehyde for this purpose Do not sterilize or disinfect the device under high pressure or high temperature 6 4 Disposal To avoid contaminating or i...

Page 39: ...ing functions can be realized Outputting data and upgrading internal software Previewing data exported Adding patient information Printing patient data 7 1 Installation and Uninstall 7 1 1 Installation Before you use PMS software you must first install it in your PC Take Windows 2000 for example you can follow the steps below for installation 1 Insert the installation CD into the CD ROM 2 Run the ...

Page 40: ...new shortcut icon will appear in the desktop of your computer as shown below 9 Double click the icon to run the PMS software 7 1 2 Uninstall To uninstall the PMS software please follow the steps 1 Click Start Setting Control Panel and double click the icon for Add Remove Programs to open the Add Remove Programs dialogue box 2 Select the Pulse Oximeter Management System and click the Change Remove ...

Page 41: ...S software on the desktop of your computer the Main Interface of PMS software will be displayed as shown below Figure 7 1 Main Interface Menu Bar Tool Bar Data Area 7 2 1 Menu Bar In the Menu Bar four menus are available File Setup Operation and Help See the descriptions below to know the details ...

Page 42: ... Print Preview Click to preview the data to be printed Print Setting Click to open the Print Setting dialog box Exit Click to exit the PMS software Figure 7 2 File Menu Setup Click the Setup menu to see its pull down menu as shown in Figure 7 3 There are two submenus Figure 7 3 Setting Menu Patient Information Click to open the Modify Patient Information dialogue box Serial Port Selection Click to...

Page 43: ...al port Operation Click the Operation menu to see its pull down menu as shown below There are two submenus Figure 7 4 Operation Menu Data Output Click to conduct the Data Output function Software Upgrade Click to open the Input Password dialogue box Help Click the Help menu to see its pull down menu as shown below Figure 7 5 Help Menu Help Click to open the Help document About PMS Click to show th...

Page 44: ...agement Equals to File Management submenu Print Equals to Print submenu Print Preview Equals to Print Preview submenu Serial Port Selection Equals to Serial Port Selection submenu Patient Information Equals to Patient Information submenu Data Output Equals to Data Output submenu Help Equals to Help submenu 7 2 3 Data Area The Data Area displays the data of the current ID The left part of Data Area...

Page 45: ...cord number is to indicate that the data thereafter are additional ones to this ID 7 3 Functions Before operate the function hereinafter please first connect the Pulse Oximeter with your PC Refer to 3 4 Connect Computer and then double click the shortcut icon on the desktop to run the PMS software 7 3 1 Data Output PMS software can output the data stored in the Pulse Oximeter into the hard disk of...

Page 46: ...irectory is the Files folder under the directory where the PMS software is installed The default file name is PMS srd where the represents the current system time For example 11091133 means November 9th 11 o clock and 33 minute The hour is 24 hour format 4 Click Save button to save the data Meanwhile information and data outputted will be displayed in the Data Area 5 If error occurs during outputt...

Page 47: ...PMS software you can upgrade the internal software of Pulse Oximeter 1 Click Software Upgrade under the Operation menu the Input Password dialogue box will pop up Figure 7 9 Input password 2 Input the correct password and then click the OK button The Software Upgrade dialog box will pop up as shown in Figure 7 10 Figure 7 10 Software Upgrade 3 Select the serial port and click Browse to display the...

Page 48: ...y and verify version of the Upgrade File If the Upgrade File is valid and the current version loaded on the Pulse Oximeter is lower than the Upgrade file the following message will be displayed Figure 7 12 Version Verify 7 Click Yes and the system will start to upgrade the software automatically Figure 7 13 If you click Cancel when the upgrading is in process the software in the Pulse Oximeter wil...

Page 49: ...t loaded on the Pulse Oximeter corresponding different message will be displayed in Figure 7 12 Click Yes to continue to upgrade and Cancel to cancel upgrading If the Upgrade File is invalid the following message will be displayed Figure 7 14 Upgrade File Error 8 Click OK to finish the upgrading Figure 7 15 Upgrade Succeed ...

Page 50: ...er where the outputted data is saved in the File List The Files contained in that folder will be displayed in the right 3 To open a file choose a file name and click Open button and then the data contained in the file will be displayed in the Data Area of the Main Interface 4 To delete a file choose a file name and click Delete button and then the selected file will be deleted The data of all pati...

Page 51: ...e The age of the patient Measure Start Time The displayed format of the time is dependent on the setting of the PC s system For example 2004 9 12 15 30 here the hour is 24 hour format Bed No Range from 1to 65535 Patient No 12 characters English Character or number at maximum Doctor Name of the doctor 30characters at maximum 3 Click OK the dialog box will disappear and the information inputted will...

Page 52: ...e of the patient ID Figure 7 18 Print Range 2 Click OK and set the properties according to the printer your personal computer installed in the pop up dialog box 3 Click OK to start printing the selected ID data 4 Before printing you can select Print Preview from the File menu to preview the content to be printed as shown in Figure 7 19 Figure 7 19 Print Preview ...

Page 53: ... inputted is incorrect Input the correct password or exit the upgrade operation Serial Port Error Other program is using the serial port selected Choose another serial port or close the program that using the selected serial port Age Input Error The age inputted is out of the range 1 to 255 Input the age again Bed No Input Error The No inputted is out of the range 1 to 65535 Input the Bed Number a...

Page 54: ...Pulse Oximeter Management System 48 FOR YOUR NOTES ...

Page 55: ... OXI P I paediatric infant sensor 9000 10 07308 OXI A N adult neonatal sensor and sensor wraps 9000 10 07336 Disposable SpO2 sensor for adults 0010 10 12333 Disposable SpO2 sensor for pediatrics 0010 10 12334 Disposable SpO2 sensor for infants 0010 10 12335 Disposable SpO2 sensor for neonates 0010 10 12336 Adult oxygen sensor 30Kg 0010 10 12202 Pediatric oxygen sensor 10 50Kg 0010 10 12203 Infant ...

Page 56: ...roof degree IPX0 Ordinary sealed equipment without liquid proof function Disinfection Sterilization Refer to Chapter 6 Maintenance Working mode Continuous Basic specifications Item Description To be used on Adult pediatric and neonatal patients Measured parameters SpO2 PR Pulse strength Signal interface Dual purpose interface for both SpO2 sensor and PC communication Display Matrix LCD Display are...

Page 57: ...own Printer The PC s printer Paper A4 Printing Content ID data and trend data Downloading Download new software revision through PC serial port Ambient environment Item Description Temperature range Operation Transportation and storage 0 C to 50 C 20 C to 60 C Relative humidity Operation Transportation and storage 15 to 95 no condensing 10 to 95 no condensing Barometric Operation Transportation an...

Page 58: ... or rechargeable batteries Shutdown leakage current 200uA Battery run time 15 hour continuous operation with alkaline batteries Power Consumption 720mW SpO2 PR specifications Item Item SpO2 range 0 to 100 SpO2 resolution 1 SpO2accuracy 70 to 100 2 Adult Pediatric 70 to 100 3 Neonate 0 to 69 No specified PR range 25 to 254bpm PR resolution 1bpm PR accuracy 2bpm ...

Page 59: ......

Page 60: ...P N 0850 20 30761 ...

Reviews: