3-14
Change the cutting (plotting) order
You can reorder or sort the cut data that has been sent from the host computer to change the order for cutting
(SORTING function).
Suppose that there is data that you want to cut just like drawing a picture with a single stroke, according the
order in which data is sent from application software. But in case you cannot do it in one continuous pen stroke,
you can change the cutting order to make it.
You cannot perform such one-stroke cutting in the following cases
Some applications software send data to the plotter in the order that the data has been created and edited.
• For example, in case you have modified the data read in via scanner, you cannot cut it in one stroke as the
modified part is cut later.
When you want to cut after SORTING
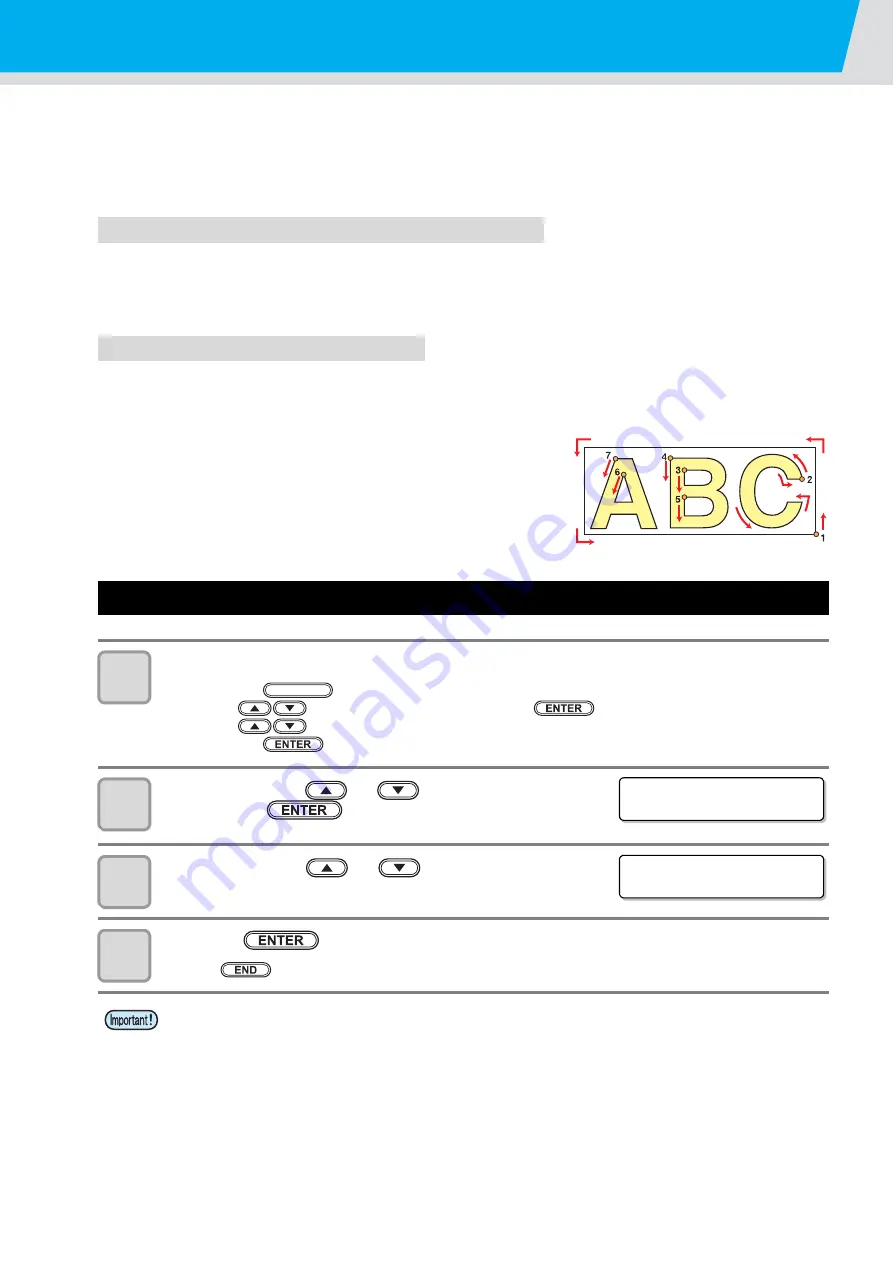
With the sorting function, the plotter handles a piece of data corresponding to each cutting operation that starts
with pen down and ends with pen up as one block. After the completion of cutting one block, the plotter will
perform cutting of another block whose starting point is closest to the finished block.
For data transmitted from the host computer, the starting position
and cutting direction will not be changed.
●
: Starting point of data = Starting point of cutting
Arrow
: Direction of data = Cutting direction
Number : Block cutting order
Set SORTING
1
Select [PLOT SETTING] of the set up menu.
(1)
Press the
key in LOCAL.
(2)
Press
to select [SET UP] and press the
key.
(3)
Press
to select [PLOT SETTING].
(4)
Press the
key.
2
Press the jog key
or
to select [SORTING],
and ress the
key.
3
Press the jog key
or
to select Setting.
• Setting values : ON, OFF
4
Press the
key.
• Press
if you do not want to save the setting.
• Changing the setting value will clear the data in the receiver buffer.
• Setting the sorting function to ON will decrease the size of the receiver buffer to about 17MB.
FUNCTION
< P LOT SE T T I NG>
SORT I NG
: OF F
< P LOT SE T T I NG>
SORT I NG
: ON
Summary of Contents for CFL-605RT
Page 7: ...vi ...
Page 14: ...xiii ...
Page 48: ...2 8 1 Put the workpiece on the cutting panel 2 Press ...
Page 68: ...2 28 ...
Page 138: ...4 22 ...
Page 168: ...6 24 ...
Page 169: ...D202786 14 30062016 ...


