


Cleaning and care
71
Take the universal tray with the
collected descaling agent out of the
oven and empty it. Place the tray
back in the oven again on the top
shelf level.
Remove the plastic tube from the
container.
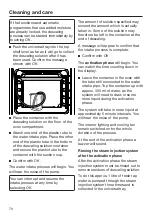
Remove the container, rinse it out
thoroughly and fill it with approx.
1 litre of fresh tap water.
Replace the container in the oven
compartment and secure the plastic
tube in the container.
Confirm with
OK
.
The intake process for the
first rinse
will start.
The water is fed through the steam
injection system and is collected in the
universal tray.
Instructions for preparing the
second
rinse
will appear.
Take the universal tray with the
collected rinse water out of the oven
and empty it. Place the tray back in
the oven again on the top shelf level.
Remove the plastic tube from the
container and fill it with approx. 1 litre
of fresh tap water.
Replace the container in the oven
compartment and secure the plastic
tube in the container.
Confirm with
OK
.
Proceed in exactly the same way for
the
third rinse
.
Leave the universal tray with the
collected rinse water from the third
rinse in the oven compartment during
residual moisture evaporation.
Evaporating residual moisture
After the third rinse residual moisture
evaporation will commence.
Remove the container and tube from
the oven compartment.
Close the door.
Confirm with
OK
.
Danger of injury caused by steam.
Steam can cause severe scalding.
Do not open the door while the
residual water is being evaporated.
The oven heating will switch on and the
duration of residual moisture
evaporation will appear.
The duration is amended automatically
depending on the actual amount of
residual moisture.
Finalising the descaling process
At the end of residual water evaporation,
an information window appears with tips
on cleaning after the descaling process.
Confirm with
OK
.
A buzzer sounds and
Finished
appears.
Switch the oven off with the
On/
Off sensor control.
Summary of Contents for 11 190 803
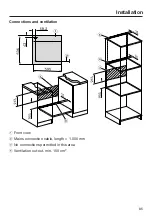
Page 84: ...Installation INSTALLATION 84 Side view A H 71xx 43 mm H 72xx 47 mm ...
Page 105: ......
Page 106: ......