9
8.
Operating the regulator
The regulator turns on by pressing the knob.
To start the use of boiler, fire up the boiler
using the FIRING UP operation mode, then
change the operation mode to OPERATION.
8.1
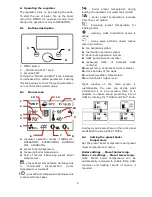
Buttons description
1.
MENU button
2.
,,TOUCH and PLAY” knob
3.
przycisk EXIT
Turning the “TOUCH and PLAY" knob increases
or decreased the edited parameter. Pushing
this knob allows to enter the given parameter,
or to confirm the selected value.
8.2
Main screen
1.
regulator operation modes: FIRING UP,
OPERATION, SUPERVISION BURNING
OFF, STANDSTILL
2.
preset boiler temperature
3.
measured boiler temperature
4.
field of factors influencing preset boiler
temperature:
- preset boiler temperature decrease due
to
thermostat
disconnection
(room
temperature is reached)
- preset boiler temperature decrease due
to activated time spans
– boiler preset temperature during
loading the domestic hot water tank (HUW)
– boiler preset temperature increase
from mixer circulation
- increasing preset temperature for
loading buffer
– warning, HUW disinfection mode is
active
– 4-way valve partially closed (active
return protection)
5.
fan operation symbol
6.
fuel feeder operation symbol
7.
boiler pump operation symbol
8.
HUW pump operation symbol
9.
measured temp. of domestic HUW
container
10.
preset temp. of domestic HUW container
11.
clock and day of the week
12.
outside (weather) temperature
13.
current boiler output level.
Right window on the main screen is
customizable, the user can decide what
information is to be presented there. It is
possible to choose setup presenting info of
HUW by rotating the “TOUCH and PLAY” knob.
Fuel level can be also shown in the room panel
ecoSTER200 and ecoSTER TOUCH.
8.3
Setting the preset boiler
temperature
Set the preset boiler temperature and preset
mixer temperature in menu:
Boiler settings
→
Preset boiler temp.
Mixer 1-5 settings
→
Preset mixer temp.
Note: Preset boiler temperature will be
automatically increased to enable filling HUW
container and heating circuits of mixers, if
required.
7
12
13
11
10
9
8
6
5
4
3
STOP
2
1
3
2
1
Fr
Summary of Contents for ecoMAX 860P
Page 6: ......
Page 7: ...INSTRUCTION MANUAL ecoMAX 860P...
Page 16: ...16...
Page 17: ...17 INSTALLATION AND SERVICE SETTINGS ecoMAX 860P...
Page 44: ...44...
Page 45: ......
Page 46: ......
Page 47: ......


