background image

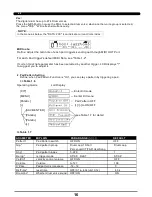
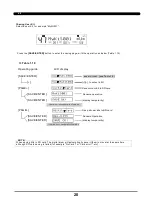
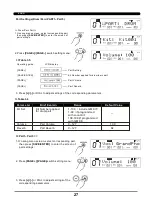
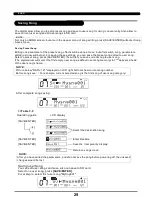
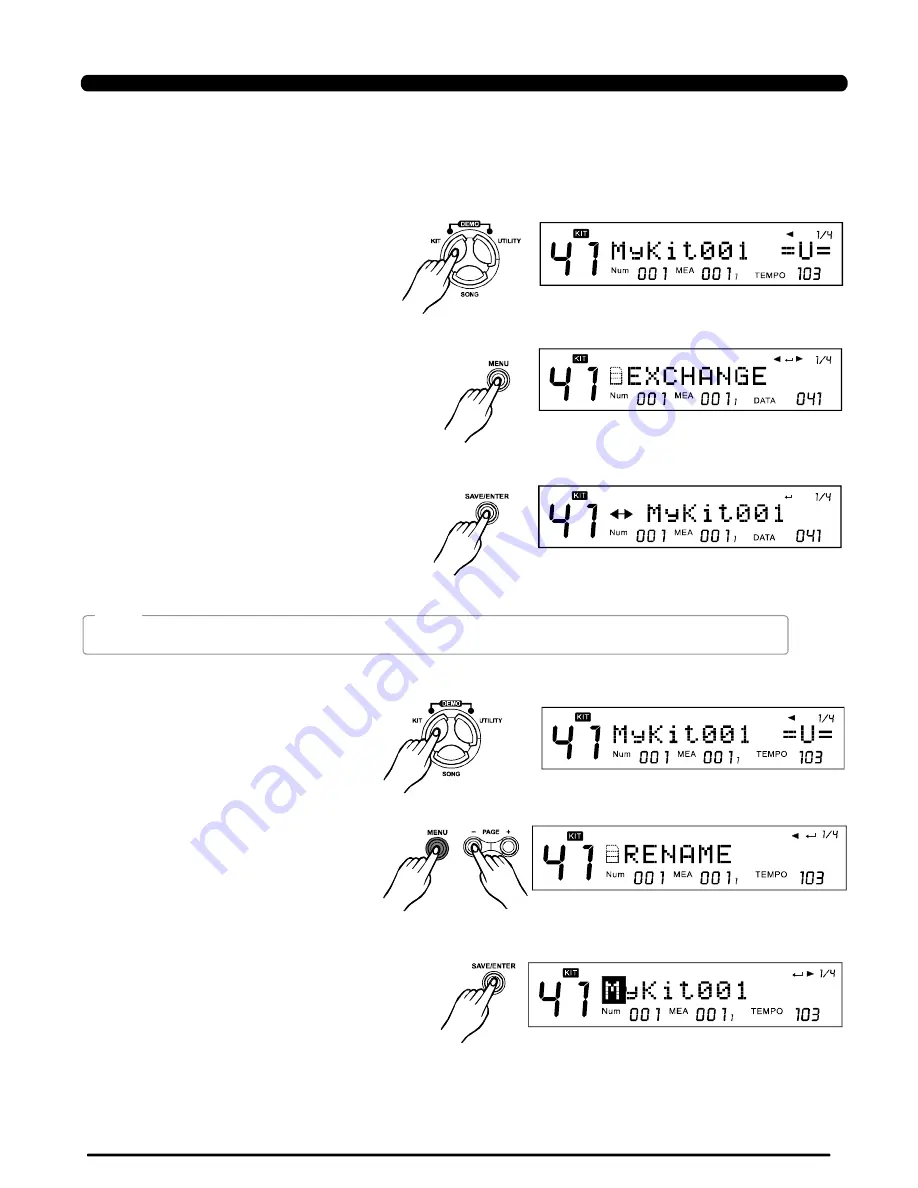
2)Press the

button, and the

button, enter the menu

displayed"EXCHANGE"

[MENU]

[PAGE+]/

[PAGE-]

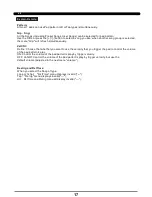
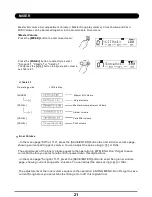
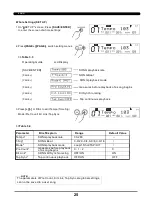
Define: Choose that whether sound drum voice when pad pattern is ON.

ON: Default setting. When triggering the pad, sound the pad pattern also with drum voice;

OFF: When triggering the pad, just sound the pad pattern.

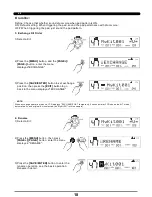
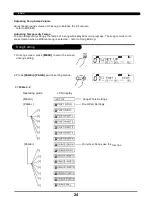
1)Select a Kit:

3. Exchange Kit Order

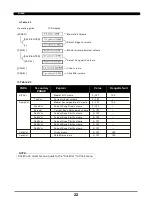
3)Press the

button to set exchange

position, then press the

button to go

back to the menu displayed" EXCHANGE"

[SAVE/ENTER]

[EXIT]

When exchange operation is done, L CD displays "EXCHANGE OK!" temporarily, 2 seconds la ter, LCD shows the KIT m ode

automatically, and original Kit is sele cted.(as "MyKit001" in th is example).

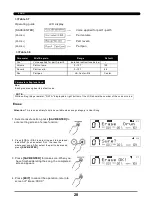
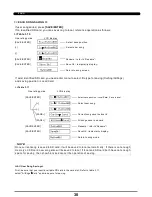
4. Rename

1)Select a Kit:

18

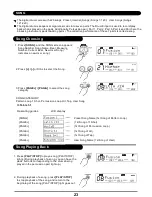
2)Press the

button, then press

/

button, enter the menu

displayed "RENAME":

[MENU]

[PAGE+] [PAGE-]

3)Press the

button to enter the

rename operation, see the basic operation

in detail.

[SAVE/ENTER]

Rename

NOTE :

DrumVoc:

KIT

PDF created with pdfFactory Pro trial version 

www.pdffactory.com

Summary of Contents for DIGITAL DRUM

Page 1: ...DIGITAL DRUM Instruction Manual ...

Page 2: ...g and Transport Cleaning Electrical Interference Never apply excessive force to the controls connectors or other parts of the instrument Always unplug cables by gripping the plug firmly but not pulling on the cable Disconnect all cables before moving the instrument Physical shocks caused by dropping bumping or placing heavy objects on the instrument can result in scratches and more serious damage ...

Page 3: ...ed on preset song Setting record Click ON OFF Click Settings Saving user Kit Saving user Song Saving Global Setup Adjust Value Setting MUTE QUICK RECORD RECORD Connect the Pads and the Pedal Connect a MIDI and USB device Connect a audio equipment Connect a CD player etc Aux in jack Connect Headphones Connect the Power supply jack 4 5 5 6 7 7 8 8 8 8 8 9 10 10 10 10 12 12 13 14 18 19 20 21 22 23 23...

Page 4: ... in a SD card Playback MIDI files in a SD card Mute a channel of the MIDI file The error information during a card operation VOICE LIST KIT LIST SONG LIST DEMO LIST ASCII CHARACTER LIST Load Delete Format 47 48 55 56 57 59 60 39 40 41 42 42 42 43 43 43 44 45 46 47 47 60 Contents ...

Page 5: ...rval Volume MIDI IN MIDI OUT MIDI THRU soft USB MIDI Save Load Kits Songs and User Settings Play Standard MIDI Files up to 16 channels Update Operating Firmware Sturdy 4 Legged Drum Rack with All Mounting Hardware Kick Pad_ Dual Zone Snare Pad Dual Zone Tom Pads x 3 Dual Zone Floor Tom Pad Kick pad Dual Zone Crash Pads with Choke x 2 14 Dual Zone Ride Pad with Bell and Choke Dual Zone Hi Hat Pad w...

Page 6: ... 5 6 7 Enter MIXER menu adjust master volume including Kit volume Accompaniment volume Card midi volume or Click volume Adjust the parameters of global setup such as sensitivity curve Effect MIDI setup etc Enter SD card menu load delete play or format the SD card Enter DEMO mode and start to play demo Part mute switch Quick record for quickly recording drum part Click switch Control the play of a ...

Page 7: ...ed manual for details This port is used to connect to a computer MIDI In Out via USB AUX IN Line output jacks Pad input jacks Phone jack This stereo input jack is for an external sound source such as an MP3 or CD player Stereo output connection to an audio system or drum amplifier Input connections for Kick Snare Tom Cymbal pads and Hi Hat control pedal This stereo jack is used to connect headphon...

Page 8: ... hi hat when the pedal is stepped When the pedal is released it functions as a closed hi hat The valid striking area of a cymbal pad ride crash or hi hat is near the edge of the pad which is different from other pads Caution To prevent electric shock and damage to the device make sure the power is switched OFF on the drum and all related device before making any connection Setup 7 Connect the Pads...

Page 9: ...on the rear panel can be mixed with the sound of the drum This function is convenient that lets you play along with a favourite song The volume of the external signal is adjusted with the VOLUME knob Make sure the power is switched OFF and connect the power adaptor with the DC IN jack on the rear panel To protect the speakers amplifier and the drum module from damage rotate the volume knob to the ...

Page 10: ...black background Mode icon The top line of the LCD display current mode icon KIT icon is always lightened Song num Measure beat Tempo In menu pages when selecting voice or song or group the icon DATA is lightened indicates the current voice or song s index For instance These icons indicate that the PAGE SAVE ENTER PAGE is valid 100 KIT INST SONG DEMO UTY CLICK MIX NUM MEA TEMPO DATA 4 1 2 3 6 7 5 ...

Page 11: ...P 1 Press button to enter current menu refer to current mode for instance KIT mode Song mode etc 2 Hold button and then press or button to enter Mute Menu or Click Setting Menu Press button to Exit from the current sub menu back to the superior level menu Or press the correspond buttons such as KIT or Song etc to immediately enter another menu MENU MENU PART MUTE CLICK Exit Menu EXIT Enter Menu PO...

Page 12: ...e LCD icon Page SAVE ENTER PAGE is valid 2 Adjust the value using buttons or DIAL Rename Quick Start Sav e PAGE PAGE SAVE ENTER Move the cursor right Move the cursor left Change the character see ASCII list Change the character Rename succeed Operating guide LCD display ...

Page 13: ...er Kits Like below Table 1 1 PAGE PAGE Table 1 1 The digital drum has 10 Pad triggers and 1 pedal controller see Table 1 2 as below Selecting KIT 1 Enter KIT Mode KIT Press the button to enter KIT mode The Kit indicator KIT is lightened and the LCD displays the current Kit number and Kit name like below 2 Selecting Pad 12 KIT PAGE enter KIT mode select user kit select next kit select previous kit ...

Page 14: ...4 R 39 RIDE 51 RIDE R 59 RIDE Bell 53 CRASH1 49 CRASH1 R 55 CRASH2 57 CRASH2 R 52 O HIHAT 46 O HIHAT R 26 Half Open HIHAT 23 Half Open HIHAT R 24 C HIHAT 42 C HIHAT R 22 P HIHAT 44 Splash 21 The current pad to be edited can be selected either by pressing its Pad Select button or by striking the pad itself Pad Selected Pad Select indicator RIDE BELL RIDE sparkling Half Open HIHAT HI HAT lighten HH ...

Page 15: ... and RENAME menu can t be seen when it s Preset Kits VOICE Num MEA TEMPO KIT 1 14 Editing KIT KIT KIT MENU Eenter Kit menu PAGE PAGE PAGE Pad Pattern set default OFF set pad pattern ON Parameter set see Table 1 4 SAVE ENTER PAGE PAGE PAGE Exchange kit order SAVE ENTER SAVE ENTER OK Eenter Kit menu SAVE ENTER PAGE KIT RENAME Operating guide LCD display See Table 1 4 Pad trigger Parameter set ...

Page 16: ...ad voice group See detail below Voc Voice index HH combi group index 1 674 See detail below Volume Volume 0 127 Pan Pan L8 R8 Center Pitch Pitch 8 8 Decay Decay 0 5 RvbLevel Reverb Level 0 127 MidiNote Pad note MIDI out See detail below Duration Pad note length MIDI out 0 0s 0 8s StartVol Pad voice start volume 0 127 according to different Pad triggers Table 1 5 After selecting HH Combi group you ...

Page 17: ...d the menu Grp Will refresh simultaneously In the menu as below the DATA 290 icon indicate current Voice index 16 Table 1 6 Table 1 7 ARAMETER EXPLAIN PARA RANGE DEFAULT Pattern Pad Pattern switch OFF ON OFF Grp Pad pattern group DrumLoop 1 Shot PercLoop HIT TAP UserSong Sng Pad pattern index 1 220 1 Retrig retrigger mode ST SP ReST ST SP VelCtrl velocity control volume OFF ON OFF Volume Volume 0 ...

Page 18: ...to use the velocity that you trigger the pad to control the volume of the pad pattern s play ON Control the volume of the pad pattern s play by trigger velocity OFF do NOT Control the volume of the pad pattern s play by trigger velocity but use the default volume adjusted in the next menu volume Pattern Grp Sng VelCtrl Restrig and RstTime When you select the Song of type Loop or 1shot RstTime menu...

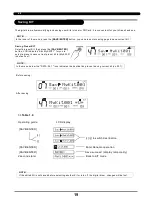
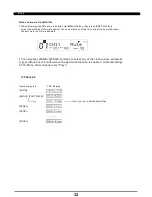
Page 19: ... Press the button to set exchange position then press the button to go back to the menu displayed EXCHANGE SAVE ENTER EXIT When exchange operation is done LCD displays EXCHANGE OK temporarily 2 seconds later LCD shows the KIT mode automatically and original Kit is selected as MyKit001 in this example 4 Rename 1 Select a Kit 18 2 Press the button then press button enter the menu displayed RENAME ME...

Page 20: ... you to select a place to save current preset kit to MyKit001 is default set In the menu below the DATA 041 icon indicates the destination place of saving current kit no 001 Before saving After saving Table 1 9 19 If the edited Kit is not saved before selecting another Kit or turn off the digital drum changes will be lost NOTE NOTE NOTE Saving KIT KIT Operating guide LCD display SAVE ENTER to swit...

Page 21: ... at the same time although SD card saving is failed for example No Card or Card error etc NOTE KIT SAVE ENTER save to local see Table 1 9 to select a Kit PAGE Save current Kit to SD card PAGE Save all user kits to SD card Rename Operation Rename operation SAVE ENTER display temporarily SAVE ENTER SAVE ENTER SAVE ENTER display temporarily Operating guide LCD display If card is error see detail on T...

Page 22: ...ume You can adjust the value using or DIAL The adjustments of the inner volume equals to the operation in KIT MENU Don t forget to save current Kit before you select another Kit or power down this digital drum In the menu page SongVol 110 press the SAVE ENTER button to enter Song inner volume page showing current song parts volumes You can adjust the value using or DIAL The adjustments of the inne...

Page 23: ...t3Vol Current Song Part3 volume 0 127 Part4Vol Current Song Part4 volume 0 127 Part5Vol Current Song Part5 volume 0 127 ClickVol Click volume 0 127 100 CardVol Card Midi volume 0 127 100 NOTE ClickVol in mixer menu equals to the ClickVol in Click menu PARA Secondary Explain Value RangeDefault PARAE 22 MIXER MIXER Master Kit Volume Adjust trigger s volume PAGE Master Accompaniment Volume Adjust Son...

Page 24: ...play a song PLAY STOP lights During playback of a song you can have the pads buttons corresponding to the drums being played in the percussion part light up 2 During playback of a song press to stop playback of the song and return to the beginning of the song PLAY STOP light goes out PLAY STOP PLAY STOP SONG CATEGORY Pattern Loop 1 Shot Percussion Loop Hit Tap User Song 1 Press and the SONG screen...

Page 25: ...eset tempo when a different song is selected refer to Adjusting Temporarily Tempo MIXER Song Editing 1 On song screen press to enter the screen of song editing MENU 2 Press switch setting menus PAGE PAGE Table 3 2 Adjusting Song Acmp Volume Song Editing 24 SONG MENU Song Whole Settings PAGE Drum Part Settings PAGE Only User Songs use the function Operating guide LCD display ...

Page 26: ...4 0 9 8 0 9 16 Mode SONG playback mode Loop 1 Shot TAP HIT Pre Count 0 1 2 0 Kit Link SONG Kit Synchronizing OFF ON ON Tap Sync Tap continuous playback OFF ON OFF Table 3 3 measures before playback of a song begins 25 NOTE SONG SAVE ENTER SONG playback rate PAGE SONG Beat PAGE SONG playback mode PAGE measures before playback of a song begins PAGE Kit Synchronizing PAGE Tap continuous playback Oper...

Page 27: ...ayback of a song the function will be become effective at once while switched from OFF to ON If you want to change some other kit for your performance you can simply enter Kit mode to select a new kit OFF While you are selecting songs the kit selection won t be changed with the songs Tap Sync 26 This is an auxiliary function available when TAP and HIT are specified as the Play Mode for the song In...

Page 28: ...applied for drum part 1 109 include GM KIT 1 99 if programmed with Local Kit 100 109 if programmed with GM Kit Volume Part Volume 0 127 100 Reverb Part Reverb 0 127 64 27 Table 3 6 Part1 Part5 SAVE ENTER 1 On song menu screen select corresponding part then press to enter the screen of part settings 2 Press switch setting menu 3 Press or DIAL to adjust settings of the corresponding parameters PAGE ...

Page 29: ...xiliary function available when song category is User Song Attention 1 Select erase function press to enter setting screen of erase function SAVE ENTER 2 Press or DIAL to select the part to be erased in addition you can select ALL to erase the whole user song After select the part to be erased press SAVE ENTER 3 Press for make sure When you have finished deleting the song the completed screen appe...

Page 30: ...after switch song parameters edited just now will be lost For saving these editings you can save the preset song edited to user song Select a preset song press SAVE ENTER It s will let you save current song to user song The digital drum will select the first empty user song as default user song memory slot appears ahead of the user song s name Not only on SONG screen but also in the deeper menu of...

Page 31: ... card slot Refer to table 3 11 select AllSngs Card and make sure for saving If exist identified SD card you need enter menu to select file type for saving CurSng AllSngs and saving position Local Card 30 EACH SONG SAVING Table 3 10 NOTE SONG SAVE ENTER Select save position Select user song SAVE ENTER Rename refer to Rename SAVE ENTER Save Ok temporarily display Return to song screen Operating guid...

Page 32: ...n mute function PART MUTE led is dark PLAY STOP MENU PART MUTE Mute a part of Song 1 If it plays Song when pressing button whatever in KIT mode UTILITY menu etc press and hold button then press button to choose the parts for mute of current song 2 Then press button to switch the mute part see Table 4 1 in detail Table 4 1 MUTE 31 Setting MUTE MENU PART MUTE Mute drum part default set Mute percussi...

Page 33: ...y of the 16 channels to be muted when the part mute function is enabled Table 4 2 32 2 You can press PAGE PAGE buttons to select any of the 16 channels and press buttons to set it muted when the part mute function is enabled default setting Ch10 Mute other channels are Play MUTE CARD MENU PART MUTE PAGE PAGE PAGE Operating guide LCD display Use or to switch Mute Play ...

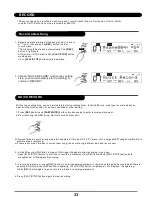
Page 34: ...enu etc assign a NEW song automatically to start drum part recording c If there is drum part already in current user song then delete original drum part and record new 2 In Quick Record SYNC start is always ON trigger the pads to start recording or you can press PLAY STOP button to start too In recording statement the REC button and PLAY STOP button both are lightened LCD displays Recording 3 In r...

Page 35: ...rt recording The midi channel 12 16 would be recorded to corresponding part MIDI Channel Part Note 12 Part 1 13 Part 2 14 Part 3 15 Part 4 16 Part 5 3 Stop recording In recording statement press PLAY STOP button or EXIT button to stop recording The REC button and PLAY STOP button are putting out 4 Playback After recording stops it would enter SONG Mode automatically press PLAY STOP button to playb...

Page 36: ...CD displays record menu as below SAVE ENTER Rename 5 The click would be started automatically The REC button is lightened at this time if SYNC start if ON PLAY STOP button would spark if not PLAY STOP button would be darken 6 Choose without any setting step you can immediately start recording or common QUICK RECORD RECORD Press button to enter to record setting page REC Table 5 1 QUICK 35 Recordin...

Page 37: ...the parts which are being recorded including drum percussion part1 part5 2 Refer to note on quantize the note starting position but not note length 3 Refer to controllers NOT quantize 4 The error information during record Mode Loop Qntize 36 Explain Details PARAMETER EXPLAIN PARA RANGE DEFAULT Part Select record part Drum Perc Drum TimeSig record time signature 1 9 2 1 9 4 1 9 8 1 9 16 4 4 Tempo t...

Page 38: ...beats per measure is set to 0 no accent is added to the first beat The metronome click sound then plays at a fixed volume 37 CLICK Click ON OFF Table 6 1 3 Press or DIAL to adjust parameters In DEMO CLICK is invalid Holding down and pressing enter the screen of click settings MENU CLICK NOTE Click Settings NOTE During playback of a song time signature can not be edited NOTE Operating guide LCD dis...

Page 39: ...Y_EDRUM All user Song SNG Root MY_EDRUM Global Setup SET Root MY_EDRUM Saving user Kit Saving user Song Saving Global Setup UTILITY Refer to Refer to Be sure that your SD Card is inserted and valid Press button to enter Global Setup saving page Saving user Kit Saving user Song 38 Table 7 2 SAVE UTILITY Enter UTILITY menu PAGE PAGE PAGE SAVE ENTER See Rename page 12 SAVE ENTER Save succeed displays...

Page 40: ... menu Press button to enter the utility menu UTILITY Table 8 1 39 UTILITY UTILITY Trigger detection parameters SAVE ENTER Trigger type PAGE Sensitivity Change value PAGE Reverb and EQ PAGE MIDI set up PAGE Save global settings to SD card PAGE Set global settings to factory default Operating Guide LCD display ...

Page 41: ...aneous vibrations from another pad This setting allows you to control the relation between the velocity striking force and changes in volume the dynamic curve Adjust this curve until the response feels as natural as possible Playing snare drum pads and other devices with commercially available acoustic drum triggers attached may result in altered waveforms which may also cause inadvertent sounding...

Page 42: ...mmediately after the intended stroke or like with acoustic drums if you leave the bass drum beater against the head it can cause a single strike to double trigger two sounds instead of the intended one The Mask Time setting helps to prevent such problems Once a pad has been hit any additional trigger signals occurring within the specified MASKTIME will be ignored When set to a high value it then b...

Page 43: ...d EQ high middle band 12dB 12dB EQHigh EQ high band 12dB 12dB According to current KIT Item Explain Default Local ON Output both local sound and MIDI data OFF Mute the local s ound output only output MIDI data ON SoftThru ON Forward all input MIDI data to MIDI out OFF MIDI output only local MIDI data OFF GM Mode ON The input program change of MIDI channel 10 is processed as GM kit selection OFF Th...

Page 44: ... and browsed We strongly recommend use the SD card formatted by the digital drum 1 When a MIDI file is selected its initial tempo and time signature would be set in less than 1 sec if the playback is not started Press the button the playback will start PLAY STOP 2 During the playback press PLAY STOP again can stop the playback 43 SD Card 1 Press the button the button would be lightened and the roo...

Page 45: ...rite song into the digital drum as a user song by using the SD card menu 1 Press button when browsing the card to open the card menu MENU 2 Use or to select operations as shown in table 9 2 PAGE PAGE Operation Parameters Default LOAD DELETE LOOP PRECOUNT FORMAT Load current file Delete current file Select loop mode of the playback 1 Set the pre count of playback 0 1 2 0 Format the card Load and De...

Page 46: ...he name of the selection it means it s empty and it s safe to save the new song into it without worrying about losing your previous data SAVE ENTER 3 Press to confirm your selection If you have selected a user song memory slot which is not empty we will ask you to confirm the over write operation You can use to confirm or use to go back to the last step and change your selection SAVE ENTER SAVE EN...

Page 47: ...loop through all the MIDI files in current folder 1 The playback would loop for the current MIDI file only SAVE ENTER EXIT 46 MIDI Channel Part Note 10 Drum 11 Percussion 12 Part 1 13 Part 2 14 Part 3 15 Part 4 16 Part 5 Tap Hit Only the first of channel 12 16 in the MIDI file would be used Note Set controller 0 to select bank as 127 to use internal KIT otherwise GM kit would be used 1 Select Dele...

Page 48: ...32 only some SD card with small capacity under 32M may be using FAT12 in this case the card would be formatted into FAT16 Note Please take out the card unlock the card and try again The fatal error can be caused by a damaged card poor contact etc Please clean the metal connection part of the card and try again The digital drum can support only FAT16 and FAT32 No Card Card Locked Card Error FS Erro...

Page 49: ...ick 4 AcBd5 Acoust Kick 5 AcBd6 Acoust Kick 6 AcBd7 Acoust Kick 7 AcBd8 Acoust Kick 8 AcBd9 Acoust Kick 9 AcBd10 Acoust Kick 10 AcBd12 Acoust Kick 12 AcBd13 Acoust Kick 13 AcBd15 Acoust Kick 15 AcBd16 Acoust Kick 16 AcBd17 Acoust Kick 17 AcBd18 Acoust Kick 18 AcBd19 Acoust Kick 19 AcBd20 Acoust Kick 20 AcBd22 Acoust Kick 22 AcBd23 Acoust Kick 23 AcBd24 Acoust Kick 24 AcBd26 Acoust Kick 26 AcBd27 A...

Page 50: ...re Rim FunkSn1 Funk Snare 1 FkStick Funk Stick FunkSn Funk Band Snare FunkSnR Funk Band Snare Rim FunkSnS Funk Band Snare Stick FusionSn Fusion Snare FusnSnS Fusion Snare Stick SnareS Snare Stick PwrSn Pwrbd Snare RingoSn Ringo Snare RingoSn Ringo Snare Rim HipopSn1 Hiphop Snare 1 HipopSn2 Hiphop Snare 2 506Sn1 506 Snare 1 506SnR1 506 Snare Rim 1 506Sn2 506 Snare 2 506SnR3 506 Snare Rim 3 1969Sn 1...

Page 51: ... ElSn35 Electronic Snare 35 ClsTm1a Classic Tom 1 a ClsTmR1a Classic Tom Rim 1 a ClsTm2a Classic Tom 2 a ClsTmR2a Classic Tom Rim 2 a ClsTmR3a Classic Tom 3 a ClsTmR3a Classic Tom Rim 3 a ClsTm4a Classic Tom 4 a ClsTmR4a Classic Tom Rim 4 a ClsTm5a Classic Tom 5 a ClsTmR5a Classic Tom Rim 5 a ClsTm6a Classic Tom 6 a ClsTmR6a Classic Tom Rim 6 a ClsTm1b Classic Tom 1 b ClsTmR1b Classic Tom Rim 1 b ...

Page 52: ...Jazz Tom 2 b JazzTm3b Jazz Tom 3 b JazzTm4b Jazz Tom 4 b JazzTm5b Jazz Tom5 b JazzTm6b Jazz Tom 6 b BshTm1a Brush Tom 1 a BshTm2a Brush Tom 2 a BshTm3a Brush Tom 3 a BshTm4a Brush Tom 4 a BshTm5a Brush Tom 5 a BshTm6a Brush Tom 6 a BshTm1b Brush Tom 1 b BshTmR1b Brush Tom Rim 1 b BshTm2b Brush Tom 2 b BshTmR2b Brush Tom Rim 2 b BshTm3b Brush Tom 3 b BshTmR3b Brush Tom Rim 3 b BshTm4b Brush Tom 4 b...

Page 53: ... s Ride Rim ClPopRdR Clean Pop Ride Rim SkyRdR Sky Ride Rim ClsCrBl1 Classic Crash Bell 1 ClsCrBl2 Classic Crash Bell 2 StdCr1 Standard Crash 1 ClsChina Class China StdCr2 Standard Crash 2 StdCrBl1 Standard Crash Bell 1 StdCrBl2 Standard Crash Bell 2 China1 China 1 ClsCr1 Classic Crash 1 ClsCr2 Classic Crash 2 ClsCr3 Classic Crash 3 ClsCr4 Classic Crash 4 Splash Splash SplashBl Splash Bell RockCr ...

Page 54: ... HH Close PopHCs Pop HH Close PopHCsR Pop HH Close Rim BrshHCs Brush HH Close 60 sHCs 60 s HH Close MiniHCs Mini HH Close MiniHCsR Mini HH Close Rim ClsHCsA Classic HH Close A ClsHCsB Classic HH Close B ClsHCsRB Classic HH Close Rim B CamcoHCs Camco HH Close VoiceHCs Voices HH Close HouseHCs House HH Close 606HCs TR 606 HH Close 808HCs TR 808 HH Close 909HCs TR 909 HH Close JyHCs Junkyard HH Close...

Page 55: ...laves Woodbk Wood block CuicaMut Cuica Muted CuicaOp Cuica Open TriaMut Triangle Muted TriaOp Triangle Open SleighBl Sleigh Bells WindCh WindChimes Castanet Castanets SurdoMut SurdoMuted SurdoOpn SurdoOpen LotusDrm LotusDrum Cowbell1 Cowbell 1 Cowbell2 Cowbell 2 Cowbell3 Cowbell 3 Cowbell4 Cowbell 4 Cowbell5 Cowbell 5 Cowbell6 Cowbell 6 Cowbell7 Cowbell 7 Cowbell8 Cowbell 8 Cowbell9 Cowbell 9 Cowb...

Page 56: ... 58 FX59 FX 59 FX60 FX 60 FX61 FX 61 FX62 FX 62 FX63 FX 63 FX64 FX 64 FX65 FX 65 FX66 FX 66 FX67 FX 67 FX68 FX 68 FX69 FX 69 FX70 FX 70 DJ1 DJ 001 DJ2 DJ 002 DJ3 DJ 003 DJ4 DJ 004 DJ5 DJ 005 DJ6 DJ 006 DJ7 DJ 007 DJ8 DJ 008 DJ9 DJ 009 DJ10 DJ 010 Fx1 Fx001 Fx2 Fx002 Fx3 Fx003 Fx4 Fx004 Fx5 Fx005 Fx6 Fx006 Fx7 Fx007 Fx8 Fx008 Fx9 Fx009 Fx10 Fx010 Fx11 Fx011 Fx12 Fx012 Fx13 Fx013 Fx14 Fx014 Fx15 Fx0...

Page 57: ...35 16 36 17 37 18 38 19 39 20 40 Acoust 1 FunkBand Pwrbd Std 2 Acoust 2 Fusion Camco JzBrush Room Rock PopRock Jazz Brush Songo 1971 s Timbals O school Tr606 Disco 909 DrumBass Funk HipHop 1 HipHop 2 House 1 House 2 Vintage Junkyard M box Step Industry Lowfi Metal Electron JzLatin Noise Std 1 R B Magic Teckno ...

Page 58: ... Rock Big Band 1 Drum N Bass 1 Ballad1 Swing1 Pop1 Funk2 Ltin Jz2 Pop Fuk1 Ltin Rk1 BigBand2 Pop Bald Pop Fuk2 3 4 Jazz Pop Bosa Samba1 6 8Bald1 Fusion2 Jazz1 Gtr Bosa BreakBt1 World1 Funk3 Ltin Jz3 LtinPop2 Reggae1 Fusion3 Swing2 Pop Shuf Ballad2 Piano Rk Blues1 R B1 Ballad 1 Swing 1 Pop 1 Funk 2 Latin Jazz 2 Pop Funk 1 Latin Rock 1 Big Band 2 Pop Ballad Pop Funk 2 3 4 Jazz Pop Bossa Samba 1 6 8B...

Page 59: ...s2 Disco1 Arabic1 House Arabic2 R N R2 Piano Bt Rock2 Ltin Jz4 Country BigBand3 Slow Fs Moden Jz D N B3 Reggae3 Funk6 Funk7 Swing3 Funk 4 Mambo Latin Dance 2 Drum N Bass 2 Pop Rock Punk Fusion 4 Break Beat 2 Dance Rock Funk 5 Fusion 5 Reggae 2 Country Blues Pop 2 Dance 2 R B 2 Rock N Roll 1 Boogie 1 Beguine New Age 16 Beat Metal 1 6 8 Balla 2 Dance 3 8 Beat Blues 2 Disco 1 Arabic 1 House Arabic 2 ...

Page 60: ... Bass Tp1 Syn Str Brigh T2 Bass Tp2 Pad Tap1 Vibrapho Bass Tp3 Rain Tap Pizz Str Bass Tp4 Crystal Xylophon Bass Tp5 Pad Tap2 Glock Tp Disco 2 Boogie 2 Metal 2 Hard Rock Latin 1 World 2 Latin 2 Bossa Samba 2 3 4 Pop Pop 3 Jazz 2 Reggae 4 Reggae 5 Latin Rock 2 Choru Piano Tap 1 Fifths Tap Brightenss Tap 1 Atmosphere Choru Piano Tap 2 Bass Tap 1 Synth String Tap Brightenss Tap 2 Bass Tap 2 Pad Tap 1 ...

Page 61: ...ASCII CHARACTER LIST 60 _ 0 1 2 3 4 5 6 7 8 9 A B C D E F G H I J K L M N O P Q R S T U V W X Y Z a b c d e f g h i j k l m n o p q r s T u v w x y z Voice List DEMO LIST Demo No NAME 1 2 WORLD FUSION ...

Page 62: ...Version G04 ...

Reviews: