background image

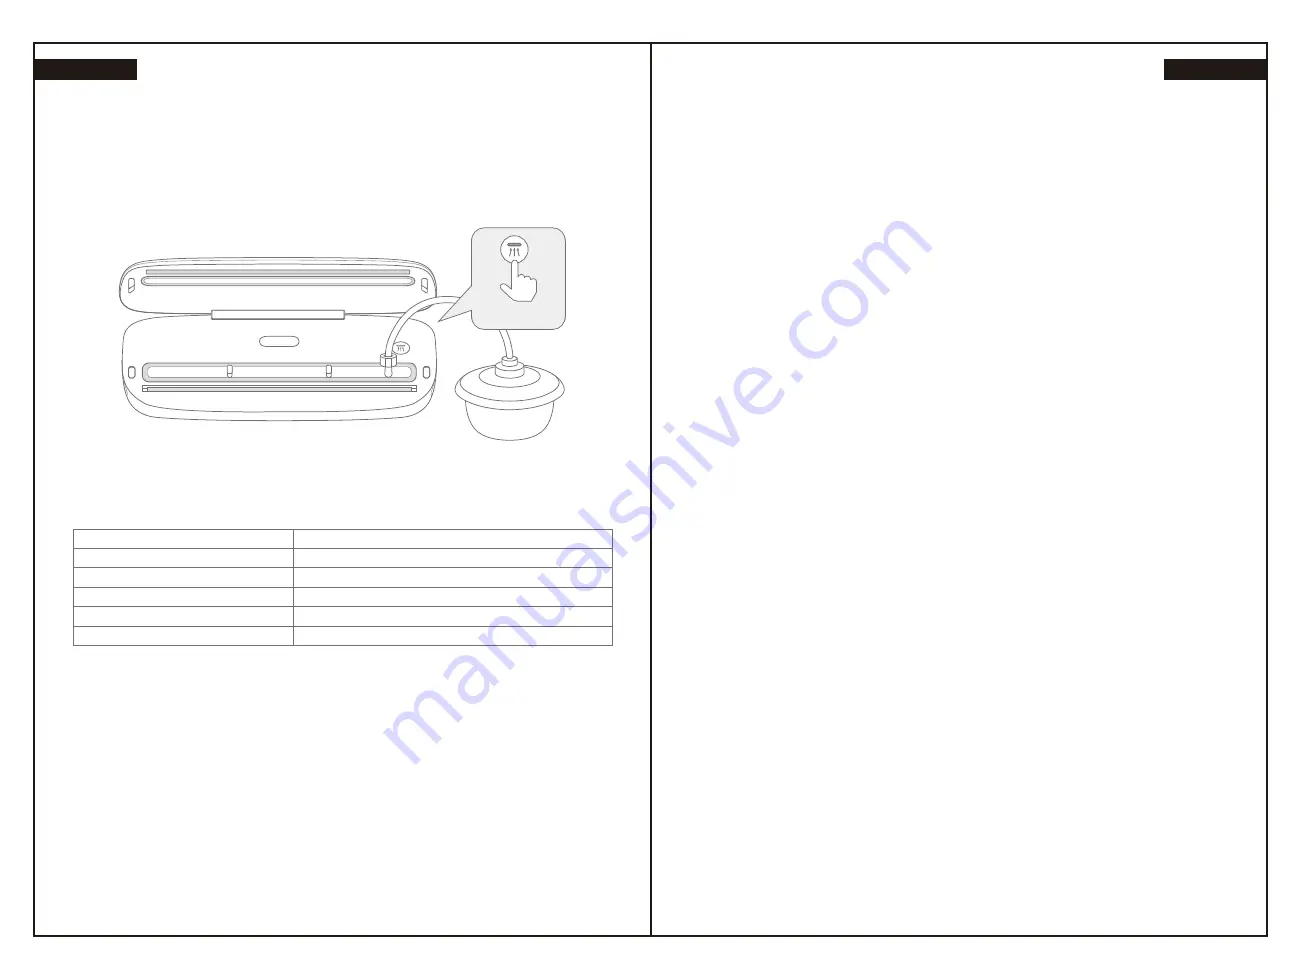
ENVASADO AL VACÍO CON ACCESORIOS (OPCIONAL)

Botón de tarros

Alimentación eléctrica

Potencia

Tiempo de sellado

Presión

Tamaño máx. de bolsa

Dimensiones

CA100-240 V / 50 Hz~60Hz

130W

5-9S

-60kpa

30cm

370X150X70mm

1.Coloque los alimentos y ponga la tapa en el tarro o recipiente.

2.Conecte el orificio de extracción del aire del aparato y el tarro con el tubo de vacío. Fig. 6

3. Compruebe que no hay fugas de aire entre la tapa y el tarro. Fig. 7

4. Cuando finalice el proceso de vacío, retire el tubo.

Thank you for purchasing our Vacuum Packaging System, please read the User 

Manual carefully for operating instructions and keep it well for the future.

Nota: 

Tire de la válvula de liberación para abrir el tarro antes de introducir el tarro en el 

microondas.

05

For  your  own  safety,  always  follow  these  basic  precautions,  please  read  all 

instructions before use.

1. Before turning on the power, please check if local power supply voltage matches the 

voltage indicated on the device.

2. If there is a damage on the flexible cord, stop using immediately and must change it by 

the manufacturer’s maintenance department or similar sector professionals.

3. Do not place any parts of this product, power cord or plug in water or other liquids; Do 

not use it on wet or hot surfaces, or near a heat source.

4. Cut off the power source before cleaning, use a mild dish washing soap and a warm, 

damp cloth to wipe away food residue inside or around components. 

5. In “Moist”mode, it only can vacuumed foods with a little water; please do not vacuumed 

liquid foods, these foods are only suitable for sealing.

6. Please use accessories or parts recommended by the manufacturer.

7. The machine is not intended for children or people who do not know how to operate.

8. After used, do not touch the heat sealer on the machine to avoid being burned

1. Pour water into the bag 2/3 of its content, seal the open (no vacuuming) of the bag. After 

freeze, can be used in the ice bucket, or as an ice cube to treat sports injuries.

2.  Vacuum  packaging  also  protects  non-food  items  from  oxidation,  corrosion  and 

moisture,  such  as  museum  piece,  photos,  important  documents,  stamps,  books, 

jewelry, cards, cosmetics, medicine and metal.

3. The machine also can marinate, when vacuum process opens the pores of the food and 

absorbs the marinate quickly.

4. If the bag is melted, it means the heating wire may be very hot. Please let the machine 

cool for 90 seconds.

5.For foods with sharp parts, such as bones and fish bones, please wrap up the sharp 

parts before vacuum packaging to avoid poking bags. 

6. When vacuum apck the foods with liquid, you’d better wipe the foods by cleaning towle 

or wrappingit by palstic bag before vacuum packing.

Important: When the machine not in use, please place support card back, 

do not lock the appliance. Or the sponge may be distorted which will affect 
the air extracting results.

IMPORTANT SAFEGUARDS

WARM TIPS:

06

EN

ES

Summary of Contents for BGMP-9080

Page 1: ...oint for the recycling of electrical and electronic equipment By ensuring this product is disposed of correctly you will help prevent potential negative consequences for the environment and human heal...

Page 2: ...tratar lesiones 2 El envasado al vac o tambi n protege art culos no alimentarios de la oxidaci n corrosi n y humedad tales como piezas de museo fotos documentos importantes sellos libros joyas tarjeta...

Page 3: ...os botones no responden Cuando la banda de calentamiento baja a una temperatura segura sobre 2 minutos el indicador deja de parpadear y el aparato vuelve a funcionar con normalidad autom ticamente Esp...

Page 4: ...h washing soap and a warm damp cloth to wipe away food residue inside or around components 5 In Moist mode it only can vacuumed foods with a little water please do not vacuumed liquid foods these food...

Page 5: ...ed 1 year 1 year 1 year 7 10 days 14 20 days Normal 1 2 days 4 6 month 3 5 month 3 6 month 3 6 month Vacuumed 6 8 days 1 year 1 year 1 year 1 year 30 50 days Dry Moist Mode Dry mode indicator light is...

Page 6: ...crowave 10 Put the bag into the clip flatly Press the two sides of the cover Dry Left Dry Moist Vacuum Seal Moist Right 1 Plug the power cord connector into the AC power connector of the machine 2 Pla...

Page 7: ...rosione e umidit ad esempio pezzi da museo fotografie documenti francobolli libri gioielli cartoline cosmetici medicine e metalli 3 L apparecchio ideale per la marinatura l aspirazione sottovuoto apre...

Page 8: ...la temperatura di sicurezza l apparecchio entrer automaticamente in modalit di protezione l indicatore luminoso lampegger e i pulsanti si disattiveranno Quando la temperatura della barra sigillante sc...

Page 9: ...mme un bloc de glace pour traiter des blessures sportives 2 L emballage sous vide prot ge galement les articles non alimentaires de l oxydation de la corrosion et de l humidit tels que les objets de m...

Page 10: ...rs 10 14 jours Aspiration sous vide 1 an 1 an 1 an 7 10 jours 14 20 jours Normal 1 2 jours 4 6 mois 3 5 mois 3 6 mois 3 6 mois Aspiration sous vide 6 8 jours 1 an 1 an 1 an 1 an 30 50 jours Mode Sec e...

Page 11: ...e sac plat entre les pinces Appuyez sur les deux c t s du couvercle Sec Gauche Sec et humide Scellage vide Humide Droite 1 Branchez le connecteur du c ble d alimentation sur le connecteur d alimentati...

Page 12: ...ckung sch tzt auch Non Food Artikel von Oxidation Korrosion und Feuchtigkeit wie Museumsst cke Fotos wichtigen Dokumente Briefmarken B cher Schmuck Karten Kosmetik Medizin und Metall 3 Die Maschine hi...

Page 13: ...eitsschutzmodus Die Anzeige blinkt und ist die Tastenbedienung ist in dem Fall ung ltig Wenn das Heizband ca 2 Minuten auf eine sichere Temperatur sinkt h rt die Anzeige auf zu blinken und das Ger t k...

Page 14: ...para eliminar os res duos de alimentos no interior ou em redor dos componentes 5 No modo H mido s pode armazenar alimentos a v cuo com um pouco de gua Por favor n o utilize o v cuo com alimentos l qu...

Page 15: ...pirar Fixador direito Bot o da lata Prima o bot o da lata para aspirar latas ou garrafas No modo de funcionamento prima de novo este bot o para parar o funcionamento no modo de lata Controlo da temper...

Page 16: ...Seco e H mido Selar a v cuo H mido Direita 1 Ligue o conector do fio da alimenta o na entrada AC da m quina 2 Coloque a extremidade aberta do saco plana nas molas do saco da m quina Imagem 1 3 Pressi...

Reviews: