background image

Crank Pin and Connecting Rod Bearings

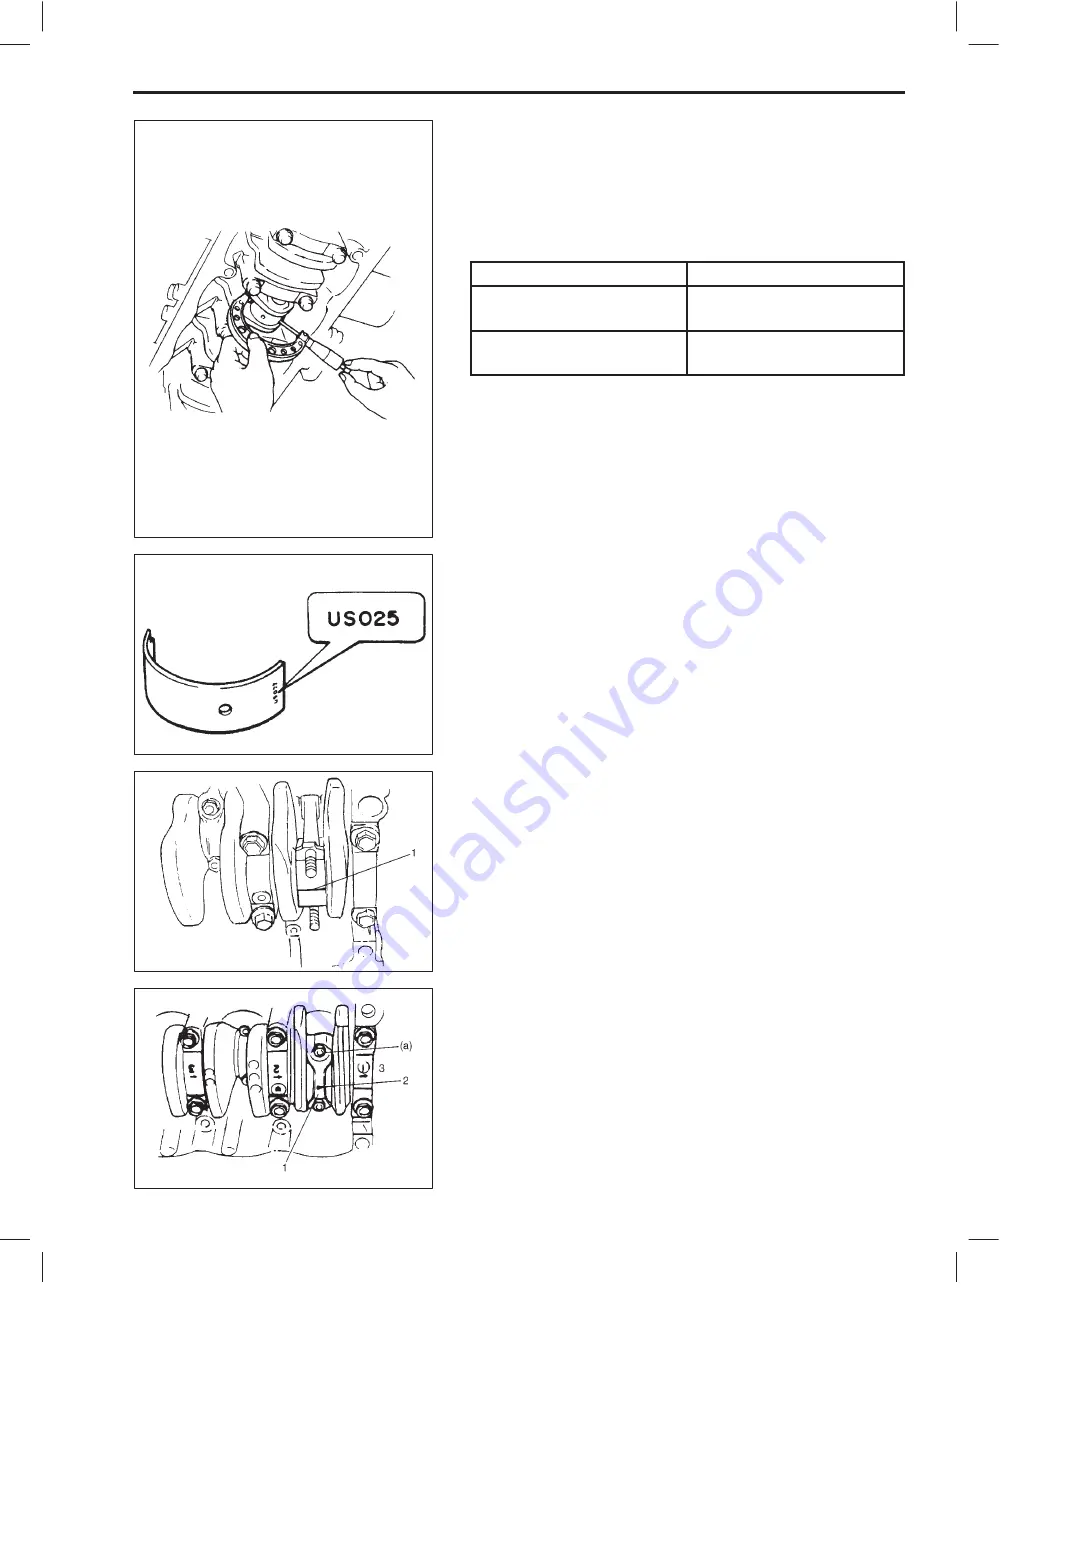
Inspect crank pin for uneven wear or damage. Measure crank
pin for out-of-round or taper with a micrometer. If crank pin is
damaged, or out-of-round or taper is out of limit, replace crank-
shaft or regrind crank pin to undersize and use undersize bear-
ing.

Out-of-round and taper limit: 0.01 mm (0.0004 in.)

Rod bearing:
Inspect bearing shells for signs of fusion, pitting, burn or flaking
and observe contact pattern. Bearing shells found in defective
condition must be replaced.
Two kinds of rod bearing are available; standard size bearing
and 0.25 mm undersize bearing. To distinguish them, 0.25 mm
undersize  bearing has the stamped number (US025) on its
backside as indicated in figure, but standard size one has no
number.

Rod bearing clearance:
1) Before checking bearing clearance, clean bearing and crank

pin.

2) Install bearing in connecting rod and bearing cap.
3) Place a piece of gaging plastic (1) to full width of crankpin as

contacted by bearing (parallel to crankshaft), avoiding oil
hole.

4) Install rod bearing cap (1) to connecting rod.

When installing cap, be sure to point arrow mark (2) on cap to
crankshaft pulley side (3), as shown in figure. After applying en-
gine oil to rod bolts, tighten cap nuts to specified torque. DO
NOT turn crankshaft with gaging plastic installed.

Tightening Torque
(a): 35 N

.

m (3.5 kg-m, 25.5 lb-ft)

ENGINE MECHANICAL

6A1-55

SH410

Connecting rod bearing size

Crank pin diameter

Standard

41.982 – 42.000 mm

(1.6528 – 1.6535 in.)

0.25 mm (0.0098 in.)
undersize

41.732 – 41.750 mm

(1.6430 – 1.6437 in.)

Summary of Contents for Zen

Page 1: ...y CAUTION Indicates a potential hazard that could result in vehicle damage NOTE Indicates special information to make mainte nance easier or instructions clearer WARNING This service manual is intended for autho rized Maruti dealers and qualified service mechanics only Inexperienced mechanics or mechanics without the proper tools and equipment may not be able to properly per form the services desc...

Page 2: ......

Page 3: ...neral Information Maintenance and Lubrication HEATING AND AIR CONDI TIONING Air Conditioning If Equipped STEERING SUSPENSION WHEELS AND TIRES Electrical Power Steering EPS System Steering Wheel and Column 3C TABLE OF CONTENTS ENGINE Engine Diagnosis Engine Mechanical Engine Cooling Engine Fuel Engine and Emission Control System Ignition System Cranking System Charging System Exhaust System ELECTRI...

Page 4: ...on Procedure 0A 7 Intermittent and Poor Connection 0A 10 Precaution for Installing Mobile Communication Equipment 0A 11 IDENTIFICATION INFORMATION 0A 11 Vehicle Identification Number 0A 11 Engine Identification Number 0A 11 Transmission Identification Number 0A 11 VEHICLE LIFTING POINTS 0A 12 ABBREVIATIONS MAY BE USED IN THIS MANUAL 0A 14 METRIC INFORMATION 0A 16 Metric Fasteners 0A 16 Fasteners S...

Page 5: ...or drive plate for A T vehicle Using special tool lock flywheel or drive plate and tighten flywheel or drive plate bolts to specified torque Special Tool A 09924 17810 Tightening Torque c 78 N m 7 8 kg m 56 0 lb ft 1 Flywheel bolts or drive plate bolts for A T vehicle 4 A number of abbreviations are used in the text For their full explanations refer to ABBREVIATIONS MAY BE USED IN THIS MANUAL of t...

Page 6: ...d getting burned keep away from hot metal parts such as the radiator exhaust manifold tailpipe muffler etc New and used engine oil can be hazardous Children and pets may be harmed by swallowing new or used oil Keep new and used oil and used engine oil filters away from children and pets Continuous contact with used engine oil has been found to cause skin cancer in laboratory ani mals Brief contact...

Page 7: ...tion Whenever you use oil seals gaskets packing O rings locking washers split pins self locking nuts and certain other parts as specified be sure to use new ones Also be fore installing new gaskets packing etc be sure to remove any residual material from the mating surfaces Make sure that all parts used in reassembly are perfectly clean When use of a certain type of lubricant bond or sealant is sp...

Page 8: ...g the fuel pressure or fuel can be sprayed out under pressure PRECAUTIONS FOR CATALYTIC CONVERT ER For vehicles equipped with a catalytic converter use only un leaded gasoline and be careful not to let a large amount of un burned gasoline enter the converter or it can be damaged Conduct a spark jump test only when necessary make it as short as possible and do not open the throttle Conduct engine c...

Page 9: ... may cause dam age to electronic control unit and sensors Be sure to use a specified voltmeter ohmmeter Otherwise accurate measurements may not be obtained or personal injury may result If not specified use a voltmeter with high impedance M V minimum or a digital type voltmeter When taking measurements at electrical connectors using a tester probe 2 be sure to insert the probe from the wire harnes...

Page 10: ...Possible causes for the open circuit are as follows As the cause is in the connector or terminal in many cases they need to be checked particularly carefully Loose connection of connector Poor contact of terminal due to dirt corrosion or rust on it poor contact tension entry of foreign object etc Wire harness being open When checking system circuits including an electronic control unit such as ECM...

Page 11: ...Measure resistance between connector terminals at both ends of the circuit being checked between A 1 and C 1 in the figure If no continuity is indicated infinity or over limit that means that the circuit is open between terminals A 1 and C 1 2 Disconnect the connector included in the circuit connector B in the figure and measure resistance between terminals A 1 and B 1 If no continuity is indicate...

Page 12: ...RT CIRCUIT CHECK wire harness to ground 1 Disconnect negative cable from battery 2 Disconnect connectors at both ends of the circuit to be checked NOTE If the circuit to be checked is connected to other parts dis connect all connectors of those parts Otherwise diagnosis will be misled 3 Measure resistance between terminal at one end of circuit A 1 terminal in figure and body ground If continuity i...

Page 13: ...d or damaged terminals Check each connector terminal in problem circuits carefully to ensure good contact tension by using the corresponding mating terminal If contact tension is not enough reform it to increase contact ten sion or replace 1 Check contact tension by inserting and removing just once 2 Check each terminal for bend and proper alignment Poor terminal to wire connection Check each wire...

Page 14: ...rol unit Keep the antenna feeder more than 20 cm 7 9 in away from electronic control unit and its wire harnesses Do not run the antenna feeder parallel with other wire har nesses Confirm that the antenna and feeder are correctly adjusted IDENTIFICATION INFORMATION VEHICLE IDENTIFICATION NUMBER The number is punched on the front dash panel in the engine room ENGINE IDENTIFICATION NUMBER The number ...

Page 15: ...me contact hoist apply hoist as shown right and left at the same position Lift up the vehicle till 4 tires are a little off the ground and make sure that the vehicle will not fall off by trying to move vehicle body in both ways Work can be started only after this confirmation Make absolutely sure to lock hoist after vehicle is hoisted up When using frame contact hoist 1 Front right tire 2 Rear rig...

Page 16: ...end be sure to block the wheels on ground in order to ensure safety After the vehicle is jacked up be sure to support it on stands It is extremely dangerous to do any work on the vehicle raised on jack alone When using floor jack To perform service with either front or rear vehicle end jacked up be sure to place safety stands under body so that body is securely supported And then check to ensure t...

Page 17: ... Head Camshaft DOJ Double Offset Joint DRL Daytime Running Light DTC Diagnostic Trouble Code Diagnostic Code E EBCM Electronic Brake Control Module ABS Control Module ECM Engine Control Module ECT Sensor Engine Coolant Temperature Sensor Water Temp Sensor WTS EGR Exhaust Gas Recirculation EGRT Sensor EGR Temperature Sensor Recirculated Exhaust Gas Temp Sensor REGTS EFE Heater Early Fuel Evaporatio...

Page 18: ... PCM Powertrain Control Module PCV Positive Crankcase Ventilation R RH Right Hand S SAE Society of Automotive Engineers SDM Sensing and Diagnostic Module Air bag controller Air bag control module SFI Sequential Multiport Fuel Injection SOHC Single Over Head Camshaft T TBI Throttle Body Fuel Injection Single Point Fuel Injection SPI TCC Torque Converter Clutch TCM Transmission Control Module A T Co...

Page 19: ...OLTS IDENTIFICATION CLASS NUMBERS OR MARKS CORRESPOND TO BOLT STRENGTH INCREAS ING NUMBERS REPRESENT INCREASING STRENGTH STANDARD TIGHTENING TORQUE Each fastener should be tightened to the torque specified in each section of this manual If no description or specifi cation is provided refer to the following tightening torque chart for the applicable torque for each fastener When a fastener of great...

Page 20: ... AND LUBRICATION CONTENTS PERIODIC MAINTENANCE SCHEDULE 0B 2 MAINTENANCE SERVICE 0B 5 Engine 0B 5 Ignition System 0B 10 Fuel System 0B 10 Emission Control System 0B 11 Brake 0B 12 Chassis and Body 0B 13 Final Inspection 0B 18 RECOMMENDED FLUIDS AND LUBRICANTS 0B 19 ...

Page 21: ...tive crankcase ventilation System Hoses connections and valve I I I I I IGNITION 1 Ignition wiring damage deterioration I I I I 2 Distributor cap and rotor wear deterioration I I I I 3 Spark plugs clean and adjust the gap I R I R I R I R FUEL 1 Air cleaner Paved road Clean every 5 000 km Replace every 40 000 km Dusty condition Clean every 2 500 km or as required Replace every 40 000 km More freque...

Page 22: ... I I I I 6 Master cylinder and wheel cylinder oil leakage boot kit I I I I I R I I I R 7 Brake hoses and pipes leakage damage I I I I I I I I I I WHEEL 1 Tyres air pressure abnormal wear crack ROTATION Rotate and inspect every 5 000 km 2 Wheels damage I I I I I I I I I I 3 Front wheel bearings loose damage I I I I I I I I I 4 Rear wheel bearings loose damage I I I I I I I I I FRONT AND REAR SUSPEN...

Page 23: ...stem voltage I I I I I I I I I BODY 1 All chassis bolts and nuts tighten I T T T T T T T T 2 All Latches Hinges Locks function I I L I L I L I L I L I L I L I L I L ROAD TEST 1 Operation of Brakes Gear shifting speedometer I I I I I I I I I I 2 Body and Chassis noise I I I I I I I I I I AIR CONDITIONER if equipped 1 Check belt tension I I I I I I I I I I 2 Check receiver drier bubbles I I I I I I ...

Page 24: ...4 in 4 Connect negative cable to battery Water pump generator belt replacement Replace belt with new one Refer to SECTION 6B for replacement procedure of pump belt A C compressor drive belt inspection if equipped 1 Disconnect negative cable from battery 2 Inspect belt for wear deterioration and tension Replace or adjust if necessary A C compressor drive belt tension a 8 10 mm 0 32 0 39 in deflecti...

Page 25: ...left chart WARNING New and used engine oil can be hazardous Be sure to read WARNING in General Precaution in Section 0A and observe what in written there Proper Engine Oil Viscosity Chart Before draining engine oil check engine for oil leakage If any evi dence of leakage is found make sure to correct defective part be fore proceeding to the following work 1 Drain engine oil by removing drain plug ...

Page 26: ... stick oil pan and oil filter capacity Filler inlet is at the top of cyl inder head cover 8 Start engine and run it for three minutes Stop it and wait another 5 minutes before checking oil level Add oil as necessary to bring oil level to FULL level mark on dipstick 1 Low level mark hole 2 Full level mark hole NOTE Engine oil capacity is specified as left table However note that amount of oil requi...

Page 27: ...alls lower than 16 C 3 F in winter and mixture of 70 water and 30 ethylene glycol base cool ant for the market where ambient temperature doesn t fall lower than 16 C 3 F Even in a market where no freezing temperature is antici pated mixture of 70 water and 30 ethylene glycol base coolant should be used for the purpose of corro sion protection and lubrication 1 Remove radiator cap when engine is co...

Page 28: ... Any service on exhaust system should be performed when it is cool When carrying out periodic maintenance or vehicle is raised for other service check exhaust system as follows Check rubber mountings for damage and deterioration Check exhaust system for leakage loose connections dents and damages If bolts or nuts are loose tighten them to specification Refer to Section 6K for torque specification ...

Page 29: ...lter out of air cleaner case 3 Visually check that air cleaner filter is not excessively dirty dam aged or oily 4 Clean filter with compressed air from air outlet side of filter 5 Install air cleaner filter into case referring to Section 6A1 6 Clamp case securely Air Cleaner Filter Replacement Replace air cleaner filter with new one according to steps 1 2 5 and 6 of Air Cleaner Filter Inspection F...

Page 30: ...und repair or replace Fuel Tank Cap Inspection Check fuel filler cap 1 for malfunction and damage gasket 2 for even filler neck imprint deterioration and damage Replace if faulty EMISSION CONTROL SYSTEM PCV Positive Crankcase Ventilation Valve Inspec tion Check crankcase ventilation hoses and PCV hoses for leaks cracks or clog and PCV valve 1 for stick or clog Refer to Section 6E1 for PCV valve ch...

Page 31: ...ame time check wheel cylinders for leakage Replace as necessary For the details refer to Section 5 3 Install brake drum and wheel Brake Hoses and Pipes Inspection Perform this inspection where there is enough light and use a mir ror as necessary Check brake hoses and pipes for proper hook up leaks cracks chafing wear corrosion bends twists and other damage Replace any of these parts as necessary C...

Page 32: ...e Lever and Cable Inspection Parking brake lever Check tooth tip of each notch for damage or wear If any damage or wear is found replace parking lever Check parking brake lever for proper operation and stroke and adjust it if necessary For checking and adjusting procedures refer to Section 5 a Parking brake lever stroke 3 8 notches With 20 kg or 44 lbs of pull pressure Parking brake cable Inspect ...

Page 33: ...disc for dents distortion and cracks A disc in badly damaged condition must be replaced Tire rotation Rotate tires as shown in figure to equalize wear Left hand steering vehicle front Right hand steering vehicle front Wheel bearing inspection 1 Check front wheel bearing for wear damage abnormal noise or rattles For details refer to Section 3D 2 Check rear wheel bearing for wear damage abnormal noi...

Page 34: ...and retighten them as neces sary Repair or replace defective parts if any a 3 Check steering linkage for looseness and damage Repair or replace defective parts if any 4 Check boots 1 and 2 of steering linkage and steering gear case for damage leaks detachment tear etc If damage is found replace it with new one 5 Check universal joints 3 of steering shaft for rattle and dam age If rattle or damage ...

Page 35: ...t to specified torque Change 1 Place vehicle level and drain oil by removing drain plug 2 2 Apply sealant to drain plug after cleaning it and tighten drain plug to specified torque 3 Pour specified oil up to level hole 4 Tighten filler plug to specified torque For recommended oil its amount and tightening torque data re fer to On Vehicle Service of Section 7A Automatic Transmission Fluid level ins...

Page 36: ...oors Check that each door of front rear and back doors opens and closes smoothly and locks securely when closed If any malfunction is found lubricate hinge and latch or repair door lock system Engine hood Check that secondary latch operates properly check that second ary latch keeps hood from opening all the way even when pulling hood release handle inside vehicle Also check that hood opens and cl...

Page 37: ...hift or select lever for smooth shifting to all positions and for good performance of transmis sion in any position With automatic transmission equipped vehicle also check that shift indicator indicates properly according to which position select lever is shifted to Brake Foot brake Check the following that brake pedal has proper travel that brake works properly that it is free from noise that veh...

Page 38: ...tc are operating accurately Lights Check that all lights operate properly Windshield Defroster Periodically check that air comes out from defroster outlet when operating heater or air conditioning Set fan switch lever to HI position and mode lever to defroster position for this check RECOMMENDED FLUIDS AND LUBRICANTS Engine oil SE SF SG SH or SJ grade Refer to engine oil viscosity chart in item 1 ...

Page 39: ...witch 1B 34 A C Switch 1B 34 A C Condenser Cooling Fan Motor Relay and A C Compressor Relay 1B 35 Compressor Assembly 1B 35 Magnet clutch 1B 38 Compressor 1B 41 REQUIRED SERVICE MATERIALS 1B 50 SPECIAL TOOLS 1B 50 AIR CONDITIONING OPTIONAL 1B 1 SH410 SECTION 1B AIR CONDITIONING OPTIONAL CAUTION The air conditioning system of this vehicle uses refrigerant CFC 12 R 12 None of refrigerant compressor ...

Page 40: ...e checked by the shape of the service charge valve GENERAL DESCRIPTION 1 Compressor label 2 Service valve REFRIGERANT FLOW OF AIR CONDITIONING SYSTEM 1 Compressor 2 Magnet clutch 3 Condenser assembly 4 Receiver dryer 5 Dual pressure switch 6 Expansion valve 7 Evaporator Liquid Vapor Superheated Vapor 1B 2 AIR CONDITIONING OPTIONAL SH410 ...

Page 41: ...eceiver dryer outlet pipe 8 Condenser outlet pipe 9 Expansion valve 10 Ventilation air 11 Foot air 12 Defroster air 13 Demister air 14 Fresh air 15 Recirculation air 16 Heater unit 17 Air inlet box 18 Dual Pressure Switch 19 Low pressure charge Valve 20 High pressure charge valve 21 Suction pipe AIR CONDITIONING OPTIONAL 1B 3 SH410 ...

Page 42: ... Drive belt loosen or broken A C compressor faulty Check A C fuse Fusible Link and check short circuit to ground Check A C compressor relay Check ECM and its circuit Check magnet clutch Adjust or replace drive belt Check A C compressor Cool air won t come out A C condenser cooling fan motor won t operative Fuse blown A C condenser cooling fan relay faulty Wiring or grounding faulty A C condenser c...

Page 43: ...r unit Check blower motor Pull out compressor oil in A C system circuit and replace compressor Cool air won t come out only intermittently Wiring connection faulty Expansion valve faulty Excessive moisture in A C system Magnetic clutch faulty Excessive charge of refrigerant Repair as necessary Check expansion valve Replace receiver dryer and evacuation and charging Check magnetic clutch Check char...

Page 44: ...dition for a long time ABNORMAL NOISE FROM MAGNETIC CLUTCH Condition Possible Cause Correction A rumbling noise is heard when compressor is not operating Worn or damaged bearings Replace bearings A chattering noise is heard when compressor is engaged Faulty clutch gap excessive Worn clutch friction surface Compressor oil leaked from shaft seal contaminating the friction surface Adjust clutch gap R...

Page 45: ... heard from evaporator Depending on the combination of the interior exterior temperatures engine rpm and refrigerant pres sure the refrigerant flowing out of the expansion valve may under certain conditions make a whis tling sound At times slightly decreasing refrig erant volume may stop this noise Inspect expansion valve and re place if faulty ABNORMAL NOISE FROM BLOWER MOTOR Condition Possible C...

Page 46: ...s with a leak tester 2 No bubbles observed in sight glass No or insufficient charge of refrigerant in system Refer to the items 3 and 4 3 No temperature difference between compressor inlet and outlet Empty or nearly empty system Evacuate and charge system and then check it for leaks with a leak tester 4 Noticeable temperature difference between compressor inlet and outlet Proper or too much charge...

Page 47: ... 90 C and keep it at specified idle speed Radiator cooling fan should not be working when checking pressure and temperature 6 Turn A C switch ON and set blower switch at HI 3rd position temperature knob at COOL air outlet control knob at FACE fresh circulation control knob at CIRCULATION Confirm that A C compressor and condenser fan are working 7 Keep all windows doors and engine food open CAUTION...

Page 48: ...mperature rela tionship using graph at the left For example if evaporator inlet port temperature is 25 C and center duct air outlet temperature is 8 C their crossing point is within acceptable range as shown in graph at the left 11 If crossing point is out of acceptable range diagnose trouble referring to following Performance Diagnosis table Temp at Evaporator Air Inlet Temp at Center Duct Air Ou...

Page 49: ...wide Compressor malfunction Insufficient compression Check expansion valve Check compressor LOW PRESSURE Pressure low B area of low side graph Insufficient refrigerant Insufficient charge or leakage Expansion valve malfunction valve opens too narrow Clogged refrigerant passage crashed pipe Check for leakage repair if necessary and recharge Check expansion valve Repair or replace MOMETER AT TER DUC...

Page 50: ...adings Continuous air bubbles are visible through sight glass Output air is slightly cold Insufficient refrigerant in system Refrigerant leaking Using a gas leak detector check for leaks and repair as necessary Recharge refrigerant to a specified amount If the pressure reading is al most 0 when the manifold gauges are attached check for any leaks repair them and evacuate the system 0 4 0 6 4 6 56 ...

Page 51: ...witch 5 A C Switch 6 Fuse box 7 A C condenser cooling fan relay 8 A C condenser cooling fan motor 9 Compressor 10 Main fuse box 11 Ignition switch 12 A C evaporator thermistor 13 ECT sensor 14 Compressor relay 15 Alternator 16 Battery 17 A C fuse holder 18 Fusible link AIR CONDITIONING OPTIONAL 1B 13 SH410 ...

Page 52: ...nspection of ECM and its circuit in ENGINE AND EMISSION CONTROL SYSTEM section NOTE As each terminal voltage is affected by the battery voltage confirm that it is 11V or more when ignition switch is ON TERMINAL ARRANGEMENT OF ECM COUPLER VIEWED FROM HARNESS SIDE 1 Blower fan motor 2 ECM 3 Dual pressure switch 4 A C switch 5 A C evaporator thermistor 6 ECT sensor 7 A C condenser fan motor relay 8 A...

Page 53: ...Fig B 8 14 volts Blower fan motor switch or A C switch OFF with engine running 2 33 volts 2341 Evaporator thermistor temperature at approx 15 C 59 F with engine run ning E02 07 V W Evaporator thermis tor temperature EVAP temp sen sor input Ground to engine Fig B 3 09 volts 4693 Evaporator thermistor temperature at approx 2 C 35 6 F with engine run ning If the temperature is less than approx 2 C in...

Page 54: ... 10 kg force a 8 10 mm as deflection 100N 10 kg If belt tension is without above specification adjust belt tension by according to following items i Loosen tension pulley 3 tightening bolt 4 ii Adjust belt tension by tighten or loosen tension pulley adjust bolt 5 iii Tighten tension pulley bolt 4 to specified torque Tightening torque 40 N m 4 0 kg m iv Turn the crank pulley one revolution then che...

Page 55: ...r to splash it over the affected area to gradually raise temperature of such area above freezing point b Obtain proper treatment as soon as possible from a doctor or eye specialist D Should the CFC 12 R 12 liquid come into contact with your skin the affected area should be treated in the same manner as when skin is frostbitten or frozen D Refrigerant must not be handled near where welding or steam...

Page 56: ...charging hose 6 of manifold gauge set 3 to vacuum pump 7 4 Operate vacuum pump 7 and then open discharge side valve 9 Hi of manifold gauge set 3 If there is no blockage in the system there will be an indication on high pressure gauge 10 When this occurs open the other side valve 8 Lo of the set 5 Approx 10 minutes later low pressure gauge 11 should show a vacuum lower than 760 mmHg providing no le...

Page 57: ...H LOW PRESSURE SIDE of A C system at after the initial charging is performed from the high pressure side with the engine stopped NEVER CHARGE TO HIGH PRESSURE SIDE of A C system with engine running Do not charge while compressor is hot When installing tap valve to refrigerant container to make a hole there through carefully follow directions given by manufacturer A pressure gauge should always be ...

Page 58: ... valve of manifold gauge set a little iii As soon as refrigerant comes out with a hiss through a clearance between refrigerant container and tap valve tighten plate nut as well as manifold gauge set low pres sure valve iv Turn handle of tap valve clockwise so that its needle is screwed into the new container to make a hole for refrig erant flow 1 Hiss 8 After the system has been charged with speci...

Page 59: ...er vice operation has been performed which may result in disturbing lines or connections it is advisable to test for leaks Common sense should be used in performing any refrigerant leak test since the need and extent of any such test will in general de pend upon the nature of a complaint and the type of a service per formed on the system LIQUID LEAK DETECTORS There are a number of fittings and pla...

Page 60: ...le being serviced Use of incorrect one will result in leakage of refrigerant damage in parts or other faulty condition NOTE When servicing air conditioning system the following rules must be observed PIPING 1 Suction hose Apply compressor oil refrigerant oil to O ring 2 Discharge hose Apply compressor oil refrigerant oil to O ring 3 Receiver dryer outlet pipe Apply compressor oil refrigerant oil t...

Page 61: ...erant container higher than 40_C D Do not discharge refrigerant into atmosphere D Do not allow liquid refrigerant to touch bright metals Refrigerant combined with moisture is corrosive and will tarnish surfaces of bright metals including chrome D After recovering refrigerant from system the amount of compressor oil removed must be measured and the same amount added to the system REFRIGERANT RECOVE...

Page 62: ...age condenser fins If condenser fin is bent straighten it by using a screwdriver or pair of pliers If any leakage is found from fitting or tube repair or replace con denser Removal 1 Recover refrigerant by using recovery and recycling equipment 1 Be sure to follow the instruction manual for the equipment The amount of compressor oil removed must be measured and the same amount added to the system ...

Page 63: ...ndenser 12 Remove cooling fan from condenser Installation 1 Reverse removal sequence to install condenser assembly noting the follows Tighten specified torque to flared nut for condenser Tightening Torque for flared nut Suction hose 33 N m 3 3 kg m Condenser outlet pipe 13 N m 1 3 kg m NOTE When replacing condenser add 15 cc of refrigerating oil from compressor suction side 2 Evacuate and charge s...

Page 64: ...s Removal 1 Recover refrigerant by using recovery and recycling equipment 1 Be sure to follow the instruction manual for the equipment The amount of compressor oil removed must be measured and the same amount added to the system 2 Disconnect condenser outlet pipe 1 and receiver dryer outlet pipe 2 from receiver dryer 3 3 Remove receiver dryer 3 from its holder by removing mount ing bolt 4 NOTE As ...

Page 65: ... for receiver dryer NOTE When replacing receiver dryer add 20 cc of refrigerating oil from compressor suction side Blind plugs of receiver dryer should not be removed un til just before receiver dryer is installed 2 Evacuate and charge system according to previously de scribed procedure AIR CONDITIONING OPTIONAL 1B 27 SH410 ...

Page 66: ...e amount of compressor oil removed must be measured and the same amount added to the system 3 Open glove box door and remove glove box upper panel by re moving mounting screws 1 4 Remove instrument panel mounting screws 2 and loosen instrument panel mounting screw 4 5 Remove ECM from vehicle body 6 Remove air inlet box 1 from cooling unit 2 7 Remove connecting stay 3 4 from heater and cooling unit...

Page 67: ...at moisture and dust do not enter cooling unit 10 Disconnect drain hose 1 11 Remove its attaching bolt 2 and nut 3 to remove evaporator unit 4 DISASSEMBLY 1 Detach clamps 1 and screws 2 to separate evaporator upper and lower cases from each other 2 Take out evaporator 1 from upper 2 and lower cases 3 3 Detach following components from evaporator Pipe 5 Expansion valve 4 Thermistor AIR CONDITIONING...

Page 68: ...in HEATER AND VENTILATION section Install the cutting part of drain hose downward Tighten specified torque to flared nut for cooling unit Tightening Torque Suction pipe 33 N m 3 3 kg m Receiver dryer outlet pipe 13 N m 1 3 kg m NOTE When the thermistor removed it should be reinstalled in original position If cooling unit or evaporator is replaced pour 25 cc of re frigerating oil to compressor suct...

Page 69: ...water contained in a water pan 4 3 Previously close both low and high pressure valves 4 Open refrigerant container valve 5 Open high pressure valve to adjust pressure to approx 5 kg cm2 6 Read the pressure indicated on low pressure gauge 5 At the same item use a thermometer to measure water temperature 7 Use the Chart as shown left to check whether above measure ments faIl within shaded acceptable...

Page 70: ...APORATOR THERMISTOR Check resistance between evaporator thermistor 1 terminals If check results are as not specified replace thermistor Temperature Removal Refer to items REMOVAL and DISASSEMBLY in the section of EVAPORATOR Installation 1 Reverse removal sequence to install thermister 2 Evacuate and charge system according to previously described procedure NOTE When the thermistor removed it shoul...

Page 71: ...re to follow the instruction manual for the equipment The amount of compressor oil removed must be measured and the same amount added to the system 2 Replace defective hose or pipe NOTE As soon as the above hose or pipe is disconnected cap its opened fitting to prevent moisture and dust from entering Installation 1 Reverse removal procedure to install refrigerant line 2 Evacuate and charge system ...

Page 72: ... 2 1 kg cm2 B Approx 2650 kPa 26 5 kg cm2 C Approx 230 kPa 2 3 kg cm2 D Approx 2060 kPa 20 6 kg cm2 Tightening torque for dual pressure switch 10 N m 1 0 kg m ON Continuity OFF No continuity A C SWITCH REMOVAL 1 Disconnect A C switch coupler from instrument panel harness 2 Remove instrument panel center garnish 1 refer to HEATER CONTROL LEVER in section 1A 3 Pull out A C switch 2 by unlock the loc...

Page 73: ... relay 3 Compressor and condenser cooling fan fuse COMPRESSOR ASSEMBLY REMOVAL 1 Run engine at idle with air conditioning on for 10 minutes 2 Disconnect negative cable at battery 3 Recover refrigerant from refrigeration system using recovery and recycling equipment 1 Be sure to follow the instruction manual for the equipment The amount of compressor oil removed must be measured and the amount adde...

Page 74: ... Tighten compressor mounting bolts and nut to specified torque Tightening Torque a 30 N m 3 0 kg m 21 5 Ib ft b 50 N m 5 0 kg m 36 0 Ib ft If compressor is replaced pour new compressor oil with the same amount as that drained from compressor in REMOVAL Refer to REPLENISHING COMPRESSOR OIL in this section Evacuate and charge system according to previously described procedure 1 New compressor 2 Remo...

Page 75: ...nd installation or for some other reason replenish 20cc oil When replenishing gas only oil replen ishment is not necessary When replacing compressor Compressor oil is sealed in each new compressor by the amount required for air conditioner cycle Therefore when using a new compressor for replacement drain oil from it by the amount calcu lated as follows C A B C Amount of oil to be drained A Amount ...

Page 76: ...se leakage Using ohmmeter measure resistance of clutch coil between clutch lead wire and compressor body ground If measured resistance is not within tolerance replace coil Standard resistance 3 0 5 0 at 20 C REMOVAL 1 Fix Pressure plate with special tool A and then remove pres sure plate nut and washer Special Tool A 09991 06020 2 Remove pressure plate 1 by using a special tool B Special Tool B 09...

Page 77: ... 5 With special tool D in place remove drive clutch 3 from com pressor 2 with puller 1 Special Tool D 09951 65510 6 Disconnect coil lead wire from compressor housing 7 Remove circlip by using special tool C 8 Remove clutch coil 1 Special Tool C 09900 06107 AIR CONDITIONING OPTIONAL 1B 39 SH410 ...

Page 78: ...plate 2 Shim 3 Install pressure plate i Adjust clearance between pressure plate 1 and drive clutch 2 by putting shims on compressor shaft Standard clearance a 0 4 0 7 mm ii Fix pressure plate 1 with special tool A then tighten pressure plate fixing nut as specified below Special Tool A 09991 06020 Tightening Torque 16 5 N m 16 5 kg m 1B 40 AIR CONDITIONING OPTIONAL SH410 ...

Page 79: ...Front gasket 17 Cylinder front head 18 Blank 19 O ring 20 Seal plate 21 Circlip 22 Oil felt 23 Joint service connector bolt 24 Housing through bolt 1 Joint service connector 2 Diffuser seal 3 O ring 4 Diffuser 5 Rear housing 6 Rear gasket 7 Reed valve 8 Valve rear plate 9 Suction valve AIR CONDITIONING OPTIONAL 1B 41 SH410 ...

Page 80: ... key 1 from shaft by using a hammer and punch 4 Remove circlip 1 by using special tool E Special Tool E 09900 06108 5 Apply compressor oil to inner bore 6 Remove lip seal by using special tool F The following explains this removal procedure i Fit special tool F into the clutch installation boss Special Tool F 09990 48220 1B 42 AIR CONDITIONING OPTIONAL SH410 ...

Page 81: ... the protru sion 1 and groove 3 are engaged iv Turn special tool F by 30 60 v Pull up special tool F to remove lip seal 1 7 Remove joint service connector 1 8 Remove O rings from service connector and discard them 9 Drain oil into container 10 Remove front housing NOTE Do not reuse five washers 1 Bolt 2 Washer AIR CONDITIONING OPTIONAL 1B 43 SH410 ...

Page 82: ...plate 2 Remove two pins 1 from cylinder block 13 Remove the rear housing 2 by prying its protrusion 1 NOTE Be careful not to scratch sealing surface of rear housing 14 Remove rear valve plate 2 Remove two pins 1 from rear housing 15 Remove front and rear O rings 2 from cylinder block 1 and discard them 1B 44 AIR CONDITIONING OPTIONAL SH410 ...

Page 83: ...h fine oil stone Red valve 1 Check reed for cracks scratches deformation and corrosion Replace Front housing 1 Check sealing surface for cracks scratches and deformation Replace Piston Cylinder block 1 Check cylinder bore for scratches and corrosion 2 Check radial bearings for poor contact worn out needle scoring or pit 3 Check shaft for excessive axial play 4 Check piston for excessive axial play...

Page 84: ...r cylinder iii Install suction reed valve 1 rear valve plate 2 and discharge reed valve 3 onto rear cylinder top For installing positions refer to the figure NOTE Front and rear reed valves suction and discharge are the same Rear valve plate is marked R 4 Pin holes iv Lubricate gasket 1 with compressor oil Install gasket 1 on valve plate NOTE Front and rear gasket are different so do not interchan...

Page 85: ...s suction and discharge are the same Front valve plate is marked F 4 Pin holes iv Lubricate gasket 1 with compressor oil Install gasket 1 on valve plate NOTE Front and rear gaskets are different so do not inter change them To differentiate them refer to description on rear valve plate Assemble gaskets so that their protruded surfaces face upward 4 Install front housing 1 on front cylinder and tigh...

Page 86: ...rom compressor 1 Lip seal 2 O ring 3 Seal iii Press it slowly by hand until lip seal 4 contacts the stopper 3 of front housing 2 by using special tool H Special Tool H 09990 58220 NOTE With lip seal pressed in completely its upper face must come to the position lower than the circlip fitting groove Check this condition visually Do not use a press machine hammer etc when pressing 1 Circlip installa...

Page 87: ...al oil after compressor overhauling 40 cc Oil capacity in air conditioner system 60 100 cc 10 Install service connector i Lubricate new O rings 3 with compressor oil and install them in service connector 1 ii Install service connector 1 to compressor NOTE Suction port has larger internal opening than discharge port Tightening Torque a 26 N m 2 6 kg m 2 Diffuser seal 4 Diffuser 11 Check shaft rotat...

Page 88: ...nent Refrigerant REFRIGERANT DRUM 95793 60D00 000 Refrigerant charge SPECIAL TOOLS 09990 28210 Key presser 09990 48220 Lip seal remover 09900 06107 Snap ring pliers Opening type 09900 06108 Snap ring pliers Closing type 09990 58210 Pressure plate remover 09990 58230 Lip seal protector 09990 58220 Lip seal presser 09991 06020 Armature plate spanner 09951 65510 Shaft protector ...

Page 89: ... power supply circuit failure 3B1 10 DTC 21 23 24 VSS circuit failure 3B1 11 DTC 22 Engine speed signal circuit failure 3B1 12 DTC 41 42 43 44 45 Motor circuit failure 3B1 13 DTC 51 Clutch circuit failure 3B1 14 DTC 53 P S control module power supply circuit failure 3B1 15 DTC 52 54 55 P S control module failure 3B1 15 Inspection of P S control module circuit 3B1 16 Trouble diagnosis for trouble n...

Page 90: ...to the steering column In this system the P S control module determines the level and direction of the assist force for the steering wheel according to the signals from the torque sensor and the vehicle speed runs the motor so as to assist operation of the steering wheel 1 Steering wheel 2 Steering column assembly 3 P S control module 4 Torque sensor 5 Motor assembly with clutch incorporated 6 Ste...

Page 91: ... sensor 15 Connector E41 16 Connector X01 17 Connector X02 ELECTRICAL POWER STEERING EPS SYSTEM 3B1 3 SH410 TERMINAL CIRCUIT TERMINAL CIRCUIT E41 1 P S control module power supply from battery X01 1 Motor output 1 E41 2 Ground X01 2 Motor output 2 E41 3 X01 3 Clutch output 1 E41 4 X01 4 Clutch output 2 E41 5 Diagnosis switch terminal X02 1 E41 6 Engine speed signal X02 2 5V power supply for torque...

Page 92: ...on indicator lamp which alert the driver to the occurrence of the trouble The trouble area is shown as Diag nostic Trouble Code DTC and it can be read using analog type voltmeter For detail refer to DTC CHECK in this Section PRECAUTIONS IN DIAGNOSING TROUBLES Take a note of DTC indicated first Be sure to read PRECAUTIONS FOR ELECTRONIC CIRCUIT SERVICE in Section 0A before inspection and observe wh...

Page 93: ...and left during test driving See WARNING 1 Check if any trouble symptom exists 2 Inspect and repair basic parts referring to DIAGNOSIS CHART in Section 3 3 If the trouble cannot be repaired in Step 3 2 inspect and repair referring to TROUBLE DIAGNOSIS FOR TROUBLE NOT INDICATED BY ON BOARD DIAG NOSTIC SYSTEM in this section Does the trouble recur Go to Step 5 Go to Step 4 4 Confirm that the problem...

Page 94: ...ittent times a day a month other________________ Conditions for Occurrence of Problem Vehicle at stop ignition is switch ON position When starting at initial start only at every start Other_______________ Vehicle speed while while accelerating while decelerating at stop while turning while running at constant speed other________________ Road surface condition Paved road rough road snow covered roa...

Page 95: ...switch to OFF position and disconnect voltmeter probes from monitor coupler DTC CLEARANCE 1 Turn ignition switch to ON position 2 Using service wire short diagnosis output terminal 1 to ground terminal 2 of monitor coupler 3 3 After keeping them connected for 4 seconds or longer discon nect one end of service wire open and within 2 seconds after that make the disconnected end of service wire conta...

Page 96: ...ircuit fail DTC 21 is set High Low TIME sec DTC VOLTMETER DEFLECTION PATTERN DIAGNOSTIC ITEM DIAGNOSIS 12 Normal This code appears when none of the other codes are identified 11 13 Torque sensor 14 Torque sensor 15 21 23 VSS signal 24 22 Engine speed signal 41 Diagnose trouble according to DIAGNOSTIC FLOW TABLE 42 DIAGNOSTIC FLOW TABLE corresponding to each code No 43 Motor 44 45 51 Clutch 52 54 P...

Page 97: ... If OK turn ignition switch to ON position 4 Hold steering wheel at position for run straight 5 Check voltage between X02 5 W wire termi nal and X02 3 G wire terminal with X02 connector connected to P S control module Is it about 2 5V Go to Step 4 Repair high resistance open or short to power circuit or ground in torque sensor main sensor X02 5 W wire circuit and recheck 4 1 Check voltage between ...

Page 98: ...le cover 2 Check proper connection for 5 pin X02 con nector to P S control module 3 If OK turn ignition switch to ON position 4 Check voltage between X02 2 R wire termi nal and body ground with X02 connector con nected to P S control module Is it about 5 V Go to Step 3 Repair high resistance open or short to power circuit or ground in 5V power supply and X02 2 R wire cir cuit and recheck 3 1 Check...

Page 99: ... 8 pin E41 connector from P S control module 4 Check proper connection to P S control module at terminal E41 7 V wire 5 If OK connect voltmeter between E41 7 V wire terminal and body ground with E41 connector connected 6 Hoist front end of vehicle and lock front right tire 7 Turn front left tire quickly with ignition switch to ON position Does voltmeter indicate deflection between 0 1V and 9 11V a...

Page 100: ...ne running Is DTC 22 indicated Go to Step 3 It is nothing abnormal for DTC 22 System is in normal condition 3 1 Check proper connection to P S control module and ECM at each Br wire terminal P S control module side E41 6 terminal ECM PCM side Refer to in Section 6E1 then check intermittent trouble referring to INTERMITTENT TROUBLE in Section 0A 2 If they are OK check high resistance open or short ...

Page 101: ...con nector to P S control module 3 If OK start engine 4 Check voltage between X01 1 B wire termi nal and body ground and X01 2 R wire termi nal and body ground with X01 connector con nected to P S control module Are they 5 7 V with steering wheel held at position for vehicle to run straight Go to Step 3 Repair poor connec tion high resistance open or short to power circuit or ground in X01 1 B wir...

Page 102: ...body ground with X01 connector connected to P S control module Is it 10 14 V with steering wheel held at position for vehicle to run straight Go to Step 3 Repair poor connec tion high resistance open or short to power circuit or ground in X01 3 B wire cir cuit 3 1 Check voltage between X01 4 B wire terminal and body ground with X01 connector connected to P S control module Is it 0 V Go to Step 4 R...

Page 103: ... steering column hole cover 2 Check P S fuse and proper connection to P S control module at E41 1 B R wire terminal 3 If OK check voltage between E41 1 B R wire terminal and body ground with E41 connector connected to P S control module Is it 10 14 V Check intermittent trouble referring to IN TERMITTENT TROUBLE in Section 0A If OK substitute a known good P S con trol module and re check Repair poo...

Page 104: ...h coupler disconnected from it Voltage Check 1 Remove steering column hole cover with ignition switch to OFF position 2 Check voltage at each terminal with couplers 2 connected P S control module Each voltage should be as specified in the fol lowing page NOTE As each terminal voltage is affected by the battery voltage confirm that it is 11V or more when ignition switch is ON position TERMINAL ARRA...

Page 105: ...1 5 7V Engine idling Steering wheel held at position for vehicle to run straight X01 2 Motor output 2 5 7V Engine idling Steering wheel held at position for vehicle to run straight X01 3 Clutch output 1 10 14V Engine idling X01 4 Clutch output 2 0V X02 1 X02 2 5V power supply for torque sensor About 5V Ignition switch is ON position Check voltage between X02 2 and X02 3 terminals X02 3 Torque sens...

Page 106: ...TION Steering wheel feels heavy Perform IN SPECTION OF STEERING FORCE on next page before diagnosis Steering wheel installed improperly twisted Poor performance of torque sensor Poor performance of motor and clutch Faulty steering column Poor performance of VSS Install steering wheel correctly Check torque sensor referring to ON VEHICLE SERVICE of TORQUE SENSOR Check motor and clutch referring to ...

Page 107: ... inspect as follows and replace if found defective Tie rod end ball stud for wear Lower ball joint for wear Steering shaft joint for wear Steering pinion or rack gear for wear or breakage Each part for looseness STEERING FORCE INSPECTION 1 Place vehicle on level road and set steering wheel 1 at straight ahead position 2 Check that tire inflation pressure is as specified Refer to tire placard 3 Sta...

Page 108: ...l umn CHECKING PROCEDURE Refer to CHECKING STEERING COLUMN ASSEMBLY AND LOWER SHAFT FOR ACCIDENT DAMAGE FOR EPS MODEL in Section 3C CAUTION Never disassemble steering column assembly remove torque sensor or motor assembly with clutch incorpo rated Performing any of these prohibited services will affect original performance of EPS system P S CONTROL MODULE REMOVAL 1 Disconnect negative cable at bat...

Page 109: ...nce between terminals of motor assembly cou pler 1 If check result is not as specified above replace steering col umn assembly 4 Check continuity between terminal of motor assembly coupler and body ground If check result is not as specified above replace steering col umn assembly ELECTRICAL POWER STEERING EPS SYSTEM 3B1 21 SH410 Steering wheel turned fully left Steering wheel held at position for ...

Page 110: ...own in left figure Standard current reference value About 0 65 A If check result is not satisfactory replace steering column as sembly 6 Connect battery 1 between X01 3 and X01 4 then check that clutch operation sound is heard If check result is not satisfactory replace steering column as sembly 3B1 22 ELECTRICAL POWER STEERING EPS SYSTEM SH410 ...

Page 111: ...RING WHEEL AND COLUMN NOTE For the descriptions items not found in this section refer to the same section of Service Manual mentioned in Forward of this manual CONTENTS CHECKING STEERING COLUMN ASSEMBLY AND LOWER SHAFT FOR ACCIDENT DAMAGE FOR EPS MODEL 3C 2 ...

Page 112: ... anything is found faulty replace as steering column assembly 3 Take measurement length a of steering column assembly 1 as shown If it is shorter than specified length replace steering column as sembly with new one Length a 553 5 555 5 mm 21 8 21 9 in 4 Check steering shaft joints and shaft for any damages such as crack breakage malfunction or excessive play If anything is found faulty replace as ...

Page 113: ...at proper cleaning and protection of machined surfaces and friction areas is part of the repair procedure This is considered standard shop practice even if not specifically stated A liberal coating of engine oil should be applied to friction areas during assembly to protect and lubricate the surfaces on initial operation Whenever valve train components pistons piston rings connecting rods rod bear...

Page 114: ...t in mind while working on engine that 12 volt electrical system is capable of violent and damaging short cir cuits When performing any work where electrical terminals could possibly be grounded ground cable of the battery should be dis connected at battery Any time the air cleaner air intake hose throttle body or intake manifold is removed the intake opening should be covered This will protect ag...

Page 115: ...ry cover the fitting to be disconnected with a shop cloth Put that cloth in an ap proved container when disconnection is completed Never run engine with fuel pump relay disconnected when en gine and exhaust system are hot Fuel or fuel vapor hose connection varies with each type of pipe When reconnecting fuel or fuel vapor hose be sure to connect and clamp each hose correctly referring to left figu...

Page 116: ...pressure in lines Fuel connections are now safe for servic ing 5 Upon completion of servicing install fuel pump relay to relay box CAUTION This work must not be done when engine is hot If done so it may cause adverse effect to catalyst FUEL LEAKAGE CHECK PROCEDURE After performing any service on fuel system check to make sure that there are no fuel leakages as follows 1 Turn the ignition switch ON...

Page 117: ...ine and emission control system which controls the A F mixture ignition tim ing emission etc suitably to engine conditions by ECM ECM has an On Board Diagnostic system which detects a malfunction in this system When diagnosing a trouble in the engine including this system be sure to have understanding of the outline of On Board Diagnostic system and each item in Precaution in Diagnosing Trouble an...

Page 118: ...firmation in this section Is trouble symptom identified Go to Step 6 Go to Step 7 6 Rechecking and Record of DTC 1 Recheck for DTC referring to DTC Check in Section 6E1 Is there any DTC s Go to Step 9 Go to Step 8 7 Rechecking and Record of DTC 1 Recheck for DTC referring to DTC Check in Section 6E1 Is there any malfunction DTC s Go to Step 10 8 Engine Basic Inspection and Engine Diagnosis Table 1...

Page 119: ... S j Other j Other j OTHERS VEHICLE ENVIRONMENTAL CONDITION WHEN PROBLEM OCCURS Environmental Condition Weather Temperature Frequency Road j Fair j Cloudy j Rain j Snow j Always j Other j Hot j Warm j Cool j Cold _F _C j Always j Always j Sometimes times day month j Only once j Under certain condition j Urban j Suburb j Highway j Mountainous j Uphill j Downhill j Tarmacadam j Gravel j Other Vehicl...

Page 120: ...t support proper function of the engine INSPECTION ITEM REFERRING SECTION Engine oil level leakage Engine coolant level leakage Fuel level leakage A T fluid level leakage Air cleaner element dirt clogging Battery fluid level corrosion of terminal Water pump belt and or cooling fan belt tension damage Throttle cable play installation Vacuum hoses of air intake system disconnection looseness deterio...

Page 121: ...s engine start Go to Step 5 Go to Step 7 5 Check engine idle speed IAC duty referring to Idle Speed IAC Duty Inspection in section 6E1 Is check result as specified Go to Step 6 Go to ENGINE DIAGNOSIS TABLE in this section 6 Check ignition timing referring to Ignition Timing Inspec tion in section 6F Is check result as specified Go to ENGINE DIAGNOSIS TABLE in this section Adjust ignition timing 7 ...

Page 122: ...n DTC a normal code is indicated ENGINE DIAGNOSIS TABLE Condition Possible Cause Reference Item Hard starting Engine cranks OK Engine and emission control system out of order Faulty CMP sensing rotor Faulty idle air control system Faulty ECT sensor or MAP sensor Faulty ECM Low compression Compression leak from valve seat Sticky valve stem Weak or damaged valve springs Compression leak at cylinder ...

Page 123: ...its circuit in Section 6E1 Previously outlined Diagnosis in Section 5 Diagnosis in Section 7C Improper engine idling or engine fails to idle Ignition system out of order Faulty spark plug Faulty ignition coil Fuel system out of order Fuel pressure out of specification Malfunctioning fuel pressure regulator Engine overheating Engine and emission control system out of order Faulty idle air control s...

Page 124: ...in Section 6E1 Fuel pressure check in Section 6E1 Refer to Overheating Section Fuel injector in Section 6E1 TP sensor ECT sensor or MAP sensor in Section 6E1 Inspection of ECM and its circuit in Section 6E1 Previously outlined Surges Engine power variation under steady throttle or cruise Feels like the vehicle speeds up and down with no change in the accelerator pedal Ignition system out of order ...

Page 125: ... oil filter or oil strainer Poor oil pump performance Dragging brakes Slipping clutch Blown cylinder head gasket Thermostat in Section 6B Water pump in Section 6B Radiator in Section 6B Engine oil and oil filter change in Section 0B Oil pressure check in Section 6A Oil pressure check in Section 6A Diagnosis in Section 5 Diagnosis in Section 7C Cylinder head inspection in Section 6A Poor gasoline m...

Page 126: ...the mechanical noise make sure that Ignition timing is properly adjusted Specified spark plug is used Specified fuel is used Valve noise Improper valve lash Worn valve stem and guide Weak or broken valve spring Warped or bent valve Loose camshaft housing bolts Piston ring and cylinder noise Worn piston ring and cylinder bore Connecting rod noise Worn crankpin bearing Worn crankpin Loose connecting...

Page 127: ...ctor PCV valve in Section 6E1 EVAP control system check in Section 6E1 Check oxygen sensor output voltage referring to DTC No 14 Diag Flow Table in Section 6E1 Fuel injector in Section 6E1 Inspection of ECM and its circuit in Section 6E1 Previously outlined Excessive nitrogen oxides NOx emission Fuel system out of order Fuel pressure out of specification Engine and emission control system Lead con...

Page 128: ...eaner Outlet Hose 6A1 9 Cylinder Head Cover 6A1 10 Throttle Body and Intake Manifold 6A1 11 Exhaust Manifold 6A1 14 Timing Belt and Belt Tensioner 6A1 16 Oil Pan and Oil Pump Strainer 6A1 22 Oil Pump 6A1 25 Rocker Arms Rocker Arm Shaft and Camshaft 6A1 30 Valves and Cylinder Head 6A1 38 Piston Piston Rings Connecting Rods and Cylinders 6A1 50 UNIT REPAIR OVERHAUL 6A1 60 Engine mounting 6A1 60 Engi...

Page 129: ... C Single Overhead Camshaft valve mechanism arranged for V type valve configuration and 16 valves IN2 and EX2 one cylinder The single overhead camshaft is mounted over the cylinder head it is driven from crankshaft through tim ing belt and no push rods are provided in the valve train system 6A1 2 ENGINE MECHANICAL SH410 ...

Page 130: ... intersecting passages drilled in crankshaft and then injected from a small hole provided on big end of connecting rod to lubricate piston rings and cylinder wall In another path oil goes up to cylinder head and lubri cates camshaft journals rocker arms camshaft etc after passing through the internal oilway of rocker arm shafts An oil relief valve is provided on oil pump This valve starts relievin...

Page 131: ...mpression gauge into spark plug hole Special Tool A 09915 64510 001 B 09915 64510 002 C 09915 64530 D 09915 67010 7 Disengage clutch to lighten starting load on engine for M T model and depress accelerator pedal all the way to make throttle valve full open 8 Crank engine with fully charged battery and read the highest pressure on compression gauge NOTE For measuring compression pressure crank engi...

Page 132: ...iscon nected Special Tool A 09915 67310 B 09918 08210 x 2 pcs MARUTI GENUINE PARTS C 3 way joint 09367 04002 D Hose 09355 35754 6010 3 Run engine at specified idle speed refer to Section 6E1 and read vacuum gauge Vacuum should be within following specifi cation Vacuum specification 52 6 65 8 kPa 40 50 cm Hg at sea level 15 7 19 7 in Hg at specified idling speed 4 After checking connect vacuum hose...

Page 133: ...rpm 5 After checking oil pressure stop engine and remove oil pres sure gauge 6 Before reinstalling oil pressure switch 1 be sure to wrap its screw threads with a sealing tape and tighten switch to specified torque NOTE If sealing tape edge is bulged out from screw threads of switch cut it off Tightening Torque a 14 N m 1 4 kg m 10 5 lb ft 7 After installing oil pressure switch start engine and che...

Page 134: ... valve clearance insert thickness gauge between camshaft and cam riding face of rocker arm 7 If valve lash is out of specification adjust it to specification by turning adjusting screw after loosening lock nut After adjustment tighten lock nut to specified torque while hold ing adjusting screw stationary and then make sure again that valve lash is within specification Special Tool A 09917 18210 Ti...

Page 135: ...r installation AIR CLEANER FILTER This air cleaner filter is of dry type Remember that it needs clean ing according to following procedure REMOVAL 1 Open air cleaner upper case 1 after unhooking its clamps 2 Remove air cleaner filter from case INSPECTION Check air cleaner filter for dirt Replace excessively dirty element CLEANING Blow off dust by compressed air from air outlet side of filter INSTA...

Page 136: ...TALLATION Reverse removal procedure for installation AIR CLEANER OUTLET HOSE REMOVAL 1 Disconnect negative cable at battery 2 Disconnect breather pipe 1 from air cleaner outlet hose 2 3 Disconnect IAT sensor 3 wire at coupler 4 Remove air cleaner outlet hose by loosing its clamps INSTALLATION Reverse removal procedure for installation ENGINE MECHANICAL 6A1 9 SH410 ...

Page 137: ...ure A Sealant 99000 31110 NOTE Be sure to check each of these parts for deterioration or any damage before installation and replace if found defec tive 2 Install cylinder head cover to cylinder head and tighten cover bolts to specified torque Tightening Torque a 11 N m 1 1 kg m 8 0 lb ft NOTE When installing cylinder head cover use care so that cylin der head cover gasket or O rings will not get o...

Page 138: ...d in Sec tion 6 2 Disconnect negative cable at battery 3 Disconnect radiator outlet hose 1 to drain coolant After draining coolant be sure to connect radiator outlet hose securely WARNING To help avoid danger of being burned do not remove drain plug and radiator cap while engine and radiator are still hot Scalding fluid and steam can be blown out under pressure if plug and cap are taken off too so...

Page 139: ...ound wire 2 from intake manifold Fuel injectors 3 TP sensor 4 IAC valve 5 MAP sensor 6 7 Disconnect following hoses Brake booster hose 1 from intake manifold EVAP canister purge hose 2 from EVAP canister purge valve Engine cooling water coolant hose 3 from IAC valve and intake manifold PCV hose 4 from intake manifold 8 Disconnect fuel feed hose 1 from fuel delivery pipe 6A1 12 ENGINE MECHANICAL SH...

Page 140: ... gasket When installing intake manifold install clamps securely 1 Long bolt 2 Short bolt Adjust accelerator cable play referring to Section 6E1 Check to ensure that all removed parts are back in place Reinstall any necessary parts which have not been reinstalled Refill cooling system referring to Section 6B Upon completion of installation turn ignition switch ON but en gine OFF and check for fuel ...

Page 141: ... Exhaust manifold nut 14 Exhaust pipe bolt 15 Catalytic converter case nut Tightening Torque Do not reuse WARNING To avoid danger of being burned do not service exhaust system while it is still hot Service should be performed after system cools down REMOVAL 1 Disconnect negative cable at battery 2 Disconnect oxygen sensor coupler and clamp 3 Remove exhaust pipe and then remove oxygen sensor 1 by u...

Page 142: ...ts to specified torque Tightening Torque a 23 N m 2 3 kg m 17 0 lb ft 3 Install exhaust manifold cover 1 5 Install oxygen sensor 1 Tightening Torque a 45 N m 4 5 kg m 32 5 lb ft 6 Install exhaust pipe 2 with new catalytic converter case gas ket Tightening Torque b 43 N m 4 3 kg m 31 5 lb ft c 40 N m 4 0 kg m 29 0 lb ft 7 Connect oxygen sensor coupler and clamp its wire securely 8 Connect negative ...

Page 143: ...utside cover 13 Tensioner stud 14 Outside cover bolt 15 Outside cover nut REMOVAL 1 Disconnect negative cable at battery 2 Remove outlet hose and air cleaner assembly 3 Remove clutch housing torque converter housing for A T low er plate 1 4 Remove rubber plug 1 on right side fender apron panel to ro tating crankshaft 5 Remove A C compressor belt 3 if equipped 6 Remove water pump pulley 1 and drive...

Page 144: ...haft pulley 4 10 Install crankshaft timing belt pulley bolt temporarily to turn crankshaft 11 Release harness clamps 12 Remove timing belt outside cover 13 For installation of timing belt align 4 timing marks as shown in figure by turning crankshaft 1 V mark on cylinder head cover 2 Timing mark by E on camshaft timing belt pulley 3 Arrow mark on oil pump case 4 Timing mark on crankshaft timing bel...

Page 145: ...tact with oil water etc 1 Camshaft allowable turning range By timing mark within 90_ from V mark on head cover on both right and left 2 Crankshaft allowable turning range By timing mark within 90_ from arrow mark on oil pump case on both right and left INSPECTION D Inspect timing belt for wear or crack Replace it as necessary D Inspect tensioner for smooth rotation INSTALLATION 1 Install tensioner...

Page 146: ... range which is described on previous page 4 Check that timing mark 2 on crankshaft timing belt pulley is aligned with arrow mark 1 on oil pump case If not align two marks by turning crankshaft but be careful not to turn it more than its allowable turning range which is described on previous page 5 Install timing belt and tensioner spring 2 With two sets of marks aligned and tensioner plate pushed...

Page 147: ...g make sure that seal is between water pump and oil pump case Tightening Torque a 11 N m 1 1 kg m 8 0 lb ft 1 Long bolt 2 Short bolt 8 With crankshaft locked using flat end rod or the like 5 remove crankshaft timing pulley bolt 4 9 Install crankshaft pulley 2 Fit hole of pulley to pin 1 on crankshaft timing belt pulley and tighten pulley bolts 3 to specified torque Tightening Torque a 16 N m 1 6 k...

Page 148: ...ction 6B 15 Adjust A C compressor belt tension if equipped Refer to Section 1B 16 Install rubber plug on right side fender apron panel 17 Install clutch housing torque converter housing for A T lower plate 18 Install outlet hose and air cleaner assembly refer to INSTAL LATION of AIR CLEANER ASSEMBLY in this section 19 Connect negative cable at battery ENGINE MECHANICAL 6A1 21 SH410 ...

Page 149: ...Support engine by using support device 3 Raise vehicle 4 Drain engine oil by removing drain plug 1 5 Remove exhaust pipe 6 Remove clutch housing torque converter housing for A T low er plate 7 Remove engine rear mounting nut 1 and engine mounting member bolts 2 and then keep space enough to remove the oil pan by putting the wood block between engine mounting member 3 and vehicle body 4 CAUTION Whe...

Page 150: ...150 2 Install O ring 2 into cylinder block securely as shown in figure Install oil pump strainer 1 and oil pan 3 to cylinder block Tighten strainer bolt 4 first and then bracket bolt 5 to speci fied torque Tightening Torque a 11 N m 1 1 kg m 8 0 lb ft After fitting oil pan to cylinder block run in securing bolts and start tightening at the center move wrench outward tightening one bolt at a time T...

Page 151: ...e a 55 N m 5 5 kg m 40 0 lb ft b 40 N m 4 0 kg m 29 0 lb ft 5 Install exhaust pipe 1 Tighten bolts and nuts to specified torque Tightening Torque a 43 N m 4 3 kg m 31 5 lb ft b 40 N m 4 0 kg m 29 0 lb ft NOTE Use new gasket for exhaust pipe 6 Install clutch housing torque converter housing for A T lower plate 7 Lower hoist 8 Remove engine support device 9 Install oil level gauge 10 Refill engine w...

Page 152: ...tlined 3 Remove generator and its bracket NOTE When installing bracket tighten nut A first 4 Remove oil pan and oil pump strainer as previously outlined 5 Detach A C compressor with hose connected from bracket if equipped NOTE Suspend removed compressor at a place where no dam age will be caused during removal and installation of oil pump 6 Remove A C compressor bracket if equipped 7 Remove cranks...

Page 153: ...move oil pump 1 assembly DISASSEMBLY 1 Remove oil level gauge guide bolt 3 and pull out guide 2 from oil pump 1 2 Remove rotor plate 1 3 Remove outer rotor 1 and inner rotor 2 6A1 26 ENGINE MECHANICAL SH410 ...

Page 154: ...il pump case for excessive wear or damage MEASUREMENT Radial clearance Check radial clearance between outer rotor 1 and case using thickness gauge If clearance exceeds its limit replace outer rotor or case Limit on radial clearance between outer rotor and case 0 2 mm 0 0079 in Side clearance Using straight edge and thickness gauge measure side clear ance Limit on side clearance 0 1 mm 0 0039 in EN...

Page 155: ...y engine oil to O ring 1 and install O ring and guide 2 INSTALLATION 1 Install two oil pump pins and oil pump gasket to cylinder block Use a new gasket 2 To prevent oil seal lip from being damaged or upturned when installing oil pump to crankshaft fit special tool Oil seal guide to crankshaft and apply engine oil to special tool Special Tool A 09926 18210 3 Install oil pump to cylinder block As th...

Page 156: ...mp strainer oil pan and oth er parts as previously outlined 7 Install A C compressor and its bracket referring to Section 1B 8 Check to ensure that all removed parts are back in place Reinstall any necessary parts which have not been reinstalled 9 Adjust water pump drive belt tension referring to Section 6B 10 Adjust A C compressor belt tension if equipped Refer to Section 1B 11 Refill engine with...

Page 157: ...haust valve 16 Valve spring 17 Valve spring retainer 18 Valve cotter 19 Valve spring seat 20 Valve stem seal Tightening Torque Apply engine oil to sliding surfaces of each part REMOVAL 1 After disconnect negative and positive cables at battery re move battery and battery tray 2 Remove timing belt as previously outlined 3 Remove camshaft timing belt pulley 1 by using special tool Special Tool A 099...

Page 158: ...connector Place a container or rag under distributor case for a small amount of oil flows out during removal of case NOTE To remove camshaft housing bolts loosen them in such or der as indicated in figure a little at a time 7 Remove timing belt inside cover 1 8 Remove intake rocker arm 1 with clip 2 from rocker arm shaft 3 NOTE Do not bend clip when removing intake rocker arm 9 Remove rocker arm s...

Page 159: ...SPECTION Adjusting Screw and Rocker Arm If tip of adjusting screw 1 is badly worn replace it Rocker arm 2 must be replaced if its cam riding face 3 is badly worn EX IN Rocker Arm Shaft Runout Using V blocks and dial gauge check runout If runout exceeds its limit replace rocker arm shaft Runout limit 0 10 mm 0 004 in 6A1 32 ENGINE MECHANICAL SH410 ...

Page 160: ...ts limit replace camshaft Runout limit 0 10 mm 0 0039 in Camshaft Journal Wear Check camshaft journals and camshaft housings for pitting scratches wear or damage If any malcondition is found replace camshaft or cylinder head with housing Never replace cylinder head without replacing housing ENGINE MECHANICAL 6A1 33 SH410 Item Standard Limit Rocker arm I D 15 996 16 014 mm 0 629 0 630 in Rocker arm...

Page 161: ...1 N m 1 1 kg m 8 0 lb ft NOTE Do not rotate camshaft while gaging plastic is installed 6 Remove housing and using scale 2 on gaging plastic enve lope measure gaging plastic 1 width at its widest point If measured camshaft journal clearance exceeds limit measure journal housing bore and outside diameter of camshaft jour nal Replace camshaft or cylinder head assembly whichever the difference from sp...

Page 162: ...g 1 3 Check O ring for damage or deterioration Install O ring to rocker arm shaft 4 Install rocker arm shaft bolts and tighten them to specified torque Tightening Torque a 11 N m 1 1 kg m 8 0 lb ft 5 Fill small amount of engine oil into arm pivot holding part 3 of rocker arm shaft Install rocker arm intake side 1 with clips 2 to rocker arm shaft ENGINE MECHANICAL 6A1 35 SH410 ...

Page 163: ... sure to first fit No 1 housing to No 1 journal of camshaft securely Indicates position from timing beltside Install in numerical or der starting from timing belt side Indicates direction of housing Install so that arrow is directed toward timing belt side After applying engine oil to housing bolts tighten them tem porarily first Then tighten them by following sequence as in dicated in figure Tigh...

Page 164: ...outlined 12 Remove cylinder head cover 13 After applying sealant to part A as shown in figure install dis tributor case to cylinder head and tighten its fixing bolts to spe cified torque A Sealant 99000 31110 Tightening Torque a 11 N m 1 1 kg m 8 0 lb ft Install distributor assembly referring to Section 6F 1 O ring 14 Adjust valve clearance as previously outlined 15 Install cylinder head cover 16 ...

Page 165: ...otters 2 Valve spring retainer 3 Valve spring Be sure to position spring in place with its bottom end small pitch end facing the bottom valve spring seat side Tightening Torque Do not reuse Apply engine oil to sliding surfaces of each part REMOVAL 1 Relieve fuel pressure according to procedure described in Sec tion 6 2 Disconnect negative cable at battery 3 Disconnect radiator outlet hose 1 to dra...

Page 166: ...head Fuel injectors TP sensor IAC valve Oxygen sensor if equipped EVAP canister purge valve if equipped and then release above wire harnesses from clamps 8 Disconnect following hoses Canister purge hose from EVAP canister purge valve Radiator inlet hose from thermostat case Brake booster hose from intake manifold Heater inlet hose from thermostat case Throttle body outlet hose from throttle body 9...

Page 167: ...iously outlined 13 Loosen cylinder head bolts in such order as indicated in figure and remove them 14 Check all around cylinder head for any other parts required to be removed or disconnected and remove or disconnect what ever necessary 15 Remove cylinder head with thermostat case intake manifold and exhaust manifold A Camshaft pulley side B Distributor case side 6A1 40 ENGINE MECHANICAL SH410 ...

Page 168: ...ring retainer and valve spring 5 Remove valve from combustion chamber side 6 Remove valve stem oil seal 1 from valve guide and then valve spring seat 2 NOTE Do not reuse oil seal once disassembled Be sure to use new oil seal when assembling 7 Using special tool Valve guide remover drive valve guide out from combustion chamber side to valve spring side Special Tool A 09916 44910 NOTE Do not reuse v...

Page 169: ...s Remove all carbon from valves Inspect each valve for wear burn or distortion at its face and stem and as necessary replace it Measure thickness a of valve head If measured thickness ex ceeds limit replace valve 6A1 42 ENGINE MECHANICAL SH410 Item Standard Limit Valve stem In 5 465 5 480 mm 0 2152 0 2157 in diameter Ex 5 440 5 455 mm 0 2142 0 2148 in Valve guide In 5 500 5 512 mm g I D Ex 0 2166 ...

Page 170: ...ithout any break and the width a of pattern must be within specified range D Valve seat repair A valve seat 2 not producing a uniform contact with its valve or showing width of seating contact that is out of specified range must be repaired by regrinding or by cutting and regrinding and finished by lapping 1 EXHAUST VALVE SEAT Use valve seat cutters 1 to make two cuts as illustrated in figure Two ...

Page 171: ... Check cylinder head for cracks in intake and exhaust ports com bustion chambers and head surface Flatness of gasketed surface Using a straightedge and thickness gauge check surface at a total of 6 locations If distortion limit given below is exceeded correct gasketed surface with a surface plate and abrasive pa per of about 400 Waterproof silicon carbide abrasive paper place paper on and over sur...

Page 172: ...rings can cause chatter not to mention possibility of reducing power output due to gas leakage caused by decreased seating pressure Spring squareness Use a square and surface plate to check each spring for square ness in terms of clearance between end of valve spring and square Valve springs found to exhibit a larger clearance than limit given below must be replaced Valve spring squareness limit 1...

Page 173: ...tool Valve guide installer contacts cylinder head After installing make sure that valve guide protrudes by 11 5 mm 0 45 in from cylinder head Special Tool C 09916 56011 D 09916 58210 NOTE D Do not reuse valve guide once disassembled Install new valve guide Oversize D Intake and exhaust valve guides are identical Valve guide oversize 0 03 mm 0 0012 in Valve guide protrusion In and Ex 11 5 mm 0 45 i...

Page 174: ...uide only by pushing special tool by hand Tapping or hitting special tool may cause damage to seal 6 Install valve to valve guide Before installing valve to valve guide apply engine oil to stem seal valve guide bore and valve stem 7 Install valve spring and spring retainer Each valve spring has top end large pitch 1 end and bottom end small pitch 2 end Be sure to position spring in place with its ...

Page 175: ...at oil jet venturi plug is installed and if it is that it is not clogged When installing it be sure to tighten to specified torque Tightening Torque a 3 5 N m 0 35 kg m 2 5 lb ft 3 Apply engine oil to cylinder head bolts and tighten them gradu ally as follows a Tighten all bolts to 32 N m 3 2 kg m 23 5 lb ft according to numerical order in figure b In the same manner as in 1 tighten them to 52 N m...

Page 176: ... Adjust accelerator cable play Refer to Section 6E1 Check to ensure that all removed parts are back in place Reinstall any necessary parts which have not been rein stalled Refill cooling system referring to Section 6B Connect negative cable at battery Confirm that ignition timing is within specification referring to Section 6F Verify that there is no fuel leakage water leakage and ex haust gas lea...

Page 177: ... lined 2 Drain engine oil 3 Remove oil pan and oil pump strainer as previously outlined 4 Mark cylinder number on all pistons connecting rods and rod bearing caps using silver pencil or quick drying paint 5 Remove rod bearing caps 6 Install guide hose 1 over threads of rod bolts This is to prevent damage to bearing journal and rod bolt threads when removing connecting rod 7 Decarbon top of cylinde...

Page 178: ...ession rings Top and 2nd and oil ring from piston 2 Remove piston pin from connecting rod Ease out piston pin circlips 1 as shown Force piston pin out CLEANING Clean carbon from piston head and ring grooves using a suitable tool ENGINE MECHANICAL 6A1 51 SH410 ...

Page 179: ...inder bore dia limit 74 15 mm 2 9196 in Tapper and out of round limit 0 10 mm 0 0039 in NOTE If any one of four cylinders has to be rebored rebore all four to the same next oversize This is necessary for the sake of uniformity and balance a 50 mm 1 96 in b 95 mm 3 74 in Pistons Inspect piston for faults cracks or other damaged Damaged or faulty piston should be replaced Piston diameter As indicate...

Page 180: ...2 If clearance is out of specification replace piston Ring groove clearance Top 0 03 0 07 mm 0 0012 0 0027 in 2nd 0 02 0 06 mm 0 0008 0 0023 in Piston pin Check piston pin connecting rod small end bore and piston bore for wear or damage paying particular attention to condition of small end bore bush If pin connecting rod small end bore or pis ton bore is badly worn or damaged replace pin connectin...

Page 181: ... normal manner If measured clearance is found to exceed its limit replace con necting rod Connecting rod alignment Mount connecting rod on aligner to check it for bow and twist and if limit is exceeded replace it Limit on bow 0 05 mm 0 0020 in Limit on twist 0 10 mm 0 0039 in 6A1 54 ENGINE MECHANICAL SH410 Item Standard Limit Piston Top ring 0 15 0 30 mm 0 0059 0 0118 in 0 7 mm 0 0275 in Piston ri...

Page 182: ...umber US025 on its backside as indicated in figure but standard size one has no number Rod bearing clearance 1 Before checking bearing clearance clean bearing and crank pin 2 Install bearing in connecting rod and bearing cap 3 Place a piece of gaging plastic 1 to full width of crankpin as contacted by bearing parallel to crankshaft avoiding oil hole 4 Install rod bearing cap 1 to connecting rod Wh...

Page 183: ...r piston to cylinder clearance When installing a standard size piston make sure to match piston with cylinder as follows a Each piston has stamped number 1 or 2 as shown It represents outer diameter of piston b There are also stamped numbers of 1 and 2 on the cylinder block as shown The first number represents inner diameter of No 1 cylinder the second number of No 2 cylinder the third number of N...

Page 184: ... come on intake side Circlip or 2 Install piston rings to piston As indicated in figure 1st 1 and 2nd rings 2 have RN or R mark respectively When installing these piston rings to piston direct marked side of each ring toward top of piston 1st ring differs from 2nd ring in thickness shape and color of surface contacting cylinder wall Distinguish 1st ring from 2nd ring by referring to figure When in...

Page 185: ...in der bore point front mark punch mark or arrow mark 2 on pis ton head to crankshaft pulley side 1 4 Install piston and connecting rod assembly into cylinder bore Use special tool Piston ring compressor to compress rings Guide connecting rod into place on crankshaft Using a hammer handle tap piston head to install piston into bore Hold ring compressor firmly against cylinder block until all pisto...

Page 186: ...at all removed parts are back in place Re install any necessary parts which have not been reinstalled Refill engine with engine oil referring to ENGINE OIL CHANGE in Section 0B Refill cooling system referring to Section 6B Connect negative cable at battery Verify that ignition timing is within specification referring to Section 6F Verify that there is no fuel leakage coolant leakage oil leak age a...

Page 187: ...rear mounting bracket 11 Rear torque stopper M T 12 Rear torque stopper bracket M T 13 Engine left mounting A T 14 Engine left mounting bracket A T 15 Front lower cross member bolt 16 Engine mounting member bolt 17 Engine rear mounting nut 18 Engine right mounting bracket bolt 19 Engine right mounting bush bolt 20 Rear torque stopper bracket nut 21 Engine left mounting bracket nut 22 Rear torque s...

Page 188: ...ipes For A T mod el 8 Remove radiator referring to Section 6B WARNING To help avoid danger of being burned do not remove drain plug and radiator cap while engine and radiator are still hot Scalding fluid and steam can be blown out under pressure if plug and cap are taken off too soon 9 Remove outlet hose 1 and remove air cleaner assembly 2 by removing its fastening bolt 3 10 Disconnect following c...

Page 189: ... sensor IAC valve Fuel injectors ECT sensor CMP sensor Oxygen sensor Oil pressure switch Back up light switch M T Shift switch A T Solenoid coupler A T A T vehicle speed sensor A T Battery negative cable from transmission Generator Starting motor and release above wire harness from clamps 13 Disconnect fuel feed hose 1 from fuel delivery pipe 14 Disconnect heater inlet and outlet hoses 15 Remove e...

Page 190: ... generator cover 20 Detach A C compressor with hose connected from bracket if equipped NOTE Suspend removed compressor at a place where no dam age will be caused during removal and installation of en gine assembly 21 Remove A C compressor bracket if equipped 22 Install support device 23 Remove engine mounting member bolts 1 24 Remove front lower cross member bolts 2 25 Remove rear torque stopper b...

Page 191: ...on from body recheck to make sure all hoses electric wires and cables are discon nected from engine and transmission 28 Lower engine with transmission front lower cross member and engine mounting member from body 6A1 64 ENGINE MECHANICAL SH410 ...

Page 192: ... engages with differential gear or center bearing support Use care not to damage oil seal lip when inserting Install stabilizer bar refer to Section 3D Install exhaust pipe Install radiator Connect each hoses securely Clamp electric wire securely 10 Adjust clutch pedal free travel referring to Section 7C M T Connect gear select cable referring to Section 7B A T Adjust oil pressure control cable re...

Page 193: ...l to bolt and bearing surfaces Tightening Torque Do not reuse 6 Timing pulley key 7 Crankshaft Apply engine oil to crankshaft journals 8 Thrust bearing Set oil grooves of bearing to crank weds Apply engine oil 9 Rear oil seal Apply engine oil to contact part of crankshaft with oil seal lip 10 Pin 11 Oil seal housing gasket 12 Oil seal housing 13 Housing bolt 14 Input shaft bearing 15 Flywheel 16 F...

Page 194: ...ey timing belt and crankshaft timing pulley 4 Remove cylinder head assembly 5 Remove oil pan and oil pump strainer 6 Remove oil pump 1 7 Remove oil seal housing 8 Remove connecting rod bearing caps 9 Loosen crankshaft bearing cap bolts in such order as indicated in figure a little at a time and remove bearing caps 10 Remove crankshaft from cylinder block ENGINE MECHANICAL 6A1 67 SH410 ...

Page 195: ...ne or oversize one to obtain standard thrust play Crankshaft Thrust Play Standard 0 11 0 31 mm 0 0044 0 0122 in Limit 0 38 mm 0 0149 in Thickness of crankshaft thrust bearing Standard 2 500 mm 0 0984 in Oversize 0 125 mm 0 0049 in 2 563 mm 0 1009 in Out of round and taper uneven wear of journals An unevenly worn crankshaft journal shows up as a difference in diameter at a cross section or along it...

Page 196: ...specified torque Inspection Check bearings for pitting scratches wear or damage If any malcondition is found replace both upper and lower halves Never replace one half without replacing the other half Main bearing clearance Check clearance by using gaging plastic 1 according to following procedure 1 Remove bearing caps 2 Clean bearings and main journals 3 Place a piece of gaging plastic to full wi...

Page 197: ...ameter by using following procedure As shown in figure crank webs of No 2 and No 3 cylinders 1 have five stamped numerals Three kinds of numerals 1 2 and 3 represent following journal diameters The first second third fourth and fifth left to right stamped nu merals represent journal diameters at bearing caps 1 2 3 4 and 5 respectively For example in figure the first leftmost numeral 3 indicates th...

Page 198: ...s that cap bore dia of cap 5 is within 49 000 49 006 mm 1 9291 1 9294 in 3 There are five kinds of standard bearings differing in thickness To distinguish them they are painted in following colors at the position as indicated in figure Each color indicates following thickness at the center of bear ing 1 Paint ENGINE MECHANICAL 6A1 71 SH410 Alphabet stamped Bearing cap bore diameter without bearing...

Page 199: ... nu merals stamped on new crankshaft or alphabets stamped on mating surface of new cylinder block UNDERSIZE BEARING 0 25 mm 0 25 mm undersize bearing is available in five kinds varying in thickness To distinguish them each bearing is painted in following colors at such position as indicated in figure Each color represents following thickness at the center of bear ing 1 Paint 6A1 72 ENGINE MECHANIC...

Page 200: ...ze bearing by referring to table given below Check bearing clearance with newly selected undersize bear ing Rear Oil Seal Carefully inspect rear oil seal 1 for wear or damage If its lip is worn or damaged replace it For oil seal 1 installation press fit rear oil seal so that oil seal housing 2 end face is flush with oil seal end face ENGINE MECHANICAL 6A1 73 SH410 Measured journal diameter 44 744 ...

Page 201: ... thickness gauge check gasketed surface for distortion and if flatness exceeds its limit correct it Honing or reboring cylinders 1 When any cylinder needs reboring all other cylinders must also be rebored at the same time 2 Select oversized piston according to amount of cylinder wear 3 Using micrometer measure piston diameter a 15 mm 0 59 in 6A1 74 ENGINE MECHANICAL SH410 Item Standard Limit Flatn...

Page 202: ... journals journal bearings thrust bearings crankpins connecting rod bearings pistons pis ton rings and cylinder bores Journal bearings bearing caps connecting rods rod bear ings rod bearing caps pistons and piston rings are in com bination sets Do not disturb such combination and make sure that each part goes back to where it came from when installing 1 Install main bearings to cylinder block 1 Up...

Page 203: ...asket and oil seal housing Do not reuse gasket removed in disassembly Apply engine oil to oil seal lip before installation Tighten housing bolts to specifi cation Tightening Torque a 11 N m 1 1 kg m 8 0 lb ft NOTE As there are 2 types of housing bolts refer to figure for their correct use After installing oil seal housing gasket edges might bulge out it so cut them off to make them flush with cyli...

Page 204: ...cylinder head bolts to specified torque as pre viously outlined and loosen them once till tightening torque becomes zero And then torque them to speci fication again A Camshaft pulley side B Distributor case side 11 Install camshaft crankshaft timing belt pulley timing belt crankshaft pulley water pump pulley etc as previously out lined 12 Install clutch to flywheel for M T vehicle For clutch inst...

Page 205: ...ure gauge 09917 18210 Tappet adjuster wrench 09926 18210 Oil seal guide Vinyl resin 09917 68221 Camshaft pulley holder 1 09916 14510 Valve lifter 2 09916 14910 Valve lifter attachment 09916 84511 Forceps 09916 44910 Valve guide remover 09916 34542 Reamer handle 09916 38210 Reamer 11 mm 09916 58210 Valve guide installer handle 09916 56011 Valve guide installer attachment 09916 34550 Reamer 5 5 mm 0...

Page 206: ...RIALS MATERIALS RECOMMENDED PRODUCT USE Sealant SUZUKI BOND NO 1207C 99000 31150 Mating surfaces of cylinder block and oil pan Sealant SUZUKI BOND NO 1215 99000 31110 Mating surfaces of camshaft housing No 1 and No 6 Mating surfaces of distributor case and cylinder head Mating surfaces of cylinder head cover gasket ...

Page 207: ...B 3 DIAGNOSIS 6B 4 MAINTENANCE 6B 4 Coolant 6B 4 Coolant Level 6B 5 Cooling System Service 6B 5 Cooling System Flush and Refill 6B 6 Water Pump Belt Tension 6B 7 ON VEHICLE SERVICE 6B 8 Cooling System Draining 6B 8 Cooling Water Pipes or Hoses 6B 8 Thermostat 6B 9 Water Pump Belt 6B 10 Radiator 6B 11 Water Pump 6B 12 REQUIRED SERVICE MATERIALS 6B 13 ...

Page 208: ...pump Cylinder Cylinder head Throttle body IAC valve Intake manifold Water inlet pipe Thermostat case Heater core 2 When coolant is warmed up to normal temperature and the thermostat opens coolant passes through the radia tor core to be cooled as well as the above flow circuit 1 Radiator inlet hose 2 Radiator outlet hose 3 Water intake pipe 4 Thermostat 5 Water pump 6 IAC valve throttle body 7 Heat...

Page 209: ...ent personal injury This fan is electric and can come on whether or not the engine is running The fan can start automatically in response to the ECM PCM and ECT sensor with the ignition switch in the ON position ECT SENSOR Coolant temp gauge is incorporated with ECT engine coolant temperature sensor 1 and installed to thermostat case 2 This gauge activates a temp meter gauge in the instrument clus...

Page 210: ... as damage to cooling system could occur Even in a market where no freezing tempera ture is anticipated mixture of 70 water and 30 antifreeze anticorrosion coolant ethyl ene glycol base coolant should be used for the purpose of corrosion protection and lu brication ANTI FREEZE PROPORTIONING CHART 6B 4 ENGINE COOLING SH410 DIAGNOSIS Condition Possible Cause Correction Engine overheats Loose or brok...

Page 211: ... to reservoir to bring coolant level up to FULL mark Then reinstall cap NOTE If proper quality antifreeze is used there is no need to add extra inhibitors or additives that claim to improve system They may be harmful to proper operation of system and are unnecessary expense When installing reservoir cap align arrow marks 4 on res ervoir and cap COOLING SYSTEM SERVICE Cooling system should be servi...

Page 212: ...ollen or otherwise deteriorated 6 Clean frontal area of radiator core COOLING SYSTEM FLUSH AND REFILL 1 Remove radiator cap when engine is cool Turn cap slowly to the left until it reaches a stop Do not press down while turning it Wait until pressure is relieved indicated by a hissing sound then press down on cap and continue to turn it to the left WARNING To help avoid danger of being burned do n...

Page 213: ...eservoir with soap and water Flush it well with clean water and drain Reinstall tank and hose 8 Add 50 50 mixture of good quality ethylene glycol antifreeze and water to radiator and tank Fill radiator to the base of radiator filler neck and reservoir to FULL level mark 2 Reinstall reservoir cap aligning the ar row marks 3 on the tank and cap 9 Run engine with radiator cap removed until radiator u...

Page 214: ...OOLING SYSTEM DRAINING 1 Remove radiator cap 2 Loosen drain plug 1 on radiator or disconnect radiator outlet hose 2 from radiator to drain coolant 3 After draining coolant be sure to tighten drain plug or connect radiator outlet hose securely 4 Fill cooling system Refer to Item COOLANT of MAINTE NANCE COOLING WATER PIPES OR HOSES without heater with heater 1 Face mark downward 2 Align marks 6B 8 E...

Page 215: ...EMOVAL 1 Disconnect negative cable at battery 2 Drain cooling system and tighten drain plug or connect radiator outlet hose 3 Detach thermostat cap 1 from thermostat case 2 4 Remove thermostat 1 INSPECTION 1 Make sure that air bleed valve 1 of thermostat is clear Should this valve be clogged engine would tend to overheat 2 Check to make sure that valve seat is free from foreign matters which would...

Page 216: ...bout overcooling or overheating tendency 1 Thermostat 2 Thermometer 3 Heater INSTALLATION 1 Install thermostat 1 on thermostat case 2 so that air bleed valve 3 comes upmost and into the recession of thermostat case 2 Install thermostat cap to thermostat case aligning arrow marks on cap and case A Upside WATER PUMP BELT REMOVAL INSTALLATION Refer to GENERATOR WATER PUMP BELT in SECTION 6H WATER PUM...

Page 217: ...nect radiator inlet and reservoir hose from radiator 5 Disconnect A T fluid hoses 1 from A T fluid pipes 2 for A T vehicle Place a drain pan or a suitable container under radia tor to receive A T fluid which will flow out when hoses are dis connected 6 Remove radiator 1 with A T fluid hoses 2 if equipped and cooling fan 3 INSPECTION Check radiator for leakage or damage Straighten bent fins if any ...

Page 218: ...ve timing belt and tensioner according to procedure de scribed in SECTION 6A 4 Remove oil level gauge guide 1 with oil level gauge 5 Remove generator adjusting arm 2 6 Remove water pump 1 gasket and rubber seal 2 INSPECTION NOTE Do not disassemble water pump If any repair is required on pump replace it as assembly Rotate water pump by hand to check for smooth operation and in spect water pump impe...

Page 219: ...ioner spring timing belt and timing belt outside cover referring to SECTION 6A 7 Install crankshaft pulley water pump pulley pump drive belt 8 Adjust water pump belt tension referring to SECTION 6H 9 Connect negative cable at battery 10 Fill cooling system 11 After installation check each part for leakage ENGINE COOLING 6B 13 SH410 REQUIRED SERVICE MATERIALS MATERIALS USE Ethylene glycol base cool...

Page 220: ...SYSTEM GENERAL DESCRIPTION FUEL SYSTEM The main components of the fuel system are fuel tank fuel pump fuel filter and fuel level gauge and it includes three lines fuel feed line fuel return line and fuel vapor line 1 Fuel tank 2 Fuel pump 3 Fuel level gauge 4 Fuel filter 5 Fuel filler cap 6 Tank pressure control valve 7 Black nozzle 8 Breather hose 9 Fuel feed line 10 Fuel return line 11 Fuel vapo...

Page 221: ...h a shop cloth Be sure to put that cloth in an ap proved container when disconnection is completed Note that fuel hose connection varies with each type of pipe Be sure to connect and clamp each hose cor rectly referring to the left figure Clamp securely at a position 3 to 7 mm 0 12 0 27 in from hose end With short pipe fit hose as far as it reaches pipe joint as shown Clamp securely at a position ...

Page 222: ...ng to procedure on p 6 4 2 Disconnect negative cable at battery 3 Disconnect fuel hoses from fuel pipes at the front and rear of each fuel pipes 4 Remove pipe cover from body 5 Put clamp position mark 2 on body and pipes so that clamps 1 can be installed on original position 6 Remove pipes with clamp from body 7 Remove clamp from pipes INSTALLATION 1 Install clamps 1 to marked position on pipes If...

Page 223: ...EMOVAL 1 Relieve fuel pressure in fuel feed line according to procedure on p 6 4 2 Disconnect negative cable at battery 3 Hoist vehicle 4 Place fuel container under fuel filter WARNING A small amount of fuel may be released after fuel hose is disconnected In order to reduce the chance of personal injury cover hose and pipe to be disconnected with a shop cloth Be sure to put that cloth in an approv...

Page 224: ...ount of fuel may be released after fuel hose is disconnected In order to reduce the chance of per sonal injury cover hose and pipe to be disconnected with a shop cloth Be sure to put that cloth in an ap proved container when disconnection is completed REMOVAL 1 Relieve fuel pressure in fuel feed line according to procedure described on p 6 4 2 Disconnect negative cable at battery 3 Remove rear sea...

Page 225: ...fuel tank check hoses and pipes connected to fuel tank for leaks loose connections deterioration or damage Also check fuel pump and level gauge gasket for leaks visually inspect fuel tank for leaks and damage Replace any damaged or malconditioned parts INSTALLATION 1 Install fuel pump and fuel level gauge to fuel tank Use new gas kets 2 Install tank pressure control valve to fuel tank directing it...

Page 226: ... figure and clamp them securely 7 Connect fuel hoses to filter and pipes as shown in figure and clamp them securely 8 Connect fuel pump and level gauge connectors 9 Install rear seat cushion 10 Connect negative cable to battery 11 With engine OFF and ignition switch ON check for fuel leaks ENGINE FUEL 6C 7 SH410 ...

Page 227: ... and contamination If present replace or clean and check for presence of dirt in fuel tank For inspection of fuel level gauge refer to BODY ELECTRICAL section of this manual INSTALLATION 1 Clean mating surfaces of fuel pump assembly and fuel tank 2 Install new gasket and plate to fuel pump assembly then install fuel pump assembly to fuel tank 3 Connect wire harness connector and fuel hoses to fuel...

Page 228: ...ystem Check 6E1 35 B 6 Engine Start Signal Check 6E1 36 B 7 Radiator Fan Control System Check 6E1 37 B 8 A C Control Signal Check If equipped 6E1 38 B 9 Electric Load Signal Circuits Check 6E1 39 B 10 Fuel Cut Operation Check 6E1 40 Inspection of ECM PCM and Its Circuits 6E1 41 Voltage Check 6E1 41 Resistance Check 6E1 44 ON VEHICLE SERVICE 6E1 45 General 6E1 45 Accelerator Cable Adjustment 6E1 45...

Page 229: ...onic control system and emission control sys tem Air intake system includes air cleaner MAP sensor throttle body IAC valve and intake manifold Fuel delivery system includes fuel pump delivery pipe fuel pressure regulator fuel injectors etc Electronic control system includes ECM PCM vari ous sensors and controlled devices Emission control system includes EVAP and PCV systems ...

Page 230: ...VAP canister 9 Tank pressure control valve 10 Fuel pressure regulator 11 Ignition switch 12 PCV valve 13 Fuel injector 14 Oxygen sensor 15 Fuel pump 16 Main fuse 17 ECT sensor 18 Three way catalytic convertor 19 CMP sensor 20 Battery 21 ECM PCM 22 Fuel pump relay ENGINE AND EMISSION CONTROL SYSTEM 6E1 3 SH410 ...

Page 231: ...sor 12 Engine coolant FUEL DELIVERY SYSTEM The fuel delivery system consists of the fuel tank fuel pump fuel filter fuel pressure regulator delivery pipe and fuel injectors The fuel in the fuel tank is pumped up by the fuel pump filtered by the fuel filter and fed under pressure to each injector through the delivery pipe As the fuel pressure applied to the injector the fuel pressure in the fuel fe...

Page 232: ...ative emission control system A C control system if equipped Also with 3 A T model ECM PCM controls auto matic transmission INFORMATION SENSORS 1 MAP sensor 2 TP sensor 3 IAT sensor 4 ECT sensor 5 Oxygen sensor 6 VSS Reed switch 7 VSS A T VSS A T 8 CMP sensor 9 Transmission range switch A T 10 A C evaporator temp sensor if equipped 11 A C dual pressure switch if equipped CONTROL DEVICES a Fuel inj...

Page 233: ...6E1 6 ENGINE AND EMISSION CONTROL SYSTEM SH410 ...

Page 234: ...01 16 E01 17 E01 18 E01 19 E01 20 E01 21 E01 22 E02 1 E02 2 E02 3 E02 4 E02 5 E02 6 E02 7 E02 8 E02 9 E02 10 E02 11 E02 12 E02 13 E02 14 E02 15 E02 16 Blank IAC valve Transmission range switch 2 Transmission range switch N Transmission range switch P Blank Test switch terminal Diagnosis switch terminal Electric load signal for blower fan motor Stop light switch brake pedal switch Blank Data link c...

Page 235: ...ENSOR MAP SENSOR CMP SENSOR INPUT OUTPUT ELECTRIC CONTROL DEVICE 6E1 8 ENGINE AND EMISSION CONTROL SYSTEM SH410 SIGNAL FROM SENSOR SWITCH AND CONTROL MODULE FUEL PUMP RELAY f f f FUEL INJECTOR f f f f f f f f f A C COMPRESSOR CONTROL RELAY CONDENSER FAN CONTROL RELAY f f IAC VALVE f f f f f f f f f f f IGNITER f f f f f f f f EVAP CANISTER PURGE VALVE f f f f RADIATOR FAN CONTROL RELAY f f MIL f f...

Page 236: ...engine is running malfunction indi cator lamp turns OFF When ECM PCM detects a trouble which has occurred in the areas it makes malfunction indicator lamp turn ON while the en gine is running to warn the driver of such occurrence of trouble and at the same time it stores the exact trouble area in ECM PCM back up memory PRECAUTIONS IN DIAGNOSING TROUBLES Before identifying diagnostic trouble code d...

Page 237: ... DLC 1 located on underside of instrument panel at driver s seat side Special Tool A 09931 76011 SUZUKI scan tool B Mass storage cartridge C 09931 76030 16 14 pin DLC adapter 4 Turn ignition switch ON 5 Read DTC according to instructions displayed on SUZUKI scan tool and print it or write it down Refer to SUZUKI scan tool oper ator s manual for further details If communication between SUZUKI scan ...

Page 238: ...ection NOTE If abnormality or malfunction lies in two or more areas malfunction indicator lamp indicates applicable codes three times each And flashing of these codes is repeated as long as diag nosis terminal is grounded and ignition switch is held at ON position Take a note of diagnostic trouble code indicated first 4 After completing the check turn ignition switch OFF and discon nect service wi...

Page 239: ... details 5 After completing the clearance turn ignition switch OFF and disconnect SUZUKI scan tool from data link connector DLC Not using SUZUKI scan tool 1 Turn OFF ignition switch 2 Disconnect battery negative cable for specified time below to erase diagnostic trouble code stored in ECM PCM memory and reconnect it Time required to erase DTC 6E1 12 ENGINE AND EMISSION CONTROL SYSTEM SH410 Ambient...

Page 240: ...o DIAG NOSTIC FLOW TABLE corresponding to each code No P0500 16 Vehicle speed sensor P0110 18 Intake air temperature sensor P0115 19 Engine coolant temperature sensor 12 Normal This code appears when none of the oth er codes above codes are identified A T ONLY DIAGNOSTIC TROUBLE CODE NO MALFUNCTION INDICATOR DIAGNOSTIC ITEM DIAGNOSIS SUZUKI SCAN TOOL MIL LAMP FLASHING PATTERN DIAGNOSTIC ITEM DIAGN...

Page 241: ... Switch Terminal Circuit Check 1 With the ignition switch ON position check voltage between E01 7 terminal of ECM connector and ground Is voltage 4 5 V Go to Step 2 P wire test switch terminal shorted to ground circuit If OK substitute a known good ECM and recheck 2 MIL Bulb and Circuit Check 1 Using service wire ground E03 17 terminal of ECM connector Does MIL turn ON at ignition switch ON posi t...

Page 242: ...IT CHECK MALFUNCTION INDICATOR LAMP DOES NOT FLASH OR JUST REMAINS ON EVEN WITH GROUND ING DIAGNOSIS SWITCH TERMINAL STEP ACTION YES NO 1 MIL Circuit Check 1 Turn ignition switch OFF and disconnect connec tors from ECM PCM Does MIL turn ON at ignition switch ON V Y circuit shorted to ground Go to Step 2 2 ECM PCM Connection Check 1 Turn ignition switch OFF Is connector C01 8 connection connected t...

Page 243: ...use Check Is main TAIL LH fuse in good condition Go to Step 3 Check for short in circuits connected to this fuse 3 Main Relay Check 1 Turn OFF ignition switch and remove main relay 2 Check for proper connection to main relay at terminal A and B 3 If OK check main relay for resistance and operation referring to MAIN RELAY INSPECTION in this section Is check result satisfactory Go to Step 4 Replace ...

Page 244: ...and ground at ignition switch ON Is it 10 14 V Check ground circuits B Bl and B for open If OK then substitute a known good ECM PCM and recheck Go to Step 6 6 Is operating sound of main relay heard in Step 1 Go to Step 7 B Y or B R wire open 7 Main Relay Check 1 Check main relay according to procedure in Step 3 Is main relay in good condition B Y or B R wire open Replace main relay Fig for STEP 3 ...

Page 245: ...eck voltage between b wire terminal of MAP sensor connector and ground with ignition switch ON Is voltage about 4 5 V Go to Step 3 Lg R wire open or short Poor E02 5 connection If wire and connection are OK substitute a known good ECM PCM and recheck 3 1 Connect b and c wire terminals of MAP sensor connector using service wire 2 Check voltage between c wire terminal of MAP sensor connector and gro...

Page 246: ...ROL SYSTEM 6E1 19 SH410 Fig for STEP 1 Fig for STEP 2 Fig for STEP 3 NOTE Upon completion of inspection and repair work perform DTC Confirmation Procedure referring to page 6E1 33 to confirm that the trouble has been corrected ...

Page 247: ...nnection are OK substitute a known good ECM PCM and recheck 2 1 Check voltage between b wire terminal of TP sensor connector and ground with igni tion switch ON Is voltage about 4 5 V Go to Step 3 Gr wire open or short Poor E02 6 connection If wire and connection are OK substitute a known good ECM PCM and recheck 3 1 Connect b and c wire terminal of TP sensor connector using service wire 2 Check v...

Page 248: ...ROL SYSTEM 6E1 21 SH410 Fig for STEP 1 Fig for STEP 2 Fig for STEP 3 NOTE Upon completion of inspection and repair work perform DTC Confirmation Procedure referring to page 6E1 33 to confirm that the trouble has been corrected ...

Page 249: ...ture 2 Connect voltmeter between E02 13 terminal of ECM coupler and body ground 3 Maintain engine speed at 2000 rpm and after 60 seconds check volt meter Does the voltage deflect between above and below 0 45 V repeatedly Oxygen sensor and its circuit closed loop system A F ratio feed back system are in good condition Intermittent trouble or faulty ECM PCM Recheck referring to INTERMIT TENT AND POO...

Page 250: ...TEM 6E1 23 SH410 Fig for STEP 1 1 ECM PCM connector connected 2 Body ground NOTE Upon completion of inspection and repair work perform DTC Confirmation Procedure referring to page 6E1 33 to confirm that the trouble has been corrected ...

Page 251: ...upler CMP sensor resistance 185 275 at 20 C 68 F 3 Measure resistance between E02 3 termi nal of ECM PCM connector and ground Insulation resistance 1 M or more Were measured resistance values in above 2 and 3 as specified Go to Step 2 R wire open or short G wire open or short Poor terminal connec tion of CMP sensor cou pler If wire and connection are OK replace CMP sensor 2 1 Check CMP sensor refe...

Page 252: ...lock front right tire 4 Turn front left tire slowly Does ohm meter indicator deflect between 0 and a few times while tire is turned one revolution Poor E02 4 connection If connection is OK intermit tent trouble or faulty ECM Recheck referring to IN TERMITTENT TROUBLE Go to Step 3 3 1 Remove combination meter 2 Check speed sensor referring to VSS INSPECTION under ON VEHICLE SERVICE Is it good condi...

Page 253: ...en terminal and transmission body 1 MW or more Are check results satisfactory Go to step 2 Replace VSS 2 Check visually VSS and counter shaft gear for the following No damage No foreign material attached Correct installation Are they in good condition Or or Br W wire open or shorted to ground or poor E02 4 or E02 12 connection If wire and connection are OK intermittent trouble or faulty PCM Rechec...

Page 254: ...sensor coupler terminals using service wire 2 Check voltage between Lg wire terminal of IAT sensor connector and ground with ignition switch ON Is voltage 0 15 V or less Go to Step 3 O wire open or poor E02 9 connection If wire and connection are OK substitute a known good ECM PCM and recheck 3 1 Perform IAT SENSOR INSPECTION in this section Is IAT sensor in good condition Poor connection of IAT s...

Page 255: ...ect ECT sensor couple terminals using service wire 2 Check voltage between Lg B wire terminal of ECT sensor coupler and ground with igni tion switch ON Is voltage 0 15 V or less Go to Step 3 B Or wire open or poor E02 9 connection If wire and connection are OK substitute a known good ECM PCM and recheck 3 1 Perform ECT SENSOR INSPECTION in this section Is ECT sensor in good condition Poor connecti...

Page 256: ...0 r min in 3rd gear in case of M T model and 2 range in case of A T model 3 Release accelerator pedal and with engine brake applied keep vehicle coasting for 5 to 8 seconds till engine speed reaches 2 000 r min 4 Repeat above steps 2 and 3 3 times or more 5 Stop vehicle Driving Test Condition for Code No 14 P0130 1 Start engine and warm up engine to normal operating temperature 2 Increase vehicle ...

Page 257: ...h OFF 2 Connect two terminals of relay connector as shown in figure using service wire Is fuel pump heard to operate with ignition switch ON Go to Step 3 B R or P wire open poor fuel pump relay to coupler connection or faulty fuel pump 3 1 Check fuel pump relay referring to p 6E1 68 Is it in good condition Poor fuel pump relay to coupler con nection Br W wire open or poor E03 18 connection If wire...

Page 258: ...make operating sound Fuel injector circuit is in good condition Go to Step 2 2 Does none of 4 injectors make operating sound at Step 1 Go to Step 4 Go to Step 3 3 Check fuel injector s referring to p 6E1 57 Is it in good condition Check coupler connection and wire harness of injector not making operating sound Faulty fuel injector s 4 Check power circuit of injectors for open and short Is it in no...

Page 259: ... 1 Go to Step 3 Go to Step 4 3 1 Start engine and warm it up to normal operating temperature 2 Keep it running at specified idle speed Is fuel pressure then within 200 240 kPa 2 0 2 4 kg cm2 28 4 34 1 psi Normal fuel pressure Clogged vacuum passage for fuel pressure regulator or faulty fuel pressure regulator 4 Is there fuel leakage from fuel feed line hose pipe or their joint Fuel leakage from ho...

Page 260: ...r Clogged fuel filter restricted fuel feed hose or pipe Faulty fuel pump or fuel leakage from hose connection in fuel tank 10 1 Disconnect fuel return hose from pressure regulator and connect new return hose to it 2 Insert the other end of new return hose into approved gasoline container 3 Check again if specified pressure is obtained While doing so does fuel come out of return hose Faulty fuel pr...

Page 261: ...k result as specified Check for followings EVAP canister purge valve Accessory engine load PCV system Idle air passage A C signal Go to Step 4 4 1 With the ignition switch OFF position disconnect negative battery cable for 30 seconds and connect it 2 Recheck closed throttle position referring to Step 2 Is each check result as specified Recheck engine idle speed Go to Step 5 5 1 With the ignition s...

Page 262: ...on Check EVAP canister referring to p 6E1 74 and fuel filler cap referring to Section 6C If OK system is in good condition Go to Step 2 2 Check vacuum passage hoses and EVAP canister purge valve referring to p 6E1 72 Are they in good condition Or wire open Or wire shorted to ground Poor EVAP canister purge valve coupler connection Poor E03 7 connection Poor performance of ECT sensor or MAP sensor ...

Page 263: ...ting motor STEP ACTION YES NO 1 1 With ignition switch OFF disconnect connectors from ECM PCM 2 Is 6 12 V voltage applied to E01 13 terminal of connec tor only when cranking engine Engine starter signal circuit is in good condition B Y wire open or Poor E01 13 connection Fig for STEP 1 1 ECM PCM connector disconnected 2 Body ground ...

Page 264: ...ator fan control system referring to p 6E1 70 Is it in good condition RFC system is in good condition Go to Step 2 2 Check RFC relay referring to p 6E1 69 Is it in good condition Go to Step 3 Faulty RFC relay 3 Check wire harnesses and connections for open or short Are they in good condition Poor performance of ECT sensor If ECT sensor is OK substitute a known good ECM PCM and recheck Wire open or...

Page 265: ...y STEP ACTION YES NO 1 1 Check voltage at E01 19 terminal under each condition given in table below 2 Is check result satisfactory Ignition switch ON A C switch OFF Blower fan switch OFF Ignition switch ON A C switch ON Blower fan switch ON 10 14 V 2 V or less A C control signal is in good condition Bl R wire open or short Poor E01 19 terminal connection If wire and connection are OK check dual pr...

Page 266: ...ll light turned ON 10 14 V Is check result satisfactory Go to Step 2 Br wire open or short Poor E01 18 ter minal connection 2 Check voltage at E01 9 terminal under each condition given below Ignition switch ON Heater blower fan switch OFF 4 14 V Ignition switch ON Heater blower fan switch except for OFF 2 V or less Is check result satisfactory Electric load signal circuit are in good condition P B...

Page 267: ...cified Substitute a known good ECM and re check Go to step 2 3 Closed throttle position recheck 1 With the ignition switch OFF position disconnect neg ative battery cable for 30 seconds and connect it 2 Recheck closed throttle position referring to Step 2 Is each check result as specified Recheck fuel cut op eration Go to step 3 4 TP sensor signal voltage check 1 With the ignition switch at ON pos...

Page 268: ...ected from it Voltage Check 1 Remove ECM PCM from body with ignition switch OFF refer ring to ECM PCM REMOVAL 2 Connect ECM PCM connectors to ECM PCM 3 Check voltage at each terminal of connectors connected NOTE As each terminal voltage is affected by the battery voltage confirm that it is 11V or more when ignition switch is ON 1 ECM PCM 2 Connectors 3 Body ground TERMINAL ARRANGEMENT OF ECM PCM C...

Page 269: ...gine starter signal 6 12 V While engine cranking E01 14 Transmission range switch 10 14 V Ignition switch ON selector lever L range E01 14 g L 1 V or less Ignition switch ON selector lever Other than L range E01 15 Transmission range switch 10 14 V Ignition switch ON selector lever D range E01 15 g D 1 V or less Ignition switch ON selector lever Other than D range E01 16 Transmission range switch ...

Page 270: ... E03 2 Power source 10 14 V Ignition switch ON E03 3 Blank E03 4 Blank E03 5 Shift solenoid B 1 V or less Ignition switch ON P range E03 6 Shift solenoid A 1 V or less Ignition switch ON P range E03 7 EVAP canister purge valve 10 14 V Ignition switch ON E03 8 Blank E03 9 Blank E03 10 Igniter 1 V or less Ignition switch ON E03 11 Fuel injector No 3 10 14 V Ignition switch ON E03 12 Fuel injector No...

Page 271: ...is 20 C 68 F 6E1 44 ENGINE AND EMISSION CONTROL SYSTEM SH410 TERMINAL CIRCUIT NORMAL RESISTANCE CONDITION E03 12 E03 2 Fuel Injector No 1 11 3 13 8 E03 25 E03 2 Fuel injector No 2 11 3 13 8 E03 11 E03 2 Fuel Injector No 3 11 3 13 8 E03 24 E03 2 Fuel injector No 4 11 3 13 8 E03 7 E03 2 EVAP canister purge valve 30 34 E03 20 E03 2 Radiator fan control relay 90 110 omron made E03 20 E03 2 Radiator fa...

Page 272: ...d check accelerator pedal play which should be within the following specification Pedal play a 2 7 mm 0 08 0 27 in If measured value is out of specification adjust accelerator cable 1 to specification with cable adjusting nut 2 2 With accelerator pedal depressed fully check clearance be tween throttle lever 2 and lever stopper 1 throttle body which should be within following specification Clearanc...

Page 273: ... Before starting engine place transmission gear shift lever in Neutral shift selector lever to P range for A T vehicle and set parking brake and block drive wheels Using SUZUKI scan tool 1 Connect SUZUKI scan tool to DLC 1 with ignition switch OFF Special Tool A 09931 76011 SUZUKI scan tool B Mass storage cartridge C 09931 76030 16 14 pin DLC cable 2 Start engine and warm it up to normal operating...

Page 274: ... idle speed is out of specifications inspect idle air control system referring to B 4 IDLE AIR CONTROL SYSTEM CHECK in this section NOTE Above duty values are on duty meter indications IAC duty can be checked roughly by using voltmeter IAC duty to voltage relation is as follows OFF DUTY METER is such duty meter that indicates approx 100 when terminal voltage is approx 0V VB represents battery volt...

Page 275: ...able from throttle body 4 Remove air cleaner outlet hose 6E1 48 ENGIINE AND EMISSION CONTROL SYSTEM SH410 AIR INTAKE SYSTEM THROTTLE BODY 1 Throttle body 2 Throttle stop screw 3 TP sensor 4 O ring 5 IAC valve 6 MAP sensor CAUTION Do not remove or adjust throttle stop screw as it is factory adjusted precisely CAUTION Do not disassemble IAC valve Disassembly spoils its original performance ...

Page 276: ...lean throttle body bore and idle air passage by blowing com pressed air CAUTION TP sensor IAC valve MAP sensor or other compo nents containing rubber must not be placed in a sol vent or cleaner bath A chemical reaction will cause these parts to swell harden or get distorted Do not blow compressed air through bypass air pas sage with IAC valve installed to throttle body This will cause IAC valve to...

Page 277: ...fold 3 Connect engine coolant hoses 1 and EVAP canister purge valve hose 4 Connect connectors to TP sensor 2 and IAC valve 3 secure ly 5 Install air cleaner outlet hose 6 Connect accelerator cable and adjust cable play to specification 7 Refill cooling system 8 Connect negative cable at battery 6E1 50 ENGIINE AND EMISSION CONTROL SYSTEM SH410 ...

Page 278: ...on switch while the other checks valve operation As valve operation is momentary it may be overlooked To prevent this perform this operation check 3 times or more continuously If rotary valve of lAC valve does not operate at all check wire harnesses for open and short If wire harnesses are in good condition replace lAC valve and recheck INSTALLATION 1 Install new O ring 1 to IAC valve 2 Install IA...

Page 279: ... 5 Turn ignition switch ON to operate fuel pump and after 2 se conds turn it OFF Repeat this 3 or 4 times and then check fuel pressure 6 Start engine and warm it up to normal operating temperature 7 Measure fuel pressure at idling If measured pressure doesn t satisfy specification refer to B 3 FUEL PRESSURE CHECK in this section and check each possibly defective part Replace if found defective At ...

Page 280: ...ll fuel filler cap after check ing If above check result is not satisfactory advance to DIAGNOS TIC FLOW TABLE B 1 1 Fuel filler 2 Ignition switch 2 Fuel pressure should be felt at fuel return hose for 2 seconds after ignition switch ON If fuel pressure is not felt advance to DIAGNOSTIC FLOW TABLE B 3 REMOVAL Remove fuel tank from body according to procedure described in Section 6C and remove fuel...

Page 281: ...sconnect fuel return hose 2 from fuel pressure regulator 8 Remove fuel pressure regulator from fuel delivery pipe CAUTION A small amount of fuel may be released when hose is disconnected Cover hose to be disconnected with a shop cloth CAUTION A small amount of fuel may be released when it is from delivery pipe Place a shop cloth under delivery pipe so that re leased fuel is absorbed in it INSTALLA...

Page 282: ...Relieve fuel pressure according to procedure described in Sec tion 6 2 Disconnect battery negative cable at battery 3 Remove air cleaner outlet hose referring to Section 6A 4 Remove intake manifold stiffener 5 Disconnect fuel injector couplers 6 Remove fuel delivery pipe bolts 7 Remove fuel injector s CAUTION A small amount of fuel may come out after removal of fuel injectors cover them with shop ...

Page 283: ...ay connector using service wire as shown CAUTION Check to make sure that connections made between correct terminals Wrong connection can cause dam age to ECM wire harness etc 8 Apply battery voltage to injector for 15 seconds and measure in jected fuel volume with graduated cylinder Test each injector two or three times If not within specification replace injector Injected fuel volume 43 7 46 3 cc...

Page 284: ...oat of fuel to O rings and then install injectors and grommets 2 into delivery pipe and intake manifold Make sure that injectors rotate smoothly If not probable cause is incorrect installation of O ring Replace O ring with new one Tighten delivery pipe bolts and make sure that injectors rotate smoothly With engine OFF and ignition switch ON check for fuel leaks around fuel line connection ENGIINE ...

Page 285: ...essive shock INSTALLATION 1 Install ECM PCM to body 2 Connect couplers to ECM PCM securely 3 Connect battery negative cable at battery MANIFOLD ABSOLUTE PRESSURE SENSOR MAP SENSOR REMOVAL AND INSTALLATION 1 Disconnect negative cable at battery 2 Disconnect MAP sensor connector 1 and hose 2 from MAP sensor 3 Remove MAP sensor from intake manifold Reverse above procedure in case of installation Befo...

Page 286: ...ce between terminals under each condition given in table below NOTE There should be more than 1 5 k resistance difference be tween when throttle valve is at idle position and when it is fully open If check result is not satisfactory replace TP sensor 3 Connect TP sensor coupler securely 4 Connect negative cable to battery ENGIINE AND EMISSION CONTROL SYSTEM 6E1 59 SH410 ALTITUDE Reference BAROMETR...

Page 287: ... 5 lb ft 2 Connect coupler to TP sensor securely 3 Connect battery negative cable to battery ADJUSTMENT 1 Loosen TP sensor screws 2 Using SUZUKI scan tool Connect SUZUKI scan tool to DLC with ignition switch OFF and check TP SENSOR VOLT value displayed on scan tool by us ing DATA LIST mode Not using SUZUKI scan tool Remove ECM PCM as previously outlined and with couplers connected to ECM PCM conne...

Page 288: ...voltage when throttle is fully open 4 2 0 5 V 6 Not using SUZUKI scan tool Install ECM PCM as previously outlined IAT SENSOR REMOVAL 1 Disconnect battery negative cable at battery 2 Disconnect coupler from IAT sensor 3 Remove IAT sensor 1 from air cleaner outlet hose 2 INSPECTION Immerse temperature sensing part of IAT sensor in water or ice and measure resistance between sensor terminals while he...

Page 289: ... pipe WARNING To help avoid danger of being burned do not remove radiator cap while engine and radiator are still hot Scaldingfluid and steam can be blown out under pres sure it cap is taken off too soon INSPECTION Immerse temperature sensing part of ECT sensor in water or ice and measure resistance between sensor terminals a and b while heating water gradually If measured resistance doesn t show ...

Page 290: ...rring to Section 6B MAIN RELAY INSPECTION 1 Disconnect negative cable at battery 2 Remove main relay 1 from its connector 3 Check resistance between each two terminals as in table below If check results are as specified to next operation check If not replace 4 Check that there is continuity between terminals A and B when battery is connected to terminals C and D If found defective replace ENGIINE ...

Page 291: ...haust pipe from exhaust manifold 3 Disconnect connector of oxygen sensor and release its wire harness from clamps 4 Remove oxygen sensor 2 from exhaust manifold 1 INSTALLATION Reverse removal procedure noting the followings Tighten oxygen sensor to specified torque Tightening Torque a 45 N m 4 5 kg m 32 5 lb ft Connect connector of oxygen sensor and clamp wire harness securely After installing oxy...

Page 292: ... with A T model selector lever in P range and that parking brake lever is pulled all the way up 1 Warm up engine to normal operating temperature 2 While listening to sound of injector 2 by using sound scope 1 or such increase engine speed to higher than 3 000 r min 3 Check to make sure that sound to indicate operation of injector stops when throttle valve is closed instantly and it is heard again ...

Page 293: ...lly in response to the ECT sensor with the ignition switch in the ON position RADIATOR FAN MOTOR INSPECTION Connect battery positive terminal to terminal of radiator fan motor connector Bl R wire side and negative terminal to B terminal Check that radiator fan operates smoothly RADIATOR FAN CONTROL RELAY RFC RELAY INSPECTION 1 Disconnect negative cable at battery 2 Remove RFC relay 1 from its conn...

Page 294: ...ator should move back and forth between conti nuity and infinity 4 times while cable joint is turned one full revo lution Replace speedometer if check result is not satisfactory A T VEHICLE Vehicle speed sensor 1 itself can be checked on its resistance by disconnecting connector NOTE Function of vehicle speed sensor can be checked by mea suring generated pulse as voltage For its measurement use an...

Page 295: ...o check that vacuum is felt when engine speed is increased to higher than about 3000 r min If check result is not satisfactory check vacuum passage hoses EVAP canister purge valve wire harness and ECM PCM Refer to B 5 EVAPORATIVE EMISSION CONTROL SYSTEM CHECK VACUUM PASSAGE INSPECTION Start engine and run it at idle speed Disconnect vacuum hose from EVAP canister purge valve With finger placed aga...

Page 296: ...9931 76011 SUZUKI scan tool B Mass Storage Cartridge C 09931 76030 16 14 pin DLC cable 5 Disconnect vacuum hoses from intake manifold Blow into hose A Air should not come out of nozzle B 6 Open EVAP canister purge valve by executing EVAP CANI PURGE under MISC TEST mode of SUZUKI scan tool with ignition switch ON In this state blow hose A Air should come out of nozzle B WARNING Do not suck the air ...

Page 297: ...ted blow into hose A Air should not come out of hose B 5 Connect 12V battery to EVAP canister purge valve terminals In this state blow hose A Air should come out of hose B WARNING Do not suck the air through valve Fuel vapor inside valve is harmful If check result is not as described replace EVAP canister purge valve 6 Connect vacuum hoses 7 Connect EVAP canister purge valve coupler securely EVAP ...

Page 298: ...E When connecting tank pressure control valve between hoses refer to left figure for installing direction TANK PRESSURE CONTROL VALVE INSPECTION 1 Remove fuel tank and tank pressure control valve installed on the side of EVAP canister 2 Air should pass through valve smoothly from fuel tank side 2 black side of check valve to orange side 1 when blown hard 3 From orange side even when blown softly a...

Page 299: ...ION 1 Disconnect PCV valve from cylinder head cover and install plug to head cover hole 2 Run engine at idle speed 3 Place your finger over end of PCV valve 1 to check for vacu um If there is no vacuum check for clogged valve Replace as nec essary 4 After checking vacuum stop engine and remove PCV valve 1 Shake valve and listen for the rattle of check needle inside the valve If valve does not ratt...

Page 300: ...1 4 8 Hose attachment 2 09917 47010 Vacuum pump gauge 09930 88530 Injector test lead 09931 76011 SUZUKI scan tool Tech 1A kit 1 Storage case 2 Operator s manual 3 SUZUKI scan tool Tech 1A 4 DLC cable 5 Test lead probe 6 Power source cable 7 DLC cable adapter 8 Self test adapter Mass storage cartridge 09931 76030 16 14 pin DLC cable TIGHTENING TORQUE SPECIFICATIONS Fastening Parts Tightening Torque...

Page 301: ...nents 6F 2 System Wiring 6F 3 DIAGNOSIS 6F 4 Diagnostic Flow Table 6F 4 ON VEHICLE SERVICE 6F 6 Ignition Spark Test 6F 6 High Tension Cords 6F 6 Spark Plugs 6F 7 Noise Suppressor 6F 8 Igniter 6F 8 Ignition Coil 6F 9 Distributor 6F 9 Ignition Timing 6F 10 DISTRIBUTOR UNIT 6F 12 SPECIAL TOOLS 6F 14 ...

Page 302: ...e signal from ECM or PCM Ignition coil When the ignition coil primary current is turned OFF a high voltage is induced in the secondary winding Distributor It distributes a high voltage current to each plug High tension cords spark plugs and noise suppressor CMP sensor Camshaft position Sensor Located in the distributor it converts the crank angle into voltage variation and sends it to ECM or PCM F...

Page 303: ...switch 4 Main relay 5 Ignition coil 6 Igniter 7 ECM PCM 8 Distributor 9 Distributor rotor 10 Signal rotor 11 CMP sensor 12 Spark plug 13 Noise suppressor 14 ECT sensor 15 MAP sensor 16 VSS 17 Test switch terminal 18 TP sensor 19 Transmission range switch A T 20 IG COIL METER fuse ...

Page 304: ...ostic Flow Table in SECTION 6 performed Go to Step 2 Go to Engine Diag nostic Flow Table in SECTION 6 2 Ignition Spark Test 1 Check all spark plug for condition and type refer ring to Spark Plugs in this section 2 If OK perform ignition spark test referring to Igni tion Spark Check in this section Is spark emitted from all spark plugs Go to Step 11 on the next page Go to Step 3 3 Diagnostic Troubl...

Page 305: ...ection Is check result satisfactory Go to Step 10 Replace igniter 10 Ignition Trigger Signal Circuit Check 1 Check ignition trigger signal Br Y wire circuit for open short and poor connection Are circuits in good condition Go to Step 11 Repair or replace 11 Ignition Timing Check 1 Check initial ignition timing and ignition timing ad vance referring to Ignition Timing in this section Is check resul...

Page 306: ... related parts HIGH TENSION CORDS REMOVAL 1 Remove high tension cord from ignition coil while gripping its cap 2 Remove distributor cap with high tension cords connected 3 Detach high tension cord clamp from cylinder head cover 4 Pull out high tension cords 1 from spark plugs while gripping each cap 2 CAUTION Removal of high tension cords together with clamps will be recommended so as not to damag...

Page 307: ...plugs INSPECTION 1 Inspect them for Electrode wear Carbon deposits Insulator damage 2 If any abnormality is found adjust air gap clean with spark plug cleaner or replace them with specified new plugs Spark plug air gap a 0 7 0 8 mm 0 028 0 031 in Spark plug type NGK BKR6E DENSO K20PR U INSTALLATION 1 Install spark plugs and torque them to specification Tightening Torque for spark plug 15 N m 1 5 k...

Page 308: ...3 4W light bulb and one 12V battery fully charged 1 Disconnect igniter connector 1 2 Remove igniter 2 from ignition coil 3 3 Arrange 3 new batteries in series 1 check total voltage is above 4 7V 4 Connect light bulb 2 between c terminal of igniter 3 and bat tery 4 positive terminal then connect battery negative terminal to igniter body Also connect battery positive terminal and b terminal of ig ni...

Page 309: ...tor for crack and their terminals for corrosion and wear Replace as necessary Signal Rotor Air Gap 1 Remove distributor cap and rotor 2 Using thickness gauge measure air gap 3 between signal ro tor tooth 1 and CMP sensor 2 Signal rotor air gap 0 2 0 4 mm 0 008 0 016 in 3 If gap is out of specification loosen CMP sensor securing screws 4 Using blade screw driver move CMP sensor and adjust gap to sp...

Page 310: ...otor distributor cap seal and cap IGNITION TIMING NOTE Before starting engine place transmission gear shift lever in Neutral shift select lever to P range for A T model and set parking brake INSPECTION AND ADJUSTMENT 1 When using SUZUKI scan tool connect SUZUKI scan tool to DLC with ignition switch OFF Special Tool A 09931 76011 SUZUKI scan tool B Mass storage cartridge C 09931 76030 16 14 pin DLC...

Page 311: ...just timing by turning distributor assembly 2 while engine is running and then tighten bolts Tightening Torque a 13 N m 1 3 kg m 9 5 lb ft 8 After tightening distributor flange bolts recheck that ignition timing is within specification 9 After checking and or adjusting initial ignition timing discon nect service wire from monitor connector or exit MISC mode on scan tool and release ignition timing...

Page 312: ...NOTE Always grip the cap of high tension cord when disconnect ing it 3 Remove distributor cap screws and cap 4 Remove distributor flange bolts 5 Pull out distributor housing assembly 6F 12 IGNITION SYSTEM SH410 DISTRIBUTOR UNIT 1 Cap 2 Cap seal 3 Cap screw 4 Rotor 5 CMP sensor 6 CMP sensor screw 7 Housing 8 O ring ...

Page 313: ...fset 4 Therefore if the dogs can not be fitted into the slots turn distrib utor shaft by 180 and try again 2 Lightly install flange bolts and prepare for ignition timing adjust ment 3 Check to make sure that rotor is in good condition 4 Inspect distributor cap and clean or replace as required 5 Make sure that distributor cap seal is placed properly and install cap and then fasten it with screws 6 ...

Page 314: ... 76011 SUZUKI scan tool Tech 1A kit 1 Storage case 2 Operator s manual 3 Tech 1A 4 DLC cable 14 26 pin 09931 76040 5 Test lead probe 6 Power source cable 7 DLC cable adaptor 8 Self test adaptor Mass storage cartridge 09931 76030 16 14 pin DLC cable ...

Page 315: ... 6G 2 Starting Motor 6G 3 DIAGNOSIS 6G 4 UNIT REPAIR OVERHAUL 6G 6 Dismounting and Remounting 6G 6 Disassembly 6G 6 Reassembly 6G 7 Inspection 6G 8 Performance Test 6G 11 Pull in test 6G 11 Hold in test 6G 11 Pinion return test 6G 12 No load performance test 6G 12 SPECIFICATIONS 6G 13 REQUIRED SERVICE MATERIAL 6G 13 SPECIAL TOOL 6G 13 ...

Page 316: ...tion STARTING MOTOR CIRCUIT The magnetic switch coils are magnetized when the starter switch is closed The resulting plunger and pinion drive lever movement causes the pinion to engage the engine flywheel gear and the magnetic switch main contacts to close and cranking takes place When the engine starts the pinion over running clutch protects the armature from excessive speed until the switch is o...

Page 317: ... housing assembly 2 Washer 3 Snap ring 4 Pinion stop ring 5 Over running clutch assembly Apply grease A 99000 25010 to inside and outside of spline 6 Armature Apply grease A 99000 25010 to joint of drive housing bush over running clutch and armature shaft bush 7 Pinion drive lever Apply grease A 99000 25010 to joint of magnetic switch and over running clutch 8 Seal 9 Boot 10 Magnetic switch 11 Rea...

Page 318: ...due to battery deterioration Poor contact in battery terminal connection Loose grounding cable connection Fuse set loose or blown off Poor contacting action of ignition switch and magnetic switch Lead wire coupler loose in place Open circuit between ignition switch and magnetic switch Open circuit in pull in coil Brushes are seating poorly or worn down Poor sliding of plunger and or pinion Shift i...

Page 319: ...unning but not cranking engine Worn pinion tip Poor sliding of over running clutch Over running clutch slipping Worn teeth of ring gear Replace over running clutch Repair Replace over running clutch Replace flywheel M T or drive plate A T Noise Abnormally worn bush Worn pinion or worn teeth of ring gear Poor sliding of pinion failure in return movement Lack of oil in each part Replace bush Replace...

Page 320: ...h by pulling up its rear portion so as to inside hook is disconnected from drive lever NOTE Do not disassemble magnetic switch Replace it as assem bly when required A Pull up to disconnect hook 3 Remove housing bolts and then pull out commutator end hous ing 4 Remove insulator brush springs 1 and then brush holder 2 5 Remove yoke armature 1 and drive lever 2 from drive hous ing 3 6 Draw stop ring ...

Page 321: ...ve lever 2 and combine it with armature 1 Then assemble them with drive housing 3 A Grease 99000 25010 4 Install yoke and brush holder 3 then set 4 brushes 1 with their springs 2 Install insulator NOTE When installing brushes make sure that brushes and commutator have been degreased thoroughly Check to confirm that brush parts do not have unneces sary contacts with others 5 Install rear housing 6 ...

Page 322: ...hout fail Face boot 2 breather down Upon completion of assembly carry out PERFORMANCE TEST INSPECTION PLUNGER Inspect plunger for wear Replace if necessary MAGNETIC SWITCH Push in plunger and release it The plunger should return quickly to its original position Replace if necessary Pull In Coil Open Circuit Test Check for continuity across magnetic switch S terminal 1 and M terminal 2 If no contin...

Page 323: ...in New one 10 mm 0 394 in BRUSH HOLDER Check brush springs for rust or breakage Also check brush holder for rust and insulation Replace it as assembly if required ARMATURE Ground Test Between commutator segment and armature core should be in sulated Use ohmmeter for inspection Open Circuit Test Check for continuity between segments If there is no continuity at any test point there is an open circu...

Page 324: ...ica depth and correct it as required Commutator insulator depth a Limit minimum value 0 2 mm 0 008 in 1 Mica insulator 2 Commutator segment YOKE Check field coil for continuity There should be continuity between following terminals Between A terminals Between B terminals Between B terminal and C bare metal part of yoke body OVER RUNNING CLUTCH Inspect pinion for wear damage or other abnormal condi...

Page 325: ...gure and check that pinion over running clutch move outward If it does not replace magnetic switch NOTE Before testing disconnect field coil lead 3 from M terminal 2 HOLD IN TEST While connected as the above with pinion out disconnect negative lead from M terminal 1 and check that pinion remains out If not replace magnetic switch CRANKING SYSTEM 6G 11 SH410 ...

Page 326: ...k to make sure that pinion returns inward quickly NO LOAD PERFORMANCE TEST Connect test leads as shown in left figure and check that motor runs without fail with pinion moved out Also check that ammeter indicates specified current Specified Current 50A at 11 5V 6G 12 CRANKING SYSTEM SH410 ...

Page 327: ... at 11 5 volts 50 A maximum 6 000 rpm minimum Performance at ambient Load characteristic at 9 volts 150 A 2 84 N m minimum 1 900 rpm minimum temperature 20 C 68 F Locked characteristic at 5 5 volts 420 A maximum 6 2 N m 0 62 kg m 4 5 Ib ft minimum Minimum operating voltage Magnetic switch operating voltage 8 volts REQUIRED SERVICE MATERIAL MATERIAL RECOMMENDED PRODUCT USE Lithium grease SUZUKI SUP...

Page 328: ...Jump starting in case of emergency with auxiliary booster battery 6H 10 Removal 6H 11 Handling 6H 11 Installation 6H 11 Generator 6H 12 Removal 6H 12 Installation 6H 12 Generator Water Pump Drive Belt 6H 13 Belt tension inspection 6H 13 Removal 6H 13 Installation 6H 13 UNIT REPAIR OVERHAUL 6H 14 Generator 6H 14 Disassembly 6H 15 Inspection 6H 17 Replace Brush 6H 19 Assembly 6H 20 SPECIFICATIONS 6H...

Page 329: ...rier the hold down bolts should be tight enough but not over tightened ELECTROLYTE FREEZING The freezing point of electrolyte depends on its specific gravity Since freezing may ruin a battery it should be protected against freezing by keeping it in a fully charged condition If a battery is fro zen accidentally it should not be charged until it is warmed SULFATION If the battery is allowed to stand...

Page 330: ...ns clean The cable connections particularly at the positive terminal post tend to become corroded The product of corrosion or rust on the mating faces of conductors resists the flow of cur rent Clean the terminals and fittings periodically to ensure good met al to metal contact and grease the connections after each cleaning to protect them against rusting WARNING Never expose battery to open flame...

Page 331: ...roduced by the generator and the voltage setting cannot be adjusted The generator rotor bearings contain enough grease to eliminate the need for periodic lubrication Two brushes carry current through the two slip rings to the field coil mounted on the rotor and under normal conditions will provide long period of attention free service The stator windings are assembled on the inside of a laminated ...

Page 332: ...ator coil 5 Stator core 6 Field coil 7 Regulator 8 Brush 9 Rear end frame 10 Drive end frame B Generator output Battery terminal D Dummy terminal E Ground F Field coil terminal IG Ignition terminal L Lamp terminal CHARGING SYSTEM 6H 5 SH410 ...

Page 333: ...zing As the S G varies with the temperature if battery temperature is not at 20 C 68 F you have to correct your S G reading taken with your hydrometer to the value at 20 C 68 F and apply the corrected S G value to the three point guide stated value For the manner of correction refer to the graph showing the rela tion between S G value and temperature at the left HOW TO USE THE TEMPERATURE CORRECTE...

Page 334: ... indica tor dark 3 Overcharged battery as evidenced by excessive spewing of electrolyte from vents Noise from generator may be caused by a loose drive pulley loose mounting bolts worn or dirty bearings defective diode or defec tive stator CHARGING SYSTEM 6H 7 SH410 FAULTY INDICATOR LAMP OPERATION PROBLEM POSSIBLE CAUSE CORRECTION Charge light does not light with ignition ON and engine off Fuse blo...

Page 335: ...and ignition ground cable 5 Connect voltmeter and ammeter as shown in figure Voltmeter Set between generator B terminal and ground Ammeter Set between generator B terminal and battery terminal NOTE Use fully charged battery 6 Measure current and voltage 1 Generator 2 Ammeter 3 Voltmeter 4 Battery 5 Load 6 Switch Ammeter between generator B terminal and battery terminal Voltmeter between generator ...

Page 336: ...nerator itself has problem check the generator Load Check 1 Run engine at 2 000 rpm and turn on head light and heater mo tor 2 Measure current and if it is less than 20 A repair or replace gen erator OVERCHARGED BATTERY 1 To determine battery condition refer to Battery section in this DIAGNOSIS 2 If obvious overcharge condition exists as evidenced by exces sive spewing of electrolyte proceed to di...

Page 337: ...er battery and the other end to a solid engine ground such as exhaust manifold at least 45 cm 18 in away from battery of vehicle being started 5 Start engine of vehicle with booster battery and turn off electrical accessories Then start engine of the vehicle with discharged battery 6 Disconnect jumper cables in the exact reverse order WARNING Departure from these conditions or procedure de scribed...

Page 338: ...llowing safety precautions should be fol lowed Hydrogen gas is produced by battery A flame or spark near bat tery may cause the gas to ignite Battery fluid is highly acidic Avoid spilling on clothing or other fabric Any spilled electrolyte should be flushed with large quan tity of water and cleaned immediately INSTALLATION 1 Reverse removal procedure 2 Torque battery cables NOTE Check to be sure t...

Page 339: ...attery 2 2 Disconnect B terminal wire 3 and coupler 4 from generator 5 3 Remove generator cover 6 4 Remove adjusting bolt 1 and loosen generator pivot bolt 2 5 Remove generator with generator bracket 7 INSTALLATION Reverse above procedure giving specified tension to drive belt Refer to Generator Water Pump Belt for belt tension Tightening Torque a 22 N m 2 2 kg m 16 0 lb ft b 50 N m 5 0 kg m 36 5 ...

Page 340: ...ning Torque a 22 N m 2 2 kg m 16 0 lb ft b 50 N m 5 0 kg m 36 5 lb ft 5 Connect negative cable at battery terminal REMOVAL 1 Disconnect negative cable at battery 2 Loosen generator adjusting bolt 1 and generator pivot bolt 2 When servicing vehicle equipped with A C remove A C com pressor drive belt before removing generator water pump drive belt 3 3 Slacken belt by displacing generator and then re...

Page 341: ...r screw 10 Rotor 11 Spacer 12 End housing bearing 13 Bearing cover 14 Wave washer 15 Rear end frame 16 Rear end frame nut 17 Rear end frame bolt 18 B terminal inner nut 19 Stator lead screw 20 Insulator 21 Rectifier 22 Regulator 23 Regulator screw 24 Regulator screw long 25 Brush 26 Brush holder 27 Brush holder screw 28 Rear end cover 29 Rear end cover screw Tightening Torque ...

Page 342: ...ch and remove pulley nut 1 and then pull out pulley 2 CAUTION To hold shaft use hexagonal box Duodecimal box may cause slipping and consequential shaft or tool damage Do not attempt to hold pulley by using vise or pipe wrench so as not to distort it 9 Remove rear end frame nuts 1 and bolts 2 10 Drive out rear end frame 3 with rotor tapping shaft 4 lightly by using plastic hammer 11 Separate rear e...

Page 343: ...be exercised so as not to distort cooling fan blade while applying puller 13 If required remove 4 screws retainer plate 1 and then drive out drive end bearing 2 14 If required remove stud bolts and then pull out stator NOTE Heating drive end frame may facilitate removal of stator 6H 16 CHARGING SYSTEM SH410 ...

Page 344: ...lip rings for roughness or scoring If rough or scored re place rotor Using a vernier caliper measure slip ring diameter Standard diameter 14 4 mm 0 567 in Minimum diameter 12 8 mm 0 504 in If the diameter is less than minimum replace the rotor Stator Open Circuit Using ohmmeter check all leads for continuity If there is no conti nuity replace stator Ground Using ohmmeter check that there is no con...

Page 345: ...nal 1 and the other to each rectifier terminal 2 2 Reverse the polarity of tester probes and repeat step 1 3 Check that one shows continuity and the other shows no conti nuity If there is continuity replace rectifier Negative Rectifier 1 Using ohmmeter connect one tester probe to each negative ter minal 1 and the other to each rectifier terminal 2 2 Reverse the polarity of tester probes and repeat...

Page 346: ...PLACE BRUSH 1 Unsolder and remove brush and spring 2 Run wire of new brush through the hole in the brush holder and insert spring and brush into brush holder 3 Solder brush wire to brush holder at specified exposed length Exposed length a 10 5 mm 0 413 in 4 Check that brush moves smoothly in brush holder 5 Cut off excess wire 6 Apply insulation paint to the soldered area CHARGING SYSTEM 6H 19 SH41...

Page 347: ...Check drive end bearing turns smoothly Tightening Torque a 8 8 N m 0 88 kg m 6 5 lb ft b 2 6 N m 0 26 kg m 2 0 lb ft 6 Place space collar and drive end frame 2 on pulley and then install rotor 1 to drive end frame 7 Install bearing cover 1 wave washer 2 and rear end frame 3 to drive end frame 4 8 Tighten bolts and nuts to specified torque Tightening Torque a 4 5 N m 0 45 kg m 3 5 lb ft 6H 20 CHARG...

Page 348: ...ance with cooling fan blades Tightening Torque a 2 0 N m 0 2 kg m 1 5 lb ft 11 Install brush holder cover 1 to brush holder 2 12 Place IC regulator 1 together with brush holder 2 horizon tally on rear end frame 3 13 Install 5 screws Tightening Torque a 2 0 N m 0 2 kg m 1 5 lb ft 14 Install rear end cover 1 Tightening Torque a 3 7 N m 0 37 kg m 3 0 lb ft 15 Install insulator 2 and tighten B termina...

Page 349: ...2 L 4 65 3 87 US lmp pt AMCO 2 4 L 5 07 4 22 US lmp pt Electrolyte S G 1 24 when fully charged at 20 C 68 F GENERATOR Rated voltage 12 V Nominal output 55 A at 13 5 V Permissible max speed 18 000 rpm No load speed 1 070 r min rpm Setting voltage 14 2 to 14 8 V Permissible ambient temperature 30 to 90 C 22 to 194 F Polarity Negative ground Rotation Clockwise viewed from pulley side ...

Page 350: ...NTENTS GENERAL DESCRIPTION 6K 2 MAINTENANCE 6K 3 ON VEHICLE SERVICE 6K 4 CAUTION THE ENGINE OF THIS VEHICLE REQUIRES THE USE OF UNLEADED FUEL ONLY USE OF LEADED AND OR LOW LEAD FUEL CAN RESULT IN DAMAGE AND REDUCE THE EFFECTIVENESS OF THE CATALYTIC CONVERTER ...

Page 351: ...stem to lower the levels of Hydrocarbon HC Carbon Monoxide CO and Oxides of Nitrogen NOx pollutants in the exhaust gas Tightening Torque Do not reuse 1 Exhaust manifold cover 2 Exhaust manifold cover bolt 3 Exhaust manifold Gasket 4 Exhaust manifold 5 Oxygen sensor 6 Exhaust manifold nut 7 Seal ring 8 Exhaust pipe bolt 9 Exhaust pipe 10 Rubber mounting 11 Mounting bolt 12 Exhaust pipe nut 13 Gaske...

Page 352: ...tion Check exhaust system for leakage loose connection dent and damage If bolts or nuts are loosened tighten them to specified torque Refer to GENERAL DESCRIPTION in this section for torque data Check nearby body areas for damaged missing or misposi tioned part open seam hole loose connection or any other de fect which could permit exhaust fumes to seep into vehicle Make sure that exhaust system c...

Page 353: ...lace them as necessary EXHAUST PIPE For replacement of exhaust pipe be sure to hoist vehicle and ob serve WARNING under Maintenance and the following CAUTION Exhaust pipe have three way catalytic converter in it it should not be exposed to any impulse Be careful not to drop it or hit it against something Tighten bolts and nuts to specified torque when reassembling Refer to GENERAL DESCRIPTION in t...

Page 354: ... 12 To ground G R B R Y Br B Y B R B W R V Y W B BI 1 To fuel level gauge 2 Blank 3 Blank 4 To ECM 5 To ignition switch 6 To combination switch dimmer switch 7 Blank 8 To main fuse 9 To combination switch turn R 10 Blank Y R V Y B W R W BI G Y COUPLER K Coupler K Coupler L COUPLER L BODY ELECTRICAL SYSTEM 8 1 SH410 SECTION 8 BODY ELECTRICAL SYSTEM NOTE For the descriptions items not found in this ...

Page 355: ...ocedure for installation 3 Aiming for up down adjustment 4 Aiming for right left adjustment ENGINE COOLANT TEMPERATURE ECT SENSOR FOR METER INSPECTION 1 Warm up ECT sensor 1 observing resistance between sensor terminal 2 and sensor unit 1 Resistance should be de creased with increase of its temperature 2 Check resistance between sensor terminal 2 and sensor unit 1 shown below If check result is no...

Page 356: ...g terminals Switch Position Terminal Power Window Lock Switch 1 Power window main switch 2 Power window lock switch 3 Driver side window switch 4 Passenger side window switch TYPE 1 TYPE 2 BODY ELECTRICAL SYSTEM 8 3 SH410 Driver Side Window Switch Passenger Side Window Switch B E DU DD B E PU PD UP OFF OFF DOWN UP ON OFF DOWN ...

Page 357: ...POWER WINDOW SUB SWITCH INSPECTION Inspect switch for continuity between the following terminals Switch Position Terminal TYPE 1 TYPE 2 8 4 BODY ELECTRICAL SYSTEM SH410 B SD SU D U UP OFF DOWN ...

Page 358: ... SH410 Prepared by Overseas Service Department 1st Ed January 2000 Printing January 2000 356 ...

Reviews: