


22
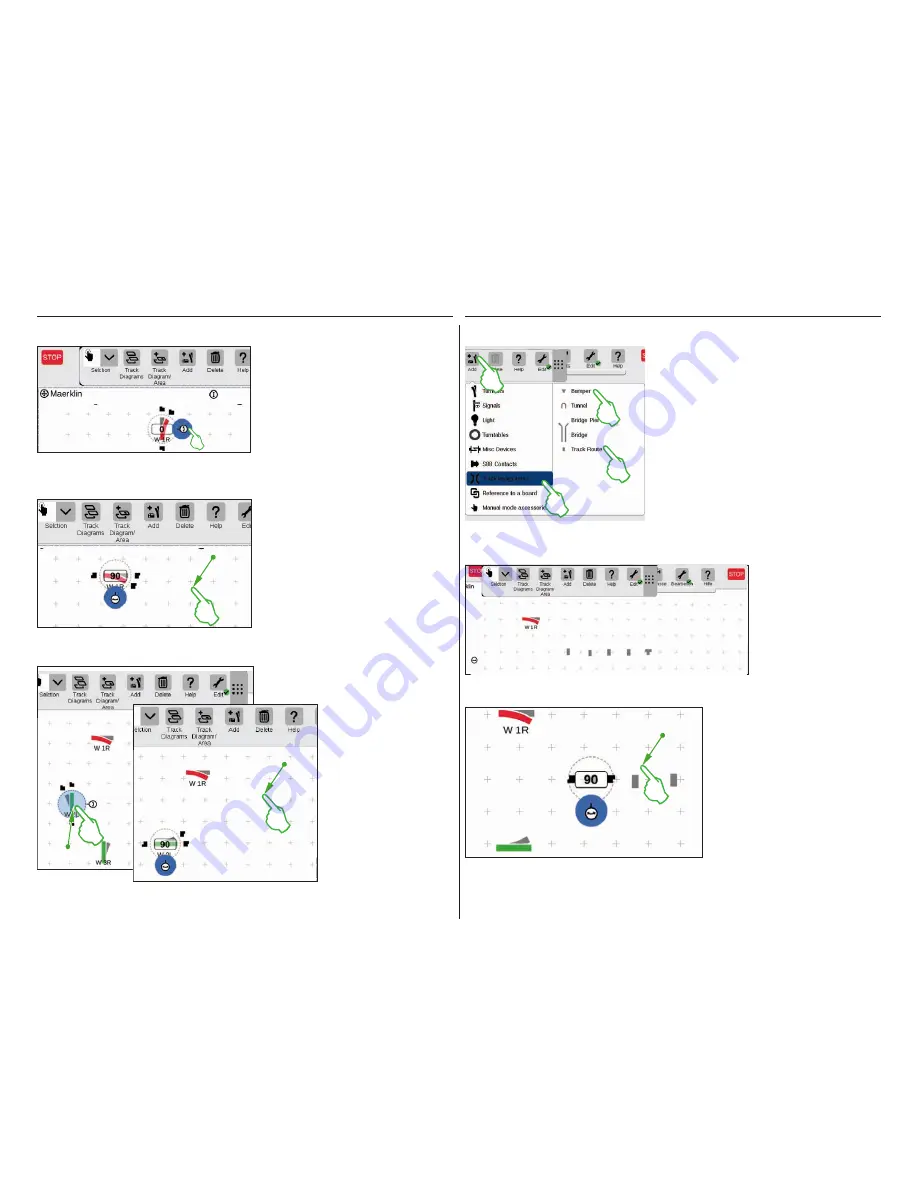
We need the turnout in a horizontal
alignment for the planned track diagram
control screen. We will therefore rotate it
90 degrees: First, we mark the turnout by
tapping briefly on it. You will see the light
blue circle again surrounding the turnout.
Then we tap again – this time specifically
on the double arrow on the edge of the
turnout – and hold the finger pressed down
on it. The arrow is now shown outlined in
blue (left image).
The turnout is now in the
rotation mode
. You
can now move your finger up and down. The
turnout will rotate according to the move-
ment of your finger. The current angle for the
turnout will be shown on the turnout symbol.
Stop at 90 degrees.
Tip:
The farther from the turnout you move
your finger on the screen, the slower the
rotation will be: The intended angle can be
set more easily this way.
Rotating Solenoid Items: The Rotation Mode
We need turnout „W 2L“
in the lower left section of
the board in order to get
closer to the desired track
diagram. The same steps
are needed for this as
described above: So, pull
the turnout to the lower left
section of the board (left
image), activate the rotation
mode and rotate the turnout
in a horizontal direction to
an angle as shown of 90
degrees (right image).
Adding Track Laying Items
We need track path items in order to generate a visually
appealing track diagram. These are purely decorative
elements without a function. Open a drop-down menu by
means of the „Add“ button in the tool bar. Here you will
select „Track laying items”. In the menu that follows, tap
four times on „Track Route” and once on „Bumper” since a
storage siding is also part of the desired track diagram. Tap
again on „Add” or on an area outside of the menu in order
to close it.
Tip:
You can add other possible track building items such as
tunnels, bridge retainers, and bridges (left image) using the
same process. All other items from turnouts to S88 contacts
can be added in this way and at the same time, they can be
put in the item list.
The track path items and
the track bumper are
automatically put on the
activated board by the
add function, in our case
the „Maerklin”.
The items added always appear on
the board in a set alignment. Since
we need a horizontal track path item
for the next step, we have to realign
it and rotate it to a horizontal position
(Rotation Mode, see Page 22).
Summary of Contents for Central Station 3
Page 2: ... 1 Central Station 3 ...
Page 9: ... 8 Fahren Lokliste Funktionen schalten Loks bearbeiten ...
Page 16: ... 15 Artikelliste bearbeiten Magnetartikel anlegen sortieren schalten ...
Page 21: ... 20 Gleisstellbild bearbeiten Gleisartikel positionieren drehen verbinden ...
Page 32: ... 31 Systemeinstellungen Anpassung des Systems Systeminformationen ...
Page 41: ... 1 Central Station 3 ...
Page 48: ... 8 Running Locomotives Locomotive List Switching Functions Editing Locomotives ...
Page 55: ... 15 Editing the Item List Setting Up Sorting Switching Solenoid Items ...
Page 60: ... 20 Editing the Track Diagram Control Screen Positioning Rotating Connecting Track Items ...
Page 67: ... 27 Creating and Editing Events Creating Routes Programming and Switching Procedures ...
Page 71: ... 31 System Settings Adjusting the System System Data ...
Page 80: ... 1 Central Station 3 ...
Page 87: ... 8 Conduite Liste des locomotives Activer des fonctions Modifier des locomotives ...
Page 94: ... 15 Modifier la liste des articles Créer trier commuter des articles électromagnétiques ...
Page 99: ... 20 Modifier le TCO Positionner faire pivoter relier des articles de voie ...
Page 110: ... 31 Paramètres système Adaptation du système Informations système ...
Page 119: ... 1 Central Station 3 ...
Page 126: ... 8 Rijden Loclijst Functies schakelen Locs bewerken ...
Page 133: ... 15 Artikelenlijst bewerken Magneetartikelen invoeren sorteren schakelen ...
Page 138: ... 20 Seinpaneel bewerken Railartikelen positioneren draaien verbinden ...
Page 145: ... 27 Gebeurtenissen maken en bewerken Rijwegen aanmaken Aflopen programmeren en schakelen ...
Page 149: ... 31 Systeeminstellingen Aanpassing van het systeem Systeeminformatie ...
Page 158: ... 1 Central Station 3 ...
Page 165: ... 8 Viaggiare Elenco locomotive Commutare funzioni Elaborare locomotive ...
Page 172: ... 15 Elaborare un elenco di apparati Aggiungere ordinare commutare apparati elettromagnetici ...
Page 188: ... 31 Impostazioni di sistema Adattamento del sistema Informazioni sul sistema ...
Page 197: ... 1 Central Station 3 ...
Page 204: ... 8 Conducción Lista de locomotoras Conmutar funciones Editar locomotoras ...
Page 211: ... 15 Editar lista de artículos Crear ordenar conmutar artículos magnéticos ...
Page 216: ... 20 Editar el esquema de mando de agujas Posicionamiento giro conexión de artículos de vía ...
Page 223: ... 27 Crear y editar eventos Crear itinerarios programar y conmutar secuencias ...
Page 227: ... 31 Configuración del sistema Adaptación del sistema Informaciones del sistema ...


