D8B Manual • Chapter 3 • page 74
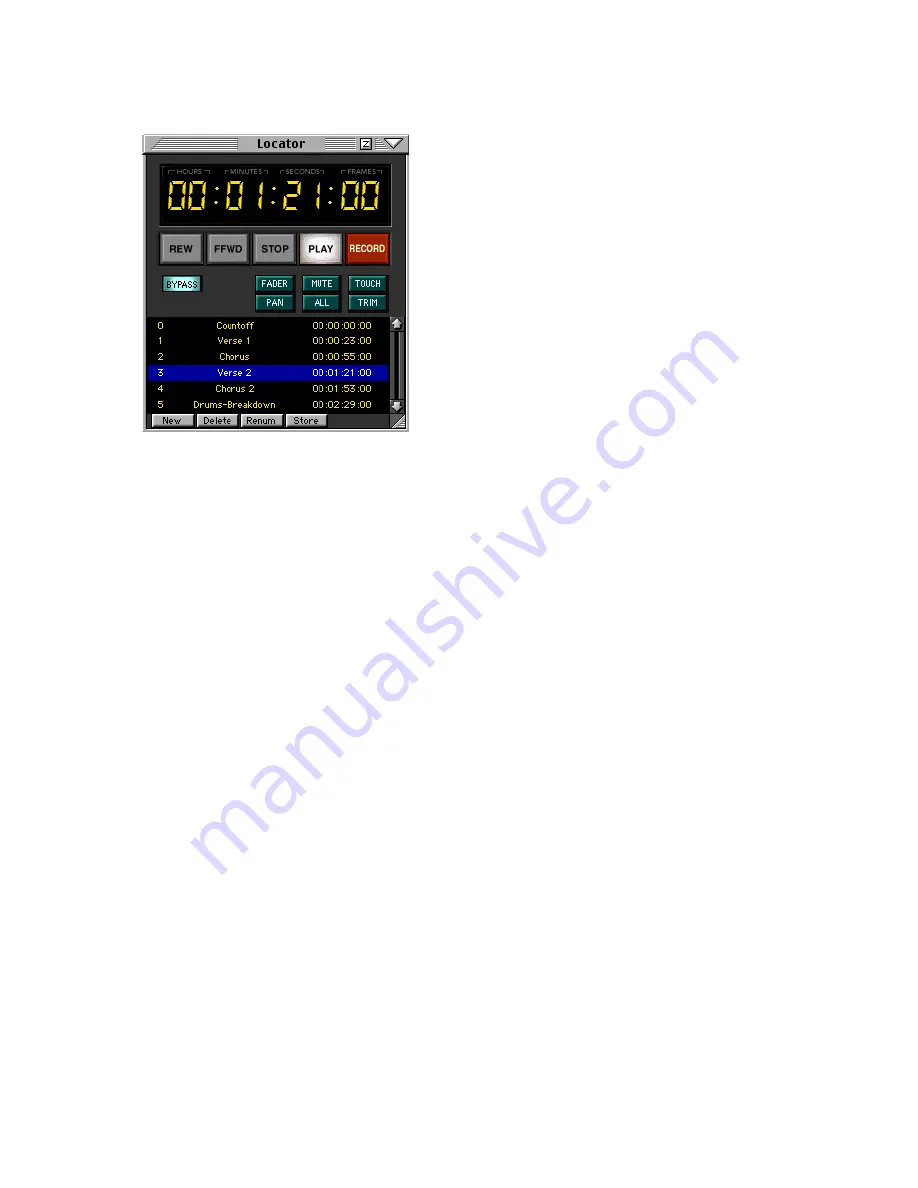
The Locator Window (Ctrl+4)
Transport Controls
Play, Stop, REWind, FFWD, Record
These controls operate any connected record
or playback devices. Devices are controlled
through MIDI Machine Control (MMC) and must
be set properly to receive transport control
commands.
Numeric Transport Position Indicator
• This window defaults to SMPTE time code
position, but can also indicate transport position
in Bars/Beats/Ticks or Milliseconds.
• To change the transport position readout, right-
click anywhere in its numeric window, then scroll
and select from the pop-up menu.
• From the control surface, toggle between SMPTE
and Bars/Beats/Ticks by pressing the SMPTE
VIEW button next to the POSITION readout.
Ways to Enter Locator SMPTE Position
• Click in desired field (Hours, Minutes, Seconds,
Frames) and drag up to increase and down to
decrease. Press Enter or click out of the field to
complete.
• Click in the desired field and enter the number
from the keyboard number row or numeric
keypad. Press Enter or click out of the field to
complete.
• Press Tab to enter the SMPTE window, starting at
the Hours field and enter the desired setting.
Press Tab to move from field to field; press Return
to complete action and to exit data entry mode.
• Press the SET TIME button (in the Transport
section on the console) to enter a locate time.
Using the numeric keypad on the control surface,
enter the desired time in hours, minutes, and
seconds, then press Enter to complete. Store
locate time by selecting LOCATOR mode, entering
the locate number, then pressing Store followed
by Enter.
• Locate points can be entered on the fly by simply
clicking the New button at the desired time during
playback.
• Selected Locate points can be updated by clicking
the Store button to overwrite with the current
time.
Automation Parameters
These settings activate and deactivate the
write status of all automation parameters. In
addition, Bypass controls the read/playback status
for all automation data.
BYPASS
• When this is highlighted, automation data is
completely ignored.
• When this icon is not highlighted, all previously
recorded automation data plays back and any
selected automation data can be written, as long
as channels are in automation write mode and
time code is received at the MTC input.
• See the Playback column in the Channel List
(under Channel in the upper menu bar) for
individual channel automation playback status.
FADER
• Highlight this button to enable the recording of
fader movements into automation.
MUTE
• Highlight this button to enable the recording of
mute on/off selections into automation.
PAN
• Highlight this button to enable the recording of
pan and surround positions into automation.
ALL
• Highlight this button to enable the recording of
all other automation parameters besides fader,
mute, and pan, into automation.
TOUCH
• Highlight this button to enable automation data
recording by simply moving an automation
parameter control.
• While automation is playing back, moving any
selected parameter control begins instant
recording of that automation parameter.
TRIM
• Highlight this button to move all faders to unity
position for TRIM automation.
• This status adds or subtracts the TRIM fader
movement to or from all previous channel
automation data.
• Use this feature anytime you want to keep all
previously recorded fader moves intact while
offsetting the relative track level.
Summary of Contents for D8B 3.0
Page 8: ...D8B Manual Preface page 2 ...
Page 9: ...D8B Manual Chapter 1 page 3 Chapter 1 Getting Ready ...
Page 27: ...D8B Manual Chapter 2 page 21 Chapter 2 Where Is It ...
Page 47: ...D8B Manual Chapter 3 page 41 Chapter 3 What s On TV ...
Page 93: ...D8B Manual Chapter 4 page 87 Chapter 4 Applications ...


