Beta Draft Confidential
Installing and Removing Modules
Installing or Replacing Air Filters
6-36
4/5/03
CBX 500 Multiservice WAN Switch Hardware Installation Guide
Installing or Replacing Air Filters
There are two air filters that you can optionally order and install in the CBX 500
switch:
•
The top filter slides into the air intake area above the fan tray on the front of the
chassis
•
The side filter slides into the chassis vertically to the left of the power supplies
You are not required to power down the switch to install or replace the air filters.
To install or replace the top and side air filters:
1. Grasp the edges of the front bezel (the cover on the bottom front of the switch),
then pull on the bezel to remove it.
2. Using a 1/4-in. flathead screwdriver, loosen the two captive screws located on the
right and left edges of the fan access cover.
3. Tilt the fan access cover forward and down.
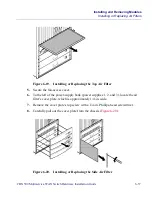
4. Slide the top air filter (larger of the two) horizontally into the air intake area above
the fan tray (see
Figure 6-19 on page 6-37
).
!
Caution – Air filters must be vacuumed or replaced once a month to prevent heat
from building up inside the chassis. To order a replacement air filter, contact your
sales representative.
Warning – The following procedure may make the device susceptible to electrostatic
charge.

