LNS QUICK SIX S2 Instruction Manual Download Page 74

18

CHAPTER 4: OPERATION
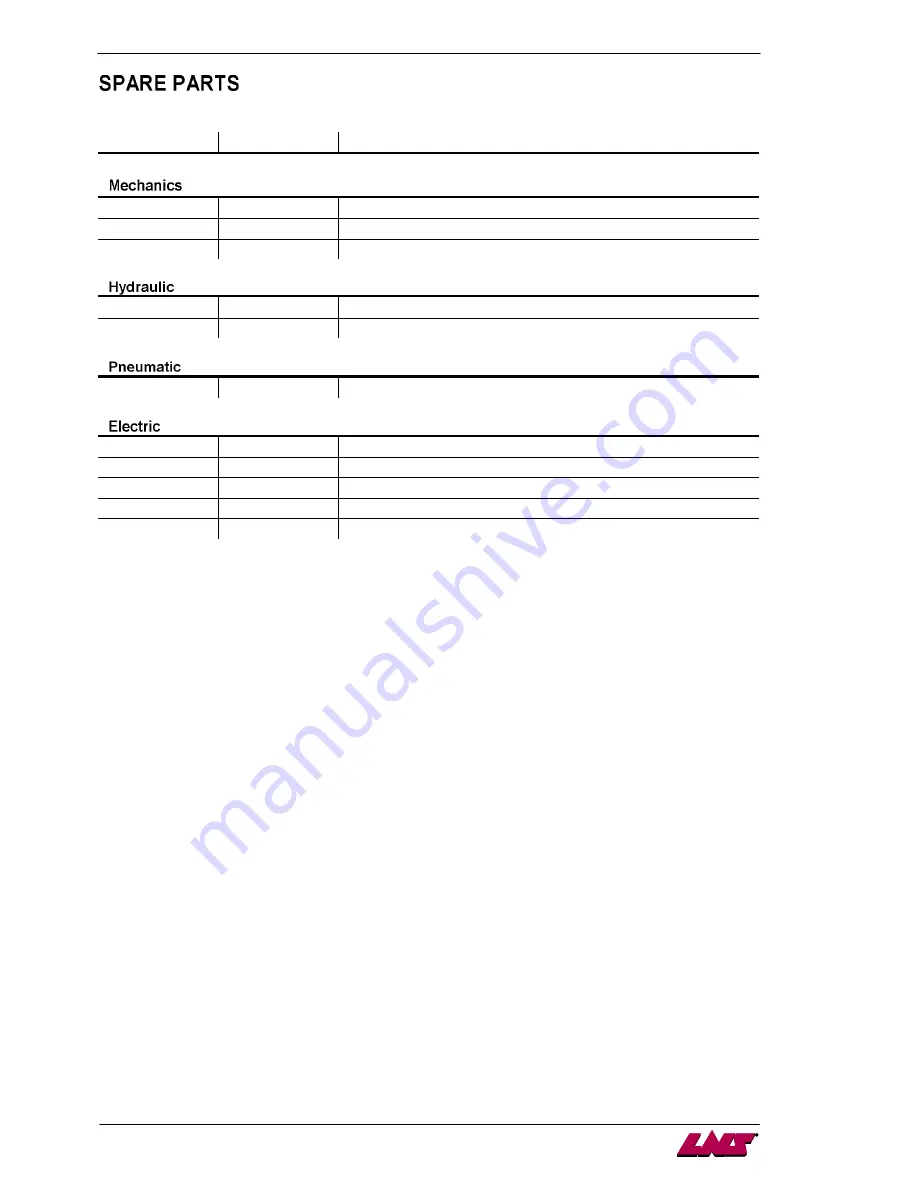
MOVE S2

Designation

Article no.

Description

-

024.14.054

Dropping finger

-

024.11.024

Pusher guide

-

024.11.054

Pusher guide

M 1

2.210.150

Hydraulic pump motor

SP 2

4.050

Hydraulic pressure switch

C

3.580

Silencer

FU1

4.416

Fuse connector

KA1 - 6

4.606

Motor relay

KM1

4.507

Circuit breaker

K1

4.507

Safety chain control

R1 - R5

4.606

Interface relay

Summary of Contents for QUICK SIX S2

Page 1: ......

Page 2: ...MOVE S2...

Page 3: ...MOVE S2...

Page 4: ...MOVE S2...

Page 5: ...CHAPTER 1 BASIC NOTIONS 3 MOVE S2...

Page 6: ...e description and settings of the devices and elements represented therein Therefore if a setting must be made while you are handling the machine please refer to the chapter on the device to be set fo...

Page 7: ...the debts losses expenses or damage incurred or suffered by the buyer of this product or a third party following an accident incorrect use or misuse or stemming from modifications repairs or transform...

Page 8: ...ry Conception of movable guards EN ISO 13850 2006 Safety of machinery Emergency stop equipment EN ISO 13849 1 2008 Safety of machinery Safety related parts of control systems ISO 14118 2000 Safety of...

Page 9: ...ation Do not knock the bar feeder while moving it as this could damage it Do not move the bar feeder while it is electrically powered on The work area surrounding the bar feeder should always be clear...

Page 10: ...ctically impossible to bypass them By pressing the emergency stop button located on the remote control the functions of the bar feeder and the lathe are immediately stopped LNS or its local representa...

Page 11: ...indle must be perfect It is essential that the alignment of the bar feeder is done in accordance with the instructions indicated in Chapter 3 Setting into operation In some cases the length of the spi...

Page 12: ...ely easy to guide Square bars or those with special profiles increase the risk of breaking the oil film Performances may vary depending on the material machined the length of the bar etc To obtain opt...

Page 13: ...CHAPTER 2 TECHNICAL DATA 11 MOVE S2...

Page 14: ...mption 10 l loading cycle Maximum feed rate 100 m min Loading cycle time 30 40 sec Hydraulic oil ISO VG 100 1200 1500 mm with specific stand extension Depending on the options these technical data may...

Page 15: ...CHAPTER 2 TECHNICAL DATA 13 MOVE S2...

Page 16: ...14 CHAPTER 2 TECHNICAL DATA MOVE S2...

Page 17: ...Pusher belt drive C Pusher guiding element D Remote control E Main access cover F Pusher holding system G Interface plug not visible here H Measuring cell I Front stand J Retraction system K Rear stan...

Page 18: ...16 CHAPTER 2 TECHNICAL DATA MOVE S2...

Page 19: ...CHAPTER 3 SETTING INTO OPERATION 17 MOVE S2...

Page 20: ...ust be observed in order to prevent any injuries to persons and damages to objects These instructions are stapled to the crate of the bar feeder Width 1110 mm 1000 mm Length 3800 mm 3800 mm Height 168...

Page 21: ...ews A The remote control and the interface plug are packaged in a separate box B with the technical documentation and the accessories Take out the parts and place them in an easily accessible area for...

Page 22: ...no one is nearby or under the suspended load Do not knock the bar feeder as you move it this may damage it Place the bar feeder behind the lathe as close as possible and in approximate alignment with...

Page 23: ...t the weight of the bar feeder is evenly distributed over the 12 support points Loosen the nuts and locking screw D and make sure that the central screws C of the front and rear feet are supported Ope...

Page 24: ...ows Two different supports are available depending on the axis height to reach Loose the nut A Set the nut B to make sure the chain loader lays on the support Check that a 10 mm gap remains between th...

Page 25: ...anchored to the ground to make it stable To accomplish this 8 anchorage points A have been provided 8 anchorage bolts B must be furnished by the client min M10 x 100 mm 1 2 x 4 Once the anchoring bol...

Page 26: ...voltage does not correspond the wiring of the motor must be modified Procedure Turn the bar feeder off trigger QS1 and QM1 see below Open the main safety cover Unscrew the motor cover unit Make sure t...

Page 27: ...LNS Although an example of an interface diagram is provided the diagram for the interface corresponding to your device essential when making the electrical connection is located inside the electrical...

Page 28: ...outputs designation of the interface on the PLC are indicated in chapter 5 Maintenance section 3 6 The interface diagrams below are provided as examples The diagram corresponding to your bar feeder is...

Page 29: ...or the bar feeder should be connected to the output of a breaker mounted in the electrical control box of the lathe 10 A max For the wiring inside the lathe the section of the cables should be at leas...

Page 30: ...off and the R1 relay of the bar feeder will be triggered see description of the R1 relay below This signal is for checking the mode of the lathe clamping device open and is mainly used for the feeding...

Page 31: ...the loading cycle or the part feed out The operational cycle of relay R2 pulsed latched etc is controlled by Services parameters When the feeding pusher reaches the End of Bar position relay R3 energi...

Page 32: ...ion Contact of relay R10 optional Relay R10 engages after verification of the presence of a bar during the loading cycle of a new bar The lathe foot switch for opening the lathe clamping device should...

Page 33: ...CHAPTER 4 OPERATION 31 MOVE S2...

Page 34: ...ering off are then checked by the PLC which analyses them The latter then gives the operator access only to those handling operations that can be undertaken To power up the bar feeder turn 1 the switc...

Page 35: ...ling and reducing the access time to the necessary functions The display reads continuously and clearly the status of the bar feeder and the production allowing one to verify at all times the function...

Page 36: ...Switch to manual mode Jump to next menu Pusher forward picture may be reversed Load a bar stock in the guiding elements Pusher reverse picture may be reversed Confirm the unloading of a bar stock out...

Page 37: ...er These keys allow to enter values bar stock diameter part length etc or parameters When an enumeration of parameters or menu sets is proposed these keys allow the selection When a dangerous situatio...

Page 38: ...strictly prohibited to use the retraction system before the bar feeder is anchored to the ground Please read the safety precautions described at the beginning of this manual before handling the follow...

Page 39: ...8 024 030 023 20 80 15 024 030 013 XX inner of the guiding element bar stock 1 mm 1 On the remote control use the manual functions to move back the pusher to its reference in lifted position 2 Select...

Page 40: ...t 6 1 Remove the rest cover located at the front of the bar feeder 6 2 Loose the holding screws C 6 3 Turn the holding rolls D and tighten the screws C 6 4 Put back the rest cover 7 On the remote cont...

Page 41: ...ntage of holding the bar at two points separated by about 1 5 the diameter with a clamping 2 times 350 over about 0 5 times the diameter Efficiency excellent With this type of clamping one should be v...

Page 42: ...eater the clearance is the more frequent the vibrations are Using reduction tubes helps to decrease this clearance Guiding is thus improved but in addition the insertion of the bar into the clamping d...

Page 43: ...by the user a positioning correction is necessary bar stock loaded under conditions as point 3 4 1 1 On the remote control press the STOP key 2 Press the key corresponding to the symbol 3 In the menu...

Page 44: ...mping system of the lathe approximately 5 mm or a 1 4 behind the chuck jaws or collet pads This will provide minimum bar stock remnant Regardless of the length of the bars or parts the end of bar posi...

Page 45: ...nt end of bar position Z is displayed Enter with the direction keys the correction to insert and press the icon to add the value or the icon to subtract it The new value is stored and displayed To exi...

Page 46: ...e between the measuring cell and the position of the material in the lathe clamping device With this system the setting is the same for any bar length Before handling the bar feeder stop the lathe at...

Page 47: ...correction to insert and press the icon to add the value or the icon to subtract it The new value is stored To exit the top cut position set mode press the key attributed to the icon By teaching Press...

Page 48: ...distance of the pusher after feeding Overall part length for the auxiliary part remnant machining Allows to set quickly the working mode by selecting the desired application Following working modes ar...

Page 49: ...otor M3 As soon as parameter 1 is selected the M3 motor automatically repositions the table and the fingers in standard position It is important at each change in start up that the diameter of the new...

Page 50: ...ice of the lathe chuck or actuator This positioning corresponds to a value Z programmed by the operator which is equal to the distance between the measuring cell and the position of the material in th...

Page 51: ...ce bar feed but in this instance for the second machining Lt2 The length of the bar feed includes the length of the piece to be machined and the thickness of the cut off tool Like the previous paramet...

Page 52: ...e bar stock according to the parameter overall part length value The bar feed is not able to drive the feeding cycle if the machining process requires several clamping device openings This parameter i...

Page 53: ...cell and the position of the material in the lathe clamping device With this system the setting is the same for any bar length Further information in the startup manual Depending on the lathe and its...

Page 54: ...t The interface signal is reversed depending on whether the clamping device functions by pushing or by pulling It is therefore essential to know the operation of the clamping device without this the f...

Page 55: ...eder settings like working speeds default torques mechanical configuration of the bar feeder To configure the interfacing signals between the lathe and the bar feeder like clamping device signal of th...

Page 56: ...ain loader is loaded on the dropping fingers The pusher is in back position lifted up and the pusher holding system is open 2 The loading flag moves forward and pushes the bar stock in measuring posit...

Page 57: ...CHAPTER 4 OPERATION 1 MOVE S2...

Page 58: ...les can become lodged in sensitive areas and can impede the proper operation of the bar feeder Do not use any corrosive detergent like acetone Detergents should never come in contact to the electrical...

Page 59: ...uld be given to the handling of electrical elements because of risks of electrocution In case of possible electrical malfunctions it is advisable to contact LNS or its local representative This chapte...

Page 60: ...4 CHAPTER 4 OPERATION MOVE S2...

Page 61: ...Pusher support in open position switch SQ4 4 968 Pusher support in closed position switch SQ5 4 391 Pusher in home position switch SQ6 4 968 Bar stock laying fingers down position control SQ7 4 968 B...

Page 62: ...606 Relay dropping fingers to upper position KA6 4 606 Relay dropping fingers to lower position KM1 4 507 Hydraulic pump motor M1 relay KM2 4 507 Chain loader motor M3 relay QF1 4 815 Circuit breaker...

Page 63: ...r provided by the lathe and if necessary adapt the cable on the power terminal block A Although fuses seldom need replacing is it advisable to keep some spare ones on hand A Primary terminal block 200...

Page 64: ...eries last for a relatively long time 2 3 years it is advisable to keep spares on hand When a battery becomes low the amplifier signals this through a control light The battery and must be replaced ri...

Page 65: ...CHAPTER 4 OPERATION 9 MOVE S2 Cover Locking clip Click in to close Open the battery compartment Remove the battery from its housing and replace Close the battery compartment...

Page 66: ...A Battery module M1 Slot for software updates M2 Slot for memory expansion in use as standard Batt The PLC does not need a backup battery on the information module Run The PLC is in RUN mode This is...

Page 67: ...ure switch O51 KA6 Relay dropping fingers low I16 K1 Safety line relay O54 SON Motor Servo ON I17 SP2 Oil pressure switch I18 SQ10 Retraction safety switch I19 SQ8 Indexing chain loader I20 SQ9 Bar st...

Page 68: ...STOP is released For safety reasons the power supply to the motor is immediately interrupted After having located and repaired the problem causing this interruption reset the circuit breaker by pressi...

Page 69: ...1 With a screwdriver unscrew the locking screw D 2 Insert a hex head wrench 5 mm into the center of the pressure switch E By turning clockwise the release of the pressure switch will take place at a...

Page 70: ...cated behind the control cabinet For the pneumatic connections of the bar feeder the customer must provide a hose B with an inside diameter of 1 2 12 7 mm For USA 3 8 9 5 mm Provide an air hose long e...

Page 71: ...f the bar feeder pneumatic circuit A 3 583 Inlets B 3 582 Outlets C 3 580 Silencer D 4 178 Control connection plug YV 2 3 578 Valve for bar stock laying fingers YV 3 3 578 Valve for air blast control...

Page 72: ...t for pneumatic cylinders activated by 2 electro valves A Air outlet B Manual activation key To guarantee an optimal work of the bar feeder the service pressure must be at least 5 bar 75 psi The press...

Page 73: ...CHAPTER 4 OPERATION 17 MOVE S2...

Page 74: ...ping finger 024 11 024 Pusher guide 024 11 054 Pusher guide M 1 2 210 150 Hydraulic pump motor SP 2 4 050 Hydraulic pressure switch C 3 580 Silencer FU1 4 416 Fuse connector KA1 6 4 606 Motor relay KM...

Page 75: ...CHAPTER 4 OPERATION 1 MOVE S2...

Page 76: ...ERATION MOVE S2 Company name Person in charge Address ZIP City Country Phone Fax Type of device Serial number Quantity Ordering no Description Expected delivery Location and date Signature and stamp o...

Page 77: ...CHAPTER 4 OPERATION 3 MOVE S2 The above is an example only Programming may change according to the interface between the lathe and the bar feed...

Page 78: ...Waterside Park Valley Way Wombwell GB Barnsley S73 0BB sales Lnsturbouk com www Lns europe com TEL 44 1226 27 00 33 FAX 44 1226 27 00 44 ITALIA LNS AUTOMAZIONE S R L Via Mons Colombo 34 IT 21053 CASTE...

Page 79: ...Number of Parts 500 Naming Convention Numeric 1 99999999 For the FTP connection a minimum Cat5e crossover cable is required The following items represent the applicable functions of the LNS Parts Libr...

Page 80: ...orques Etc Note Since the Parts Library is located in the Part Setup menu it is recommended to modify all parameters in the Application Setup and Positions Torques menu first Step 2 In the Part Setup...

Page 81: ...o restore the file The Active Part value will change to the loaded part number when the PLC has finished updating all the parameter values Note The current bar stock diameter and shape must match the...

Page 82: ...e the following information to setup FileZilla Host IP Address Example 192 168 10 197 Username part Password library Port N A There are two files which must remain on the card in order for the Parts L...

Page 83: ...important to use the disconnect function of the FTP Client This closes the session on the PLC If the disconnect function is not used the FTP session on the PLC is not closed and remains open This can...

Reviews: