background image

22

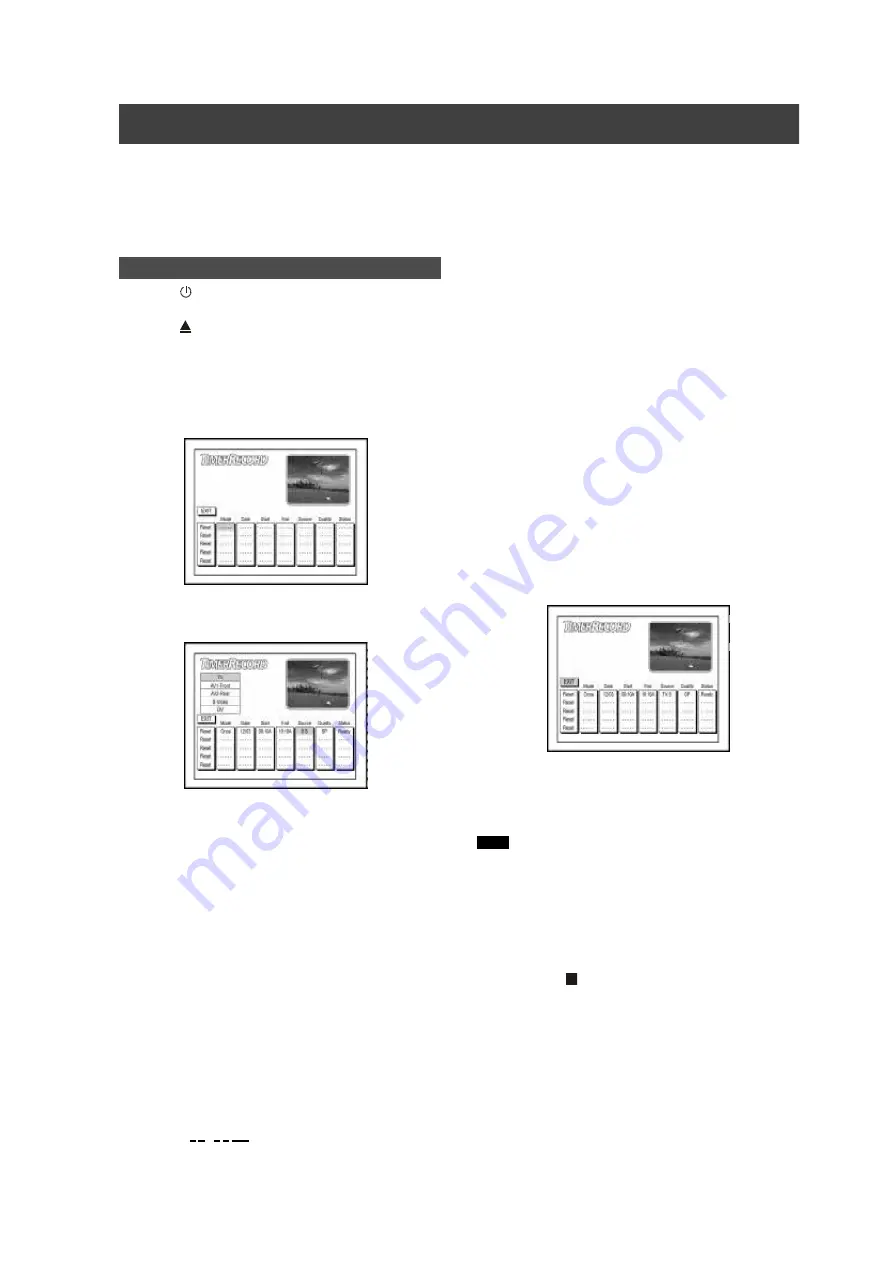
Setting the tim er

1.Press [   PO W ER ] to turn the unit on.

2.Press [   O PEN /C LO SE] to open the tray and
place a recordable D VD  disc or recordable C D
disc (LVW -5006 m odel only) on the tray.

If you use an new  recordable D VD  disc, disc preparation process

w ill take place in the background autom atically.

3.Press [TIM ER ] to display  the “Tim er-R ecord”
m enu.

4.Press [

S

][

T

] to select one of the tim er setting

list and press [

X

].

5.Press [

W

] [

X

] to select “M ode” and then press

[EN TER ] .

Each tim e you press [

S

] [

T

] , the item  changes as follow s.

M ode: O nce <-> W eekly <-> D aily

6.Press [

W

] [

X

] to select “D ate” and then press

[EN TER ] .

Each tim e you press [

S

] [

T

] , the item  changes as follow s.

For O nce:

D A TE: 1 2 : 2 5  (M M /D D )

For W eekly: D A TE: SAT

        (SU N /M O N /TU E/W ED /TH U /FR I/SAT)

For D aily:

D A TE: X X : X X  (not w ork)

7.Press [

W

] [

X

] to select “Start Tim e” and  then

press [EN TER ] to set the “R ecording start tim e”.

TIM E:0 1 : 2 8 AM   (H H /M M /A M  or PM )

8.Press [

W

] [

X

] to set “End Tim e” and then

press [EN TER ] to set the “R ecording end tim e.”

9.Press [

W

] [

X

] to select “Source” and then

press [EN TER ] to set the “R ecording source.”

TV <-->A V1-Front<-->A V2-R ear<-->S-Video<-->D V

10.Press [

W

] [

X

] to select “Q uality” and then

press [EN TER ] to set the “R ecording quality.”

LVW -5002 m odel only:

M ode: H Q  <-> SP <-> LP  <-> EP <-> SLP

LVW -5006 m odel only:

M ode:H Q  <-> SP <-> LP <-> EP <-> SLP <-> SVC D <->VC D <->

Audio C D

If you enter a w rong selection

Press [

W

] [

X

]  to re-select the item  you w ant to change.

11.Press [

S

][

T

] to select the “Exit” icon and

then press [EN TER ]  to exit the “Tim er-R ecord”
m enu.

12.Press [PO W ER ] to turn off the unit and acti-
vate the tim er record function.

Notes:

1.W hen the tim er record function is active, the “Tim er”LED  on front

panel w ill light up.

2.Tim er R ecord continues until you stop the recording or the disc is

full.

To stop recording during tim er record

W hen you press [   STO P ] , it m ay take a few  seconds for

recording to stop.

To check the disc status w hile tim er recording

Press [D ISPLAY] and the tim er recordi inform ation appears.

Prior to tim er record

Please check that the recordable D VD  disc or recordable C D  disc

(LVW -5006 m odel only) has enough available space for the tim er

recording function. Before you start to record, follow  the steps to

set the date, tim e, picture quality and channel of the program

m anually.

Tim er record

All manuals and user guides at all-guides.com

Summary of Contents for LVW-5002

Page 1: ...User s Manual User s Manual All manuals and user guides at all guides com a l l g u i d e s c o m...

Page 2: ...ng f r om a VCR orV8 Hi 8 DV 18 Thef r ontpanelandr earpanelconnect i on 18 DV r ecor di ng 19 Use EasyG ui der t o r ecor d DV si gnal 19 O ne t ouch r ecor d t o r ecor d t he DV si gnal 20 DV cont...

Page 3: ...ni ence r ecept acl es and t he poi ntwher e t heyexi tf r om t he pr oduct 16 O ut doorAnt enna G r oundi ng I fan out si de ant enna or cabl e syst em i sconnect ed t o t he pr oduct be sur e t he a...

Page 4: ...tm aybe of suf f i ci entm agni t ude t o const i t ut e a r i skof el ect r i cshockt o hum ans The excl am at i on poi ntwi t hi n an equi l at er alt r i angl e i si nt ended t o al er tt he usert...

Page 5: ...i tcan pl aybackDVD VI DEO di scscom pat i bl e wi t h t he r egi on code i spr i nt ed on t he r earoft he uni t Exam pl es ofpl ayabl e DVD VI DEO di scs N otes Audi o Syst em Dol by Di gi t al Li n...

Page 6: ...t on ENTER 16 Navi gat i on but t on NAVI 17 Next Pr evi ousbut t on NEXT PREVI O US 18 St op but t on STO P 19 Edi tbut t on EDI T 20 Ti m erbut t on TI M ER Rem ot e Cont r ol To i nst al lbat t er...

Page 7: ...se i ndi cators 12 M ul ti i nf orm ati on w i ndow 13 Ti m er recordi ng m ode Nam es ofpar t s and cont r ol s 1 PO W ER O N O FF Tur nst her ecor deronandof f 2 D I SC TRAY To accepta di sc 3 D I S...

Page 8: ...I O L R Jacks Com posi t e si gnali nput 4 COM PONENT VI DEO OUTPUT Y Pb Pr Jacks Com ponentsi gnalout put 5 LI NE OUT VI DEO AUDI O L R Jacks Com posi t esi gnalout put 6 LI NE OUT S VI DEO Jack S Vi...

Page 9: ...hi s uni tt o m al f unct i on 2 ForDi gi t alCabl e and Sat el l i t e TV user s pl ease connectyourdecoder s out putt o t hi s uni t s i nput Connect i ng t o t he ant enna out l etand t he t el ev...

Page 10: ...i onsar e r equi r ed There are t w o t ypes ofconnect i ons S Vi deo and Com ponentvi deo t hatprovi de hi gherqual i t y vi ew i ng 2 Connect i ng t o a TV vi a CO M PO NENT out Connect i ng t o a T...

Page 11: ...yDi gi t aland DTS decoder st o enj oy sur r ound sound Di gi t aloutopt i cal Use a f i ber opt i c cabl e notsuppl i ed t o connectt he DI G I TAL OUT O PTI CAL di gi t alopt i calout put on t he DV...

Page 12: ...ow t he st eps bel ow t o connectt he uni tt o t he cabl e box and TV Connect i ng t o a sat el l i t e box ora cabl e box w i t h CO M PO SI TE j acks Use AUDI O VI DEO cabl est o connectt he AUDI O...

Page 13: ...t o sui tyour t el evi si on I fyou have a r egul ar4 3 t el evi si on you can al so sel ecthow vi deo on som e di scs i spr esent ed 4 3 Let t erBox sel ectwhen you connectt he uni tt o a nor m al 4...

Page 14: ...Add Del et e and pr ess ENTER t o br i ng up t he add del et e m enu 4 Pr ess W X S T t o sel ectt he channel s t hatyou w antt o add ordel et e and pr ess ENTER t o conf i r m i t M ove t he cur sor...

Page 15: ...el ectone oft he TV Channel and press X 2 Press S T t o sel ect Sw ap w i t h and press ENTER 3 Press W X S T t o ent ert he Channel num ber and t hen press ENTER t o sw ap The or deroft he channel s...

Page 16: ...3 Press S T t o sel ect VCR Pl us i con and press ENTER The di spl ayf orent er i ng a G ui de ChannelNum ber G CN num ber appear s 4 Press W X S T t o ent ert he G ui de ChannelNum ber G CN num ber...

Page 17: ...RD i tm ayt ake a f ew m om ent st o i ni t i al i ze Bef or e r ecor di ng LVW 5002DVD Recor derr ecor dsonbot hDVD R andDVD RW di scs Pl ease use qual i f i ed r ecor dabl e DVD R RW di scst o ensur...

Page 18: ...qui pm ent you wi l lneed t o f i nal i ze t he di sc Addi ng new r ecor di ngs af t erot herr ecor di ng sessi ons Pr ess RECO RD t o st ar tr ecor di ng and pr ess STO P att he poi ntyou w antt o st...

Page 19: ...r earpanelconnect i on Connecta Vi deo Casset t e Recor derorCam cor dert o t he uni t s i nputt er m i nal s To st ar tr ecor di ng 1 Pr ess SETUP t o sel ect RECO RD t o sett he r ecor di ng m ode...

Page 20: ...ces ata t i m e t o t he f r ontpanelconnect oroft hi sDVD Recor der 4 Pow eron t he DV Cam cor der St ar t Pl ayback m ode on t he DV Cam cor der 5 Pause t he DV Cam cor derw her e you w antt o r eco...

Page 21: ...t hi suni tal l owsbasi c DV cont r olon DVD Recor derRem ot e cont r ol 1 Pow eron yourTV and t hi s DVD Recor der 2 Pl ace a r ecor dabl e DVD di sc i n t he t r ay M ake sur e t he di sc s l abeli...

Page 22: ...s 1 Youcan tper f or m anyr ecor di ngbef or eyout heCD R CD RW di sci spr epar ed 2 O nl ysi ngl e f or m ati sal l owed on a si ngl e di sc 3 Youcan tchange t he f or m atofCD R di scaf t ert he di...

Page 23: ...V1 Fr ont AV2 Rear S Vi deo DV 10 Pr ess W X t o sel ect Q ual i t y and t hen pr ess ENTER t o sett he Recor di ng qual i t y LVW 5002 m odelonl y M ode HQ SP LP EP SLP LVW 5006 m odelonl y M ode HQ...

Page 24: ...X t o sel ectTV as t he recordi ng source TV AV1 Fr ont AV2 Rear S Vi deo DV Ti m err ecor d 9 Press W X t o sel ect Q ual i t y and t hen press ENTER t o sett he Recordi ng qual i t y LVW 5002 m odel...

Page 25: ...d Vi deo CDsf r am e by f r am e dur i ng pl aybacki n pause m ode Pr ess PLAY t o r est ar tnor m alpl ayback Pr ess STO P t o st op pl ayback DVD VCD SVCD vi deo di sc pl ayback Bef or e you can st...

Page 26: ...g t o r epeata desi r ed par t REPEAT Sel ect Poi ntA att he begi nni ng oft he par tyou wantt o r epeat Sel ect Poi ntB att he end oft he par tyou wantt o r epeat The uni tl ocat es A and st ar t sr...

Page 27: ...n pl ayi ng f r om a sel ect ed t r ack Sl i deshow Concur r entpl ay JPEG and M P3 f i l es on t he sam e di sc 1 Pl ace t he di sc on t he t r ay The di scwi l lbegi n pl aybackaut om at i cal l y 2...

Page 28: ...t i on i snotappl i cabl e t o a f i nal i zed DVD R di sc Over w r i t i ng a t i t l e DVD R RW R RW di scs onl y 1 Pr ess S T t o sel ect O ver w r i t e and t hen pr ess ENTER 2 Pr ess W X t o sel...

Page 29: ...ctt he Si gnal I nput TV AV1 Fr ont AV2 Rear S Vi deo DV and pr ess ENTER I fyou sel ect TV pr ess S T t o sel ectt he channelyou wantt o r ecor dandpr ess ENTER 4 Pr ess S T t o sel ectt he r ecor di...

Page 30: ...enu 2 Pr ess S T t o sel ectt he Recor d i con and t hen pr ess ENTER 3 Pr ess S T t o sel ectt he si gnal i nput TV AV1 Fr ont AV2 Rear S Vi deo DV and pr ess ENTER I fyou sel ect TV pr ess S T t o s...

Page 31: ...nal i zi ng i snecessar ywhen you pl aydi scsr ecor ded wi t h t hi suni t on ot herDVD pl ayerorPC You m ustf i nal i ze t he DVD R di scbef or e i tcan be pl aybackon ot herDVD pl ayer s LVW 5006 m...

Page 32: ...he vi deo out putconnect i on Recor d Recor d Q ual i t y Sett he def aul tqual i t yofr ecor di ng HQ 1hr SP 2hr s LP 3hr s EP 4hr s SLP 6hr s Def aul t SP Chapt erM ar k Sett he i nt er valofchapt...

Page 33: ...et e or Sw ap Sel ectt o st ar tr escani ng channeloradd del et e a channel ort o swap t he TV channel Fi ne 24 1 0 1 24 Sel ectt o f i ne t une t he channelf r equencym anual l y Fi r m war eupdat e...

Page 34: ...ode al l ow t he cont ent st o be pr ogr am m ed oredi t ed DVD R DVD R i sa r ecor dabl e di sct hati st he sam e si ze asa DVD Vi deo Cont ent scan be r ecor ded onl yonce t o a DVD R and wi l lhave...

Page 35: ...om posi t eO ut put 1 Vp p 75 Ohm S Vi deoOut put Y 1 Vp p 75 O hm C 0 286 Vp p 75 O hm Com ponent sOut put Y 1 Vp p 75 O hm PB 0 7 Vp p 75 O hm PR 0 7 Vp p 75 O hm AUDI O RECORDI NG FORM AT DVD VR HQ...

Page 36: ...2 pi xel s Ver t i calResol ut i on 480 l i nes 576 l i nes VCD Hor i z Resol ut i on 352 pi xel s 352 pi xel s Ver t i calResol ut i on 240 l i nes 288 l i nes VI DEO PERFORM ANCE DA Conver t er 10 b...

Page 37: ...i zed Som e pl ayer swi l lnotpl ayr ecor dabl eDVD di scswhen r ecor dedi nvi deom odeandf i nal i zed Di scsr ecor ded wi t h copy once m at er i alcannotbe pl ayed on non CPRM com pat i bl epl aye...

Reviews: