background image

19

R ecordi

ng

D V recording

B efore you to start to record D V contents

This D VD  R ecorder allow s basic D V control functions w ith the

R em ote C ontrol. The D VD  R ecorder is equipped w ith a

cam corder control (Play, Stop, FF or R everse) feature via the D V

Link connection. Sim ply m ove the screen cursor to the desired

function and press [EN TER ] at D V input screen.

1.Pow er on your TV and this D VD -R ecorder.

2.Place a recordable disc on the tray. M ake sure
the disc’s label is facing up.

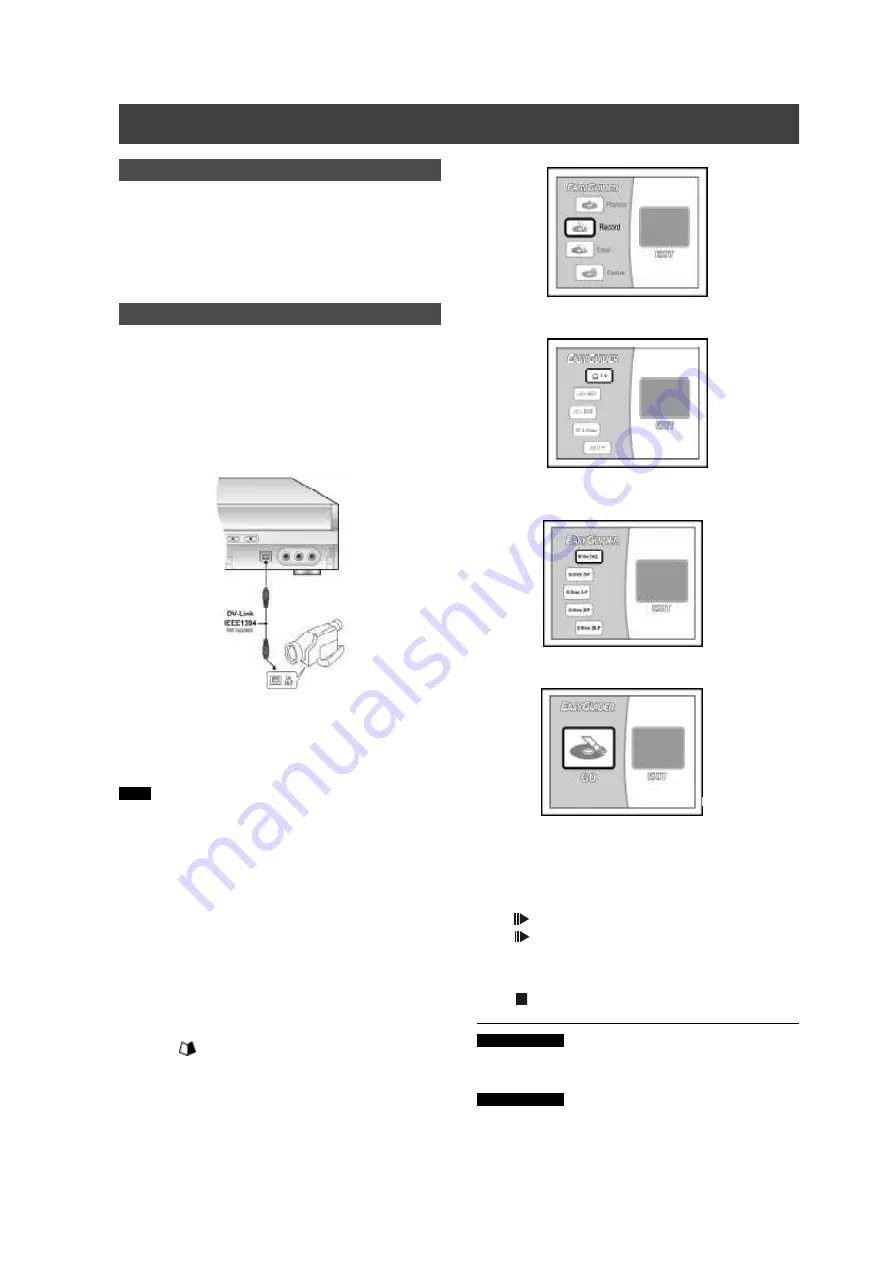
3.C onnect the D V cable (IEEE-1394 4-pin cable) to
both the D V C am corder and the D VD -R ecorder.

Notes:

1.The D V-Link input jack on this unit is for use w ith D V com patible

cam corder only.

2.O nly D V signals can be input to the D V-Link jack on this D VD

R ecorder.

3.D o not connect a M IC R O  M V form at video cam corder to this D V-

Link (IEEE-1394)  jack.

4.You cannot connect m ore than tw o pieces of video input sources

at a tim e to the front panel connector of this D VD -R ecorder.

4.Pow er on the D V C am corder. Start “Playback
m ode” on the D V C am corder.

5.“Pause” the D V C am corder w here you w ant to
record.

6.Press [   G U ID ER ] on the rem ote control. This
actives the Easy G uider m enu.

7. Press [

S

] [

T

] and to select the “R EC O R D ”

icon, and press [EN TER ] to confirm .

8.Press [

S

] [

T

] to select “D V” Input, and press

[EN TER ] to confirm .

9.Press [

S

] [

T

] to select a recording quality and

press [EN TER ] to confirm .

10.Press [EN TER ] to start recording.


N otes:

This D VD -R ecorder w ill stay in “Pause”m ode w hen no D V input

signal is detected.

11.To pause recording.

Press [ 

 PAU SE ] on the rem ote control to pause recording .

Press [ 

 PAU SE ] again,  if you w ant to resum e recording.

12.To stop recording.

Press [   ]

U se “Easy G uider” to record D V signal

LVW -5002 m odel

Before playing a D VD +R  disc on com patible equipm ent, you

w ill need to finalize the disc.

LVW -5006 m odel

Before playing a D VD +R /D VD -R /D VD -R W  disc on com patible

equipm ent, you w ill need to finalize the disc.

All manuals and user guides at all-guides.com

Summary of Contents for LVW-5002

Page 1: ...User s Manual User s Manual All manuals and user guides at all guides com a l l g u i d e s c o m...

Page 2: ...ng f r om a VCR orV8 Hi 8 DV 18 Thef r ontpanelandr earpanelconnect i on 18 DV r ecor di ng 19 Use EasyG ui der t o r ecor d DV si gnal 19 O ne t ouch r ecor d t o r ecor d t he DV si gnal 20 DV cont...

Page 3: ...ni ence r ecept acl es and t he poi ntwher e t heyexi tf r om t he pr oduct 16 O ut doorAnt enna G r oundi ng I fan out si de ant enna or cabl e syst em i sconnect ed t o t he pr oduct be sur e t he a...

Page 4: ...tm aybe of suf f i ci entm agni t ude t o const i t ut e a r i skof el ect r i cshockt o hum ans The excl am at i on poi ntwi t hi n an equi l at er alt r i angl e i si nt ended t o al er tt he usert...

Page 5: ...i tcan pl aybackDVD VI DEO di scscom pat i bl e wi t h t he r egi on code i spr i nt ed on t he r earoft he uni t Exam pl es ofpl ayabl e DVD VI DEO di scs N otes Audi o Syst em Dol by Di gi t al Li n...

Page 6: ...t on ENTER 16 Navi gat i on but t on NAVI 17 Next Pr evi ousbut t on NEXT PREVI O US 18 St op but t on STO P 19 Edi tbut t on EDI T 20 Ti m erbut t on TI M ER Rem ot e Cont r ol To i nst al lbat t er...

Page 7: ...se i ndi cators 12 M ul ti i nf orm ati on w i ndow 13 Ti m er recordi ng m ode Nam es ofpar t s and cont r ol s 1 PO W ER O N O FF Tur nst her ecor deronandof f 2 D I SC TRAY To accepta di sc 3 D I S...

Page 8: ...I O L R Jacks Com posi t e si gnali nput 4 COM PONENT VI DEO OUTPUT Y Pb Pr Jacks Com ponentsi gnalout put 5 LI NE OUT VI DEO AUDI O L R Jacks Com posi t esi gnalout put 6 LI NE OUT S VI DEO Jack S Vi...

Page 9: ...hi s uni tt o m al f unct i on 2 ForDi gi t alCabl e and Sat el l i t e TV user s pl ease connectyourdecoder s out putt o t hi s uni t s i nput Connect i ng t o t he ant enna out l etand t he t el ev...

Page 10: ...i onsar e r equi r ed There are t w o t ypes ofconnect i ons S Vi deo and Com ponentvi deo t hatprovi de hi gherqual i t y vi ew i ng 2 Connect i ng t o a TV vi a CO M PO NENT out Connect i ng t o a T...

Page 11: ...yDi gi t aland DTS decoder st o enj oy sur r ound sound Di gi t aloutopt i cal Use a f i ber opt i c cabl e notsuppl i ed t o connectt he DI G I TAL OUT O PTI CAL di gi t alopt i calout put on t he DV...

Page 12: ...ow t he st eps bel ow t o connectt he uni tt o t he cabl e box and TV Connect i ng t o a sat el l i t e box ora cabl e box w i t h CO M PO SI TE j acks Use AUDI O VI DEO cabl est o connectt he AUDI O...

Page 13: ...t o sui tyour t el evi si on I fyou have a r egul ar4 3 t el evi si on you can al so sel ecthow vi deo on som e di scs i spr esent ed 4 3 Let t erBox sel ectwhen you connectt he uni tt o a nor m al 4...

Page 14: ...Add Del et e and pr ess ENTER t o br i ng up t he add del et e m enu 4 Pr ess W X S T t o sel ectt he channel s t hatyou w antt o add ordel et e and pr ess ENTER t o conf i r m i t M ove t he cur sor...

Page 15: ...el ectone oft he TV Channel and press X 2 Press S T t o sel ect Sw ap w i t h and press ENTER 3 Press W X S T t o ent ert he Channel num ber and t hen press ENTER t o sw ap The or deroft he channel s...

Page 16: ...3 Press S T t o sel ect VCR Pl us i con and press ENTER The di spl ayf orent er i ng a G ui de ChannelNum ber G CN num ber appear s 4 Press W X S T t o ent ert he G ui de ChannelNum ber G CN num ber...

Page 17: ...RD i tm ayt ake a f ew m om ent st o i ni t i al i ze Bef or e r ecor di ng LVW 5002DVD Recor derr ecor dsonbot hDVD R andDVD RW di scs Pl ease use qual i f i ed r ecor dabl e DVD R RW di scst o ensur...

Page 18: ...qui pm ent you wi l lneed t o f i nal i ze t he di sc Addi ng new r ecor di ngs af t erot herr ecor di ng sessi ons Pr ess RECO RD t o st ar tr ecor di ng and pr ess STO P att he poi ntyou w antt o st...

Page 19: ...r earpanelconnect i on Connecta Vi deo Casset t e Recor derorCam cor dert o t he uni t s i nputt er m i nal s To st ar tr ecor di ng 1 Pr ess SETUP t o sel ect RECO RD t o sett he r ecor di ng m ode...

Page 20: ...ces ata t i m e t o t he f r ontpanelconnect oroft hi sDVD Recor der 4 Pow eron t he DV Cam cor der St ar t Pl ayback m ode on t he DV Cam cor der 5 Pause t he DV Cam cor derw her e you w antt o r eco...

Page 21: ...t hi suni tal l owsbasi c DV cont r olon DVD Recor derRem ot e cont r ol 1 Pow eron yourTV and t hi s DVD Recor der 2 Pl ace a r ecor dabl e DVD di sc i n t he t r ay M ake sur e t he di sc s l abeli...

Page 22: ...s 1 Youcan tper f or m anyr ecor di ngbef or eyout heCD R CD RW di sci spr epar ed 2 O nl ysi ngl e f or m ati sal l owed on a si ngl e di sc 3 Youcan tchange t he f or m atofCD R di scaf t ert he di...

Page 23: ...V1 Fr ont AV2 Rear S Vi deo DV 10 Pr ess W X t o sel ect Q ual i t y and t hen pr ess ENTER t o sett he Recor di ng qual i t y LVW 5002 m odelonl y M ode HQ SP LP EP SLP LVW 5006 m odelonl y M ode HQ...

Page 24: ...X t o sel ectTV as t he recordi ng source TV AV1 Fr ont AV2 Rear S Vi deo DV Ti m err ecor d 9 Press W X t o sel ect Q ual i t y and t hen press ENTER t o sett he Recordi ng qual i t y LVW 5002 m odel...

Page 25: ...d Vi deo CDsf r am e by f r am e dur i ng pl aybacki n pause m ode Pr ess PLAY t o r est ar tnor m alpl ayback Pr ess STO P t o st op pl ayback DVD VCD SVCD vi deo di sc pl ayback Bef or e you can st...

Page 26: ...g t o r epeata desi r ed par t REPEAT Sel ect Poi ntA att he begi nni ng oft he par tyou wantt o r epeat Sel ect Poi ntB att he end oft he par tyou wantt o r epeat The uni tl ocat es A and st ar t sr...

Page 27: ...n pl ayi ng f r om a sel ect ed t r ack Sl i deshow Concur r entpl ay JPEG and M P3 f i l es on t he sam e di sc 1 Pl ace t he di sc on t he t r ay The di scwi l lbegi n pl aybackaut om at i cal l y 2...

Page 28: ...t i on i snotappl i cabl e t o a f i nal i zed DVD R di sc Over w r i t i ng a t i t l e DVD R RW R RW di scs onl y 1 Pr ess S T t o sel ect O ver w r i t e and t hen pr ess ENTER 2 Pr ess W X t o sel...

Page 29: ...ctt he Si gnal I nput TV AV1 Fr ont AV2 Rear S Vi deo DV and pr ess ENTER I fyou sel ect TV pr ess S T t o sel ectt he channelyou wantt o r ecor dandpr ess ENTER 4 Pr ess S T t o sel ectt he r ecor di...

Page 30: ...enu 2 Pr ess S T t o sel ectt he Recor d i con and t hen pr ess ENTER 3 Pr ess S T t o sel ectt he si gnal i nput TV AV1 Fr ont AV2 Rear S Vi deo DV and pr ess ENTER I fyou sel ect TV pr ess S T t o s...

Page 31: ...nal i zi ng i snecessar ywhen you pl aydi scsr ecor ded wi t h t hi suni t on ot herDVD pl ayerorPC You m ustf i nal i ze t he DVD R di scbef or e i tcan be pl aybackon ot herDVD pl ayer s LVW 5006 m...

Page 32: ...he vi deo out putconnect i on Recor d Recor d Q ual i t y Sett he def aul tqual i t yofr ecor di ng HQ 1hr SP 2hr s LP 3hr s EP 4hr s SLP 6hr s Def aul t SP Chapt erM ar k Sett he i nt er valofchapt...

Page 33: ...et e or Sw ap Sel ectt o st ar tr escani ng channeloradd del et e a channel ort o swap t he TV channel Fi ne 24 1 0 1 24 Sel ectt o f i ne t une t he channelf r equencym anual l y Fi r m war eupdat e...

Page 34: ...ode al l ow t he cont ent st o be pr ogr am m ed oredi t ed DVD R DVD R i sa r ecor dabl e di sct hati st he sam e si ze asa DVD Vi deo Cont ent scan be r ecor ded onl yonce t o a DVD R and wi l lhave...

Page 35: ...om posi t eO ut put 1 Vp p 75 Ohm S Vi deoOut put Y 1 Vp p 75 O hm C 0 286 Vp p 75 O hm Com ponent sOut put Y 1 Vp p 75 O hm PB 0 7 Vp p 75 O hm PR 0 7 Vp p 75 O hm AUDI O RECORDI NG FORM AT DVD VR HQ...

Page 36: ...2 pi xel s Ver t i calResol ut i on 480 l i nes 576 l i nes VCD Hor i z Resol ut i on 352 pi xel s 352 pi xel s Ver t i calResol ut i on 240 l i nes 288 l i nes VI DEO PERFORM ANCE DA Conver t er 10 b...

Page 37: ...i zed Som e pl ayer swi l lnotpl ayr ecor dabl eDVD di scswhen r ecor dedi nvi deom odeandf i nal i zed Di scsr ecor ded wi t h copy once m at er i alcannotbe pl ayed on non CPRM com pat i bl epl aye...

Reviews: