Chapter 2
How to Use the PrintServer
3
Wireless-G PrintServer
Chapter 2:
How to Use the PrintServer
After setting up the PrintServer with the Setup Wizard
(located on the CD-ROM and explained in the Quick
Installation), the PrintServer will be ready for use .
For print jobs, your computer will automatically connect
to the printer . However, if you want to scan, fax, or access a
memory card, then you must use the PrintServer Utility to
tell your computer to connect to the printer . (Many printers
have a slot for reading information from a memory card .)
This chapter describes the PrintServer Utility used to
control the PrintServer .
How to Access the PrintServer Utility
There are two ways to access the PrintServer Utility . One
way uses the PrintServer icon in the system tray, and the
other way uses the program icon accessed through the
Start menu .
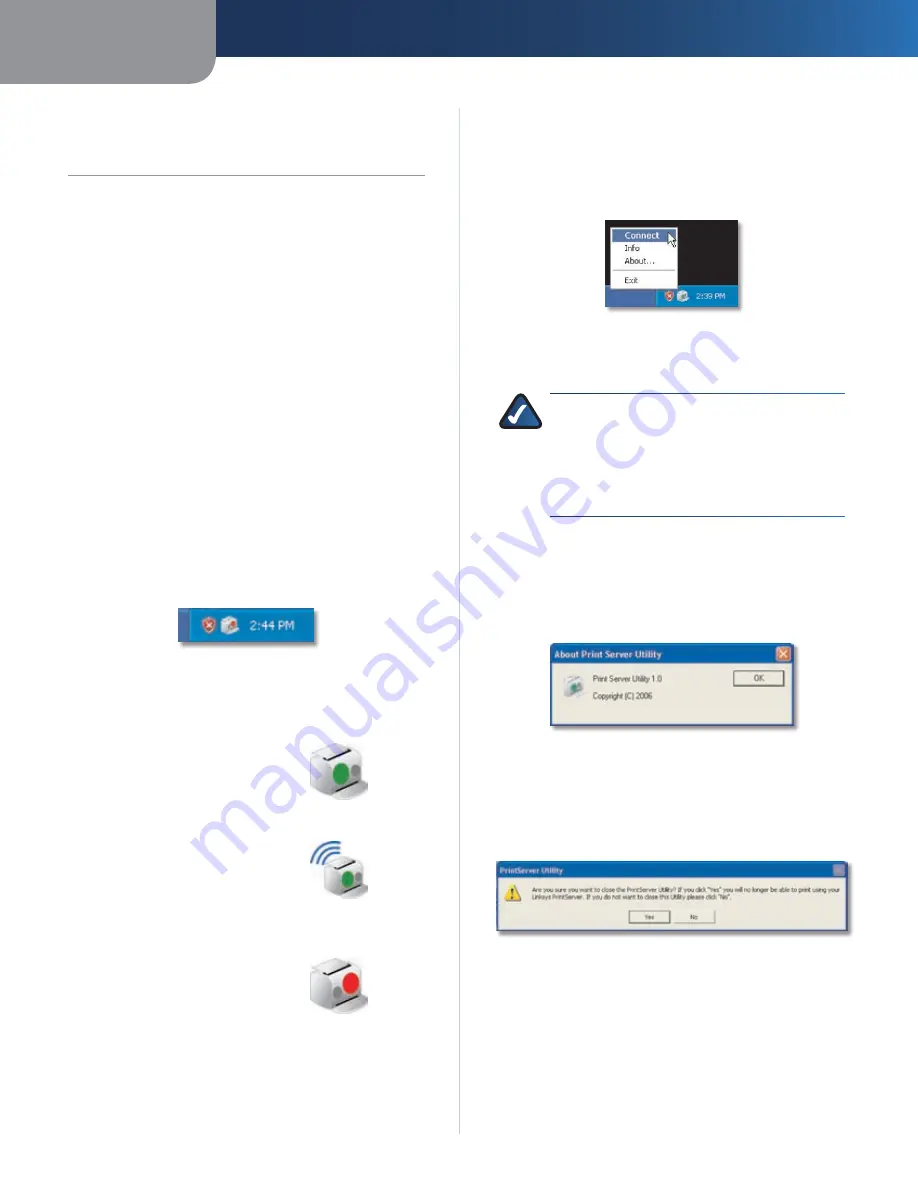
PrintServer Icon in the System Tray
After you have installed the PrintServer, the PrintServer
icon will appear in the system tray of your desktop .
PrintServer Diagnostic Icon
The icon can show three status options:
Icon Showing Availability Status
The green icon indicates that the
printer is available for use .
Icon Showing Connected Status
The green icon with waves indicates
that the computer is connected to
the printer and ready for use .
Icon Showing Offline Status
The red icon indicates that printer is
not available . Refer to “Appendix A:
Troubleshooting” for instructions .
Icon Showing Availability Status
Icon Showing Connected Status
Icon Showing Offline Status
When you double-click the icon, the
Print Server Information
screen will appear . Refer to the following section, “About
the Print Server Information Screen”, for details .
When you right-click the PrintServer diagnostic icon, you
will see a menu with four options:
PrintServer Icon Menu
Connect
To connect your computer to the printer for
scans, faxes, or usage of a memory card, click
Connect
.
NOTE:
The computer MUST be connected to
the printer for all scans, faxes, or usage of a
memory card . If the
Connection status
field says,
“Disconnected”, then click the
Connect
button .
(The computer will automatically connect to
the printer for print jobs .)
Info
To see the
Print Server Information
screen, click
Info
.
Refer to the following section, “About the Print Server
Information Screen”, for details .
About
To see the version number of the PrintServer
Utility, click
OK.
About PrintServer Utility
Exit
To close the utility, click
Exit
. A confirmation screen
will appear . If you close the utility, your computer will not
be able to use the PrintServer . To exit the utility, click
Yes
.
To keep the utility running, click
No
.
Exit PrintServer Utility
Summary of Contents for WPSM54G - Wireless-G PrintServer With Multifunction Printer Support Print Server
Page 1: ...USER GUIDE Wireless G PrintServer Model WPSM54G EU ...
Page 36: ...BENUTZERHANDBUCH Wireless G Druckserver Modell WPSM54G DE ...
Page 71: ...GUÍA DEL USUARIO Servidor de impresión Wireless G Modelo WPSM54G ES ...
Page 106: ...GUIDE DE L UTILISATEUR Serveur d impression sans fil G Modèle WPSM54G FR ...
Page 141: ...GUIDA PER L UTENTE Wireless G PrintServer Modello WPSM54G IT ...
Page 176: ...GEBRUIKERSHANDLEIDING Wireless G afdrukserver Model WPSM54G NL ...
Page 211: ...MANUAL DO UTILIZADOR Servidor de impressão sem fios G Modelo WPSM54G PT ...


