Chapter 1
Product Overview
2
Wireless-G PrintServer
Chapter 1:
Product Overview
Thank you for choosing the Linksys Wireless-G PrintServer .
The PrintServer lets you connect a USB printer directly
to your network, so your networked computers can
share a single printer . It is compatible with most USB
multifunction printers, and it allows full access to printing,
faxing, scanning, and copying functions . Like any print
server, users on the network can print anytime . The other
functions are treated a little differently—any user can
request access to one of the other functions and get
exclusive use of that function until the task is complete .
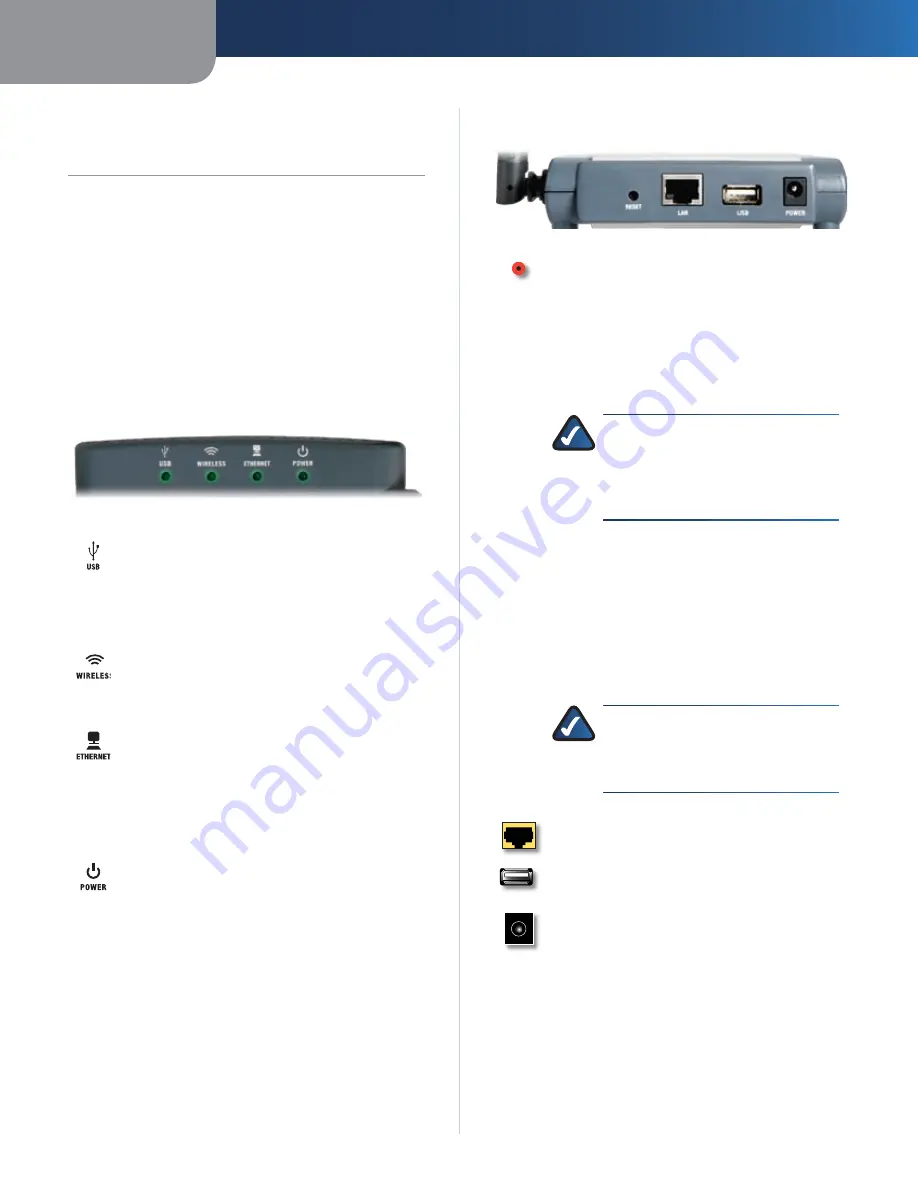
Front Panel
USB
(Green/Orange) The USB LED lights up
green when there is a printer connected to the
USB port . It flashes green when the PrintServer
is sending data through the USB port . The LED
lights up orange when there is a problem with
the printer .
Wireless
(Green) The Wireless LED lights up
when there is a wireless connection . It flashes
when the PrintServer is sending or receiving
data over the wireless network .
Ethernet
(Green/Orange)
The
Ethernet
LED lights up green when the PrintServer is
connected to a device through the Ethernet
port . It flashes green when the PrintServer is
sending or receiving data over that port . It
flashes orange when collisions are detected on
the Ethernet port .
Power
(Green/Orange) The Power LED lights
up green when the PrintServer is ready for use .
It flashes green when the PrintServer is booting
up, a system self-test is running, or the firmware
is being upgraded . The LED lights up orange
when there is an error .
Back Panel
Reset
The Reset button can be used to restore
the PrintServer’s factory default settings or
print a test page .
Reset to Factory Defaults
Hold down the Reset button for ten seconds,
and the PrintServer will be reset to its factory
default settings .
NOTE:
Resetting the PrintServer will
delete all of your custom settings
and replace them with the factory
defaults . Do not reset the PrintServer
if you want to retain your settings .
Print a Test Page
Make sure that both the PrintServer and
1 .
the printer connected to the USB port are
powered on .
Press the Reset button, and hold it down for
2 .
two seconds .
The test page, which lists the current settings
3 .
of the PrintServer, will be printed .
NOTE:
PostScript printers are unable
to print this test page . If you have a
PostScript printer on the USB port, the
test page will not be printed .
Ethernet
The Ethernet port connects the
PrintServer to your wired network for setup .
USB
The USB port connects the PrintServer to
the USB printer .
Power
The Power port connects the PrintServer
to the power adapter .
Summary of Contents for WPSM54G - Wireless-G PrintServer With Multifunction Printer Support Print Server
Page 1: ...USER GUIDE Wireless G PrintServer Model WPSM54G EU ...
Page 36: ...BENUTZERHANDBUCH Wireless G Druckserver Modell WPSM54G DE ...
Page 71: ...GUÍA DEL USUARIO Servidor de impresión Wireless G Modelo WPSM54G ES ...
Page 106: ...GUIDE DE L UTILISATEUR Serveur d impression sans fil G Modèle WPSM54G FR ...
Page 141: ...GUIDA PER L UTENTE Wireless G PrintServer Modello WPSM54G IT ...
Page 176: ...GEBRUIKERSHANDLEIDING Wireless G afdrukserver Model WPSM54G NL ...
Page 211: ...MANUAL DO UTILIZADOR Servidor de impressão sem fios G Modelo WPSM54G PT ...


