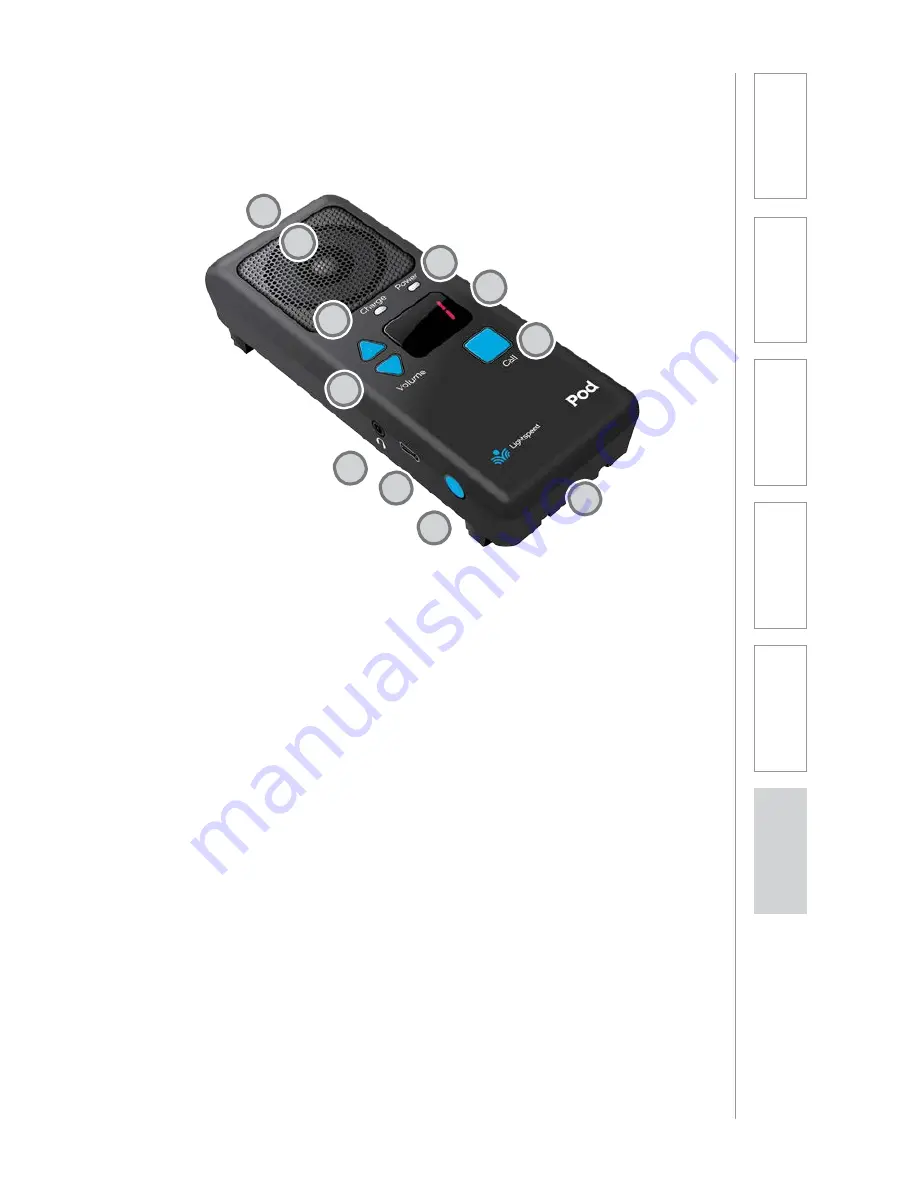
POD CONTROLS AND CONNECTIONS
1.
CHARGING INDICATOR:
this
light turns red when charging,
green to indicate charging
complete. During operation, this
light will turn green when the call
button is pressed.
2.
POWER/LOW BATTERY
INDICATOR:
this light blinks
blue when powered on, turns
solid blue when ready for
operation and turns red when
the battery is low.
3.
POD NUMBER:
the number will
light as a clear visual indicator
for the teacher to determine
which pod represents which
group number.
4.
VOLUME:
up/down buttons
adjust the volume of the pod
speaker. The volume level (-5
to 5) will be shown in the LED
window.
5.
CALL BUTTON:
students can
press this button to notify the
teacher they need assistance.
6.
LOUDSPEAKER:
the internal
loudspeaker distributes the
teacher’s voice.
7.
MICROPHONES:
the internal
microphones that picks up the
student’s voice are located at
each end of the pod.
8.
HEADPHONE OUT:
connect
headphones for private listening.
The pod speaker is muted when
headphones are connected.
9.
USB CHARGING/POWER
INPUT:
to charge pods in
addition to those in the charging
station, plug the charging cable
from the Activate station or
other USB power source into
this jack.
10. POWER:
press to power on.
Press and hold for 3 seconds to
power off.
7
6
2
3
1
5
4
8
9
7
10
6.
Sa
fe
ty
&
Sp
ecif
ica
ti
on
s
5.
M
ai
nt
ena
nc
e
&
Tr
ou
bl
es
hoot
in
g
4.
A
d
d
it
io
n
al
Inf
or
m
at
io
n
3.
D
ai
Iy
O
p
er
atio
n
2.
In
it
ial
S
et
-up
1.
O
ve
rvi
ew
Summary of Contents for ActivateStation
Page 1: ...U s e r M a n u a l...


