background image

264

Others

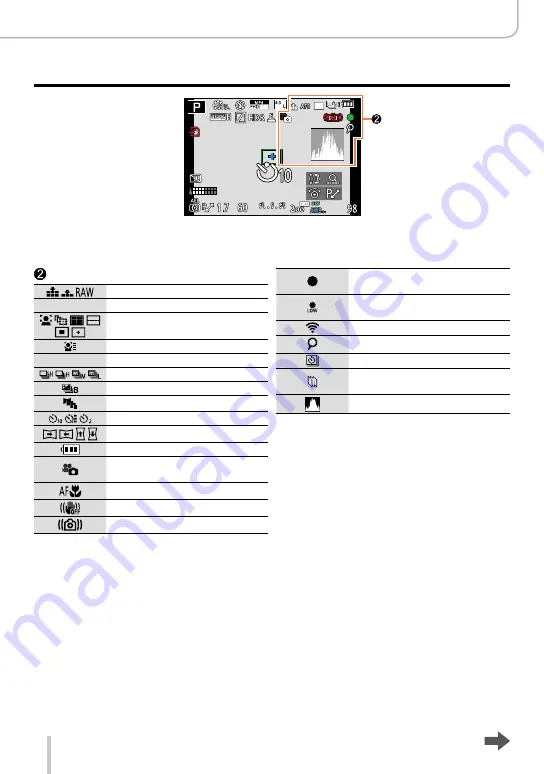
Monitor/Viewfinder Displays

25

p


[Quality] 

(→109)

AFS AFF AFC MF Focus Mode 

(→114)


AF Mode 

(→115)

[Face Recog.] 

(→163)

AFL

AF Lock 

(→133)


Series exposures 

(→142)

[Auto Bracket] 

(→145)

[Aspect Bracket] 

(→147)


Self-timer 

(→148)


Panorama Direction 

(→150)

Battery capacity 

(→21)

Picture Mode (Still picture 

priorities) 

(→195)

Macro recording 

(→126)

Stabilizer 

(→169)

Camera shake alert 

(→169)

Recording state (Flashes red.)/

Focus (Lights green.) 

(→56)

Focus (Under low illumination) 

(→56)

Wi-Fi connection status
[4K PHOTO] marker 

(→193)

[Time Lapse Shot] 

(→153)

[Stop Motion Animation] 

(→156)

Histogram 

(→64)

Summary of Contents for D-LUX 109

Page 1: ...LEICA D LUX Instructions ...

Page 2: ...ion Name List Contents by Function P 10 The Main Parts P 14 Monitor Viewfinder Display List P 263 On Screen Message List Message displays P 269 Menu List Menu list P 273 Rec P 273 Motion Picture P 275 Custom P 276 Setup P 278 Playback P 279 Q A Troubleshooting P 280 For details on how to use these instructions see the next page Wi Fi function 221 ...

Page 3: ...ressing the MENU SET button Indicates how the Wi Fi setting can be made after pressing the WIFI button AF AE DISP etc Indicate the respectively labeled buttons Settings that can be performed in the Custom menu Application tips Conditions in which a particular function cannot be used 00 Indicates the reference page Click to view the description on the next page In these instructions steps for setti...

Page 4: ...ines pictures recording time 27 Setting Language Time and Date 29 Changing time settings 30 Menu Control 31 Setting the menu screen background 33 The Quick Menu 34 Customizing the Quick Menu 35 Assigning Frequently Used Functions to the Function Buttons 37 Changing Settings Using the Control Ring 39 Changing the settings assigned to the control ring 40 The Setup Menu 41 Clock Set 41 World Time 41 ...

Page 5: ...the Playback Screen 71 Deleting Pictures 73 Delete Single 73 Deleting multiple up to 100 all pictures 74 Recording mode Using Snapshot Mode 75 Taking pictures using the camera handheld iHandheld Night Shot 78 Combining several exposures into a single picture with rich gradation iHDR 79 Taking Pictures Using Additional Effects Filter 89 Picture effects Filter Taking Pictures Using the Exposure Cont...

Page 6: ...es Long Shtr NR 113 Setting the color space 113 Focus and Exposure Settings Using Autofocus 114 Selecting the focus mode AFS AFF AFC 114 Switching AF Mode 115 Changing the position and size of the AF area 121 Setting your preferred focusing method 124 Taking Close Up Pictures 126 Focusing range 126 Manual Focusing 128 MF Assist 131 Focus and Exposure Memory Lock 133 Exposure Compensation 135 Setti...

Page 7: ...e 172 Using the Supplied Flash Unit 177 Attaching the flash unit 177 Changing the flash control mode 180 Changing the flash modes 181 Setting 2nd curtain sync 183 Flash exposure compensation 184 Synchronizing the flash output to an exposure compensation setting for the ambient light 184 Recording Motion Pictures 185 Setting the resolution and the frame rate 185 How to focus when recording a motion...

Page 8: ... tablet app Leica Image Shuttle 225 Connecting to a smartphone 226 Connecting to a smartphone using the NFC function 230 Taking pictures via remote control with a smartphone 231 Playing back pictures in the camera on a smartphone 232 Saving pictures from the camera to the smartphone 232 Easily transferring pictures from the camera 233 Sending pictures from the camera to social networking services ...

Page 9: ...ring Recorded Still and Motion Pictures on a Recorder 256 Copying by inserting the card into the recorder 256 Dubbing playback pictures via an AV cable 256 Printing pictures 257 Printing multiple pictures 258 Printing with date and text 259 Making print settings on the camera 260 Others Using Optional Flash Units 261 Monitor Viewfinder Displays 263 Message Displays 269 Menu List 273 Q A Troublesho...

Page 10: ...hite Balance 103 Picture Size 108 Quality 109 i Dynamic 111 i Resolution 111 HDR 112 Long Shtr NR 113 Color Space 113 Flash Operation Flash Mode 181 2nd curtain synchro 183 Flash Adjust 184 Screen settings Monochrome Live View 168 Mic Level Disp 197 Motion Pictures Rec Quality 185 Motion pictures in 4K 191 4K PHOTO 192 Taking still pictures while a motion picture is being recorded 195 Motion Pictu...

Page 11: ...ormation Location Logging 204 Title Edit 208 Text Stamp 209 Image settings Favorite 216 Print Set 217 Protect 218 Connecting Image Shuttle 225 NFC 230 WPS Push Button 240 243 Direct connection 243 Wi Fi Image Shuttle Remote recording 231 Saving images 232 Sending images 233 236 Sending and adding location information 234 Touch Sharing 247 Computer Software available for download 253 TV HDTV Link 2...

Page 12: ...es of temperature or humidity Avoid these conditions which may make the lens monitor or viewfinder dirty cause mold or damage the camera If condensation does occur turn off the camera and wait about two hours before using it Once the camera adjusts to the surrounding temperature the fogging will clear naturally Always take a test shot first Before important events when you will use the camera at w...

Page 13: ...ns cap string 423 109 001 019 Hot shoe cover 423 109 001 015 CD with instr PDFs 423 109 001 016 Button template for Canada French 423 114 001 009 only with camera model 18 471 Short instructions 93 588 592 delivery differs depending on markets Guarantee Card 439 399 100 026 Order No Carrying straps Artisan Artist for Leica satin green 14 884 Carrying strap D Lux Typ 109 leather cognac 18 824 Wrist...

Page 14: ... 3 Aspect ratio selector switch 107 4 Hot shoe Hot shoe cover 177 The hot shoe cover is inserted at the time of purchase 5 Aperture ring 59 6 Focus selector switch 114 126 128 7 Lens front ring To attach the auto lens cap optional remove the lens front ring 8 Lens barrel 9 Lens 1 2 5 6 4 3 9 8 7 ...

Page 15: ... 171 14 F Filter button 89 15 Exposure compensation dial 135 16 A button 59 17 Camera ON OFF switch 18 Speaker Be careful not to cover the speaker e g with your finger Doing so may impair sound audibility 19 Tripod thread 297 Using tripod screws with lengths of 5 5mm 7 32 or more may damage the camera if attached 20 Release slider 24 21 Card Battery door 24 Top 10 11 12 14 Bottom 18 20 13 16 17 15...

Page 16: ...n these instructions viewfinder is used to indicate the EVF 23 Eye Sensor 54 24 Diopter adjustment wheel 55 25 EVF button 54 Fn3 button 37 26 Strap eyelet 19 27 Monitor 28 HDMI socket 249 29 AV OUT DIGITAL socket 249 254 256 257 26 24 22 25 23 27 28 29 ...

Page 17: ...p eyelet 19 30 Wi Fi antenna 31 Wi Fi connection lamp 222 32 WIFI Fn2 button 222 33 Motion picture button 58 34 AF AE button 133 35 NFC antenna 230 36 QM button 34 37 Playback button 67 38 Delete Cancel Fn1 button 32 73 39 DISP button 62 71 40 MENU SET button Cursor button Control dial 18 26 34 33 32 30 31 37 40 39 36 38 35 ...

Page 18: ...t Bracket 147 Self timer 148 Panorama 150 AF Mode button 115 131 Control dial Turn the dial to select setting items and change setting values 32 67 Disabling the button and dial operation while recording When Cursor Button Lock is assigned to a function button operation of the MENU SET button the cursor button and the control dial is disabled 38 Enabling disabling the operation guide display Custo...

Page 19: ...amera Make sure that the thicker part of the string is not hanging over the lens cap or the shoulder strap eyelet 2 Attach the lens cap To attach and remove the lens cap press the tabs shown by arrows in the illustration 3 Attach the carrying strap Shoulder strap eyelet Attach the other end the same way Make sure it does not loosen Attach it with the Leica logo on the strap facing out Do not wrap ...

Page 20: ... products are used we urgently recommend to use only the Leica battery BP DC15 13 Use only the dedicated charger and battery 1 Insert the battery into the charger 2 Connect the charger to an electrical outlet Plug in type Battery Charger model specific Inlet type Charging light CHARGE On Charging in progress Off Charging complete If the light is flashing Battery temperature is too high or too low ...

Page 21: ...he remaining battery capacity is displayed Remaining capacity flashes red If the battery icon flashes red recharge or replace the battery with a fully charged one Use only the Leica battery BP DC15 13 Leica Camera AG cannot guarantee the quality of any other type of battery Remove the battery from the camera after use Keep the battery in a plastic case making sure that it is kept away from metalli...

Page 22: ...tandard CIPA is an abbreviation of Camera Imaging Products Association Program AE Mode Temperature 23 C 73 4 F Humidity 50 RH when monitor is on Using an SDHC memory card Using the supplied battery Starting recording 30 seconds after the camera is turned on when Stabilizer is set to Recording once every 30 seconds with full flash output every second recording Zooming through the complete focal len...

Page 23: ... the file size becomes larger with FHD recording with FHD will stop earlier than after 29 minutes Motion pictures with their file size set to 4K in Rec Quality Recording stops when the continuous recording time exceeds 15 minutes You can continue recording without interruption even if the file size exceeds 4GB but the video will be saved and played back in separate parts Viewing pictures When usin...

Page 24: ...terminals Charged battery check orientation Card check orientation terminals face monitor Latch 3 Close the card battery door and move the release slider to the LOCK position To remove Battery Move the latch in the direction of the arrow Card Push it further down until it clicks then pull it straight out Latch Remove the battery from the camera after use Keep the memory card out of reach of childr...

Page 25: ... differs Use a card that meets the following ratings of the SD or UHS speed classes SD and UHS speed classes are the speed standards regarding continuous writing Confirm the SD speed by checking the card label or other card related materials Rec Quality Speed class Label example FHD HD VGA Class 4 or higher 4K UHS speed class 3 Access to the card The access indication is displayed in red when pict...

Page 26: ...ion Format the card before recording a picture with the camera Since data cannot be recovered after formatting make sure to back up necessary data in advance 1 Set the menu item Setup Format A confirmation screen is displayed If you select Yes the operation is executed This requires a sufficiently charged battery Do not turn off the camera or perform other operations during formatting Always forma...

Page 27: ...rding picture capacity still pictures When the aspect ratio is set to 4 3 and Quality is set to Picture Size 8GB 16GB 32GB 64GB L 12 5M 1090 2200 4420 8820 M 6 5M 1880 3810 7630 14970 S 3M 3220 6500 13030 24700 When the aspect ratio is set to 4 3 and Quality is set to Picture Size 8GB 16GB 32GB 64GB L 12 5M 340 700 1400 2800 M 6 5M 400 810 1620 3230 S 3M 440 890 1780 3530 When the number of record...

Page 28: ... displayed and recording may be stopped automatically to protect the camera Motion pictures with their file size set to FHD HD or VGA in Rec Quality Recording stops when the continuous recording time exceeds 29 minutes or the file size exceeds 4GB Since the file size becomes larger with FHD recording with FHD will stop earlier than after 29 minutes Motion pictures with their file size set to 4K in...

Page 29: ... 4 Press MENU SET 5 Press to select the items year month day hour minute and then to set To cancel Press To set the display order or time display format Select Style and then press MENU SET to display the setting screen for display order and time display format Home time Destination time Style Display order Time display format 6 Press MENU SET A confirmation screen is displayed Press MENU SET 7 Wh...

Page 30: ...nt the picture or when you stamp the date on the pictures with Text Stamp Changing time settings Select Clock Set from the Setup menu to change the current time settings Clock settings will be saved for approx 3 months even after the battery is removed provided a fully charged battery was installed in the camera for 24 hours beforehand 1 Select Clock Set from the Setup menu For details about how t...

Page 31: ...u In these instructions steps for setting a menu item are described as follows Rec Quality 1 Press MENU SET to bring up the menu Rec 273 This menu lets you set the aspect ratio the resolution and other aspects of the pictures you are recording Motion Picture 275 This menu lets you set the Rec Quality and other aspects for motion picture recording Custom 276 Operation of the camera such as displayi...

Page 32: ...o the next page by pressing DISP or rotating the zoom lever Page Item 3 Press to select the setting and then MENU SET Items can also be selected by turning the control dial Selected setting Settings 4 Press repeatedly until the recording or playback screen reappears During recording the menu screen can also be exited by pressing the shutter button halfway ...

Page 33: ... MENU SET Select the menu item and perform the setting The menu types and items that are displayed vary according to the mode The setting methods vary depending on the menu item Setting the menu screen background You can set the background for the menu screen according to your preferences 1 Set the menu item Setup Menu Background 2 Press to select the background color and then MENU SET Exit the me...

Page 34: ...o select the setting The setting can also be selected with 4 Press QM button to close the Quick menu 25p Switching the method for setting Quick Menu items Custom Q MENU PRESET The default items can be set CUSTOM The Quick Menu will consist of the items you previously set 35 Using the Quick menu on the monitor recording information screen 62 of monitor style Press DISP repeatedly until the screen a...

Page 35: ...en MENU SET If there is no empty space in the bottom row you can replace an existing item with a new one by selecting the existing item To cancel the setting move to the bottom row by pressing select an item to cancel and then press MENU SET Items that can be assigned are as follows Rec menu Recording functions Photo Style 100 Picture Size 108 Quality 109 AFS AFF AFC 114 Metering Mode 139 i Dynami...

Page 36: ...m menu Silent Mode 162 Peaking 130 Histogram 64 Guide Line 65 Zebra Pattern 167 Monochrome Live View 168 Rec Area 189 Zoom lever 176 4 Press This will return the screen to that of step 1 35 Press MENU SET to switch to the recording screen ...

Page 37: ...particular buttons 1 Set the menu item Custom Fn Button Set 2 Press to select the function button you want to assign a function to and then MENU SET 3 Press to select the function you want to assign and then MENU SET For details on the functions that can be assigned refer to 38 To restore the default function button settings select Restore to Default ...

Page 38: ...ilize Custom Set feature 60 Silent Mode 162 Peaking 130 Histogram 64 Guide Line 65 Zebra Pattern 167 Monochrome Live View 168 Rec Area 189 Zoom lever 176 Function button settings at the time of purchase Certain functions cannot be assigned to some function buttons The function assigned to the function button may not work in some modes or on some display screens When Focus Area Set is assigned to a...

Page 39: ...rity Mode Shutter speed adjustment 84 Manual Exposure Mode Shutter speed adjustment 86 You can use the control ring to change the following settings which cannot be set using the shutter speed dial Faster shutter speeds than 1 4000s electronic shutter 140 Slower shutter speeds than 1s mechanical shutter 140 Setting in 1 3 EV steps The control ring is assigned to selecting the picture effect Filter...

Page 40: ...y 136 White Balance 103 Filter Select 89 OFF Not Set To return to the default setting select Normal 39 If you do not want to use the control ring select OFF Not Set The assigned function setting applies to all recording modes The function assigned to the control ring may not work in some recording mode combinations or settings used for recording panorama picture recording Filter setting etc When M...

Page 41: ...tination or Home and then press MENU SET 2 Use to select area and then press MENU SET City area name Difference to home time Current time at selected destination When Destination has been selected When Home has been selected To set daylight savings time Press in step 2 Press again to release the setting When daylight savings time is set the current time is advanced by 1 hour If the setting is canc...

Page 42: ...ove and then press MENU SET Use to select SET and then press MENU SET Enter your location Entering text 52 To print Location or the number of days that have passed use Text Stamp The travel date is calculated from the set departure date and the date set in the camera s clock When destination is set in World Time the days elapsed are calculated based on the local destination time When Travel Setup ...

Page 43: ...priority over display refresh rate and pictures are displayed at 30 fps For example use this mode when you want to record a comparatively slow moving subject while confirming the focusing It minimizes power consumption thus extending the operating time 60fps The display refresh rate has higher priority over picture quality and pictures are displayed at 60 fps The displayed pictures will appear sli...

Page 44: ...tings Brightness For adjusting the brightness Contrast For adjusting the contrast Saturation For adjusting the vividness of colors Red Tint For adjusting the rendition of red Blue Tint For adjusting blue 1 Press to select the setting item and then to make adjustments You can also make adjustments with the control dial 2 Press MENU SET The settings will affect the monitor image when it is in use an...

Page 45: ...nd the camera The brightness is increased The brightness is standard The brightness is decreased Because the picture shown on the monitor screen emphasizes brightness some subjects may look different than in reality but this will not affect the recorded picture returns to ordinary brightness if there is no operation for 30 seconds when recording Press any button to make the screen brighter again S...

Page 46: ... used for the preset time To restore Press the shutter button halfway or turn on the camera again Settings 10MIN 5MIN 2MIN 1MIN OFF The function is not available in the following cases During motion picture recording playback When Multi Exp is set When connected to a computer printer During slide shows When using Time Lapse Shot When using Stop Motion Animation ...

Page 47: ...ter PictBridge PTP Is selected when connecting to a PictBridge compatible printer PC Is selected when connecting to a computer TV Connection For changing the settings to be used when the camera is connected to a TV or another device Video Out With camera models 18 470 18 473 This setting is activated when the camera is connected via an AV or HDMI micro cable Settings NTSC Video output is set to th...

Page 48: ...fective scanning lines 1080p Outputs pictures using the progressive scan method for 1 080 effective scanning lines 1080i Outputs pictures using the interlace scan method for 1 080 effective scanning lines 720p Outputs pictures using the progressive scan method for 720 effective scanning lines 720 lines 576p 1 480p 2 Outputs pictures using the progressive scan method for 576 1 480 2 effective scann...

Page 49: ...nk compatible device Not all operations will be available Operability of the camera s own buttons will be limited OFF Operations must be performed via the camera s own buttons This will work when an HDMI micro cable is connected Menu Resume For saving the last operated menu position Settings ON OFF Menu Background For setting the background color for the menu screen 33 Menu Information For display...

Page 50: ...r number to 100 First format the card and reset the file numbers using No Reset Then select Yes on the folder number reset screen A folder number between 100 and 999 can be assigned Numbers cannot be reset once the folder number reaches 999 In this case save all necessary pictures to your computer and format the card 26 Reset For resetting to the default settings Reset Rec settings Reset setup cus...

Page 51: ... returning Wi Fi settings to default settings If you want to dispose or give away your camera always reset it to prevent your personal information from being mistakenly used When you have your camera repaired backup your personal information and always reset it as well Format For formatting initializing a memory card 26 ...

Page 52: ...to select and then press MENU SET Cursor position To continue entering characters Use to select and then press MENU SET Move the zoom lever toward T side Turn the control dial to the right Editing text Use to select and then press MENU SET Then move the cursor to the text to edit You can also use the zoom lever or control dial to reposition the cursor Use to select Delete and then press MENU SET U...

Page 53: ...ose range Make sure not to move the camera when you press the shutter button AF Assist Lamp Shoulder strap Microphone We recommend using the supplied carrying strap to avoid dropping the camera About the direction detect function Still pictures recorded with the camera held vertically can be automatically displayed in portrait orientation during playback Only when Rotate Disp is set to ON The dire...

Page 54: ...and monitor Viewfinder display Monitor display Automatic switching between viewfinder and monitor The eye sensor automatically switches to the viewfinder display when your eye or an object moves close to it and to the monitor display if not The eye sensor may not work correctly depending on the shape of your eyeglasses the way you hold the camera or whether the eyepiece and nearby areas are expose...

Page 55: ...the EVF button the setting of EVF Monitor Switch will also change About diopter adjustment Adjust the diopter to suit your vision so that you can see the viewfinder image with the best sharpness Turn the diopter adjustment wheel to adjust until you are able to clearly see the characters displayed in the viewfinder Diopter adjustment wheel About Eye Sensor AF If Eye Sensor AF in the Custom menu is ...

Page 56: ... and the AF area will be momentarily displayed only for the first time when the camera is focused while you press the shutter button halfway Focus display When focusing is successful illuminated When focusing is not successful flashing Aperture value Shutter speed AF area frame When focusing is successful green 3 Press the shutter button fully down to take the picture The focus display flashes and...

Page 57: ...ther in the same picture Displaying still pictures immediately after taking them Custom Auto Review Duration Time For setting the time the pictures are displayed immediately after taking them HOLD Displays pictures until you press the shutter button halfway 5SEC 4SEC 3SEC 2SEC 1SEC OFF Playback Operation Priority ON During Auto Review you can switch the playback screen or delete pictures OFF Durin...

Page 58: ...y operation for approximately 1 minute or longer some of the information on the screen is turned off To display the information again press DISP Do not cover the microphones when recording motion pictures You can also change the lens focal length zoom while recording motion pictures The operating sounds of the zoom lever or the control ring may be recorded in some cases Still pictures can be taken...

Page 59: ...e aperture ring and shutter speed dial When Snapshot Mode is selected the recording mode that was set using the aperture ring and shutter speed dial is canceled Snapshot Mode 75 For taking pictures with extended automatic settings Program Mode 81 For taking pictures with automatic exposure control Aperture Priority Mode 83 The exposure is determined by the automatically controlled shutter speed ba...

Page 60: ...wing menu items can not be registered as custom settings Rec menu Setup menu Playback menu Data registered with Face Recog The Profile Setup setting All menus Rotate Disp Picture Sort Delete Confirmation Using custom settings Set the menu item Custom Utilize Custom Set feature Use to select custom set Press MENU SET The settings are switched to those you selected for the custom set 25p Using a fun...

Page 61: ...ngs are changed temporarily while any one of the custom settings is selected the currently registered settings will remain unchanged To change the currently registered settings overwrite the registered data using Cust Set Mem in the Custom menu The function is not available in the Snapshot Mode ...

Page 62: ...onitor style display layout The display is switched as shown below Example With information 1 Without information With information 1 level gauge Without information level gauge 25p 25p Turned off Monitor recording information screen 2 1 When Histogram in the Custom menu is set to ON a histogram is displayed 64 When Expo Meter in the Custom menu is set to ON the Shutter speed aperture indication is...

Page 63: ...togram is displayed 64 When Expo Meter in the Custom menu is set to ON the Shutter speed aperture indication is displayed 81 If you do not perform any operation for approximately 1 minute or longer some of the information on the screen is turned off To display the information again press DISP Switching the monitor display method Custom Monitor Disp Style Viewfinder style display layout Monitor sty...

Page 64: ...ference for exposure compensation etc Example Dark OK Bright When the histogram is not the same as that of the recorded picture under the following conditions it will be displayed in orange When the light balance indicates settings other than 0 EV in Manual Exposure Mode or during exposure compensation When the flash fires When the correct exposure is not achieved or when the brightness of the scr...

Page 65: ...ing disabling the guideline display Custom Guide Line OFF The guideline display is not available during panorama picture recording When you select you can use to set the position Turning on off the recording information screen of the monitor Custom Monitor Info Disp ON OFF ...

Page 66: ...lting left or right In this case the right side is lower When the camera is tilted very little or not at all the level gauge will turn green When pictures are taken in portrait orientation the level gauge is automatically switched to that orientation Even when the camera position is more or less correct there may be an error of about 1 degree When Level Gauge is assigned to a function button you c...

Page 67: ...n the camera is switched to playback the lens barrel is retracted after approx 15 seconds The function is not available in the following cases This camera is compliant with the unified DCF Design rule for Camera File system standard formulated by the Japan Electronics and Information Technology Industries Association JEITA and with Exif Exchangeable image file format Files that are not DCF complia...

Page 68: ...ure playback automatic scrolling playback of panorama pictures or continuous playback Viewing a list of pictures Multi Playback 1 Turn the zoom lever in the W direction Turn the zoom lever in the W direction and you can switch the display methods in the following order 1 picture screen full screen 12 picture screen 30 picture screen Calendar screen Turn the lever in the T direction to return When ...

Page 69: ...picture screen You can also select the date with the control dial Selected date You can display the calendar between January 2000 to December 2099 Only months when pictures were taken are shown on the calendar screen Pictures taken without clock settings are displayed with the date 1st January 2014 Pictures taken with destination settings made in World Time are displayed in the calendar screen usi...

Page 70: ...ounterclockwise Volume down Control dial clockwise Volume up MENU SET Capturing still pictures from motion pictures while paused 200 The fast forward or rewind speed increases if you press again If is pressed during fast forward or rewind it will return to normal playback speed Motion pictures can be viewed on your computer using the software available after registering your camera on the Leica Ca...

Page 71: ...8 R G B Y Without information 1 If you do not perform any operation for approximately 1 minute or longer some of the information on the screen is turned off To display the information again press DISP 2 During Playback Zoom Motion Picture Playback Automatic Scrolling Playback of panorama pictures continuous playback or Slide Show You can only turn the display on or off 3 This screen is displayed o...

Page 72: ... blown highlights to flash on the screen when the Auto Review function is activated or during playback This does not affect recorded the pictures To reduce overexposure use a negative exposure compensation 135 using the histogram display 64 as a reference The right side of the histogram represents overexposure This feature is disabled during Multi Playback Calendar Playback or Playback Zoom ON OFF...

Page 73: ...deleting Use a sufficiently charged battery Delete Single 1 Press to delete the displayed picture 2 Use to select Delete Single and then press MENU SET A confirmation screen is displayed Select Yes and press MENU SET Delete Multi Delete Multi Delete All Delete All Delete Single Delete Single You can set either Yes or No as the default setting on the deletion confirmation screen when you perform De...

Page 74: ...s and then press MENU SET You can select All Delete Except Favorite in Delete All if there are pictures that have been set as Favorite 216 Delete Single Delete Single Delete All Delete All Delete Multi Delete Multi 3 When Delete Multi is selected Use to select the pictures and then press MENU SET To cancel Press MENU SET again Pictures can also be selected with the control dial Picture selected OK...

Page 75: ... Quick AF AF Assist Lamp 1 Press A The camera switches to Snapshot Mode When you press A again the recording mode is switched to one that is set using the aperture ring and shutter speed dial 2 Frame your subject When the camera identifies the scene the icon for the respective scene mode turns blue for 2 seconds and then changes to the normal red indication When you press and then press the shutte...

Page 76: ...n the camera identifies as the optimal scene mode and if the camera determines that camera shake is reduced by the use of a tripod or by other means a shutter speed that is slower than usual may be selected After pressing the shutter button do not move the camera while recording Automatic Scene Detection does not function until the focus is locked on a subject during AF Tracking When Face Recog is...

Page 77: ...is turned on the camera automatically sets Auto Red Eye Reduction or based on the type of subject and brightness When or is displayed the Red Eye Removal function is activated to automatically detect red eye and correct the picture data When or is selected slower shutter speeds may be used Available menu items You can set only the following menus Menu Item Rec Picture Size Quality AFS AFF AFC Burs...

Page 78: ...tly smaller A message indicating that multiple exposures are to be recorded appears on the screen After the shutter button has been pressed do not move the camera until after the last exposure When the camera is attached to a tripod or steadied by other means will not be identified The flash is fixed to the Forced Flash Off setting This function will not work for still pictures while motion pictur...

Page 79: ...sage indicating that multiple exposures are to be recorded appears on the screen After the shutter button has been pressed do not move the camera until after the last exposure Since a series of still exposures are combined after they have been recorded it will take a few moments before you can record another picture Due to the combining of several exposures double images may appear if the subject ...

Page 80: ...brightness of the picture as a result of the aperture value and the shutter speed you have set is not visible on the recording screen To check the effect on the recording screen use Preview Mode 88 The brightness of the screen may vary from the actual pictures recorded Check the brightness of pictures using the Playback Mode A faster shutter speed than the set shutter speed may be used when you re...

Page 81: ... values are displayed in yellow for approx 10 seconds you can perform Program Shift by turning the control dial 82 To cancel Program Shift either turn off the camera or turn the control dial until the Program Shift indication turns off Use the exposure compensation dial to set a compensation value 135 Enabling disabling the shutter speed aperture indication Custom Expo Meter ON OFF When you set th...

Page 82: ...by slowing the shutter speed Example of Program Shift 1 4 2 0 2 8 4 0 5 6 8 0 11 16 22 1 2 3 4 5 6 7 8 9 10 11 12 16 13 14 15 1 1 2 1 4 1 8 1 15 1 30 1 60 1 125 1 250 1 500 1 1000 1 2000 1 4000 1 8000 1 16000 17 18 19 20 21 22 23 24 25 Aperture value EV Shutter speed Program Shift range Program Shift line chart Program Shift limit EV is an abbreviation of Exposure Value a unit indicating the amoun...

Page 83: ...n Use the exposure compensation dial to set a compensation value 135 Manually settable aperture value range Automatically controlled shutter speed range F1 7 F16 60 1 4000s When the mechanical shutter is used 1 1 16000s When the electronic shutter is used You may not be able to select some values depending on the focal length set on the lens 60 5 30 15 8 4 8 0 11 16 Aperture value Shutter speed ap...

Page 84: ...nge 60 1 4000s When the mechanical shutter is used 1 1 16000s When the electronic shutter is used F1 7 F16 8 15 30 60 125 2 0 2 8 5 6 8 0 1 4 0 Shutter speed Shutter speed aperture indication Setting the shutter speed to values not provided on the shutter speed dial Turn the control ring or the control dial to set the following shutter speeds Check the shutter speed on the screen For details on se...

Page 85: ...xposure is not achieved the shutter speed is shown in red If the exposure is not adequate the aperture value and the shutter speed turn red and flash when the shutter button is pressed halfway If you switch the recording mode to Shutter Priority Mode when Sensitivity is set to Sensitivity will change to AUTO We recommend using a tripod or self timer with slow shutter speeds ...

Page 86: ... used 1 1 16000s When the electronic shutter is used 1 You may not be able to select some values depending on the focal length set on the lens 2 You may not be able to select some shutter speeds depending on the aperture value 60 125 250 500 1000 5 6 4 0 2 0 2 8 Shutter speed Light balance Aperture value Shutter speed aperture indication Setting the shutter speed to values not provided on the shut...

Page 87: ...ce assist is not displayed If you set the shutter speed to T time when Sensitivity is set to AUTO Sensitivity will change to 200 You cannot use this function when the electronic shutter is used You can use this function only in Manual Exposure Mode When you take pictures with the shutter speed set to T time we recommend using remote recording with a tripod or smartphone as a remote shutter release...

Page 88: ...s such as stopping the movement of running water 1 Assign Preview to the desired function button 37 The following step is an example of assigning Preview to the Fn1 button 2 Press the Fn1 button to switch the confirmation screen Every time you press the Fn1 button the screen switches Normal recording screen Effect of the aperture Effect of the shutter speed Shtr Speed Effect On Fn1 Shtr Speed Effe...

Page 89: ...fects Filter 92 99 The picture effect for the sample picture you selected is applied to the picture shown on the preview display Preview display No Effect 3 Press MENU SET The display of a picture with a selected picture effect appears on the screen Example When the picture effect Sunshine is selected in Program AE Mode Picture effects This is not displayed when No Effect is selected Adjusting the...

Page 90: ... HDR OFF Color Space sRGB The flash mode is set to Forced Flash Off The display of a picture reflecting a selected effect in the preview screen or recording screen may differ from the actual recorded pictures Switching the display of a selection screen for applying picture effects Filter 1 Press DISP to switch the display Every time you press DISP the screen for which picture effects are selected ...

Page 91: ...djustment level bar Taking two pictures with and without picture effects Simultaneous record w o filter You can take two pictures at the same time with one press of the shutter button one with effects and one without effects Rec Simultaneous record w o filter Settings ON OFF When ON is set the camera will take one picture with the effects applied and another without the effects The picture recorde...

Page 92: ... that can be set Press to display the setting screen Color Yellow emphasized Red emphasized Old Days This effect adds a bright soft and nostalgic feel to the overall image Items that can be set Press to display the setting screen Contrast Lower Higher High Key This effect adds a bright airy and soft feel to the overall image Items that can be set Press to display the setting screen Color Pink emph...

Page 93: ...een Color Red emphasized Blue emphasized Sepia This effect creates a sepia image Items that can be set Press to display the setting screen Contrast Lower Higher Monochrome This effect creates a black and white picture Items that can be set Press to display the setting screen Contrast Yellow emphasized Blue emphasized Dynamic Monochrome This effect uses a higher contrast to create an impressive bla...

Page 94: ...blurs the overall image to add a soft feel to a black and white picture Items that can be set Press to display the setting screen Extent of defocus Weaker Stronger The display of the recording screen will be delayed more than usual and the screen will look as if frames are dropping Impressive Art This effect gives your photo a dramatic contrast look Items that can be set Press to display the setti...

Page 95: ... the frame corners to give the impression of a toy camera Items that can be set Press to display the setting screen Colors Orange emphasized Blue emphasized Toy Pop This effect creates a vivid and bright image with the look of a toy camera Items that can be set Press to display the setting screen Size of the frame corners with reduced brightness Smaller Larger Bleach Bypass This effect gives a hig...

Page 96: ...71 18 472 When a motion picture is recorded the finished recording will be approximately 1 10th of the actual recorded time period If you record a motion picture for 10 minutes the resulting motion picture recording time will be approximately 1 minute The recordable time displayed on the camera is approx 10x longer than actual recording When the recording mode is changed be sure to check the recor...

Page 97: ...focus Weaker Stronger The monitor image is displayed with a slight delay compared to normal recording Fantasy This effect creates a fantastical image in a pale color tone Items that can be set Press to display the setting screen Color hues Subdued Exaggerated Star Filter This effect transforms light points into stars Items that can be set Press to display the setting screen Ray length Shorter Long...

Page 98: ...rom the other differently colored subject parts Items that can be set Press to display the setting screen Amount of color left Less More Setting the color to retain Set the color to retain by selecting a location on the screen Press Fn1 Select the color you want to retain by moving the frame with and then press MENU SET Press DISP to reset the frame position Depending on the subject the set color ...

Page 99: ...Fn1 Press to move the center of the light source to a different position You can move the center of the light source to the edge of the screen Tips on positioning the center of the light source A more natural appearance can be created by placing the center of the light source outside the image Turn the control dial to adjust the size of the light source You can select four light source sizes When ...

Page 100: ...tly lower contrast Monochrome Setting that creates a black and white picture Scenery Setting that creates a picture using vivid colors for the blue sky and green e g foliage Portrait Setting that produces a healthy looking complexion Custom Setting that uses colors and picture quality which were registered in advance Photo Style is fixed to Standard when the picture effect Filter is set The menu i...

Page 101: ...Shifts towards a bluish tone Shifts towards a yellowish tone Filter Effect 2 Yellow Enhances the contrast of an subject Effect Weak The blue sky is rendered more clearly Orange Enhances the contrast of an subject Effect Medium The blue sky is rendered more vividly Red Enhances the contrast of an subject Effect Strong The blue sky is rendered much more vividly Green The skin and lips of people and ...

Page 102: ...red custom settings are applied 3 Turn the control ring to adjust the brightness of bright dark parts To register your preferred settings press to select the registration target icon Custom 1 Custom 2 and Custom 3 Bright side Dark side Preview display 4 Press MENU SET You can press DISP on the brightness adjustment screen to switch the screen display The settings registered in or will be retained ...

Page 103: ... For taking pictures outdoors under a clear sky For taking pictures outdoors under a cloudy sky For taking pictures outdoors in the shade For taking pictures under incandescent lights For taking pictures with flash as the main dominant light source The manually metered and set value is used For using a preset color temperature setting The AWB setting is applied when recording motion pictures Under...

Page 104: ...0K 4000K 3000K 2000K Cloudy sky rain Shade Incandescent lighting Sunset sunrise Candlelight Sunlight White fluorescent lighting Blue sky K Color temperature in degrees Kelvin Setting the White Balance manually This mode allows metering any specific situation and storing the according White Balance setting 1 Press WB 2 Turn the control dial to select or and then press 3 Point the camera at a white ...

Page 105: ...White Balance setting and then press 2 Use to perform White Balance fine adjustments A amber orangish colors B blue bluish colors G green greenish colors M magenta reddish colors Pressing DISP resets the position back to the center 3 Press MENU SET When you perform White Balance fine adjustments toward the A amber or B blue side the color of the White Balance icon displayed on the screen will chan...

Page 106: ...e bracket setting Turning the control dial to the right Horizontal A to B Turning the control dial to the left Vertical G to M 2 Press MENU SET When White Balance Bracketing is set BKT appears on the White Balance icon When the camera is turned off Including Sleep Mode the White Balance Bracket setting is canceled The shutter sound will be emitted only once White Balance Bracketing does not functi...

Page 107: ...ct ratio of still pictures using the aspect ratio selector switch 1 Available aspect ratio settings 4 3 Aspect ratio of conventional CRT TVs 1 1 Aspect ratio of a square image 16 9 Aspect ratio of high definition TVs etc 3 2 Aspect ratio of 35mm film cameras Edges may be cut off when printing be sure to check in advance 292 The function is not available during panorama picture recording ...

Page 108: ...and more evident the larger the picture is reproduced Rec Picture Size Aspect ratio 4 3 1 1 16 9 3 2 Picture Size L 12 5M 4112 3088 L 10M 3088 3088 L 11M 4480 2520 L 12M 4272 2856 M 6 5M 2976 2232 M 5M 2240 2240 M 8M 3840 2160 M 6 5M 3120 2080 S 3M 2048 1536 S 2 5M 1536 1536 S 2M 1920 1080 S 3M 2112 1408 When Burst Rate is set to SH Picture Size is fixed to S The function is not available during p...

Page 109: ...ut changing the resolution RAW JPEG Saves pictures simultaneously in JPEG and RAW file formats 1 RAW Saves pictures in the RAW file format 2 1 If you delete a RAW file from the camera the corresponding JPEG file is also deleted 2 The resolution is fixed to the maximum setting for each image aspect ratio L About the RAW file format In RAW file format the data is saved without any picture processing...

Page 110: ...ution 1 Color Space 1 Rec menu You cannot set to or during panorama picture recording 1 When you use RAW Processing in the Playback menu the adjustments are made based on the settings used during recording Therefore you can save JPEG file pictures by using the settings applied during recording 2 If Red Eye Removal is activated during recording you can use RAW Processing in the Playback menu to sav...

Page 111: ...automatically Compensation effect may not be achieved depending on the conditions The i Dynamic does not function in the following cases During panorama picture recording When HDR is set to ON Enhancing the impression of high resolution i Resolution Available in the following modes You can use the camera s Intelligent Resolution technology to record still pictures with sharper outlines and clearer...

Page 112: ...camera shake etc We recommend using this setting to take pictures with a handheld camera OFF Does not adjust the misalignment of pictures We recommend using this setting when you use a tripod What is HDR HDR stands for High Dynamic Range and refers to a technique for the rendition of a wider contrast range than possible with a single exposure After the shutter button has been pressed do not move t...

Page 113: ...anorama picture recording During motion picture recording When Burst Rate is set to SH When using the electronic shutter Setting the color space Available in the following modes You can set the method for reproducing the colors to correctly display the recorded pictures on the screens of a computer or a printer etc Rec Color Space sRGB Sets the sRGB color space This setting is widely used for devi...

Page 114: ...hile it is pressed halfway AFF Movement cannot be predicted Children pets etc AFF is an abbreviation of Autofocus Flexible In this mode focusing is performed automatically when the shutter button is pressed halfway If the subject moves while the shutter button is pressed halfway the focus is corrected to match the movement automatically AFC Subject is moving Sport trains etc AFC is an abbreviation...

Page 115: ...ation as AFS In this case the indication on the screen will change to yellow AFS The camera uses AFS for focusing during panorama picture recording Switching AF Mode Available in the following modes This option allows selecting the focusing method that suits the positions and number of the subjects 1 Press 2 Press to select Auto Focus mode and then MENU SET If you press when or is selected the AF ...

Page 116: ...isplayed Yellow When the shutter button is pressed halfway the frame turns green when the camera has focused White Is displayed when more than one face is detected Other faces that are the same distance away as faces within the yellow AF area are also focused Eye determining for focusing You can change the position and size of the AF area and the eye to be focused on 121 If Metering Mode is set to...

Page 117: ...the camera adjusts the exposure using the locked subject 139 Under certain recording conditions such as when the subject is small or dark AF Tracking may not operate correctly When AF Tracking does not work focus will be on 1 area focusing AF Tracking cannot be used when using Time Lapse Shot In the following cases AF Tracking performs the operation of 1 area focusing When the picture effect Filte...

Page 118: ... for panning etc Vertical Pattern Vertical bar Ideal shape for recording objects such as buildings User Defined Customizable AF area grouping Custom For registering a customized AF area group Current AF area group 4 Press The AF area setting screen appears 5 Select the AF area Selected AF areas are displayed in yellow unselected areas in white When selecting When is selected you can set the size a...

Page 119: ...om Press on the screen of step 3 118 Use to select the registration target icon and then press MENU SET A confirmation screen is displayed If you select Yes the operation is executed The settings registered in or will be retained even if the camera is turned off The settings in or will be restored to the default settings when the camera is turned off If you press a cursor button when Direct Focus ...

Page 120: ... Focus display When focusing is successful illuminated When focusing is not successful flashes AF area When focusing is successful green When focusing is not successful red 2 Return to the desired composition Press fully Pinpoint focusing Enables more precise focusing on a smaller point than 1 area focusing You can set the focus position using the enlarged screen 122 When you press the shutter but...

Page 121: ... frame when is selected the eye to be used for focusing will be changed To restore the AF area to its initial state position Press DISP Press MENU SET When selecting You can set the focus position by selecting an AF area group The 49 AF areas are divided into groups each consisting of 9 areas in the screen corners 6 or 4 areas Select and then press The AF area setting screen appears Press to selec...

Page 122: ... Changing the display of the assist screen Custom Pinpoint AF Display FULL Enlarges the assist screen using the entire screen PIP Enlarges the assist screen on part of the screen When PIP is selected the size of the screen is enlarged or reduced approximately 3 to 6 times When FULL is selected it is enlarged or reduced approximately 3 to 10 times Enlarge or reduce the screen by magnification facto...

Page 123: ...is displayed Use the Quick menu 34 to set functions to be assigned to the cursor buttons such as Drive Mode White Balance and Sensitivity When you set Metering Mode 139 to spot focusing the metering target will move along with the AF area When the AF area is moved to the edges of the screen the metering operation may be affected by the surrounding brightness Direct Focus Area is fixed to OFF when ...

Page 124: ... button instead of the shutter button to start focusing 1 Set the Custom menu Custom Shutter AF OFF Custom AF AE Lock AF ON 2 Press AF AE The camera focuses on a subject 3 2 3 Press the shutter button to take a picture The camera takes a picture by adjusting the exposure Enabling disabling pre focusing Custom Quick AF ON OFF Focusing is automatically started when camera blurring is small even when...

Page 125: ...on to OFF When the AF Assist Lamp is set to OFF focusing will become difficult The setting is fixed to OFF in the following case When Silent Mode is set to ON Enabling disabling recording when a subject is out of focus Custom Focus Release Priority FOCUS The shutter release button is locked unless focusing is successful RELEASE Releasing the shutter is always possible regardless of whether the sub...

Page 126: ...functions Align with the index mark Focusing range Subjects too close to the camera cannot be properly focused Shortest focusing distance The shortest focusing distance is measured from the front of the lens to the subject This distance changes gradually depending on the set focal length Max Wide Max Tele 0 03m 13 16 0 3m 1 When the focus selector switch is set to AF Macro Focus selector switch Zo...

Page 127: ...e until distant subjects come into focus Using a tripod and Self Timer is recommended Also when photographing a subject close to the camera we recommend not to use a camera mounted flash unit Moving the camera after focusing is likely to result in poorly focused pictures if the subject is close to the camera due to the very small in focus area The resolution may be reduced at the edges of the pict...

Page 128: ... SET The screen changes to the assist screen and an enlarged display appears MF Assist 131 If you press DISP the area to be enlarged will be reset to the center 4 Turn the control ring to focus Turning the control ring to the right Focuses on nearer subjects Turning the control ring to the left Focuses on more distant subjects The edges of in focus subject parts are highlighted in color Peaking 13...

Page 129: ...MF Guide ON OFF Quickly focusing using Autofocus Custom AF AE Lock AF ON If you press AF AE in Manual Focus Autofocus is activated Autofocus is activated at the center of the frame When Autofocus is activated on the MF Assist screen the camera will focus at the center of the MF Assist screen ...

Page 130: ...king Settings The available color settings differ depending on the setting of Detect Level Changing the Detect Level setting also changes the Display Color setting as follows Detect Level HIGH LOW Display Color Light blue Blue Yellow Orange Green White When Peaking is set to ON Detect Level HIGH or Detect Level LOW will be displayed When Fn Button Set 37 in the Custom menu is set to Peaking you ca...

Page 131: ...t Focus Area in the Custom menu is set to ON the setting screen for the enlarged position appears Closing the MF Assist display To exit MF Assist press the shutter button halfway You can also exit MF Assist by pressing MENU SET When you display MF Assist by turning the control ring it is automatically ended approximately 10 seconds after you finish the operation The MF Assist display is disabled i...

Page 132: ...ng the entire screen PIP Enlarges the assist section on part of the screen When PIP is selected the MF Assist display is enlarged or reduced approximately 3 to 6 times When FULL is selected it is enlarged or reduced approximately 3 to 10 times You can enlarge or reduce the display by magnification factors of x1 steps using the control dial ...

Page 133: ...e of purchase 3 While keeping AF AE pressed move the camera to compose the picture and then press the shutter button fully When AE LOCK is set press the shutter button halfway to focus then fully to shoot Focus is locked AF Lock Setting the function of the AF AE button Custom AF AE Lock AE LOCK Locks exposure only AEL aperture value and shutter speed are displayed when the correct exposure is achi...

Page 134: ...cus Only AF Lock is active during motion picture recording Once you cancel AF Lock during the recording it cannot be reactivated The subject can be focused again by pressing the shutter button halfway even when AE is locked Program Shift can be set even when AE is locked Lock is canceled when the focal length is changed after locking the exposure and or focus Perform the locking operation again ...

Page 135: ...tion dial to select the compensation value Main subject under exposed Optimum exposure Main subject overexposed Select a positive compensation value Select a negative compensation value You can set the exposure compensation value in the range between 3 EV and 3 EV Depending on the brightness this may not be possible in some cases When Auto Exposure Comp of Flash in the Rec menu is set to ON the fl...

Page 136: ...telligent ISO ISO sensitivity is automatically set in a range up to 3200 1 depending on the movement and brightness of a subject 100 2 200 400 800 1600 3200 6400 12500 25000 ISO sensitivity is fixed at the selected setting When ISO Increments is set to 1 3EV the number of available ISO sensitivity increments will increase 138 1 When ISO Limit Set 137 in the Rec menu is set to anything other than O...

Page 137: ...ed in the following cases Shutter Priority Mode Manual Exposure Mode When Direct Focus Area 123 is set to ON the cursor buttons function as an operation for moving the AF area In that case use the Quick menu 34 to set the ISO Sensitivity You can use the following settings when recording motion pictures AUTO 200 6400 Setting the upper ISO sensitivity limit Available in the following modes You can s...

Page 138: ...800 1000 1250 1600 2000 2500 3200 4000 5000 6400 8000 10000 12500 16000 20000 25000 1 EV L 100 200 400 800 1600 3200 6400 12500 25000 Only when Extended ISO is ON When this setting is changed from 1 3EV to 1 EV the setting for Sensitivity may be changed The closest ISO Sensitivity that can be set for 1 EV will be used Extending the ISO sensitivity setting Available in the following modes This mode...

Page 139: ...ed main subjects even with greater brightness differences Center weighted The metering sensitivity is concentrated on the center while also registering the rest of the frame Use when subject is in the center or to deliberately base the exposure on an off center subject provided subject is of medium brightness Spot Center of spot metering target Spot metering target Use to base the exposure on very...

Page 140: ...u item Rec Shutter Type AUTO The shutter mode automatically switches based on the recording conditions and shutter speed The mechanical shutter mode has higher priority over the electronic shutter mode because the mechanical shutter has less function related restrictions e g when recording with a flash MSHTR Only the mechanical shutter is used ESHTR Only the electronic shutter is used When is disp...

Page 141: ...the selected interval Aspect Bracket 147 When the shutter button is pressed 4 pictures with 4 different aspect ratios are automatically recorded Self Timer 148 When the shutter button is pressed the picture is taken after the set time has elapsed Panorama Shot 150 Exposures are recorded in succession while you press the shutter button and move the camera horizontally or vertically After that the c...

Page 142: ... of pictures 2 With RAW files 20 3 20 3 20 3 Without RAW files 60 Depends on the capacity of the card 3 1 The electronic shutter will be activated 2 The number of pictures is limited by the picture taking conditions and the type and or status of the card used 3 Pictures can be taken until the card becomes full However the frame rate will become slower halfway through the recording The exact timing...

Page 143: ...tting of Focus Release Priority 125 in the Custom menu Focus mode Focus Release Priority Focusing AFS FOCUS At the first picture RELEASE AFF AFC 1 FOCUS Normal focusing 2 RELEASE Predicted focusing 3 MF Focus set with Manual Focus 1 Focus is fixed in the first picture when dark subjects are recorded or the frame rate is set to SH 2 The frame rate may become slower because the camera is continuousl...

Page 144: ...re still pictures that were taken using Continuous Mode If you continue to record while storing the number of pictures that can be taken will be reduced A high speed card is recommended when recording using Continuous Mode Continuous Mode is disabled in the following cases When the picture effect Filter is set Rough Monochrome Silky Monochrome Miniature Effect Soft Focus Star Filter Sunshine When ...

Page 145: ...ct the Auto Bracket icon etc and then 3 Press to select the compensation range and then MENU SET 4 Focus on the subject and take a picture If you press and hold the shutter button the number of pictures that you had set is taken The Auto Bracket indication flashes until the number of pictures that you had set is taken The camera restarts recording from the first still picture if you change the Aut...

Page 146: ...pictures can be recorded up to the number of pictures you have set when is set Close the menu after changing settings When you take pictures using Auto Bracket after setting an exposure compensation the camera will base the series on the compensated exposure Auto Bracket is disabled in the following cases When the picture effect Filter is set Rough Monochrome Silky Monochrome Miniature Effect Soft...

Page 147: ...is set to S the setting is automatically changed to M The same shutter speed aperture value focus Exposure White Balance and Sensitivity settings are used for all four pictures Aspect Bracket is disabled in the following cases When the picture effect Filter is set Rough Monochrome Silky Monochrome Toy Effect Toy Pop Miniature Effect Soft Focus Star Filter Sunshine During motion picture recording W...

Page 148: ...s tripped after 10 seconds and three pictures are taken at intervals of approximately 2 seconds The shutter is tripped after 2 seconds You can also set the time for the self timer using Self Timer in the Rec menu 4 Press the shutter button halfway to focus then fully to start recording The focus and exposure settings are fixed when the shutter button is pressed halfway After the self timer indicat...

Page 149: ...tent in some cases This mode cannot be set to in the following cases When White Balance Bracket is set When Multi Exp is set During T time recording The self timer is disabled in the following cases During motion picture recording When 4K PHOTO is set to ON When using Time Lapse Shot When using Stop Motion Animation only available with Auto Shooting setting ...

Page 150: ...uide line is displayed Up Down You can also select the recording direction using Panorama Direction in the Rec menu Applying a picture effect Filter Press F to select a picture effect 89 Recording direction Picture effects This is not displayed when No Effect is selected Adjusting the picture effect This is only displayed when a picture effect is selected You can also set the picture effects by tu...

Page 151: ...u move the camera too quickly or too slowly 6 Press the shutter button fully again to end recording You can also end recording if you stop panning the camera during the process Recording can also be ended by moving the camera to the end of the guide Tips Pan the camera in the respective direction as steadily as possible If the camera shakes too much it may not be able to take pictures or may end u...

Page 152: ...y not have consistent focus and brightness When the picture effect Filter is set White Balance is fixed to AWB Since several pictures are stitched together to create a panorama picture some subjects may be distorted or the joining areas may be noticeable The resolution per horizontal line and vertical line of a panorama picture varies depending on the panning direction and the number of stitched p...

Page 153: ...g when the shutter button is pressed fully Start Time Set For setting the time to start recording Any time up to 23 hours 59 minutes ahead can be set Press to select the item hour and or minute to set the start time and then MENU SET Shooting Interval Image Count The recording interval and the number of pictures can be set Select the item minute second number of pictures Setting MENU SET Set You c...

Page 154: ...n of a motion picture is displayed select Yes 5 Select the motion picture creation method Rec Quality Sets the picture quality of the motion picture With camera models 18 471 18 472 4K 30p 4K 24p FHD 60p FHD 30p HD 30p VGA 30p With camera models 18 470 18 473 4K 25p 4K 24p FHD 50p FHD 25p HD 25p VGA 25p Frame Rate Set the number of frames per second When you set a higher number you can create a mo...

Page 155: ... replacing the battery or card in the pause state and turning the camera ON OFF switch to ON Note however that the pictures recorded after restarting the operation are saved as another group picture When you replace the battery or card turn the camera ON OFF switch to OFF Do not connect an AV or an HDMI micro cable or the supplied USB cable during Time Lapse Shot recording When you select the pict...

Page 156: ...ate a motion picture in which objects appear to be moving by taking a still picture each time you move them in small increments and then splicing the recordings together With camera models 18 471 18 472 The resulting motion pictures can have frame rates of 1 to 60fps i e you can take 1 to 60 still pictures for every 1 second of motion picture With camera models 18 470 18 473 The resulting motion p...

Page 157: ...then MENU SET 3 Press to select Start and then MENU SET 4 Press to select New and then MENU SET 5 Press the shutter button fully Up to 9 999 frames can be recorded 6 Move the subject according to the intended composition Repeat the recording of the other pictures in the same way When you turn off the camera during recording a message to restart recording will appear when you turn on the camera To ...

Page 158: ...18 471 18 472 60fps 1 30fps 15fps 10fps 7 5fps 6fps 3fps 1fps With camera models 18 470 18 473 50fps 2 25fps 12 5fps 8 3fps 6 25fps 5fps 2 5fps 1fps 1 Only available with FHD 60p setting 2 Only available with FHD 50p setting You can set the number of frames to 24fps 12fps 8fps 6fps 4 8fps 2 4fps or 1fps when Rec Quality is set to 4K 24p Sequence NORMAL Splices the still pictures in the recording s...

Page 159: ... for an aspect ratio that is different from the original picture this will produce grainy pictures in a stop motion animation Use a sufficiently charged battery The maximum time for a stop motion animation video is 29 minutes the maximum file size 4GB When a stop motion animation is shorter than 2 seconds 2s will be displayed for the motion picture recording time 70 If only one still picture is re...

Page 160: ...ure press the shutter button halfway to proceed to the next recording Press to select the item and then MENU SET You can perform the following operations Next Proceed to the next recording Retake Delete the last shot and take another picture Exit Exit Multi Exposure and save the picture that was taken Next Retake Exit 4 Record the second third and fourth pictures When you press Fn1 while taking pi...

Page 161: ...o ON on the screen in step 2 160 After Start the pictures on a card will be displayed Select the RAW file pictures and press MENU SET to continue recording You can perform Overlay on RAW file pictures recorded using this camera only Pictures are not saved in memory until Multi Exposure is ended Information for the picture taken last will be used as recording information of pictures taken using Mul...

Page 162: ...are muted and an attached flash and the AF Assist lamp are switched off The settings for the following functions are fixed Shutter Type ESHTR Flash Mode Forced Flash Off AF Assist Lamp OFF Beep Volume Off Shutter Vol Off Even when this mode is set to ON the following lamps indicators will light up or flash Self timer indicator Wi Fi connection lamp The operation sounds such as when the aperture or...

Page 163: ...or the recognized faces are displayed max 3 people Only pictures of the selected registered people are played back in Category Play Face Recog functions only when the Autofocus mode is set to Only the first picture of an exposure series will contain Face Recognition information The name of the person recognized in the first picture is displayed in the case of group pictures Face Recognition search...

Page 164: ...o heavy shadows on the face During registration the flash is not used Good example for registering a face If the camera seems to have difficulty recognizing faces when recording Register additional pictures of the same person s face indoors and outdoors or with different expressions or angles Register additional pictures at the place you are recording If a registered person is no longer recognized...

Page 165: ...selected with the cursor buttons a screen to confirm deletion is displayed Select Yes to delete the face picture If only one picture is registered it cannot be deleted Record the picture step 3 164 Editing or deleting information about registered persons Information about registered faces can be edited or deleted 1 Use to select MEMORY and then press MENU SET 2 Use to select the picture of the per...

Page 166: ...y1 Baby2 Pet OFF SET Use to select SET and then press MENU SET Use to select Baby1 Baby2 or Pet and then press MENU SET Use to select Age or Name and then press MENU SET Use to select SET and then press MENU SET Age Set birthday with and press MENU SET Name See Entering Text 52 Use to select Exit and then press MENU SET to finish Canceling the display of the name and age in months years Select OFF...

Page 167: ...Pattern ZEBRA1 Displays an area brighter than a certain brightness level using a right leaning zebra pattern ZEBRA2 Displays an area brighter than a certain brightness level using a left leaning zebra pattern OFF SET For setting the brightness level for each zebra pattern Zebra 1 Zebra 2 1 Use to select the brightness level and then press MENU SET The range of brightness levels you can select from...

Page 168: ...enu every time you press the assigned function button the setting will switch in the following order Zebra 1 Zebra 2 Zebra OFF When ZEBRA2 is set to OFF you can switch the setting quickly in the following order Zebra 1 Zebra OFF Displaying the recording screen in black and white Monochrome Live View Available in the following modes You can display the recording screen in black and white This funct...

Page 169: ...ompensates vertical camera shake This setting is ideal for panning technique of recording a subject by matching the camera movement with the movement of a subject going in a specific direction OFF Stabilizer does not work To prevent camera shake If the camera shake warning is displayed use Stabilizer a tripod or Self Timer In some cases the blurring effect of camera shake can be reduced by using a...

Page 170: ...hile following a moving subject When the shutter speed becomes slower while taking pictures indoors or in dark places The panning effect by selecting is not fully achieved in the following cases Bright summer days or other bright locations When the shutter speed is faster than 1 100s When the motion of a subject is slow and the speed with which the camera is moved is too slow a nice background blu...

Page 171: ...captures a larger area Clockwise Telephoto enlarges subjects Counterclockwise Wide angle captures a larger area The illustration is an example of when using Optical Zoom i Zoom and Digital Zoom in Program AE Mode Focusing range i Zoom range Optical Zoom range Digital Zoom range Current zoom position the indicated focal lengths are 35mm film camera equivalents Do not touch the lens barrel during zo...

Page 172: ... panorama picture recording Extended optical zoom This function works when resolutions with have been selected in Picture Size 108 You can extended the focal length further than by zooming optically without reducing the picture quality Maximum magnification 6 2x Including the optical zoom ratio This maximum zoom ratio varies depending on the resolution The function is not available in the followin...

Page 173: ...p to twice the original magnification ratio while minimizing the deterioration of picture quality Rec i Zoom ON OFF Motion Picture i Zoom ON OFF The function is not available in the following cases When the picture effect Filter is set Impressive Art Toy Effect Toy Pop During panorama picture recording When Burst Rate is set to SH When HDR is set to ON When Multi Exp is set When iHandheld Night Sh...

Page 174: ...om ON OFF When Digital Zoom is used simultaneously with i Zoom you can only increase the zoom ratio up to 2x When using Digital Zoom we recommend using a tripod and the self timer 148 The AF area is largely displayed at the center in the Digital Zoom range The function is not available in the following cases When the picture effect Filter is set Impressive Art Toy Effect Toy Pop Miniature Effect D...

Page 175: ...s familiar from 35mm film cameras 1 Turn the control ring 39 Current zoom position The displayed focal lengths are 35mm film camera equivalents Using the zoom lever for Step Zoom You can use the zoom lever for Step Zoom by setting Zoom lever to Step Zoom in the Custom menu The focal length values are for reference only The function is not available during motion picture recording ...

Page 176: ...gs Custom Zoom lever Custom Control Ring Zoom Changing the focal length zooming operates in the normal way Step Zoom With each zooming operation the lens stops at the position for one of the preset focal lengths Retaining the zoom position when the camera is turned off Custom Zoom Resume ON OFF ...

Page 177: ... Mount the flash unit in the hot shoe after removing the hot shoe cover Removing the hot shoe cover Make sure that the camera s ON OFF switch is set to OFF 1 Remove the hot shoe cover by simultaneously pressing it in the direction indicated by arrow and pulling it in the direction indicated by arrow Be sure to insert the hot shoe cover when the hot shoe is not in use Store the hot shoe cover in a ...

Page 178: ...t Forced Flash Off Forced Flash Off will appear on the recording screen and the flash unit will not fire in the following cases When the flash unit s ON OFF switch is set to OFF even if it is attached When flash cannot be used for example when recording motion pictures The available flash range when the Sensitivity setting is AUTO The edges of the picture may become slightly dark if using flash at...

Page 179: ...ht emitting area of the flash unit e g with a hand or look at it from close range Do not use flash at close distances to other subjects heat light may damage subject Flash charging may take longer if the battery is low or when using flash repeatedly When the flash unit is being charged the respective icon flashes red and you cannot take a picture even when you fully press the shutter button The fl...

Page 180: ...tomatically controls the flash output MANUAL You can set the flash output manually Using TTL allows you to take a picture as intended even for dark scenes where the flash output tends to be higher When MANUAL is selected flash output e g 1 1 is displayed with the flash icon on the screen Setting the flash output When MANUAL is selected Set the menu item Rec Flash Manual Flash Adjust Press to selec...

Page 181: ...s Forced Flash Off The flash is never fired regardless of the lighting conditions Ideal for taking pictures where the use of flash is prohibited This is available only when Firing Mode is set to TTL 180 Two flashes are fired Both the subject and the camera should not move until after the second flash The interval between the flashes varies according to the brightness of the subject The red eye red...

Page 182: ...ure Mode In Snapshot Mode the shutter speed changes depending on the scene mode being used Flash settings according to the exposure control mode When the supplied flash unit is attached Available Not available Recording Mode Snapshot Mode Program AE Mode Aperture Priority Mode Shutter Priority Mode Manual Exposure Mode You cannot perform flash settings using the Rec menu Set to or depending on the...

Page 183: ...lash Synchro 2 Press to select the setting item and then MENU SET 1ST 1st curtain sync is the normal method when using the flash 2ND The light source appears behind the subject making the picture appear more logical Normally set to 1ST If you set to 2ND 2nd will be displayed in the flash icon on the screen The Flash Synchro setting is applied even when an external flash unit other than the supplie...

Page 184: ...elect 0 EV When the flash exposure is compensated or is displayed on the flash icon The Flash Adjust setting functions even when a flash unit other than the supplied one is used 261 Synchronizing the flash output to an exposure compensation setting for the ambient light Available in the following modes When Auto Exposure Comp is set to ON the flash output level will automatically be controlled to ...

Page 185: ...ps FHD 28M 60p 1 FHD 28M 50p 2 1920 1080 60p 1 50p 2 approx 28Mbps FHD 20M 30p 1 FHD 20M 25p 2 1920 1080 30p 1 25p 2 approx 20Mbps HD 10M 30p 1 HD 10M 25p 2 1280 720 30p 1 25p 2 approx 10Mbps VGA 4M 30p 1 VGA 4M 25p 2 640 480 30p 1 25p 2 approx 4Mbps 1 With camera models 18 471 18 472 2 With camera models 18 470 18 473 What is bit rate This is the volume of data for a defined period of time The qu...

Page 186: ...motion picture Continuous AF Available in the following modes The focusing procedure varies depending on the focus mode 114 and the setting of Continuous AF in the Motion Picture menu Focus Continuous AF Setting AFS AFF AFC ON The camera automatically keeps focusing on subjects during recording 114 OFF The camera maintains the focus position from the start of recording MF ON OFF You can focus manu...

Page 187: ...g status indicator red will flash If you do not perform any operation for approximately 1 minute or longer some of the information on the screen is turned off To display the information again press DISP This takes place to prevent screen burn in This is not a malfunction Do not cover the microphones when recording motion pictures You can also change the focal length zoom while recording motion pic...

Page 188: ...o the higher sensitivity automatically set by the camera When you record a subject under fluorescent or LED lighting fixtures etc the colors and the screen brightness may change or horizontal striping may appear on the screen If this happens we recommend manually setting the shutter speed to 1 60s or 1 100s About the operation sound when recording ends Since motion pictures are recorded until the ...

Page 189: ... angle of view setting used for recording still pictures and motion pictures Custom Rec Area Picture Motion picture If the aspect ratio is different for still pictures and motion pictures the angle of view will change when starting to record a motion picture When you set Rec Area to the angle of view setting used for recording motion pictures is displayed Rec Area should be regarded as a guideline...

Page 190: ... the type of the card the card access indication may appear for a while after recording motion pictures This is not a malfunction If you stop recording motion pictures too soon after you have set picture effect Filter of Miniature Effect the camera may continue recording for a certain time Hold the camera steady until the camera stops recording ISO Limit Set is disabled when you record motion pict...

Page 191: ... 25 When you record 4K motion pictures the angle of view will be small than with motion pictures of other resolutions To record 4K motion pictures Select the recording mode 59 Set Rec Quality in the Motion Picture menu to 4K 100M 30p 1 4K 100M 25p 2 or 4K 100M 24p 185 Press the motion picture button to start recording Press the motion picture button again to end recording 1 With camera models 18 4...

Page 192: ... confirmation screen is displayed If you select Yes the operation is executed The appropriate motion picture mode for capturing a still picture from a 4K motion picture is selected and the motion picture can be recorded using still picture quality Since the camera puts higher priority on the focus of a still picture captured from a 4K motion picture focusing movement during motion picture recordin...

Page 193: ...ion picture is the same as the aspect ratio of the motion picture 6 Press the motion picture button to start recording When you record 4K motion pictures the angle of view will be smaller than motion pictures of other resolutions Setting a marker When you press Fn2 while recording you can add a marker to the motion picture When you create still pictures from a motion picture you can quickly move t...

Page 194: ...to the marker position you set while recording the motion picture You can perform the same operation even during motion picture playback If you press Fn2 again you can perform single frame forward rewind operations by pressing Fn2 2 Press MENU SET A confirmation screen is displayed Select Yes and then press MENU SET is displayed for a captured still picture If you want to capture a still picture f...

Page 195: ... pictures Only pictures in JPEG file format are recorded when Quality is set to or Quality is used with the setting when is set You can take up to 30 still pictures while you are recording a motion picture When the picture effect Filter is set to Miniature Effect a still picture may be taken with a slight delay from the time you fully press the shutter button Still picture priorities A still pictu...

Page 196: ...Zoom and Digital Zoom menu items are common for both Rec and Motion Picture menus If a setting in one menu is changed the setting with the same name in other menu will also be changed automatically The Motion Picture menu will not be displayed in the following cases During panorama picture recording 4K PHOTO For details 192 Rec Quality For details 185 Picture Mode For details 195 Continuous AF For...

Page 197: ...set Miniature Effect Mic Level Adj Available in the following modes You can adjust the audio input level in 4 steps The function is not available when the picture effect Filter is set Miniature Effect Wind Cut Available in the following modes If you hear wind noise during an audio recording you can use Wind Cut to effectively reduce it Settings AUTO HIGH STANDARD LOW OFF When Wind Cut is set the s...

Page 198: ...tures in that group will be deleted 15 pic 15 pic Playing back group pictures consecutively 1 Select a picture with the group picture icon or and then press When you play back group pictures one by one the option settings are displayed From the first picture Play back the group pictures consecutively from the first picture in a group From the current picture Play back the group pictures consecutiv...

Page 199: ...ough the pictures When you press again the normal playback screen reappears You can use the same operations for pictures stored in a group as in normal still picture playback Multi Playback Playback Zoom deletion of pictures etc Pictures will not be grouped if they are recorded without setting Clock Set Picture series recorded on another device may not be recognized as group pictures ...

Page 200: ...nd the Quality The resolution varies depending on the motion picture being played back For motion pictures recorded in Rec Quality with 4K M 8M For motion pictures recorded in Rec Quality with FHD HD S 2M The picture quality becomes slightly lower depending on the Rec Quality setting of the original motion picture When a still picture captured from a motion picture is played back is displayed If y...

Page 201: ...pictures in order Recommended when viewing on a TV 1 Set the menu item Playback Slide Show 2 Use to select the item and then press MENU SET When you select Category Selection use to select category and then press MENU SET For details about category refer to 203 3 Use to select Start and then press MENU SET Operations during Slide Show Pause Play Stop Previous Next Control dial counterclockwise Vol...

Page 202: ...ar in black and white as a screen effect AUTO can be used only when Category Selection is selected The pictures are played back with the recommended effects for each category When you perform a Slide Show playback by setting Video Only or Category Selection to or Effect is fixed to OFF When you perform a Slide Show playback for a group picture and even if Effect is set the effects are disabled Whe...

Page 203: ...it i Night Scenery i Handheld Night Shot in Automatic Scene Detection i Food in Automatic Scene Detection Travel Date A series of pictures recorded by setting Burst Rate to SH Time Lapse Shot Time Lapse Video Stop Motion Animation Stop Motion Video Use to select a person to be played back and then press MENU SET Face Recognition is applied for all the pictures in the group Playback Mode automatica...

Page 204: ...f the abort operation If selected again while is displayed writing location information will resume where it left off Delete received location information Use to select Delete Location Data and then press MENU SET Use to select a period for deleting location information and then press MENU SET A confirmation screen is displayed If you select Yes the operation is executed Location information can b...

Page 205: ...ct the Photo Style effects Standard Vivid Natural Monochrome Scenery or Portrait i Dynamic You can select the i Dynamic settings HIGH STANDARD LOW or OFF Contrast You can adjust the contrast Highlight You can adjust the brightness of a bright area Shadow You can adjust the brightness of a dark area Saturation Color Tone You can adjust the saturation You can adjust the coloring when Monochrome is s...

Page 206: ...olor temperature setting screen 105 Only when White Balance is set to Use to display the White Balance fine adjustment screen 105 Only when White Balance is set DISP Use to display the comparison screen MENU SET Use to finalize a setting you just made and to return to the item selection screen If you select Noise Reduction i Resolution or Sharpness the comparison screen is not displayed Pictures c...

Page 207: ...fers from the range used during recording The White Balance setting of still pictures recorded using Multi Exp is fixed to the setting used during recording If Red Eye Removal is activated during recording you can use RAW Processing in the Playback menu to save JPEG file pictures in which red eye was detected and corrected You cannot perform RAW processing using multiple still pictures simultaneou...

Page 208: ... Edit Multi up to 100 pictures Use to select a still picture and then press MENU SET To cancel Press MENU SET again To execute Use to select OK and then press MENU SET Title Edit setting OK Title Edit already set 3 Enter the characters Entering text 52 To delete a title delete all the characters in the character input screen To print the entered text use Text Stamp The function is not available in...

Page 209: ... MENU SET Text Text Stamp Stamp Multi up to 100 pictures Use to select a still picture and then press MENU SET To cancel Press MENU SET again To execute Use to select OK and then press MENU SET Text Stamp setting Text Stamp already set OK 3 Use to select Set and then press MENU SET 4 Use to select the item and then press MENU SET 210 5 Use to select the setting and then press MENU SET 210 6 Press ...

Page 210: ...ps the text registered in Title Edit Items set to OFF are not stamped Do not request date printing in a store or set date printing on a printer for still pictures with date stamps Date printing may be overlapped Characters may be cut off on certain printers If you stamp text on the pictures in a group those pictures are saved as new pictures Text is difficult to read when stamped on pictures with ...

Page 211: ...ion picture is played back from the last position prior to activating pause 4 Press A confirmation screen is displayed Select Yes and then press MENU SET The original motion picture that was split is not retained There will only be the 2 new motion pictures that were created by the split During dividing do not turn off the camera or remove the card or the battery If you do so the motion picture ma...

Page 212: ...e Lapse Shot For details refer to step 5 and the subsequent steps 154 For details on the resulting motion picture refer to 155 Stop Motion Video You can create a motion picture from the pictures in a group that was recorded using Stop Motion Animation 1 Set the menu item Playback Stop Motion Video 2 Use to select a stop motion animation group and then press MENU SET 3 Create a motion picture after...

Page 213: ...xecuted Multi up to 100 pictures Use to select the resolution and then press MENU SET Use to select a still picture and then press MENU SET A confirmation screen is displayed If you select Yes the operation is executed To cancel Press MENU SET again To execute Use to select OK and then press MENU SET OK Resize setting The picture quality is reduced after resizing Still pictures recorded at the low...

Page 214: ...ayed If you select Yes the operation is executed Expand Change position Perform cropping for each picture in the group separately You cannot edit pictures in group units If you crop a picture in the group it is saved as a new picture Original Face Recognition information will not be copied when still pictures are cropped The picture quality is reduced after cropping The function is not available i...

Page 215: ...tes a picture 90 degrees counterclockwise Rotate Disp Rotating a displayed picture automatically 1 Set the menu item Playback Rotate Disp ON When this function is set to OFF the picture is displayed without changing its orientation The function is not available in the following cases When you play back pictures on a computer they cannot be displayed in the rotated direction unless the OS or softwa...

Page 216: ...Press MENU SET again Favorite picture setting Multi up to 999 pictures Use to select the pictures and then press MENU SET To cancel Press MENU SET again 2 3 4 5 6 1 Favorite picture setting To clear all In step 1 select Favorite Cancel Yes and then press MENU SET When you set Favorite for a picture in a group the number of pictures set is displayed with the Favorite icon of the first picture Only ...

Page 217: ...hen press MENU SET When you have performed Print Set for pictures in a group printing settings are made for the total of number of pictures set in that group If the total number of pictures is 1 000 or higher 999 is displayed When you perform Print Set for a picture in a group the number of pictures set and the total number of pictures are displayed with the Print Set icon of the first picture Dat...

Page 218: ...ulti Use to select the pictures and then press MENU SET To cancel Press MENU SET again 2 3 4 5 6 1 Picture protected To clear all In step 1 select Protect Cancel Yes and then press MENU SET When you set the write protect slider on the card to the LOCK position the picture is not erased The picture is erased when formatting even if it is protected This setting may not be effective when using other ...

Page 219: ...ose Face Recognition information has not been registered cannot be selected 4 Use to select the person to replace for another and then press MENU SET 5 Use to select Yes and then press MENU SET When Face Recognition information is deleted it cannot be restored Pictures for which all Face Recognition information has been deleted are not categorized in Face Recognition during Category Play or Catego...

Page 220: ...meras and stored on the same card this display format allows you find a specific picture more easily Pictures may not be displayed according to the DATE TIME sequence immediately after a card is inserted into this unit In that case wait a while and the pictures will be displayed in the DATE TIME sequence Delete Confirmation You can set the Yes No options that you want to select first on the confir...

Page 221: ...t use the camera in areas with magnetic fields static electricity or interference such as near microwave ovens Transmissions may not reach the camera Using the camera near devices such as microwave ovens or cordless telephones that use the 2 4 GHz radio transmission band may cause a decrease in performance in both devices Do not connect to wireless networks you are not authorized to use When the c...

Page 222: ...n operates in two ways Use it either as the WIFI or as a function button It is set to WIFI at the time of purchase For more details about function buttons 37 Before a Wi Fi connection is established press WIFI to perform the following operations You can also display the same menu by selecting Setup Wi Fi Wi Fi Function New Connection Select a destination from History 244 Select a destination from ...

Page 223: ...s The camera cannot be used to connect to a public wireless LAN connection Use a IEEE802 11b IEEE802 11g or IEEE802 11n compatible device when using a wireless access point We recommend that you use a fully charged battery when you send pictures When the battery indicator is flashing red the connection with other equipment may not start or the connection may be disrupted A message such as Communic...

Page 224: ...e tablet Sending pictures in the camera to social networking services Writing the location information on pictures in the camera Connect easily transfer pictures easily You can easily use the Wi Fi function by pressing and holding the WIFI button or using the NFC function or Press and hold Hold the device close to the camera Hereafter these instructions uses the term smartphone for both smartphone...

Page 225: ... a network Select Google PlayTM Store 2 Enter Leica Image Shuttle into the search box Select Leica Image Shuttle and install it The icon will be added to the menu 2 Not available in China To download in China please visit the site below www leica camera com Connect the iOS device to the network Select App StoreSM Enter Leica Image Shuttle into the search box Select Leica Image Shuttle and install ...

Page 226: ...en can be displayed by selecting items from the menu as follows New Connection Remote Shooting View When you press MENU SET on the camera the QR code is displayed in an enlarged size If it is difficult to read the code use the enlarge view If your smartphone cannot read the QR code move the camera away from the smartphone or use a connection method other than the QR code To change the connection m...

Page 227: ...ode is displayed in an enlarged size Install the Image Shuttle profile Select Install then select Install Now Done The message is displayed in the Web browser If a passcode is required to unlock the smartphone you will have to input the passcode Press the home button to close the Web browser Select Wi Fi under Settings on the smartphone Turn on Wi Fi and select the SSID displayed on this unit Retu...

Page 228: ...epending on the system language setting Using an Android device When reading a QR Code to connect Start Image Shuttle 225 Select QR Code Read the QR Code displayed on the camera with Image Shuttle When you press MENU SET on the camera the QR code is displayed in an enlarged size When connecting with SSID and password Start Image Shuttle 225 Select Wi Fi Select the SSID displayed on this unit Enter...

Page 229: ...press MENU SET Select Wi Fi Direct or WPS Connection and connect the camera to the smartphone by following the connection method 243 On your smartphone Start Image Shuttle 225 Closing the connection After use close the connection with the smartphone On the camera 1 Press WIFI On the recording standby screen you can also close the connection by pressing Setup Wi Fi Wi Fi Function Yes 2 Select Termi...

Page 230: ... Set NFC Operation to ON 247 On your smartphone Check if your smartphone is a compatible model Set the Wi Fi function to ON Install Image Shuttle in advance 225 1 Start Image Shuttle on your smartphone 2 While is displayed on the connection screen of the Image Shuttle hold the smartphone close to the camera Hold the smartphone close to this area within 5mm 3 16 3 Use to select Yes and then press M...

Page 231: ...be used in the following cases When the camera is turned off Including Sleep Mode During motion picture recording While recording still pictures during self timer countdown When using Time Lapse Shot When using Stop Motion Animation When using Multi Exp During motion picture playback during slide shows during panorama picture playback and during continuous playback of group pictures including paus...

Page 232: ...e icon at the top left on the screen Select Leica Image Shuttle to display a picture saved in the camera When the picture is touched it is played back at a larger size Saving pictures from the camera to the smartphone 1 Connect to a smartphone 226 2 Select from Image Shuttle 3 Press and hold the picture and drag it to save it on the smartphone The picture is saved on the smartphone Functions can b...

Page 233: ...ouch Sharing to ON 247 On your smartphone Check if your smartphone is a compatible model Set the Wi Fi function to ON Install Image Shuttle in advance 225 1 On the camera play back the picture you wish to transfer to a smartphone Hold the smartphone close to this area within 5mm 3 16 2 Start Image Shuttle on the smartphone you are transferring the picture to 3 While is displayed on the connection ...

Page 234: ...a smartphone You can send the location information acquired from a smartphone to the camera After the information is sent you can write it on the pictures in the camera GPS Starts location information recording Ends location information recording Sends and writes the location information Start the recording Location information that is different from the information acquired during recording may b...

Page 235: ... may not be written if there is not enough free space on your card You can also use Location Logging in the Playback menu to write the sent location information to the pictures Caution Remember not to exploit this function in situations where it may violate the privacy the likeness rights etc of the targeted subject Use at your own risk On the smartphone you can set the acquisition interval of loc...

Page 236: ... Images While Recording 237 Send Images Stored in the Camera 238 Excluding motion pictures recorded with the Rec Quality 4K Some images may not be played back or sent depending on the device See the instructions of the destination device for more information about picture playback For more details about picture sending methods 246 Preparation Install Image Shuttle in advance 225 ...

Page 237: ...rect On the camera Connect the camera to a smartphone 243 On your smartphone Start Image Shuttle 225 When connecting with Manual Connection in Direct Perform step 2 226 3 Select the device you wish to connect to When the connection is established the confirmation screen for the transmission setting is displayed Check the setting and then press MENU SET To change the send setting press DISP 246 4 T...

Page 238: ...ne 243 On your smartphone Start Image Shuttle 225 When connecting with Manual Connection in Direct Perform step 2 226 3 Select the device you wish to connect to When the connection is established the confirmation screen for the transmission setting is displayed Check the setting and then press MENU SET To change the send setting press DISP 246 4 Select Single Select or Multi Select Single Select S...

Page 239: ...milar situation it is convenient to make a direct connection If you are connecting with the same settings as used previously you can quickly start using the Wi Fi function by connecting with Select a destination from History or Select a destination from Favorite Wireless access point Connection method Description Via Network Connects through a wireless access point 240 Direct Your equipment connec...

Page 240: ...nt that is compatible with Wi Fi Protected Setup with a WPS mark 1 Press the wireless access point WPS button until it switches to WPS Mode Refer to the wireless access point instructions for details WPS PIN code For saving a PIN code type wireless access point that is compatible with Wi Fi Protected Setup with a WPS mark 1 Select the wireless access point you are connecting to 2 Enter the PIN cod...

Page 241: ...ual Input confirm the SSID the network authentication type the encryption type and the encryption key of the wireless access point you are using 1 Select the wireless access point you are connecting to Pressing DISP will search for a wireless access point again If no wireless access point is found refer to When connecting with Manual Input 242 2 If network authentication is encrypted Enter the enc...

Page 242: ...tion type The type of settings that can be changed may vary depending on the details of network authentication settings Network authentication type Encryption types that can be set WPA2 PSK WPA PSK TKIP AES Common Key WEP Open No Encryption WEP When an option other than No Encryption is selected Enter the encryption key Check the wireless access points instructions and settings when a saving wirel...

Page 243: ... the device to WPS mode You may have to wait longer for a connection when pressing DISP on the camera WPS PIN code 1 Select WPS PIN code 2 Enter the PIN code of the device into the camera Manual Connection 1 Enter the SSID and password into the device The SSID and password are displayed on the connection waiting screen of the camera SSID and Password QR Code 1 To connect the camera with Wi Fi Dire...

Page 244: ...ation from History or Select a destination from Favorite Item Description Select a destination from History Connects using the same settings as used previously Select a destination from Favorite Connects using settings registered in Favorite 3 Select the desired connection setting Registering History items to Favorite 1 Press WIFI 2 Select Select a destination from History 3 Select the item you wi...

Page 245: ...tering Text 52 Up to 30 characters can be entered A double byte character will be treated as two characters Registering and saving frequently used Wi Fi connection settings to Favorites The number of settings that can be saved in the history is limited We recommend that you register and save frequently used Wi Fi connection settings to Favorite 244 Checking connection details of History or Favorit...

Page 246: ...iles will not be resent You may not be able to delete files or use the Playback menu while sending 1 1 Motion pictures cannot be sent Send Images Stored in the Camera You can select and send recorded images Details of the Playback menu Favorite or Print Set settings will not be sent The function is not available in the following cases Some images taken with a different camera may not be able to be...

Page 247: ...at you protect the Wi Fi function with a password Setting a password will automatically display the password input screen when the Wi Fi function is used Setup Enter any 4 digit number as the password Close the menu after changing settings Delete A confirmation screen is displayed It is executed when Yes is selected Exit the menu after it is executed For details on how to enter characters refer to...

Page 248: ... to a 4K compatible TV using an HDMI micro cable and display the playback screen 249 When the HDTV Link setting on the camera is set to ON and the camera is connected to a HDTV Link HDMI compatible TV it automatically switches its input and the playback screen is displayed For details refer to 251 You can also play back motion pictures by inserting the card in a 4K compatible TV equipped with a SD...

Page 249: ... shape which may cause malfunction or even the camera to be damaged To connect with an HDMI micro cable An HDMI micro cable can be used to enable viewing of still and motion pictures in high resolution Align the marks and insert HDMI socket To HDMI video audio input socket HDMI micro cable Use only a High Speed HDMI micro cable with the HDMI logo Cables that do not comply with the HDMI standards w...

Page 250: ...nnect with an AV cable Check the TV Aspect 47 Compatible AV cables are available from specialist photo dealers Make absolutely sure to use only cables compatible with this camera You can play back pictures on TVs in other countries regions which use the NTSC or PAL system You can find Video Out setting in TV Connection from the Setup menu With camera models 18 470 18 473 Pictures rotated to portra...

Page 251: ...function added to the industry standard HDMI control functions known as HDMI CEC Consumer Electronics Control Operation is not guaranteed when connecting with other HDMI CEC compatible devices Refer to your product s instructions to verify compatibility with HDTV Link HDMI Preparation Set HDTV Link to ON 49 1 Connect the camera to an HDTV Link HDMI compatible TV with an HDMI micro cable 249 2 Turn...

Page 252: ...correctly 291 Use a High Speed HDMI micro cable with the HDMI logo Cables that do not comply with the HDMI standards will not work High Speed HDMI micro cable Type D Type A plug up to 2m 6 6 long Compatible HDMI micro cables are available from specialist photo dealers Make absolutely sure to use only cables compatible with this camera If you do not know if your TV is HDTV Link HDMI compatible see ...

Page 253: ... appear Doing so would cause all recorded image data to be erased so make sure to select NO With an external card reader make sure it supports the type of card being used With a computer connected directly to the camera using the available software Computers that can be used Any model capable of recognizing a mass storage device Windows support Windows XP Windows Vista Windows 7 Windows 8 Windows ...

Page 254: ...r than the above may cause a malfunction Align the marks and insert AV OUT DIGITAL socket Access sending data Do not disconnect the USB cable while Access is displayed USB cable 2 Use to select PC and then press MENU SET Setting the USB Mode to PC removes the need to make the setting each time the camera is connected to the computer 3 Copy the images to the computer using the installed software Fo...

Page 255: ...number L1000999 JPG 101LEICA 999LEICA MISC DPOF files Favorite PRIVATE Color Space L sRGB _ AdobeRGB Card 1 JPG Still pictures RWL Still pictures recorded in RAW file MP4 MP4 Motion Pictures 2 New folders are created in the following cases When there is a picture with file number 999 inside the folder When using cards already containing the same folder number for example pictures taken with other ...

Page 256: ...plugs for the differing sockets that the plugs are aligned correctly and that they are inserted straight Otherwise the connectors may be bent out of shape which may cause malfunction or even the camera to be damaged Align the marks and insert AV OUT DIGITAL socket AV cable To recorder s input socket 2 Start recording on the recorder 3 Start playback on the camera To stop recording dubbing stop the...

Page 257: ... and that they are inserted straight Otherwise the connectors may be bent out of shape which may cause malfunction or even the camera to be damaged Do not use any other USB cables except a genuine Leica USB cable of the supplied type Using cables other than the above may cause a malfunction Align the marks and insert AV OUT DIGITAL socket Do not disconnect the USB cable when the cable disconnectio...

Page 258: ...rmation screen is displayed The group pictures are displayed one by one instead of all at the same time Turn off the camera before inserting or removing memory cards Disconnect the USB cable after printing Use a sufficiently charged battery When the battery starts to run out during connection a warning beep sounds Cancel printing and disconnect the USB cable An orange displayed during printing ind...

Page 259: ...be printed Request date printing in the store Making Print Set 217 settings on the camera in advance allows settings for numbers of copies and date printing to be designated before giving the card to the store When printing still pictures with an aspect ratio of 16 9 check in advance that the store can accept this size Using a printer The recording date can be printed by setting Print Set on the c...

Page 260: ...ictures 2 Use to select the setting and then press MENU SET When setting Print with Date to ON check the date printing settings on the printer printer settings may be prioritized To print a picture on which text or a date has been stamped set Print with Date to OFF The still picture is printed with the date superimposed on it Items may not be displayed if incompatible with the printer To arrange 2...

Page 261: ...usly pressing it in the direction indicated by arrow and pulling it in the direction indicated by arrow Be sure to insert the hot shoe cover when the hot shoe is not in use Keep the hot shoe cover in a safe place after removing it so that you do not lose it Using compatible flash units Mount the flash unit in the hot shoe and then turn on camera and flash Set the menu item Rec Flash Press to selec...

Page 262: ...have sync terminals with high voltage or reversed polarity If such units are used they could cause a malfunction or hinder normal operation of the camera If you use flash units dedicated to other camera makes they may not operate normally or they may be damaged Do not use them Even if an attached flash unit is turned off the camera may enter the flash mode When you are not using the flash unit det...

Page 263: ... 4K PHOTO is set to ON 192 Custom Set 60 Panorama picture recording mode 150 Photo Style 100 Flash mode 181 261 Flash triggering 183 30p 2 25p 3 Rec Format Rec Quality 185 Aspect Ratio Resolution 108 Card displayed only during recording 25 Panorama Direction 150 EXPS Types of picture effects Filter 89 Picture effect Filter adjustment display 91 XXmXXs Elapsed recording time 1 187 Simultaneous reco...

Page 264: ...45 Aspect Bracket 147 Self timer 148 Panorama Direction 150 Battery capacity 21 Picture Mode Still picture priorities 195 Macro recording 126 Stabilizer 169 Camera shake alert 169 Recording state Flashes red Focus Lights green 56 Focus Under low illumination 56 Wi Fi connection status 4K PHOTO marker 193 Time Lapse Shot 153 Stop Motion Animation 156 Histogram 64 ...

Page 265: ...Custom menu Destination settings Elapsed travel days 2 42 Name 2 166 Age in years months 2 166 Current date time 2 World time 2 41 AF area 56 121 Spot metering target 139 Self timer 3 148 Silent Mode 162 Mic Level Disp 197 AEL AE Lock 133 Exposure metering mode 139 Program Shift 81 1 7 Aperture value 56 60 Shutter speed 56 Exposure compensation value 135 Light balance 87 ISO Sensitivity 136 Dial G...

Page 266: ...cording 87 Battery capacity 21 Card displayed only during motion picture recording 25 ISO Sensitivity 136 Exposure compensation value 135 Light balance 87 Flash Mode 181 261 Flash triggering 183 Single 141 Series exposures 142 Auto Bracket 145 Aspect Bracket 147 Self timer 148 Panorama Direction 150 AFS AFF AFC MF Focus mode 114 AF Mode 115 Quality 109 30p 2 25p 3 Rec Format Rec Quality 185 Aspect...

Page 267: ...n 257 Motion picture playback 70 Panorama picture playback 152 Continuous playback of exposure series group 198 Continuous playback of Time Lapse Shot picture group 198 Continuous playback of stop motion animation group 198 Text stamped display 209 XXmXXs Elapsed playback time 1 70 Aspect Ratio Resolution 108 30p 3 25p 4 Rec Format Rec Quality 185 Quality 109 Battery capacity 21 1 98 Picture numbe...

Page 268: ...ormation i Dynamic 111 HDR 1 112 i Resolution 111 4K motion picture recorded by setting 4K PHOTO to ON or a still picture captured from that 4K motion picture 192 Recording date time World time 41 Aspect Ratio Resolution 108 Quality 109 30p 2 25p 3 Rec Format Rec Quality 185 Color Space 1 113 100 0001 Folder File number 255 Histogram 64 Recording information 1 98 Picture number Total pictures 100 ...

Page 269: ...amera on again The card may possibly be damaged Try with a different card Motion recording was cancelled due to the limitation of the writing speed of the card The speed class of a required card varies depending on Rec Quality of a motion picture Be sure to use a card of the recommended speed class For details refer to About the motion picture recording and speed class 25 If recording stops even w...

Page 270: ...e connected to the wireless access point and devices that use the 2 4 GHz band No picture to send This is displayed when there is no image to transmit due to the restriction of the destination Check the file type of the image to transmit 236 Connection failed Please retry in a few minutes Network disconnected Transfer stopped Radio transmission from the wireless access point is getting weak Perfor...

Page 271: ...e image to send Sending motion pictures may fail if the file size is too large Split the motion picture using Video Divide 211 Cannot get IP address Please set wireless AP s IP address setting to DHCP Turn on the DHCP settings of the IP address of the connected wireless access points Cannot connect to server If a message is displayed asking to update the root certificate agree ...

Page 272: ...t to 100 when performing No Reset 50 Picture is displayed for 16 9 TV Picture is displayed for 4 3 TV An AV cable is connected to camera To remove the message immediately Press MENU SET To change the aspect ratio Change the TV Aspect setting 47 The supplied USB cable is only connected to the camera The message disappears when the cable is also connected to another device Editing operation cannot p...

Page 273: ...ng sequence 146 Self Timer Sets the manner in which the self timer works 148 Highlight Shadow Allows you to adjust the brightness of bright and dark sections of an image while checking the results on the screen 102 i Dynamic Adjusts contrast and exposure 111 i Resolution Records still pictures with sharper outlines and the impression of high resolution 111 Simultaneous record w o filter Sets wheth...

Page 274: ...y is set with the selected value as an upper limit 137 ISO Increments Changes the ISO Sensitivity settings in steps of 1 3 EV or 1 EV 138 Extended ISO Allows you to extend the values that can be set for ISO Sensitivity 138 Long Shtr NR Eliminates the noise caused by taking pictures at a slower shutter speed 113 i Zoom Allows increasing the zoom ratio with minimum image deterioration 173 Digital Zo...

Page 275: ...creating a high resolution still picture by capturing a single frame from a 4K motion picture 192 Rec Quality For setting the picture quality of the motion picture resolution frame rate etc to be recorded 185 Picture Mode For setting the recording method of still pictures to be taken while recording motion pictures 195 Continuous AF Focusing continues whenever the targeted subject changes its dist...

Page 276: ...Sensor AF Automatically starts focusing when the eye sensor is activated 55 Pinpoint AF Time For setting the time for displaying the enlarged screen if the shutter button is pressed halfway when Auto Focus mode is set to 122 Pinpoint AF Display For setting whether the assist screen is to be enlarged on a part of the screen or the entire screen when Auto Focus mode is set to 122 AF Assist Lamp Swit...

Page 277: ...hod 63 Monitor Disp Style For switching the monitor display method 62 Monitor Info Disp For setting the recording information screen of the monitor 65 Rec Area For setting the angle of view setting used for recording still and motion pictures 189 Remaining Disp Switches the display between the number of recordable pictures that you can take and the available recording time 28 Auto Review For setti...

Page 278: ...ding on the ambient brightness 45 Sleep Mode The camera automatically turns off if no operation is performed for a preset period of time 46 USB Mode For selecting a communication method for when connecting the camera to a computer or printer with the supplied USB cable 47 TV Connection Changes the settings to be used when the camera is connected to a TV or other device 47 Menu Resume Saves the las...

Page 279: ... to create a motion picture from the pictures in a group that were recorded using Time Lapse Shot 212 Stop Motion Video Allows you to create a motion picture from the pictures in a group that were recorded using Stop Motion Animation 212 Resize For reducing a picture s resolution 213 Cropping For enlarging your still pictures and cropping unwanted areas 214 Rotate For manually rotating pictures by...

Page 280: ...arging The camera switches off as soon as it is turned on The battery needs recharging The camera is turned off automatically Sleep Mode is activated 46 If you connect to a TV compatible with HDTV Link HDMI with an HDMI micro cable and turn off the TV with the remote control for the TV the camera is also turned off If you are not using HDTV Link HDMI set HDTV Link to OFF 49 The battery discharges ...

Page 281: ...cal Zoom the zooming action will stop temporarily This is not a malfunction Some pictures are taken when I press the shutter button just once The camera is set to use Auto Bracket White Balance Bracketing Aspect Bracket or Burst Self Timer is set to Clear the setting 106 141 I am unable to perform bracket recording The remaining memory space in the card is low Check the remaining memory space in t...

Page 282: ...to brightness and color These are a result of the characteristics of the light source and do not indicate a malfunction When recording subjects in extremely bright locations or recording under fluorescent lighting LED lighting fixtures mercury lamps sodium lighting etc the colors and the screen brightness may change or horizontal striping may appear on the screen Reddish horizontal streaks appear ...

Page 283: ...using with Autofocus mode is difficult while recording 4K motion pictures This may occur when taking a picture by reducing the Autofocus speed in order to focus with high precision This is not a malfunction Panorama picture recording stops before finishing If the panning motion of the camera is too slow the camera assumes that the operation has been aborted and stops recording If the panning motio...

Page 284: ...hanges because the zoom is operated or the camera is moved This is the automatic aperture operation of the camera and is not a malfunction The screen flickers indoors The screen may flicker for a few seconds after turning on This is an operation to correct flicker caused by lighting such as fluorescent lights LED lights etc and is not a malfunction The screen is too bright too dark Check the Monit...

Page 285: ...ffect Filter is set When the camera is set to use Auto Bracket White Balance Bracket or Aspect Bracket When using Burst During panorama picture recording When HDR is set to ON When the electronic shutter is used 140 Set Shutter Type to AUTO or MSHTR When Silent Mode is set to ON 162 Set Silent Mode to OFF The flash fires twice Except when the Firing Mode of Flash is set to MANUAL When red eye redu...

Page 286: ... incorrect 29 An incorrect date may be displayed in Calendar Search on pictures copied to a computer and then back to the camera if the computer and camera dates differ White round spots like soap bubbles appear on the recorded picture If you take a picture with flash in a dark place or indoors white round spots may appear on the picture caused by the light from the flash reflecting particles of d...

Page 287: ... more easily Operating sounds are recorded at the end of the motion picture recording Since motion pictures are recorded until the motion picture button is pressed the operating sound level in the picture may be higher To avoid this sound we recommend trying the following method Cut off the end of a motion picture using Video Divide 211 in the Playback menu In some cases motion pictures cannot be ...

Page 288: ...surfaces The automatic connection may not work when the network SSID of the wireless access point is set not to broadcast Set the network SSID of the wireless access point to broadcast Is any device such as microwave oven cordless phone etc that uses 2 4GHz frequency operated nearby Radio transmissions may get interrupted when used simultaneously Keep the camera sufficiently far away from such dev...

Page 289: ...ttings of the wireless access point The wireless access point may not be found depending on the radio transmission condition Perform the Manual Input 242 Is the network SSID of the wireless access point set not to broadcast It may not be detected when it is set not to broadcast Enter and set the network SSID 241 Connection methods differ depending on the wireless access point Refer to the operatin...

Page 290: ...le This function can be used with NFC compatible devices with Android 2 3 3 or above Is the NFC function on the smartphone turned off The NFC Operation on the camera is set to OFF 247 The camera has difficulties recognizing some smartphone models If it is not recognized slowly move the smartphone while it is next to the camera If you do not hold the smartphone close to the camera long enough the c...

Page 291: ...correctly 249 Check that the HDMI micro cable is fully inserted Is the camera s HDTV Link setting set to ON 49 The input setting may not be able to be changed automatically with certain TV HDMI sockets In this case please change the input setting with your TV s remote control consult your TV instructions for details Check the HDTV Link HDMI settings on the device you are connecting to Turn the cam...

Page 292: ...257 The edges of pictures are cut off when printing Delete any trimming or edgeless printing settings on the printer before printing Refer to the instructions for the printer The aspect ratio of pictures is different from that of paper used for printing If printing in a shop check if 16 9 sizes can be printed I cannot print panorama pictures properly The aspect ratio of panorama pictures is differ...

Page 293: ...nated AF Assist Lamp is set to OFF 125 The lamp does not light up in bright locations Part of a picture flashes black and white Highlight is set to ON 72 The camera is warm The camera may become a little warm during use but this does not affect performance or quality The displayed time is incorrect The camera has been unused for a long period Reset the clock 30 A long time was taken to set the clo...

Page 294: ...itters or high voltage lines If you record near radio transmitters or high voltage lines the recorded pictures and or sound may be adversely affected Do not extend the supplied cord or cable Do not allow the camera to come into contact with pesticides or volatile substances they can cause surface damage or the coating to peel Do not keep objects that may be influenced magnetically close to the spe...

Page 295: ...d data When disposing of transferring memory cards If using the format or delete functions on your camera or computer this only changes the file management information and does not completely delete the data from within the memory card When disposing of or transferring your memory cards we recommend physically destroying them or using commercially available computer data erasing software to comple...

Page 296: ...attery reduces the maximum usage time and can cause the battery to expand If the available battery capacity is significantly reduced it is reaching end of lifespan Please purchase a new battery When charging Wipe dirt from the battery terminals with a dry cloth Keep at least 1m 3feet away from an AM radio it may cause radio interference Do not use a damaged or dented battery especially connectors ...

Page 297: ...nformation Disclaimer Data containing personal information can be altered or lost due to malfunction static electricity accidents breakdowns repairs or other operations Leica Camera AG will not be liable for any damage that occurs direct or indirect as a result of the alteration or loss of data containing personal information When ordering repairs or transferring disposing of the camera After you ...

Page 298: ...untries Windows and Windows Vista are either registered trademarks or trademarks of Microsoft Corporation in the United States and or other countries iMovie Mac and Mac OS are trademarks of Apple Inc registered in the U S and other countries iPad iPhone and iPod touch are trademarks of Apple Inc registered in the U S and other countries App Store is a service mark of Apple Inc Android and Google P...

Page 299: ...deo in compliance with the AVC Standard AVC Video and or ii decode AVC Video that was encoded by a consumer engaged in a personal and non commercial activity and or was obtained from a video provider licensed to provide AVC Video No license is granted or shall be implied for any other use Additional information may be obtained from MPEG LA LLC See http www mpegla com ...

Page 300: ... AG and or 2 open source software The software categorized as 2 is distributed in the hope that it will be useful but WITHOUT ANY WARRANTY without even the implied warranty of MERCHANTABILITY or FITNESS FOR A PARTICULAR PURPOSE Please refer to the detailed terms and conditions thereof displayed by selecting MENU SET Setup Version Disp Software info ...

Page 301: ...Leica Camera AG homepage Leica Camera AG Product Support Software Support Am Leitz Park 5 D 35578 Wetzlar Telephone 49 0 6441 2080 111 108 Fax 49 0 6441 2080 490 info leica camera com software support leica camera com Leica Customer Care For servicing your Leica equipment or in the event of damage the Leica Camera AG Customer Care department or the repair service provided by authorized Leica agent...

Page 302: ...Leica Camera AG I Am Leitz Park 5 I 35578 Wetzlar I DEUTSCHLAND Telefon 49 0 6441 2080 0 I Telefax 49 0 6441 2080 333 www leica camera com ...

Reviews: