


6600-NG User’s Manual
125-9110A
Page 50
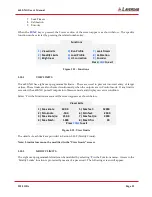
When
CANC
is pressed to exit out of Leak mode, the 6600-NG automatically goes back to Control mode.
Instant Ps1 leak rate:
While the leak-check is going on, the Actual values are still updated every 250
msec in the Upper section of the screen. The Actual Ps1 Rate is the “instant” leak rate and will instantly
indicate any change in the leak. This is especially helpful when adjustments are made to the Ps1 system
(including tightening fittings, adjusting adapters etc) to reduce the leak.
Excessive Ps1 Leak:
If the ‘instant’ leak-rate exceeds the Target Ps1 rate (factory-set at 2000 feet/min), to
protect the aircraft instruments, the 6600-NG will automatically put Ps1 back into Control mode and
abort the leak check. An error message:
ERR 8: Ps1 leak excessive. Exiting Leak mode.
Press
CANC
will be displayed on the last line of the screen. Pressing
CANC
will clear the Lower section.
Independent Ps2 Leak-check
The ideal way to perform a Ps1 leak-check is to keep Pt in Control at 0 knots, keep Ps1 in in control at
Ground and control Ps2 to 1.0 Dfin, before starting the leak check. Below is a step-by-step process of
performing the Ps2 leak-check. It is assumed that the Self-Test has already been performed as described
in Section 3.1
1.
Close all three output ports (tightly, please).
2.
Set the Units as follows: Pt=knots, Ps2=Dfin, Ps1=feet. (Key sequence:
1, 1, ENTER, 9, 2, ENTER,
5, 1, ENTER, GO
)
3.
Press
GND
to perform the Go-To-Ground function. The pumps will turn On and the tester will
go through the EQZN process. The targets will automatically be set to Pt=0 knots, Ps2=0.0 Dfin,
Ps1= the feet equivalent to “Ground” (ambient pressure).
4.
Once the EQZN process is completed, the tester will control the Actual values at the Targets.
5.
Change the Ps2 Target to 1.0 Dfin. (Key sequence:
0, 1, ENTER
) The new Target value will be
blinking. Press
GO
to activate. The Ps2 Actual value will ramp to 1.0 Dfin. The Ps1 and Pt
outputs will still be controlling at their target values.
6.
Once the Ps2 Actual values reaches its target, allow it to stabilize for a few seconds.
7.
Change the Ps2 mode to Leak. (Key sequence:
±, 2
). ‘Leak’ will be blinking in the Ps2 mode field.
Press
GO
to activate. Note that Pt and Ps1 will still be in Control at their targets.
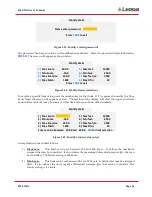
The Lower section of the screen will appear similar to Figure 3.37 below, with the 1-min, 2-min and 3-min
values appearing as the leak time crosses 1, 2 and 3 minutes.
Figure 3.37 : Ps1 Leak (after 3 min)
Leak Time: 3.45
Control
Control
Leak
4
±
8
000
Hide/Show Ps2
AC
92%
Start:
Ps2: 1.0000 Dfin
( 1 min)
0.9978 0.0022
( 2 min)
0.9960 0.0040
( 3 min)
0.9944 0.0056
Press
CANC
to exit


