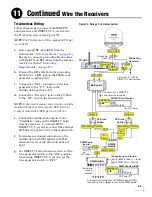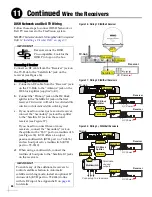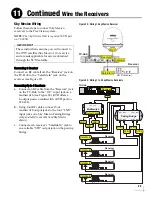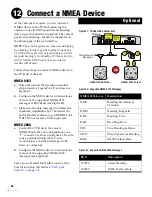
13
Follow these steps to mount the antenna.
a.
Using a 7/16" socket/ratchet or nut driver,
unlock the three hex latches securing each of
the antenna’s service hatches (see Figure 11
on page 10). Then gently lower the hatches.
b.
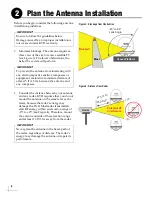
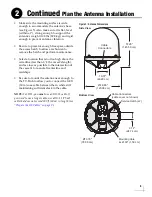
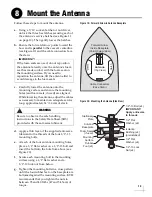
Ensure the forward arrow points toward the
bow and is
parallel
to the vessel’s centerline
(see Figure 19) and the cable connectors face
the stern.
c.
Carefully lower the antenna onto the
mounting surface and ensure the mounting
holes (and foam seals, if used) are aligned.
While lowering the antenna, adjust the cables
as necessary to maintain an adequate service
loop, approximately 14" (36 cm) of slack.
d.
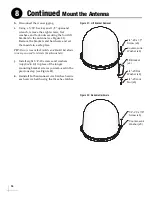
Apply a thin layer of the supplied anti-seize
lubricant to the threads of the four 1/2"-13
mounting bolts.
e.
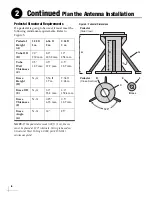
At each of the four antenna mounting holes,
place a 1/2" flat washer on a 1/2"-13 bolt and
insert the bolt into the hole from above (see
f.
Secure each mounting bolt to the mounting
surface using a 1/2" flat washer and a
1/2"-13 lock nut from below.
g.
Tighten the mounting bolts in a cross pattern
until the four rubber feet on the baseplate are
bottomed against the mounting surface. KVH
recommends that you tighten the nuts to
between 35 and 40 ft-lbs (47 and 54 N-m) of
torque.
WARNING
Be sure to observe the safe handling
instructions in the Safety Data Sheet (SDS)
provided with the anti-seize lubricant.
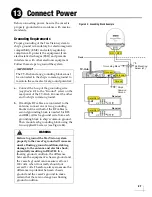
Figure 19: Forward Arrow in Antenna Baseplate
Cable Connectors
(Face Stern)
Forward Arrow
Inside Baseplate
(Point Toward Bow)
Hatch
Hatch
FOR
W
ARD
Antenna
(Top View)
If the foam seals are used, do not reposition
the antenna laterally once the antenna’s foam
seal has made contact with the foam seal on
the mounting surface. If you need to
reposition the antenna, lift the antenna first to
avoid damage to the foam seals.
IMPORTANT!
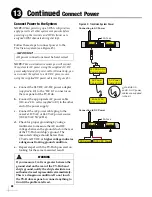
Figure 20: Mounting the Antenna (Side View)
1/2"-13 Bolt (x4)
1/2" Flat
Washer (x4)
Rubber
Foot (x4)
Mounting
Surface
1/2" Flat
Washer (x4)
1/2"-13 Lock
Nut (x4)
Antenna
Baseplate
Isolation
Bushing (x4)
IMPORTANT!
Apply anti-seize
to threads
Foam Seals
Stationary
Plate
(if used)
(preinstalled)
Mount the Antenna
8
Summary of Contents for TracVision TV10
Page 1: ...TracVision TV10 Installation Guide ...
Page 53: ......


